SparkFun Inventor's Kit for Edison Experiment Guide
 Shawn Hymel
 Experiment 8: Temperature and Light Logger
Introduction
Phant is No Longer in Operation
On its own, the Edison is not capable of taking analog voltage readings, unlike many other microcontrollers (such as the Arduino). The kit, however, contains an analog-to-digital converter (ADC) Block for the Edison. On this Block is a special chip that is capable of measuring analog voltages and reporting them over the I2C bus.
Because the Edison has built-in networking capabilities, we can use WiFi (and the power of the Internet!) to log these analog readings to a remote site. In this case, we are going to use SparkFun's own data.sparkfun.com. By constructing a simple HTTP request, we can post values to our own feed on data.sparkfun. That way, we can monitor various sensor readings from anywhere in the world!
Parts Needed
In addition to the Edison and Block Stack, you will need the following parts:
- 1x Breadboard
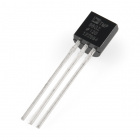
- 1x TMP36 Temperature Sensor
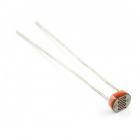
- 1x Photocell
- 1x 1kΩ Resistor
- 7x Jumper Wires


Temperature Sensor - TMP36
SEN-10988
Intel® Edison
DEV-13024
SparkFun Block for Intel® Edison - GPIO
DEV-13038
SparkFun Block for Intel® Edison - Base
DEV-13045
SparkFun Block for Intel Edison - ADC
DEV-13770Suggested Reading
- Analog vs. Digital -- What's the difference between analog and digital electrical signals?
- Analog to Digital Conversion -- How to measure an analog signal with a digital device
- Voltage Dividers -- How to reduce the voltage of a signal using a couple of resistors
- Pushing Data to data.sparkfun.com -- Using various systems to remotely log data on data.sparkfun
- I2C -- An introduction to the Inter-integrated Circuit (I2C)
Concepts
Voltage Divider
Our two sensors, the TMP36 and the photocell, change their voltage or resistance based on the property they are measuring. The TMP36, luckily, changes the voltage on its VOUT pin directly as the temperature changes.
The photocell, on the other hand, varies its resistance as the measured light changes. Since we don't have a good way to measure resistance on the Edison, we can set up a voltage divider to measure the voltage.
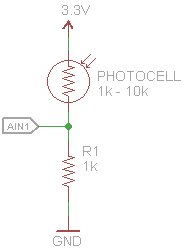
As the photocell detects more light, its resistance decreases (down to about 1kΩ). Conversely, as it detects less light, its resistance increases (up to about 10kΩ). The voltage divider allows us to measure that change is resistance through a change in voltage at AIN1. The equation for this circuit is:

We know that VIN is 3.3V and R1 is 1kΩ. In a light environment, we can calculate that the voltage measured at VOUT (AIN1) should be around:

and in a dark environment:

Luckily, that voltage can be measured with an analog-to-digital converter!
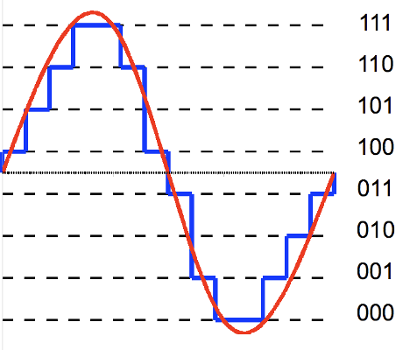
Analog-to-Digital Conversion
Being able to measure an analog voltage is extremely useful in the world of digital electronics. Many sensors, like our TMP36 temperature sensor and photocell, vary output voltage or resistance based on its measured value. For example, the resistance in the photocell increases as the amount of light falling on the sensor decreases.
The ADC on the ADC Block (a TI ADS1015) is capable of measuring the voltage on some of pins within a given range (for example, +/- 4.096 V). Many ADC chips, like our ADS1015, determine analog voltage by measuring the amount of time it takes that voltage to charge a capacitor. That time is converted to a quantized level that corresponds to the measured voltage.
In the example above, the analog signal was converted to a 3-bit digital value. Because analog values are continuous and digital values are discrete, we are essentially rounding analog values to fit within the digital value's resolution (e.g. 3 bits).
Luckily for us, the ADS1015 offers 12 bits of resolution for its conversion values. That allows us to measure voltages down to the 2 mV resolution (assuming the +/-4.096 V range), which should be good enough for most basic sensor readings.
I2C
I2C is communication protocol capable of supporting multiple masters and peripheral devices on the same 2-wire bus.
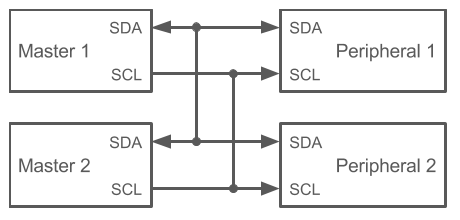
For now, we will use 1 master (the Edison) and 1 peripheral device (ADS1015). The master is in control of the SCL (clock) line, which it toggles at a pre-determined rate (generally, 100 kHz). To make sure that the master talks to the correct peripheral, we can send a specific address across the SDA line first (e.g. 0x48 for our ADS1015).
Most I2C peripherals rely on a series of registers to store data that should be written to or read from over I2C. If you look at the datasheet for the TI ADS1015 (p. 15), you will notice that there are 4 registers: conversion, config, low threshold, and hi threshold. We won't need to worry about the last two, as we are not using the threshold capabilities on the ADS1015 for this experiment.
To request an analog sample be taken, we need to write 16 bits to the config register (register address 0x01). First, we write the peripheral address (0x48), then we write the register we want (0x01), and finally, we can send the data we want. The specific bits for the config register can be found on pp. 15-16 in the datasheet.
Once the sampling has been taken and stored in the ADS1015, we can then read it back by using a similar method: the master sends the peripheral device and the conversion register address. The ADS1015 will then send the data in the conversion register back across the I2C bus.
Once again, we can rely on the MRAA library to handle much of the I2C communication for us.
NTP
The Network Time Protocol (NTP) is a relatively old (1985) networking protocol intended to synchronize clocks on interconnected computer systems. There are several NTP servers in the world, and we can use one of them (pool.ntp.org), which connects to the NTP Pool Project. By requesting the time, the NTP server responds with a value corresponding to the current date and time given in Greenwich Mean Time (GMT).
For our purposes, we can use the ntp-client module to assist with making NTP requests to servers.
Phant
Phant is SparkFun's software for logging data to a web server.

data.sparkfun is a site that runs Phant. Using data.sparkfun, we can create our very own data stream and log values to it. This can be anything from local computer time to wind speed. Anything we can measure (and store as a number or string), we can log to data.sparkfun.
To post something to a stream, we need the Public Key and Private Key for that stream, which we will create later. Knowing those, we can log values to the individual streams with the HTTP GET request:
http://data.sparkfun.com/input/<YOUR PUBLIC KEY>/?private_key=<YOUR PRIVATE KEY>&field1=<VALUE 1>&field2=<VALUE 2>
For our purposes, we will be logging a relative light value (as a voltage), the ambient temperature (in Celsius), and the current time (Greenwich Mean Time, taken at the time of the readings). We will be able to access a page on data.sparkfun to view these logs.
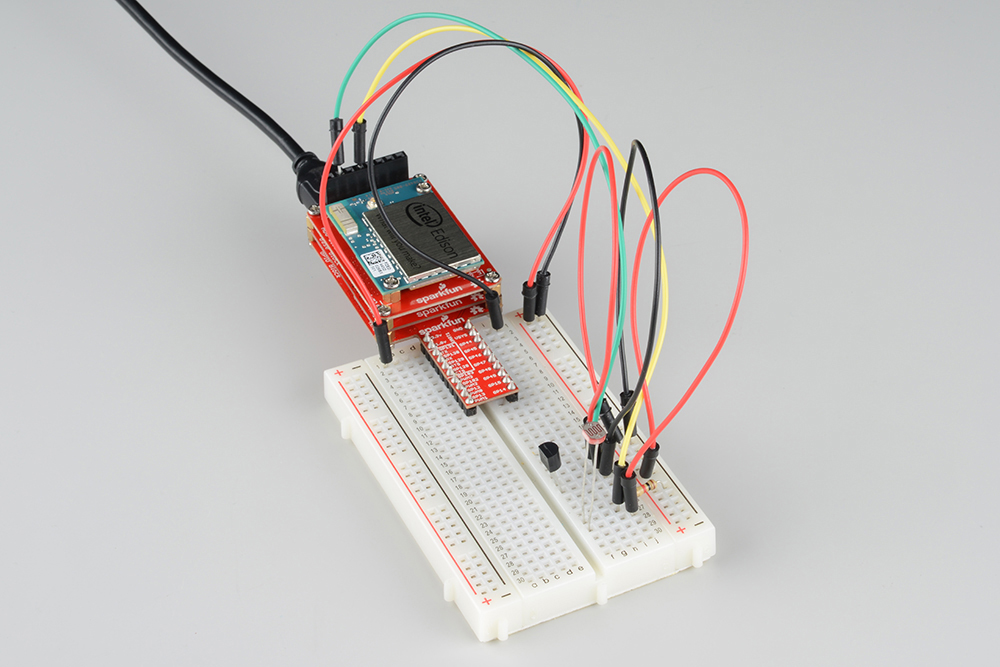
Hardware Hookup
Fritzing Diagram

Tips
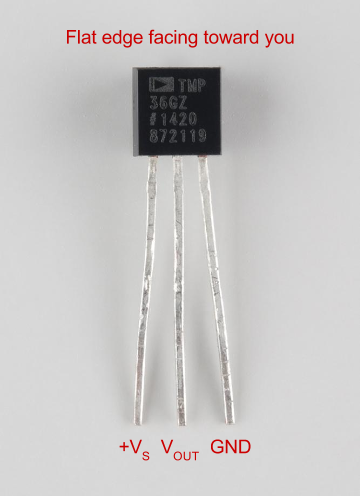
TMP36 Temperature Sensor
Like some of the other components that we've used, we need to care about polarity when it comes to the TMP36 temperature sensor. With the flat edge of the component body facing toward you, note the pins.
data.sparkfun Stream
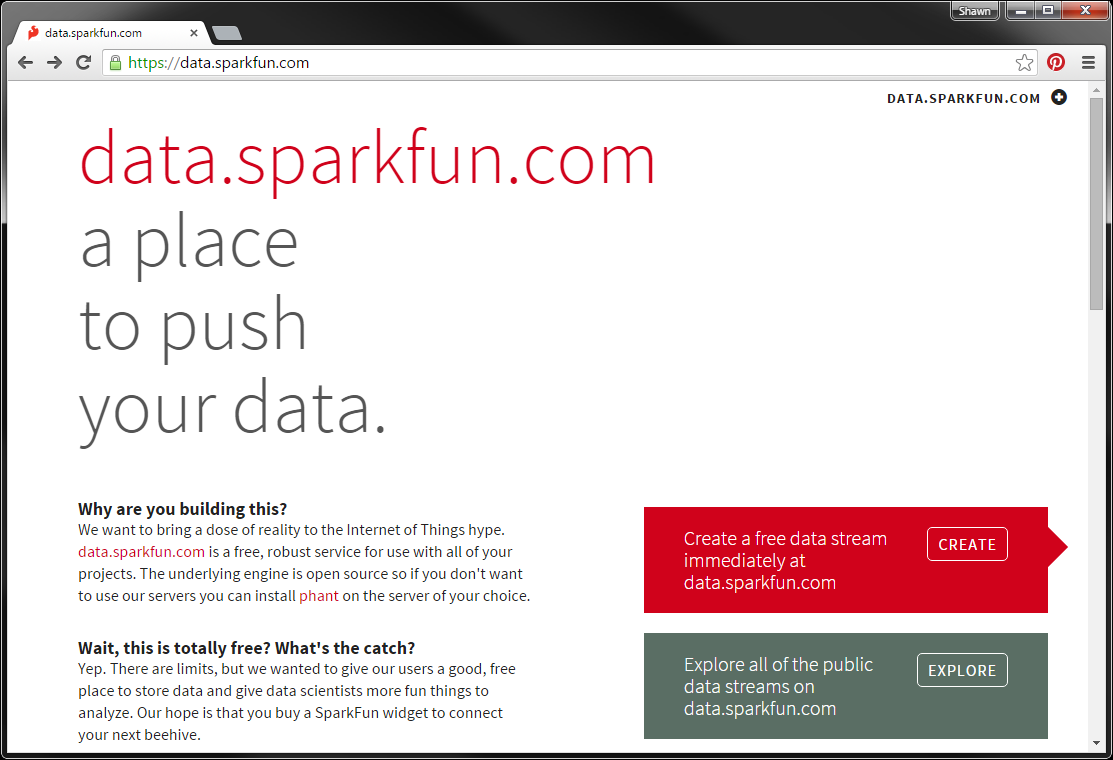
In order to log data to data.sparkfun, we first need to create a stream. The good news is that we don't even need an account! Navigate to data.sparkfun.com.
Click the CREATE button. You will be presented with a form to fill out for your stream. Go ahead and create a name and description for it. You need to add the following fields:
- time
- temperature
- light
Make sure they are spelled just like that! They need to match the field names in the code below. You can optionally fill out the rest of the form, if you wish.

Click Save at the bottom of the page, and you will be presented with the keys (public, private, and delete) for your stream.

Make sure you write them down, save them as a file, or email them to yourself! Once you exit out of this screen, you can't go back.
The three keys are quite important:
- Public Key -- Used for accessing and viewing your stream. Notice that the URL to your stream is http://data.sparkfun.com/streams/\
- Private Key -- Used to post data to your stream (it's like password). Don't share this with people if you don't want them to post, modify, or delete your stream!
- Delete Key -- Use this to permanently delete your stream. If used, your stream will be gone forever!
Click on the Public URL link to go to your stream's page.
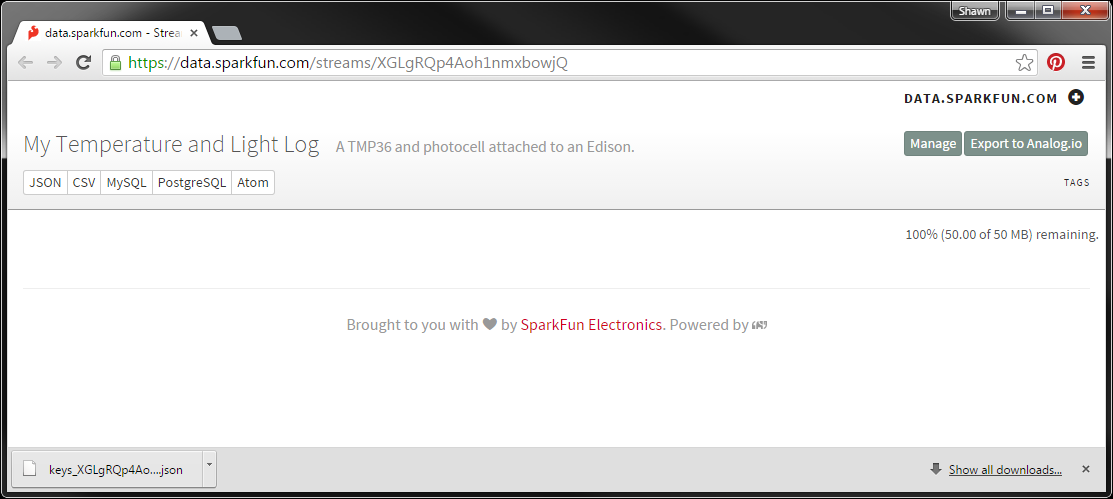
As you might have noticed, there is nothing in the stream, right now.
The Code
Create a new Blank Template in IoT Application in the XDK. In package.json, we need to add a couple of libraries:
language:javascript
{
  "name": "blankapp",
  "description": "",
  "version": "0.0.0",
  "main": "main.js",
  "engines": {
    "node": ">=0.10.0"
  },
  "dependencies": {
    "request": "2.67.0",
    "ntp-client": "0.5.3"
  }
}
In main.js, copy in the following:
language:javascript
/*jslint node:true, vars:true, bitwise:true, unparam:true */
/*jshint unused:true */
// Leave the above lines for propper jshinting

/**
 * SparkFun Inventor's Kit for Edison
 * Experiment 8: Temperature and Light Logger
 * This sketch was written by SparkFun Electronics
 * December 2, 2015
 * https://github.com/sparkfun/Inventors_Kit_For_Edison_Experiments
 *
 * Reads temperature and light values from ADC Block and posts them to
 * data.sparkfun.com.
 *
 * Released under the MIT License(http://opensource.org/licenses/MIT)
 */

// MRAA, as per usual
var mraa = require('mraa');

// The Request module helps us make HTTP calls (e.g. to data.sparkfun)
var request = require('request');

// The ntp-client module allows us to get the current time (GMT)
var ntp = require('ntp-client');

// Save our keys for data.sparkfun
var phant = {
    server: "data.sparkfun.com",        // Base URL of the feed
    publicKey: "xxxxxxxxxxxxxxxxxxxx",  // Public key, everyone can see this
    privateKey: "xxxxxxxxxxxxxxxxxxxx", // Private key, only you should know
    fields: {                           // Your feed's data fields
        "time": null,
        "temperature": null,
        "light": null
    }
};

// Define a timeout period for the HTTP request (2 seconds)
var reqTimeout = 2000;                  // milliseconds

// TI ADS1015 on ADC Block (http://www.ti.com.cn/cn/lit/ds/symlink/ads1015.pdf)
var adc = new mraa.I2c(1);
adc.address(0x48);

// Read from ADC and return voltage
adc.readADC = function(channel) {

    // The ADC Block can't have more than 4 channels
    if (channel <= 0) {
        channel = 0;
    }
    if (channel >= 3) {
        channel = 3;
    }

    // We will use constant settings for the config register
    var config = 0;                 // Bits     Description
    config |= 1 << 15;              // [15]     Begin a single conversion
    config |= 1 << 14;              // [14]     Non-differential ADC
    config |= channel << 12;        // [13:12]  Choose a channel
    config |= 1 << 9;               // [11:9]   +/-4.096V range
    config |= 1 << 8;               // [8]      Power-down, single-shot mode
    config |= 4 << 5;               // [7:5]    1600 samples per second
    config &= ~(1 << 4);            // [4]      Traditional comparator
    config &= ~(1 << 3);            // [3]      Active low comparator polarity
    config &= ~(1 << 2);            // [2]      Non-latching comparator
    config |= 3;                    // [1:0]    Disable comparator

    // Write config settings to ADC to start reading
    this.writeWordFlip(0x01, config);

    // Wait for conversion to complete
    while (!(this.readWordFlip(0x01) & 0x8000)) {
    }

    // Read value from conversion register and shift by 4 bits
    var voltage = (adc.readWordFlip(0x00) >> 4);

    // Find voltage, which is 2mV per incement
    voltage = 0.002 * voltage;

    return voltage
};

// The ADS1015 accepts LSB first, so we flip the bytes
adc.writeWordFlip = function(reg, data) {
    var buf = ((data & 0xff) << 8) | ((data & 0xff00) >> 8);
    return this.writeWordReg(reg, buf);
};

// The ADS1015 gives us LSB first, so we flip the bytes
adc.readWordFlip = function(reg) {
    var buf = adc.readWordReg(reg);
    return ((buf & 0xff) << 8) | ((buf & 0xff00) >> 8);
};

// Send an HTTP request to data.sparkfun to post our data
function postData(values) {

    var prop;

    // Construct the HTTP request string
    var req = "https://data.sparkfun.com/input/" + phant.publicKey +
              "?private_key=" + phant.privateKey;
    for (prop in values) {
        req += "&" + prop + "=" + encodeURI(values[prop].toString());
    }

    // Make a request and notify the console of its success
    request(req, {timeout: reqTimeout}, function(error, response, body) {

        // Exit if we failed to post
        if (error) {
            console.log("Post failed. " + error);

        // If HTTP responded with 200, we know we successfully posted the data
        } else if (response.statusCode === 200) {
            var posted = "Posted successfully with: ";
            for (prop in values) {
                posted += prop + "=" + values[prop] + " ";
            }
            console.log(posted);
        } else {
            console.log("Problem posting. Response: " + response.statusCode);
        }
    });
}

// Take temperature and light readings at regular intervals
takeReadings();
function takeReadings() {

    // Read temperature sensor (on ADC0) and calculate temperature in Celsius
    var v0 = adc.readADC(0);
    var degC = (v0 - 0.5) * 100;

    // Read light sensor (on ADC1)
    var v1 = adc.readADC(1);

    // Get the current time and post to data.sparkfun
    ntp.getNetworkTime("pool.ntp.org", 123, function(error, datetime) {

        // If it's an error, don't post anything
        if (error) {
            console.log("Error getting time: " + error);

        // Otherwise, post all the data!
        } else {

            // Construct a values object to send to our function
            phant.fields.time = datetime;
            phant.fields.temperature = degC.toFixed(1);
            phant.fields.light = v1.toFixed(3);

            // Post to data.sparkfun
            postData(phant.fields);
        }

        // Wait 10 seconds before taking another reading
        setTimeout(takeReadings, 10000);
    });
}
Find the phant object in the beginning of the code:
language:javascript
var phant = {
    server: "data.sparkfun.com",        // Base URL of the feed
    publicKey: "xxxxxxxxxxxxxxxxxxxx",  // Public key, everyone can see this
    privateKey: "xxxxxxxxxxxxxxxxxxxx", // Private key, only you should know
    fields: {                           // Your feed's data fields
        "time": null,
        "temperature": null,
        "light": null
    }
};
Replace the first "xxxxxxxxxxxxxxxxxxxx" with your data.sparkfun public key and the second "xxxxxxxxxxxxxxxxxxxx" with your private key. For example, my code would look like:
language:javascript
publicKey: "XGLgRQp4Aoh1nmxbowjQ",  // Public key, everyone can see this
privateKey: "1JlR9pMr2Dcjp9y7mdJE", // Private key, only you should know
What You Should See
Save, upload, and run the code on the Edison. If all goes well (and your Edison has a connection to the Internet), you should get a "Posted successfully" note in the console.

The Edison will sample the temperature from the sensors and attempt to post to data.sparkfun every 10 seconds.
Refresh your stream's page, and you should see new values in each of the fields.

Try breathing on the temperature sensor and covering the photocell with your finger. How does that affect the readings?
Code to Note
Endianness
"Endianness" refers to how a system stores bytes. The Edison, for example, is "big endian," which means that in a 2-byte "word," the first byte is the most significant byte (MSB). If you stored the value 0x12AB (decimal: 4779) into memory, the first byte would be 0x12 and the second byte would be 0xAB.
The ADS1015, however, communicates the least significant byte (LSB) first ("little endian") when it transmits and receives values over I2C. For example, if we wanted to send the number 4779 to the ADS1015, we would have to send 0xAB followed by 0x12. As you might have noticed, that is flipped from how the Edison stores values.
In our code, we need to create a couple of helper functions, writeWordFlip() and readWordFlip(), as part of the adc object. Before we send data (often in the form of 16 bits or 2 bytes), we need to flip the two bytes. We do that with ((data & 0xff) << 8) | ((data & 0xff00) >> 8);. The first part masks the lower 8 bits of our 2-byte value and shifts it left by 8 bits. The second part masks the upper 8 bits of the 2-byte value and shifts it right 8 bits. In effect, this swaps the high and low bytes in our 16-bit word.
HTTP Requests
We've used HTTP requests in the past when we were creating web servers. To that end, we waited for an HTTP request to come in, and we responded with HTML text that was then rendered on the client's broswer.
This time, however, we are creating our own HTTP request. To send something to data.sparkfun, we used the HTTP GET request (not the POST request, as you might think). With a specially crafted Uniform Resource Locator (URL), we can tell data.sparkfun which stream to post to, to which fields, and with what data.
We accomplish that in code by creating a string for our URL. We do that with
language:javascript
// Construct the HTTP request string
var req = "http://data.sparkfun.com/input/" + phant.publicKey +
          "?private_key=" + phant.privateKey;
for (prop in values) {
    req += "&" + prop + "=" + values[prop].toString().replace(/ /g, "%20");
}
This snippet of code constructs the URL consisting of the host site (data.sparkfun), the page we want (/input), the stream (phant.publicKey), and our password (phant.privateKey).
The next part is interesting and requires its own section.
for...in Loop
JavaScript offers us a unique way to deal with properties in an object: the for...in loop. Much like the basic for loop, we can iterate over several properties. Instead of an array, however, we use an object with several properties.
Given our object values (which is actually phant.fields as passed into our postData() function), we can iterate over arbitrary property names and values in that object. For example, let's say we have the following within our values object:
language:javascript
values: {
    "time": "Fri Dec 04 2015 17:43:03 GMT 0000 (UTC)",
    "temperature": 24.2,
    "light": 0.980
}
The for...in loop would, on each iteration, give us one of the property names in the parameter prop. So,
language:javascript
for (prop in values) {
    console.log(prop);
}
would output:
time
temperature
light
If we want to access the value within each property, we can do so with brackets ([]), much like an array. So,
language:javascript
for (prop in values) {
    console.log(values[prop]);
}
would output:
Fri Dec 04 2015 17:43:03 GMT 0000 (UTC)
24.2,
0.980
In our experiment code, we simply append the property name and value (as strings) to the HTTP request (making sure to replace all spaces with %20, first!).
Light Value
You might have noticed that we are posting the raw voltage level of the photocell to data.sparkfun. Why? Well, as it turns out, most photocells are not very accurate. Additionally, the color of the light affects the measured value. For instance, our photocell is more sensitive to green light than red light. As a result, coming up with an equation to convert voltage to a light measurement (e.g. lux) is extremely difficult, especially without the ability to accurately calibrate each photocell.
So, for our purposes, we will just post the raw voltage measured from the photocell. That acts as a good relative measure for how bright the surroundings are.
Troubleshooting
- NTP keeps failing -- Check for an Internet connection with the Edison, and make sure that the NTP server is set to
"pool.ntp.org". - Posting to data.sparkfun keeps failing -- Ensure that your public and private keys are set properly. You can also add a
console.log(req)just before therequest(req, ...)line to verify the HTTP request string. - My values seem off -- More than likely, this is a problem with wiring, so double-check that.
Going Further
Challenges
- Just something to think about: why do we need to replace all the spaces in a URL with "%20"?
- Change the
setTimeout()function to log data once per minute (instead of once per 10 seconds). Find somewhere you can leave your Edison with the temperature and light sensors (making sure it still has an Internet connection) for a day. We recommend somewhere indoors, since the Edison is not exactly waterproof. Log data for a day, and create a graph using something like Excel, Google Sheets, or Google Charts. What interesting patterns do you notice? - Create another field (of your choosing) in your stream and post a value to it along with time, temperature, and light. This can, for example, be something like the state of a button connected to the Edison.
Digging Deeper
- TI ADS1015 Datasheet
- Photocell Datasheet
- MRAA I2C API
- Endianness
- ntp-client GitHub repository
- request GitHub repository
- for...in loop