Getting Started with the MyoWare® 2.0 Muscle Sensor Ecosystem
 QCPete,
  bboyho
Arduino Example 2: Transmitting Sensor Data via Bluetooth® - Single Sensor
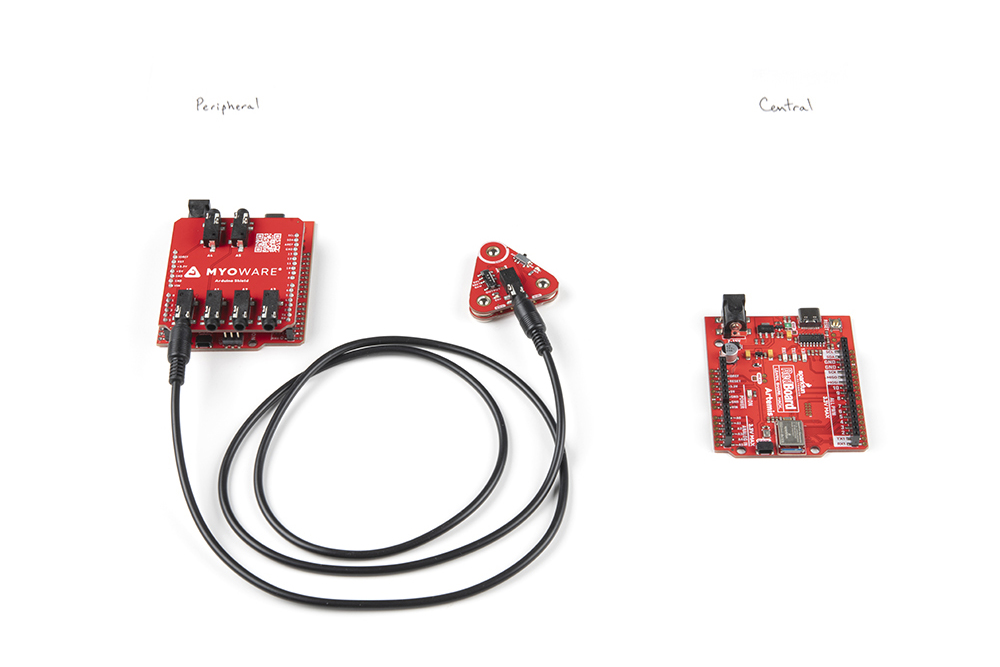
The following example requires two RedBoard Artemis boards to send and receive sensor data from one muscle sensor. This is useful for users that need a clean signal or want to transmit the sensor data wirelessly.
For an explanation of how the Bluetooth peripheral and central devices works, we recommend looking at the Arduino reference language under the ArduinoBLE Library for a quick introduction.
Example 2a: Bluetooth Peripheral "Send"
The following example uses a RedBoard Artemis to transmit the analog reading wirelessly via Bluetooth. If you have not already, select your Board (in this case the RedBoard Artemis), and associated COM port. Copy the code below and paste into your Arduino IDE. Then upload the code to the board.
language:c
/*
  MyoWare Sensor BLE Peripheral SINGLE SENSOR Example
  SparkFun Electronics
  Pete Lewis
  3/17/2022

  This example reads a single MyoWare Muscle Sensor, and then gets that data from this RedBoard Artemis
  (the peripheral) to a second RedBoard Artemis (the central) over BLE.

  This Artemis, aka the "BLE Peripheral", will read the sensor on A0.
  It will then update the value to the "bluetooth bulletin board."

  Note, in BLE, you have services, characteristics and values.
  Read more about it here:

  https://www.arduino.cc/reference/en/libraries/arduinoble/

  Note, before it begins reading the ADC and updating the data,
  It first sets up some BLE stuff:
    1. sets up as a peripheral
    2. sets up a service and characteristic (the data)
        -Note, Services and characteristics have custom 128-bit UUID,
        -These must match the UUIDs in the code on the central device.
    3. advertises itself

  In order for this example to work, you will need a second Artemis, and it will
  need to be programmed with the provided code specific to being a central device,
  looking for this specific peripheral/service/characteristic.

  Note, both the service and the characteristic get unique UUIDs
  (even though they are extremely close to being the same thing in this example)

  The second Artemis, aka the "BLE Central," will subscribe to the first board's
  characteristic, and check to see if the value has been updated. When it has been
  updated, it will print the value to the serial terminal.

  Hardware:
  MyoWare Sensor with Link Shield snapped on top.
  TRS cable from Link Shield to A0 port of Arduino Shield.
  Arduino Shield pressed into RedBoard Artemis.
  USB from Artemis to Computer.

  ** For consistent BT connection follow these steps:
  ** 1. Reset Peripheral
  ** 2. Wait 5 seconds
  ** 3. Reset Central
  ** 4. Enjoy BT connection
  **
  ** ArduinoBLE does not support RE-connecting two devices.
  ** If you loose connection, you must follow this hardware reset sequence again.

  This example code is in the public domain.
*/

#include <ArduinoBLE.h>

BLEService sensorDataService("19b10000-e8f2-537e-4f6c-d104768a1214"); // BLE Service named "sensorDataService"

// BLE Data Characteristic - custom 128-bit UUID, readable, writable and subscribable by central
// Note, "BLENotify" is what makes it subscribable
BLEByteCharacteristic dataCharacteristic("19b10001-e8f2-537e-4f6c-d104768a1214", BLERead | BLEWrite | BLENotify);

const int ledPin = LED_BUILTIN; // pin to use for the LED

void setup()
{
  Serial.begin(115200);
  while (!Serial); // optionally wait for serial terminal to open, useful with micros that have native USB
  Serial.println("MyoWare Single Sensor Example - BLE Peripheral");

  pinMode(ledPin, OUTPUT); // set LED pin to output mode

  if (!BLE.begin()) { // begin initialization
    Serial.println("starting BLE failed!");
    while (1);
  }
  Serial.println("BLE initiallized successfully");

  BLE.setLocalName("MYOWARE1"); // set advertised local name
  BLE.setAdvertisedService(sensorDataService); // set advertised service UUID
  sensorDataService.addCharacteristic(dataCharacteristic); // add the characteristic to the service
  BLE.addService(sensorDataService); // add service
  dataCharacteristic.writeValue(0); // set the initial value for the characeristic
  BLE.advertise(); // start advertising
}

void loop()
{
  BLEDevice central = BLE.central(); // listen for BLE peripherals to connect

  if (central) // if a central is connected to peripheral
  {
    Serial.print("Connected to central: ");
    Serial.println(central.address()); // print the central's MAC address

    Serial.println("Reading Sensor and writing BLE characteristic values now...");

    // while the central is still connected to peripheral:
    while (central.connected())
    {
      int val_int = analogRead(A0); // Read the sensor attached to Analog Pin A0
      byte val_byte = map(val_int, 0, 1023, 0, 255); // map the int to a byte
      delay(10);
      dataCharacteristic.writeValue(val_byte); // "post" to "BLE bulletin board"
      // Note, because our second Artemis in this example (the central) is subscribed to this characteristic,
      // it can simply call Characteristic.valueUpdated() to see if it has been updated.
      // valueUpdated() will return True if updated, or false if no update has happened.
      // If it has been updated, the central Artemis can read the latest value using Characteristic.readValue();
    }
    Serial.print(F("Disconnected from central: ")); // when the central disconnects, print it out
    Serial.println(central.address());
  }
}
Example 2b: Bluetooth Central "Receive"
The following example uses a RedBoard Artemis to receive the analog reading from the peripheral RedBoard Artemis wirelessly via Bluetooth. If you have not already, select your Board (in this case the RedBoard Artemis), and associated COM port. Copy the code below and paste into your Arduino IDE. Then upload the code to the board.
language:c
/*
  MyoWare Receiver BLE Central SINGLE SENSOR Example
  SparkFun Electronics
  Pete Lewis
  3/17/2022

  This example sets up a SparkFun RedBoard Artemis as a BLE central device,
  Then, it connects to a second Artemis peripheral device that is reading a single MyoWare
  Muscle sensor. It then streams the data on the Serial Terminal.

  Note, in BLE, you have services, characteristics and values.
  Read more about it here:

  https://www.arduino.cc/reference/en/libraries/arduinoble/

  Note, before it begins checking the data and printing it,
  It first sets up some BLE stuff:
    1. sets up as a central
    2. scans for any peripherals
    3. Connects to the device named "MYOWARE1"
    4. Subscribes MYOWARE1's data characteristic

  In order for this example to work, you will need a second Artemis, and it will
  need to be programmed with the provided code specific to being a peripheral device,
  and advertising as MYOWARE1 with the specific characteristic UUID.

  Note, both the service and the characteristic get unique UUIDs
  (even though they are extremely close to being the same thing in this example)

  This Artemis, aka the "BLE Central," will subscribe to the peripheral board's
  characteristic, and check to see if the value has been updated. When it has been
  updated, it will print the value to the serial terminal.

  Hardware:
  SparkFun RedBoard Artemis
  USB from Artemis to Computer.

  ** For consistent BT connection follow these steps:
  ** 1. Reset Peripheral
  ** 2. Wait 5 seconds
  ** 3. Reset Central
  ** 4. Enjoy BT connection
  **
  ** ArduinoBLE does not support RE-connecting two devices.
  ** If you loose connection, you must follow this hardware reset sequence again.

  This example code is in the public domain.
*/

#include <ArduinoBLE.h>

void setup()
{
  Serial.begin(115200);
  while (!Serial); // optionally wait for serial terminal to open, useful with micros that have native USB
  Serial.println("MyoWare Single Sensor Example - BLE Central");

  if (!BLE.begin()) // initialize the BLE hardware
  {
    Serial.println("starting BLE failed!");
    while (1);
  }
  Serial.println("BLE initiallized successfully");

  BLE.scanForUuid("19b10000-e8f2-537e-4f6c-d104768a1214"); // start scanning for peripherals
}

void loop()
{
  BLEDevice peripheral = BLE.available(); // check if a peripheral has been discovered

  if (peripheral) // discovered a peripheral, print out its info
  {
    Serial.print("Found ");
    Serial.print(peripheral.address());
    Serial.print(" '");
    Serial.print(peripheral.localName());
    Serial.print("' ");
    Serial.print(peripheral.advertisedServiceUuid());
    Serial.println();

    if (peripheral.localName() != "MYOWARE1")
    {
      return;
    }

    BLE.stopScan();

    checkUpdate(peripheral);

    Serial.println("Starting to scan for new peripherals again...");
    BLE.scanForUuid("19b10000-e8f2-537e-4f6c-d104768a1214"); // peripheral disconnected, scan again
    Serial.println("Scan has begun...");
  }
}

// Connect to peripheral
// Then continue to check if the data has been updated,
// If so, print it to terminal
void checkUpdate(BLEDevice peripheral)
{
  Serial.println("Connecting ..."); // connect to the peripheral

  if (peripheral.connect())
  {
    Serial.println("Connected");
  } else {
    Serial.println("Failed to connect!");
    return;
  }

  Serial.println("Discovering attributes ..."); // discover peripheral attributes
  if (peripheral.discoverAttributes())
  {
    Serial.println("Attributes discovered");
  } else {
    Serial.println("Attribute discovery failed!");
    peripheral.disconnect();
    return;
  }

  // retrieve the data characteristic
  BLECharacteristic dataCharacteristic = peripheral.characteristic("19b10001-e8f2-537e-4f6c-d104768a1214");

  if (!dataCharacteristic)
  {
    Serial.println("Peripheral does not have that characteristic!");
    peripheral.disconnect();
    return;
  } else if (!dataCharacteristic.canWrite())
  {
    Serial.println("Peripheral does not have a writable characteristic!");
    peripheral.disconnect();
    return;
  } else if (!dataCharacteristic.canRead())
  {
    Serial.println("Peripheral does not have a readable characteristic!");
    peripheral.disconnect();
    return;
  } else if (!dataCharacteristic.canSubscribe())
  {
    Serial.println("Characteristic is not subscribable!");
    peripheral.disconnect();
    return;
  } else if (!dataCharacteristic.subscribe())
  {
    Serial.println("subscription failed!");
    peripheral.disconnect();
    return;
  }

  while (peripheral.connected()) // while the peripheral is connected
  {
    if (dataCharacteristic.valueUpdated()) // Check to see if the value of the characteristic has been updated
    {
      byte received_val = 0;
      dataCharacteristic.readValue(received_val); // note, readValue returns nothing, and needs the variable to be passed by reference
      Serial.println(received_val);
    }
    delay(1);
  }
  Serial.println("Peripheral disconnected");
}
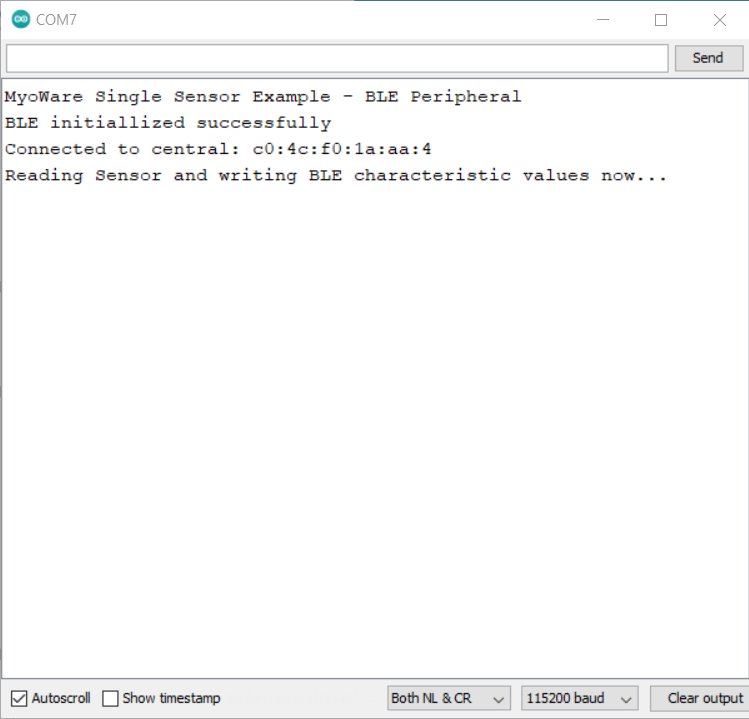
What You Should See
With two instances of the Arduino IDE open with a COM port selected for each respective board, you should see the following output in the Serial Monitor set to 115200 baud. If the Bluetooth fails to connect, try pushing the reset button on the Peripheral first, wait about 5 seconds, then hit the reset button on the Central. Once connected, the muscle sensor readings will be transmitted wirelessly to the central. Try flexing your arm to see if you can see the values increase.
 |
 |
| Debug Output from Peripheral Device | Debug Output from Central Device |
For users looking for a graphical view of the output, close the Arduino Serial Monitor for the Bluetooth set as the Central device (i.e. the RedBoard Artemis receiving the sensor data). Then open the Arduino Serial Plotter. You should see something similar to the output below. In this case, we flexed our forearm muscle causing the values to increase. Relaxing the muscle caused the values to decrease.