SparkFun Inventor's Kit for Photon Experiment Guide
Experiment 8: Activity Tracker
Introduction
This experiment will get you (or at least your Photon) moving, because we'll be wiring up a motion-sensing, orientation-finding, 3-axis accelerometer. This experiment serves as an introduction to accelerometers and I2C communication. You'll also learn about system modes, which allow you to turn WiFi on or off and save loads of battery juice.
Parts Needed
- 1x MMA8452Q Accelerometer
- 1x Green Button
- 6x Jumper wires
Suggested Reading
Two big new electronics concepts are introduced in this experiment: Accelerometers and I2C Communication. If you're interested in learning a lot more about them, check out our tutorials. For now, here's a quick introduction:
Accelerometers
Accelerometers are movement sensors. They feel acceleration -- the rate of change of velocity (how fast something is speeding up or slowing down). They've become incredibly common throughout consumer electronics, with a huge range of applications: smartphone's use them to sense orientation, activity trackers often track steps using an accelerometer, and hard drives use them to sense free-fall (giving them enough time to move and protect delicate parts).
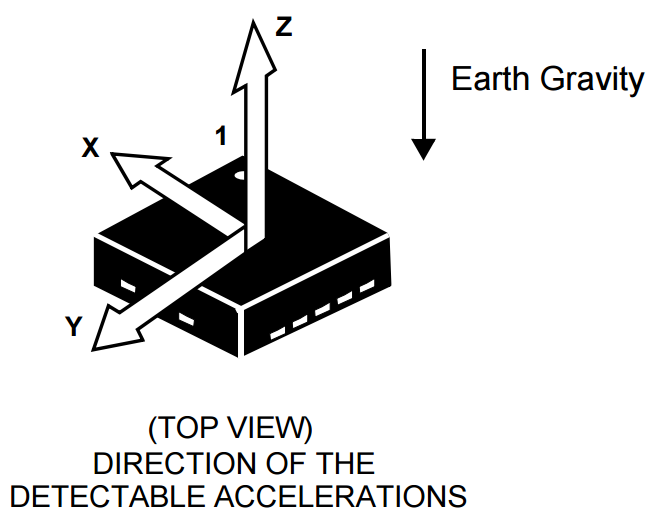
Even if a device isn't visibly moving, an accelerometer can still give you a lot of information about its orientation. Accelerometers sense the acceleration of gravity, which is a constant, pulling force toward earth. In fact, one of the most common units of acceleration is the g -- "gravity" -- which is equal to about 9.8 m/s2. An accelerometer sitting flat and motionless, will sense 1g of acceleration towards the ground (usually on the z-axis), and 0g of acceleration in the other two dimensions (x and y).
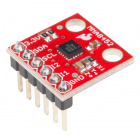
There are a huge variety of accelerometers out there. They can monitor anywhere from 1-to-3 axes of acceleration, support various communication interfaces, and host a range of other unique features. In this experiment, we're using the MMA8452Q -- a 3-axis accelerometer with a digital interface. It can be set to sense a maximum of either ±2, 4, or 6 g. It also supports a neat feature called tap, or "pulse" detection.
I2C
The accelerometer we're using in this experiment communicates over an interface called I2C, short for Inter IC Communication. I2C is an extremely popular embedded computing communication interface. It's relatively slow (the Photon and accelerometer communicate at about 400kHz), but only requires two wires for communication. These wires are usually called serial data (SDA) and serial clock (SCL). As you'll see in the next section, hooking up I2C circuits is as easy as connecting SDA-to-SDA and SCL-to-SCL (don't forget to power the device too!).
Devices on an I2C bus are called "slaves", while the lone, controlling component (our Photon RedBoard in this case), is called the "master". What makes I2C even more powerful is it allows multiple slave devices on a single, two-wire bus. Want to add a pressure sensor to your circuit? Just connect the SDA's and SCL's. Each slave device on an I2C bus has a unique address, so they can ignore messages for other devices, and only take action on bytes meant for them.
Hardware Hookup
Here's the hookup for both parts of this experiment:
As we mentioned in the I2C section above, an I2C bus is made up of two signals: SDA and SCL. An I2C interface also requires pullup-resistors on those signals, but the breakout board already takes care of that for you.
The button signal is routed to the RedBoard's D3 pin. We'll internally pull that pin up, so when the button is inactive it'll read HIGH. When the button is pressed, D3 will go LOW. We won't use the button in the first part, but it'll come in handy later on.
Photon Code
In this experiment, we'll once again be using the Libraries feature of the Build IDE. To communicate with the accelerometer, we'll be using the SparkFunMMA8452Q library.
This time, however, we'll be using another feature of the Libraries tab: examples. Most libraries include at least one example, to help demonstrate their features and usage. To use the SparkFunMMA8452Q library's example, click USE THIS EXAMPLE (make sure the MMA8452Q-Serial_Example tab is active up top).
The Build IDE will create a new app in your code tab called MMA8452Q-Serial_Example, and it will already have the library included for you.
All you have to do is flash the code!
What You Should See
This part of the experiment is designed to get you familiar with what, exactly, an accelerometer senses. We'll be reading the acceleration from each of the three axes, then printing those values out to the serial monitor.
Once the Photon begins running the application, open up a serial terminal to view the data. Acceleration sensed on all three axes is displayed at a rate of about 1Hz. There are also some fancy ASCII bar graphs, to visually represent the acceleration values.
Sitting flat, you should see about 1 g of acceleration on the z-axis, and nearly 0 g on the x- and y-axes. Carefully -- without disturbing any of the wires -- tilt your RedBoard and Breadboard around, and monitor the three accelerometer readings. If you flip the board 90°, the z-axis should become 0 g and either x or y will go to 1. Can you tilt the board and get each axis nearly equal?
Code to Note
This example introduces the SparkFunMMA8452Q library. To begin using the library, create an MMA8452Q class object. This'll often go in the global section of the code:
language:c
// Create an MMA8452Q object, used throughout the rest of the sketch.
MMA8452Q accel; // Default constructor, SA0 pin is HIGH
We'll use accel from here on to access the accelerometer functions and variables. To initialize the sensor, stick accel.begin() in your setup(). You can give the begin() function two parameters, if you want to configure the sensing range of the accelerometer or the output data rate (ODR).
language:c
// Initialize the accelerometer with begin():
// begin can take two parameters: full-scale range, and output data rate (ODR).
// Full-scale range can be: SCALE_2G, SCALE_4G, or SCALE_8G (2, 4, or 8g)
// ODR can be: ODR_800, ODR_400, ODR_200, ODR_100, ODR_50, ODR_12, ODR_6 or ODR_1
accel.begin(SCALE_2G, ODR_1); // Set up accel with +/-2g range, and slowest (1Hz) ODR
The scale can be set to either ±2, 4, or 8 g, while the output data rate can be set to either 1, 6, 12, 50, 100, 200, 400, or 800 Hz. In our example, the scale is set to its minimum -- meaning it'll have the highest resolution, but be limited to sensing a maximum of ±2 g.
To check if new data is available from the sensor, use the accel.available() function, which will return 1 if there's data to be read or 0 otherwise.
Once new data is available, call accel.read() to read all acceleration data from the sensor. Then you'll be able to access any of six class variables: x, y, z -- the "raw" 12-bit values from the accelerometer -- or cx, cy, and cz, the calculated accelerations in g.
The whole process goes something like this:
language:c
if (accel.available())
{
    accel.read();

    Serial.println("X: " + String(accel.x) + " | " + String(accel.cx, 2) + " g");
    Serial.println("Y: " + String(accel.y) + " | " + String(accel.cy, 2) + " g");
    Serial.println("Z: " + String(accel.z) + " | " + String(accel.cz, 2) + " g");
}
Troubleshooting
Motion and breadboard/jumper circuits aren't usually a great combination. If your circuit works initially, but mysteriously stops working, a jumper may have been (even briefly) disconnected. Double-check all of your wiring, and restart if anything stops working. Move things around carefully! The base plate is extremely useful for this experiment.
Part 2: Tracking Steps, Publishing Your Acitvity
Accelerometers are commonly used as the motion-sensing foundation of pedometers -- step counters. And while the baseplate probably isn't the most comfortable thing to strap to your belt and walk around with, creating an activity monitor of our own can be a fun exercise. Plus it provides an algorithm you can endlessly try to tweak and perfect.
New Photon Code
Create a new application, and post this code in:
// Pin definitions:
const int BUTTON_PIN = 3; // The Publish button is connected to D3
const int LED_PIN = 7; // The on-board LED is used to indicate status

MMA8452Q accel; // Create an accelerometer object to be used throught the sketch

// stepCount keeps track of the number of steps since the last publish:
unsigned int stepCount = 0;

// To save battery power, we'll put the Photon in SEMI_AUTOMATIC mode.
// So our Photon will not attempt to connect to the Cloud automatically.
// It'll be up to us to issue Particle.connect() commands, when we want
// to connect.
// More on modes here: https://docs.particle.io/reference/firmware/photon/#system-modes
SYSTEM_MODE(SEMI_AUTOMATIC); // Set system mode to SEMI_AUTOMATIC

// We'll use a few booleans to keep track of _if_ we need to publish,
// and if our publish was successful.
bool publishFlag = false;
bool publishSuccess = false;

void setup()
{
    // Begin by turning WiFi off - we're running off batteries, so
    // need to save as much power as possible.
    WiFi.off(); // Turn WiFi off

    // Configure our button and LED pins
    pinMode(LED_PIN, OUTPUT); // LED pin is set as an OUTPUT
    digitalWrite(LED_PIN, HIGH); // Write LOW to set LED off to begin
    pinMode(BUTTON_PIN, INPUT_PULLUP); // Button is configured as input w/ pull-up active

    // Initialize our accelerometer. Set the scale to high-resolution (2g)
    // Set the output data rate to 50Hz.
    accel.begin(SCALE_2G, ODR_50);

    // Next, we'll configure our accelerometer's tap detection interface. This is a
    // very tweak-able function. We can configure the Threshold, time limit, and latency:

    // Pulse threshold: the threshold which is used by the system to detect
    // the start and end of a pulse.
    // Threshold can range from 1-127, with steps of 0.063g/bit.
    //byte threshold = 3; // 3 * 0.063g = 0.189g // This might work better in some cases
    byte threshold = 1; // 2 * 0.063g = 0.063g

    // Pulse time limit: Maximum time interval that can elapse between the start of
    // the acceleration exceeding the threshold, and the end, when acceleration goes
    // below the threshold to be considered a valid pulse.
    byte pulseTimeLimit = 255; // 0.625 * 255 = 159ms (max)

    // Pulse latency: the time interval that starts after first pulse detection, during
    // which all other pulses are ignored. (Debounces the pulses).
    // @50Hz: Each bit adds 10ms (max: 2.56s)
    byte pulseLatency = 64; // 1.25 * 64 = 640ms

    // Use the setupTap function to configure tap detection in our accelerometer:
    accel.setupTap(threshold, threshold, threshold, pulseTimeLimit, pulseLatency);
}

void loop()
{
    // Use the readTap() function to check if a tap was detected:
    byte tap = accel.readTap();
    // readTap will return 1 if there was a tap
    if (tap != 0) // If there was a tap
    {
        stepCount++; // Increment stepCount
        toggleLED(); // Toggle the LED state
    }

    // Next, check if the button was pressed (it's active-low)
    if (digitalRead(BUTTON_PIN) == LOW)
    {   // If the button was pressed
        if (publishFlag == false) // and if we aren't publishing:
        {
            // We're in SEMI_AUTOMATIC system mode, so it's up to us
            // to connecto to the Particle cloud.
            // We've also turned WiFi off, so we'll have to connect to that too.
            WiFi.on();  // Turn WiFi on
            WiFi.connect(); // Connect to our WiFi network
            Particle.connect(); // Connect to the Particle cloud

            digitalWrite(LED_PIN, LOW); // Turn the LED off
            publishFlag = true; // Indicate that we are publishing
        }
    }

    // It takes a few seconds to connect to the Particle cloud.
    // We'll use Particle.connected() to check if we've connected
    // If we're connected, and need to publish:
    if (publishFlag && Particle.connected())
    {
        // Each step usually creates about 2 taps (arm or leg going forward then backward)
        stepCount /= 2; // Dividing by 2 usually makes for a much more accurate step count:

        // Call Particle.publish to push our step count to the web:
        publishSuccess = Particle.publish("Steps", String(stepCount / 2));

        // If the publish was successful
        if (publishSuccess)
        {
            publishFlag = false; // clear the publishFlag
            stepCount = 0; // and reset the step count
        }
        // Allow the Photon some time to Publish before disconnecting
        delay(5000); // Delay 5 seconds
    }

    // If we've successfully published, and are still connected to the Partice cloud
    if (publishSuccess && Particle.connected())
    {
        WiFi.off(); // Turn off WiFi
        publishSuccess = false; // Clear our publishSuccess flag
    }
}

// toggleLED() simply toggles the LED each time it's called. From on to off, or off to on.
void toggleLED()
{
    static bool ledState = true;
    if (ledState)
    {
        digitalWrite(LED_PIN, HIGH);
        ledState = false;
    }
    else
    {
        digitalWrite(LED_PIN, LOW);
        ledState = true;
    }
}
As with the previous part's code, you'll need to include the SparkFunMMA8452Q library in this application.
What You Should See
After flashing code to your Photon, remove the USB cable, and plug in a 9V battery via the included 9V-to-Barrel Jack adapter.
Before walking away, open up the Particle Dashboard, and click over to the "Logs" tab. It should be empty for now.
When your Photon boots up, it'll immediately begin running the application code. You'll also notice the RGB LED is blinking white-ish, which indicates the device is not connected to the Particle cloud.
Strap your circuit to your belt, or just hold it in your hand, and take about 50 steps. When you want to publish your step count, hit the green button. Your Photon will stop tracking steps while it connects to WiFi and the Particle Cloud, then posts the step count. When the activity publishes, you should see a new row-entry on the dashboard.
After successfully publishing, the Photon RedBoard shuts of WiFi and goes back into step counting mode.
There are a variety of ways to check for published events from your Photon. In raw URL form, you can subscribe to events by directing your browser to a URL like:
https://api.particle.io/v1/devices/DEVICE_ID/events?access_token=ACCESS_TOKEN
Replacing DEVICE_ID with your Photon RedBoard's device ID (found under the "Devices" tab), and swapping in your access token (in the "Settings" tab) for ACCESS_TOKEN. You'll initially get a mostly blank page, but as your Photon connects and publishes, new events will pop up:
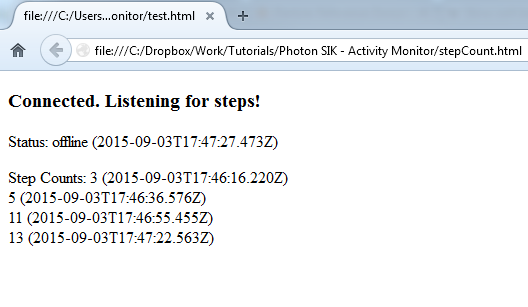
Those events include your Photon RedBoard connecting, disconnecting, and publishing an event called "Steps". If you listen for those events, and do some JSON-parsing, you can build a simple HTML/Javascript page to list your step counts.
As a simple example, copy and paste this code into a text editor. Grab your device ID and access token and plug them into the deviceID and accessToken variables (between the quotes).
<!DOCTYPE HTML>
<html>
<body>
    <p>
    <p><h3><span id="subscription"></span></h3></p>
    <p>Status: <span id="connectStatus">Nothing yet</span></p>
    <p>Step Counts: <span id="stepList"></span></p>

    <script type="text/javascript">
    function connect()
    {
        var deviceID = ""; // Photon RedBoard device ID
        var accessToken = ""; // Particle account access token

        // Subscribe to any events published by our Photon Device ID:
        var eventSource = new EventSource(
        "https://api.particle.io/v1/devices/" + deviceID + "/events/?access_token=" + accessToken);

        // When the connection opens, it'll publish an "open" event:
        eventSource.addEventListener('open', function(event)
        {
            var subSpan = document.getElementById("subscription");
            subSpan.innerHTML = "Connected. Listening for steps!";
        }, false);

        // If our eventSource fails to connect, it'll give an error:
        eventSource.addEventListener('error', function(event)
        {
            var subSpan = document.getElementById("subscription");
            subSpan.innerHTML = "Not connected :(";
        }, false);

        // Online/offline messages are published as "spark/status" events:
        eventSource.addEventListener('spark/status', function(event)
        {
            var jData = JSON.parse(event.data); // Parse the JSON data
            // Find the "data" key. It'll either be "offline" or "online":
            var statusData = jData.data;
            // Find the "publihsed_at" key, it'll be a timestamp:
            var statusTime = jData.published_at;

            // Put the data we've parsed into the "connectStatus" span:
            var statusSpan = document.getElementById("connectStatus");
            statusSpan.innerHTML = statusData + " (" + statusTime + ")";
        }, false);

        eventSource.addEventListener('Steps', function(event)
        {
            var jData = JSON.parse(event.data); // Parse the JSON data

            var stepCount = jData.data; // Find the "data" key, it'll be the step count
            var stepTime = jData.published_at; // Also get the timestamp from "published_at" key

            // Put the data we've parsed into the "stepList" span:
            var stepsSpan = document.getElementById("stepList");
            stepsSpan.innerHTML = stepsSpan.innerHTML + stepCount + " (" + stepTime + ")" + "<br>";

        }, false);
    }
    window.onload = connect; // Run the connect() function when the page loads
    </script>
</body>
</html>
Then open your HTML file with your favorite web browser. And publish some step counts. Eventually your HTML page will begin to fill out:
System Modes, and Controlling WiFi
Photon System Modes are used to control the Photon RedBoard's connection to WiFi and the Particle cloud. In this experiment we turn off WiFi whenever it's not necessary -- you don't need an Internet connection to track steps!
Control of the Photon's WiFi connection begins before setup(), by calling the SYSTEM_MODE macro:
language:c
// SEMI_AUTOMATIC mode starts the application up without WiFi, not connected to the
// Particle cloud. Call Particle.connect() manually to connect to WiFi, after that
// Particle.process()'s will be handled for us.
SYSTEM_MODE(SEMI_AUTOMATIC); // Semi-automatic WiFi/cloud mode
SYSTEM_MODE can either be AUTOMATIC, SEMI_AUTOMATIC or MANUAL. AUTOMATIC is the default state, which you should be extremely familiar with by now. The Photon boots up and immediately tries to connect to WiFi and the Cloud before running the sketch.
In SEMI_AUTOMATIC mode, our Photon jumps straight into our application code. It won't try to connect to the cloud until we call Particle.connect(). While the device is connected, its connection with the cloud is automatically administered, and Particle.disconnect() can be called to disconnect from the Particle cloud.
In addition to the SYSTEM_MODE control, the application also manages our WiFi connection with WiFi.on(), WiFi.connect(), and WiFi.off(). For example, after the button has been pressed, we tell the Photon RedBoard to connect to WiFi and the Particle cloud like this:
language:c
WiFi.on(); // Turn the WiFi module on
WiFi.connect(); // Connect to the pre-set WiFi SSID
Particle.connect(); // Connect to the Particle Cloud
And once we've successfully published, WiFi.off() is called to shut the WiFi system down.
It takes some extra planning to use anything but AUTOMATIC mode, but it can result in a big payoff.
Sensing Steps
Before we can publish any step count, we have to sense them. To be honest, pedometer algorithm's are tough. The MMA8452Q has a neat feature called pulse detection, that we can pigeonhole into our step-counting application. We can set the accelerometer to continuously monitor all three axes for short pulses of motion on any of the three axes, which will be assumed as a step.
To setup pulse or "tap" detection on the MMA8452Q, use the setupTap() function -- giving it threshold and timing parameters. We'll set the threshold to be very low -- so just about any movement will create a tap -- and set the time window between pulses to about 500ms.
language:c
// Threshold can range from 1-127, with steps of 0.063g/bit.
byte threshold = 1; // 2 * 0.063g = 0.063g (minimum threshold

// Pulse time limit: Maximum time interval that can elapse between the start of
// the acceleration exceeding the threshold, and the end, when acceleration goes
// below the threshold to be considered a valid pulse.
byte pulseTimeLimit = 255; // 0.625 * 255 = 159ms (max)

// Pulse latency: the time interval that starts after first pulse detection, during
// which all other pulses are ignored. (Debounces the pulses).
// @50Hz: Each bit adds 10ms (max: 2.56s)
byte pulseLatency = 64; // 1.25 * 64 = 640ms
accel.setupTap(threshold, threshold, threshold, pulseTimeLimit, pulseLatency);
How fast do you walk? Everyone has a different gait, so you may have to tweak these values to get a more accurate step count.
Code to Note
Particle Publish will be our tool for sharing our step activity with the world. Publish can be used to post named event data to the Particle Cloud, where it can be grabbed by another application and displayed or used otherwise.
In this example, we're publishing our step data under the "Steps" event name, and including the step count under that data. Just a few lines of code are required to publish, and verify a successful publish:
language:c
// Call Particle.publish to push our step count to the web:
publishSuccess = Particle.publish("Steps", String(stepCount / 2));

// If the publish was successful
if (publishSuccess)
{
    publishFlag = false; // clear the publishFlag
    stepCount = 0; // and reset the step count
}
The Particle Dashboard is an easy tool for viewing your device's published data. In leiu of anything more complex, we can use that interface to easily monitor the number of steps our RedBoard has taken.
Beyond the Dashboard, once you've published your data to the Cloud, there should be no shortage of actions you can take with it. You can set up a webhook, to monitor the event and post its data. Or even configure a second Photon to Subscribe to the event, to track multiple Photon activity monitors.
Troubleshooting
Saving power is great, but it can lead to some headaches if you need to upload new code to the Photon. If your Photon's WiFi is off, or if it's not connected to the cloud, you won't be able to flash new code to it. Thankfully, there's Safe Mode. By booting your Photon into safe mode, it skips running your application and instead connects to the Particle Cloud and waits for a new program.
To boot into safe mode, hold down both the RESET and MODE buttons. Then release RESET to turn the Photon on. When the RGB LED begins blinking pink-ish, release MODE. Your Photon will run through its WiFi/Cloud connection process, then breathe pink. Once it's breathing pink, you'll be able to successfully flash new code to it.
Going Further
There are plenty of projects that can combine motion sensing and the Internet. How about putting this same circuit on top of your dryer -- have it alert you when the shaking stops, so you can go grab your clothes before they wrinkle (escaping any potential scolding from your significant other)!


