SparkFun Inventor's Kit for Photon Experiment Guide
 Joel_E_B,
  b_e_n,
  HelloTechie,
  Knutson,
  jimblom,
  RBERLIA
 Experiment 1: Hello World, Blink an LED
Introduction
LEDs (light-emitting diodes) are small, powerful lights that are used in many different applications. To start off the SIK for Photon, we will work on blinking an LED using a digital output. Chances are you have blinked an LED before, or perhaps this is your first time -- but have you turned on an LED with the Internet? Blinking an LED is the most basic "Hello World" test for hardware, but now we're going to be saying "Hello Internet." This experiment will also walk you through uploading your first sketch with the Particle IDE.
Parts Needed
You will need the following parts:
- 1x LED (Choose any color in the bag full of LEDs)
- 1x 330Ω Resistor
- 2x Jumper Wires


Suggested Reading
Before continuing on with this experiment, we recommend you be familiar with the concepts in the following tutorial:
- What is a Circuit? -- This tutorial will explain what a circuit is, as well as discuss voltage in further detail.
- Voltage, Current, Resistance, and Ohm's Law -- Learn the basics of electronics with these fundamental concepts.
- LEDs (Light-emitting Diodes) -- LEDs are found everywhere. Learn more about LEDs and why they are used in some many products all over the world.
- Resistors -- Why use resistors? Learn more about resistors and why they are important in circuits like this one.
- Polarity -- Polarity is a very important characteristic to pay attention to when building circuits.
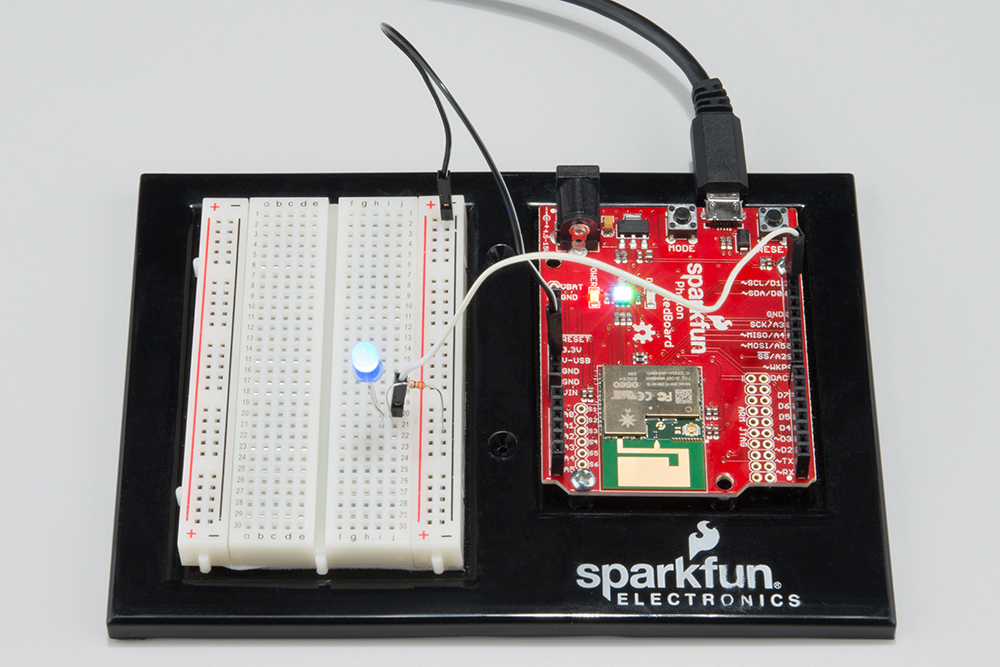
Hardware Hookup
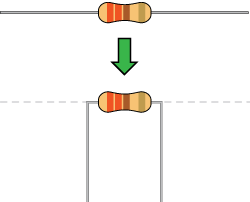
Ready to party? Components like resistors need to have their legs bent into 90° angles in order to correctly fit the breadboard sockets. You can also cut the legs shorter to make them easier to work with on the breadboard.
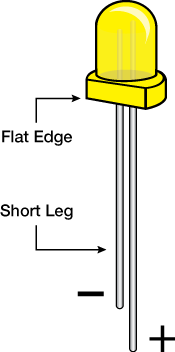
Pay close attention to the LED. The negative side of the LED is the short leg, marked with a flat edge.
Each experiment will have a Fritzing hook-up diagram. Connect the components to the breadboard and Photon RedBoard by following the Fritzing diagram below:
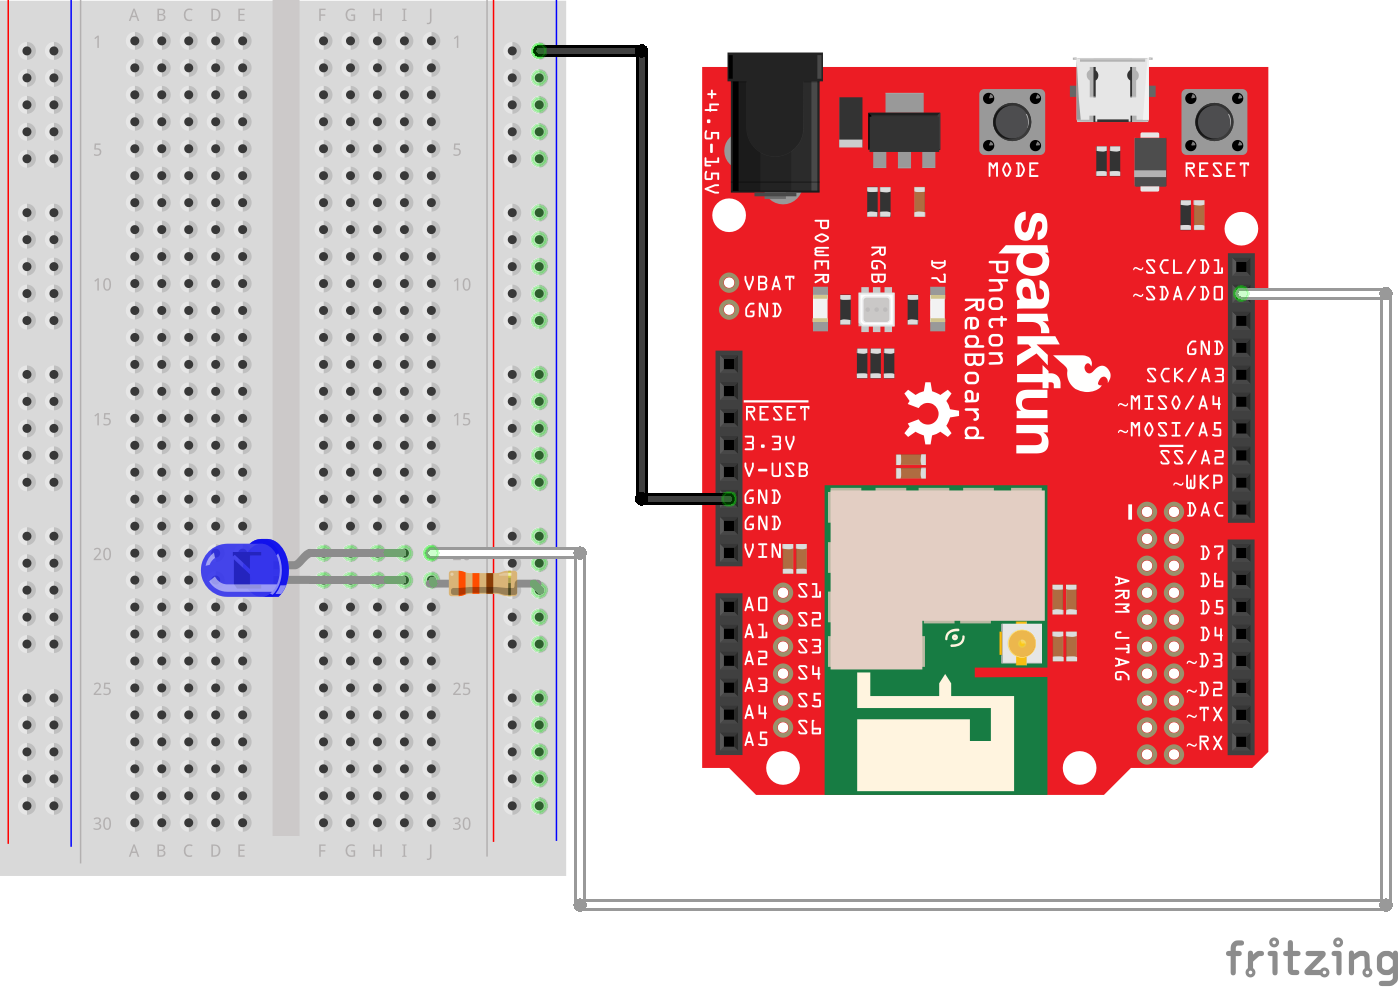
All jumper wires work the same. They are used to connect two points together. All the experiments will show the wires with different colored insulations for clarity, but using different combinations of colors is completely acceptable.
Be sure to the polarity on the LED is correct. The longer lead should be connected to D0. You will need to slightly bend the longer leg so that both are the same length when placed int he breadboard.
Photon Code
Now to the exciting part! You'll need to go to the Particle Build IDE (preferably on another tab or window) to get started. If you are not familiar with the Particle Build IDE, please refer to the Particle Build IDE documentation or the Particle Build IDE overview in the beginning of this guide.
Using an online IDE might be little different at first for some users, but it ends up being fantastic. You can program your Photon from anywhere in the world as long as you have an Internet connection.
Double check your Photon RedBoard's RGB LED is breathing cyan. If it is, then your Photon RedBoard is connected to the Internet and ready to go. If your Photon RedBoard is not breathing cyan, please refer to the Connecting your Photon to WiFi documentation. If you go to the navigation bar, click on Devices to see if your Photon RedBoard is connected.
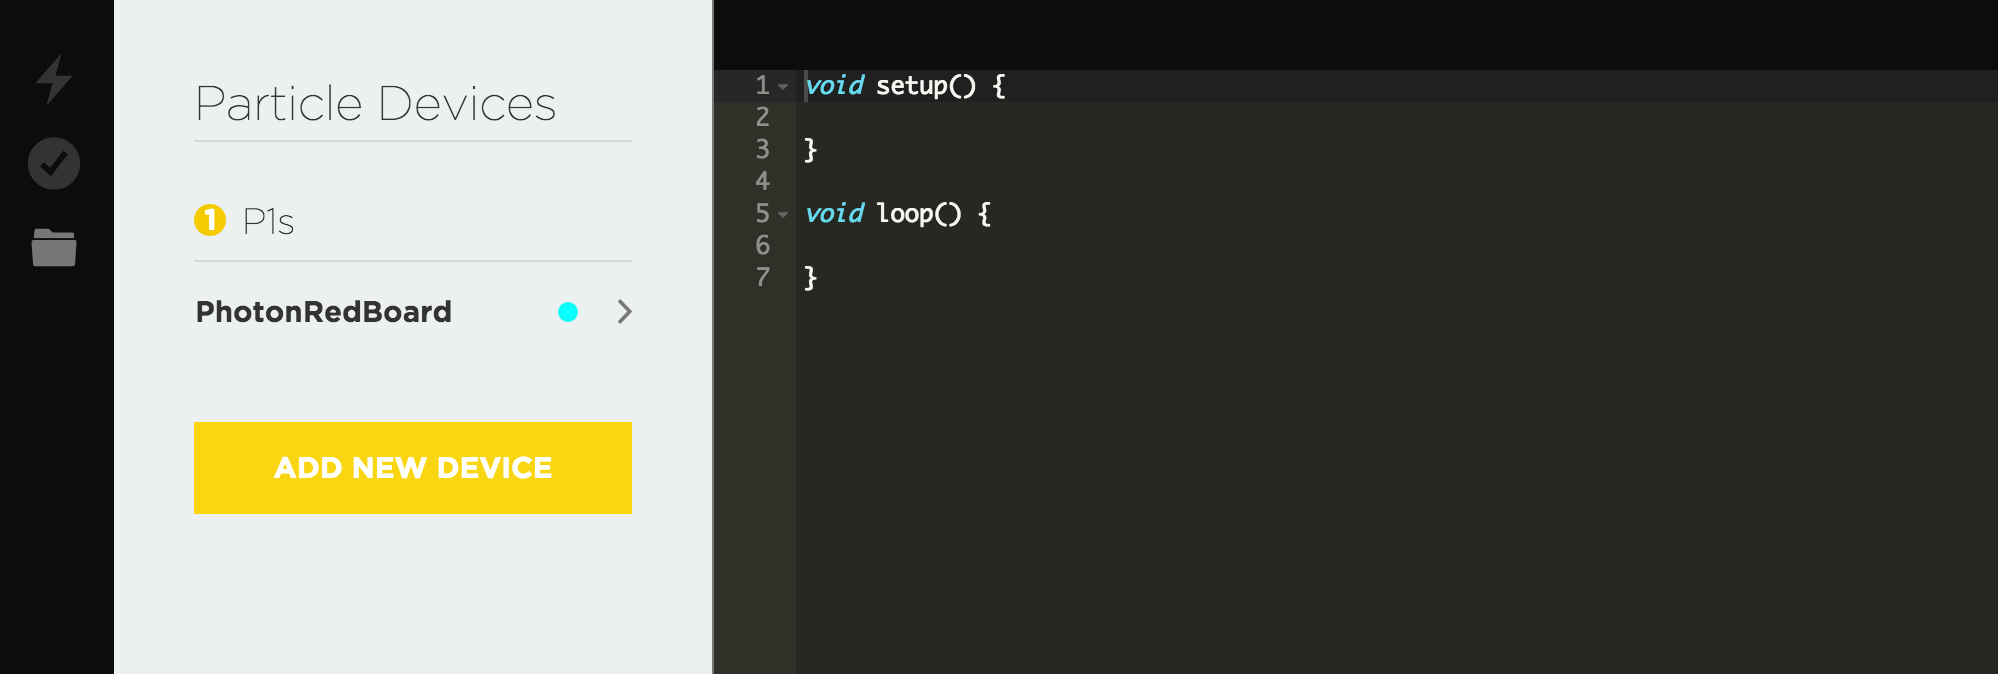
For each experiment, we recommend creating a new app. Go to the Code section in the navigation bar on the left. The hit the CREATE NEW APP button. After typing in the name, you can hit enter.
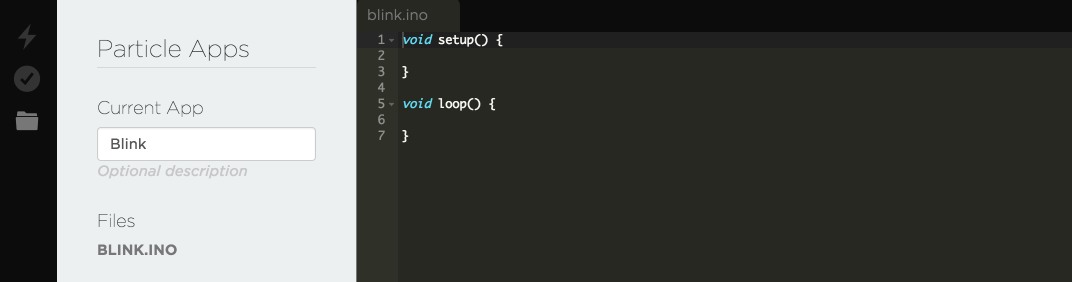
Let's add the code! Copy and paste the code below into the in Particle Build editor. You can simply hit the COPY CODE button below and paste (Right-click then click Paste or Command + V) into the Particle Build Editor.
language:c
/*  SparkFun Inventor's Kit for Photon
    Experiment 1 - Part 1: Hello World Blink an LED
    This sketch was written by SparkFun Electronics
    August 31, 2015
    https://github.com/sparkfun

    This is a simple example sketch that turns on an LED
    for one second, off for one second, and repeats forever.

    Development environment specifics:
    Particle Build environment (https://www.particle.io/build)
    Particle Photon RedBoard
    Released under the MIT License(http://opensource.org/licenses/MIT)
*/

int led = D0; // LED is connected to D0

// This routine runs only once upon reset
void setup()
{
  pinMode(led, OUTPUT); // Initialize D0 pin as output
}

// This routine loops forever
void loop()
{
  digitalWrite(led, HIGH);  // Turn ON the LED
  delay(1000);              // Wait for 1000mS = 1 second
  digitalWrite(led, LOW);   // Turn OFF the LED
  delay(1000);              // Wait for 1 second
}
Once you've pasted the code into the window, let's get in the habit of checking our code. Hit Verify (circle icon with a check mark in the top left of the Particle Build's IDE navigation bar) to check if there is any errors in the code. Next, hit Save (folder icon) to save our code, so we can come back to the code later if we want to.
Drum roll please! Hit Flash (lightning bolt icon) to load the code onto the Photon RedBoard.
If there are any invalid characters (such as ':') in your code or something is syntactically incorrect, you will get the following error when attempting to flash your device:
Error: Could not compile. Please review your code.
What You Should See
Once you click Flash, you should see your Photon RedBoard flash magenta, followed by green, and then back to breathing Cyan. Now, your LED should be blinking. You've just wirelessly programmed your Photon RedBoard to blink an LED, from the cloud!
Great job on successfully uploading your first sketch. If you want to learn how blink an LED with the Tinker mobile app, you can head to part 2 of this experiment!
Code to Note
Variables
A variable can be a number, a character, and even a string of characters. We'll often use variables to store numbers that change, such as measurements from the outside world, or to make a sketch easier to understand (sometimes a descriptive name makes more sense than looking at a number).
Variables can be different "data types", which is the kind of number we're using (can it be negative? Have a decimal point?) We'll introduce more data types later, but for the moment we'll stick with good old "integers" (called "int" in your sketch). Integers are whole numbers (0, 3, 5643).
You must "declare" variables before you use them, so that the computer knows about them. Here we'll declare a integer variable, and at the same time, initialize it to specific values. We're doing this so that further down, we can refer to the pin by name rather than number.
Note that variable names are case-sensitive! If you get an "(variable) was not declared in this scope" error, double-check that you typed the name correctly.
Here we're creating a variable called "led" of type "int" and initializing it to have the value "0":
int led = D0;
The Photon RedBoard has digital input/output pins. These pins can be configured as either inputs or outputs. This is declared with a built-in function called pinMode(). The pinMode() function takes two values, which you type in the parenthesis after the function name. The first value is a pin number (or variable representing a pin number), and the second value declares how the pin behaves, usually as some sort of INPUT or OUTPUT.
Here we'll set up pin 0 (the one connected to a LED) to be an output. We're doing this because we need to send voltage "out" of the Photon RedBoard to light up the LED.
pinMode(led, OUTPUT);
When you're using a pin as an OUTPUT, you can command it to be HIGH (output 3.3 volts in this case), or LOW (output 0 volts).
digitalWrite(led, HIGH);
For more info on the types of PinModes available, visit the Particle Documentation.
Comments
There are different ways to make comments in your code. Comments are a great way to quickly describe what is happening in your code.
// This is a comment - anything on a line after "//" is ignored
// by the computer.
/* This is also a comment - this one can be multi-line, but it
must start and end with these characters */
Troubleshooting
Code refuses to flash -- Try putting your Photon RedBoard into Safe Mode. Then, hit Flash. Sometimes to get your Photon RedBoard breathing cyan again, unplugging from USB and replugging back can get your board connecting to WiFi again. Please keep in mind if you just starting working with the Photon RedBoard it might take a couple minutes for the firmware to upload when first connected to the Internet.
LED isn't blinking -- Try checking your connections again. Make sure the positive side of the LED is connected to D0. It is really easy to put the jumper wire in the wrong hole on a breadboard.
- Photon RedBoard RGB isn't doing anything -- Don't worry! We have an awesome tech support staff to help you out if there is something wrong. Please contact our tech support team.
Part 2: Blink an LED with Tinker
Tinker is a mobile app for iPhone or Android smartphones that makes it easy to control your digital and analog pins on your Photon or Photon RedBoard.
First you will need to download the app on your smartphone.
iPhone users (requires iOS 8 or later)
Windows users -- Unfortunately, this extra feature is only for iOS and Android devices. Don’t worry, this is the only bonus material that uses with the Tinker app.
Non-smartphone users -- Most of us would love to go back the happy memories of not owning a smartphone and not getting 50+ alerts each day. We applaud you! We also might secretly envy you. Unfortunately, this bonus material isn't going to be your cup of tea. Don’t worry, this is the only bonus material that uses with the Tinker app.
When the app is done installing on your phone, you will need to sign in with your login information (the same as the Particle website). After logging in, you will see a list with all your devices.
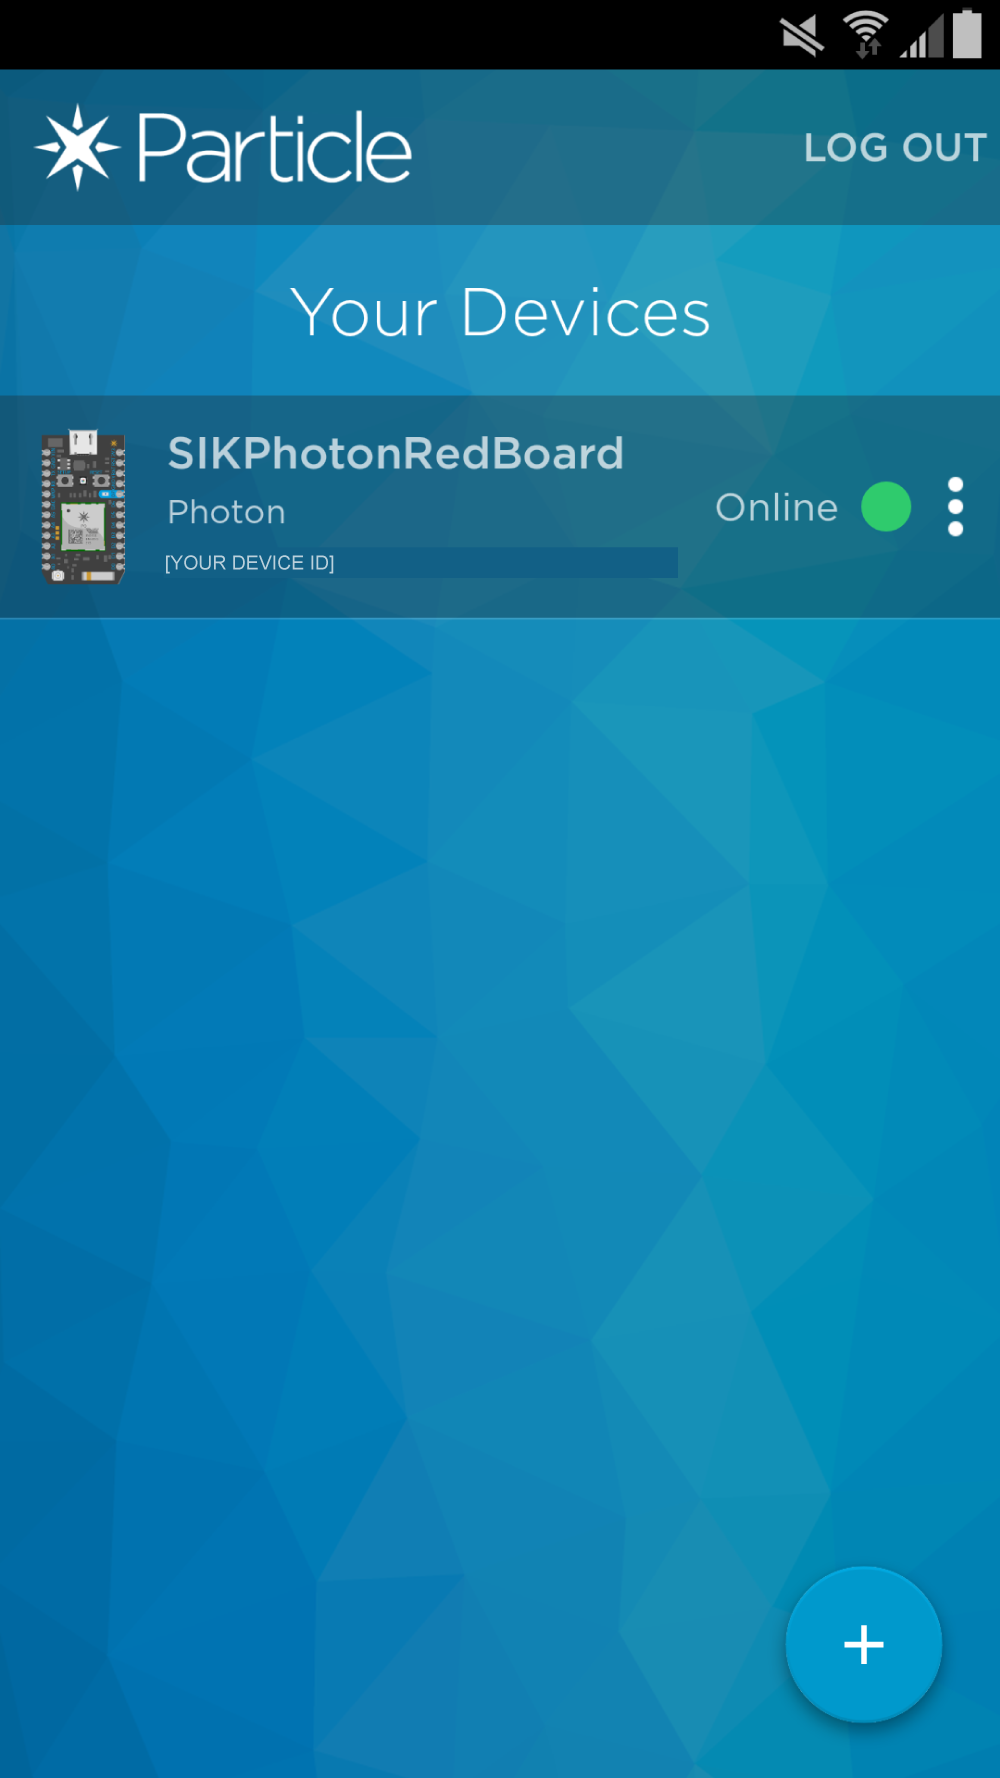
Clicking on the more icon (three dots) next to the online dot, gives you more options from which to choose. For example, you can rename your board here. We suggest naming your Photon RedBoard with unique names. When you start having a lot of Photons and demos going at once, it is hard to remember which is which.

When you tap on one of these devices, it will give you the option to reflash the Tinker firmware.
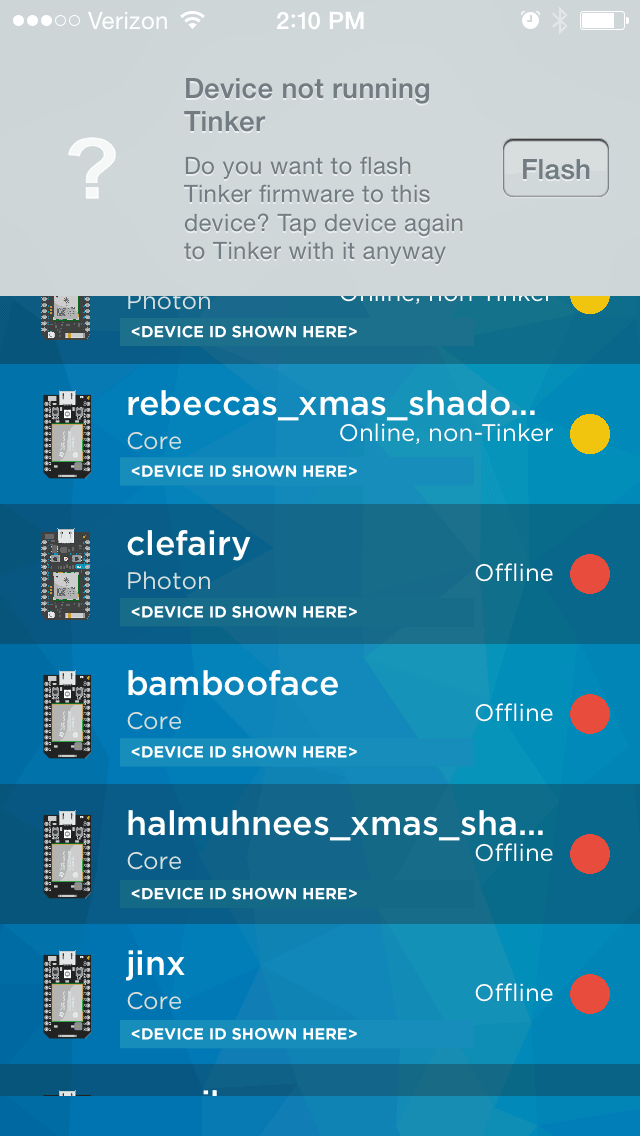
Click flash, and wait for your device to come back to a breathing cyan state.
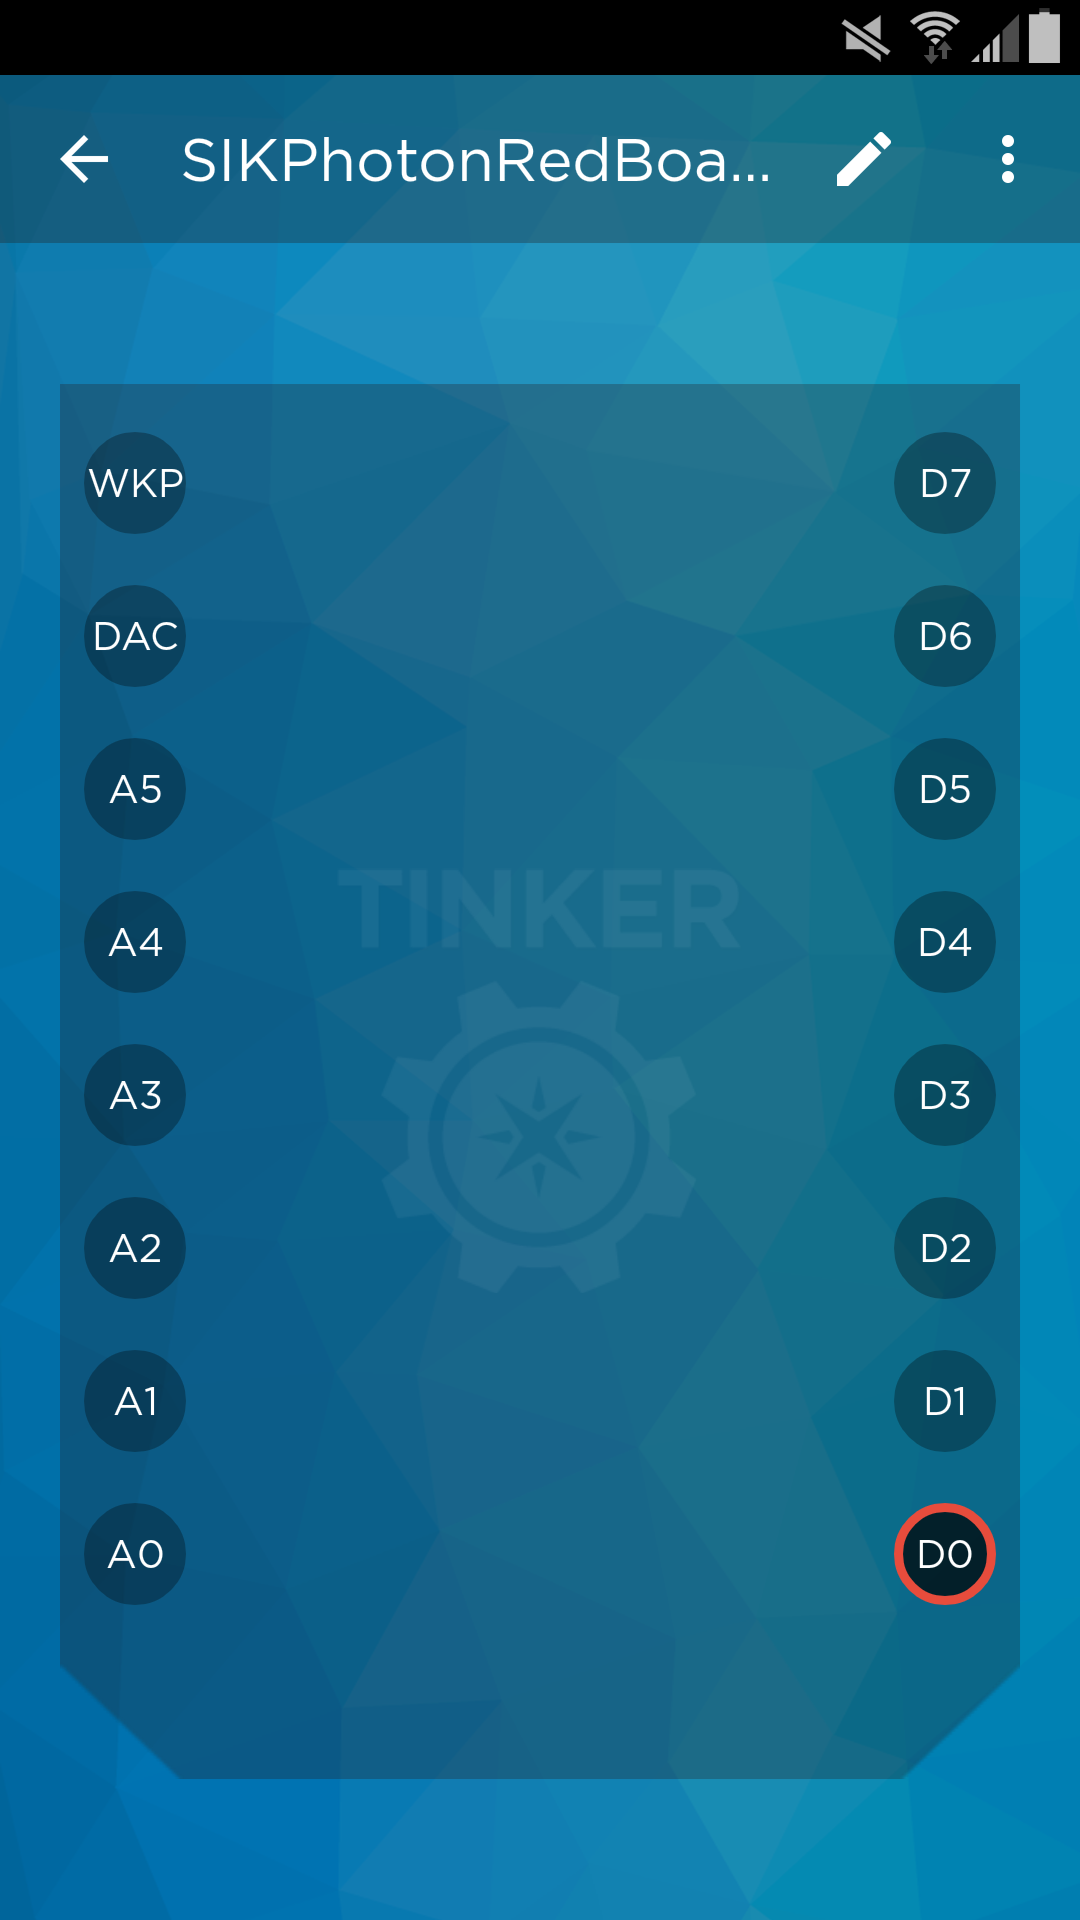
When you click over the name of the Photon RedBoard you want to work with, you will see a new screen with a list of the different pins you can control.

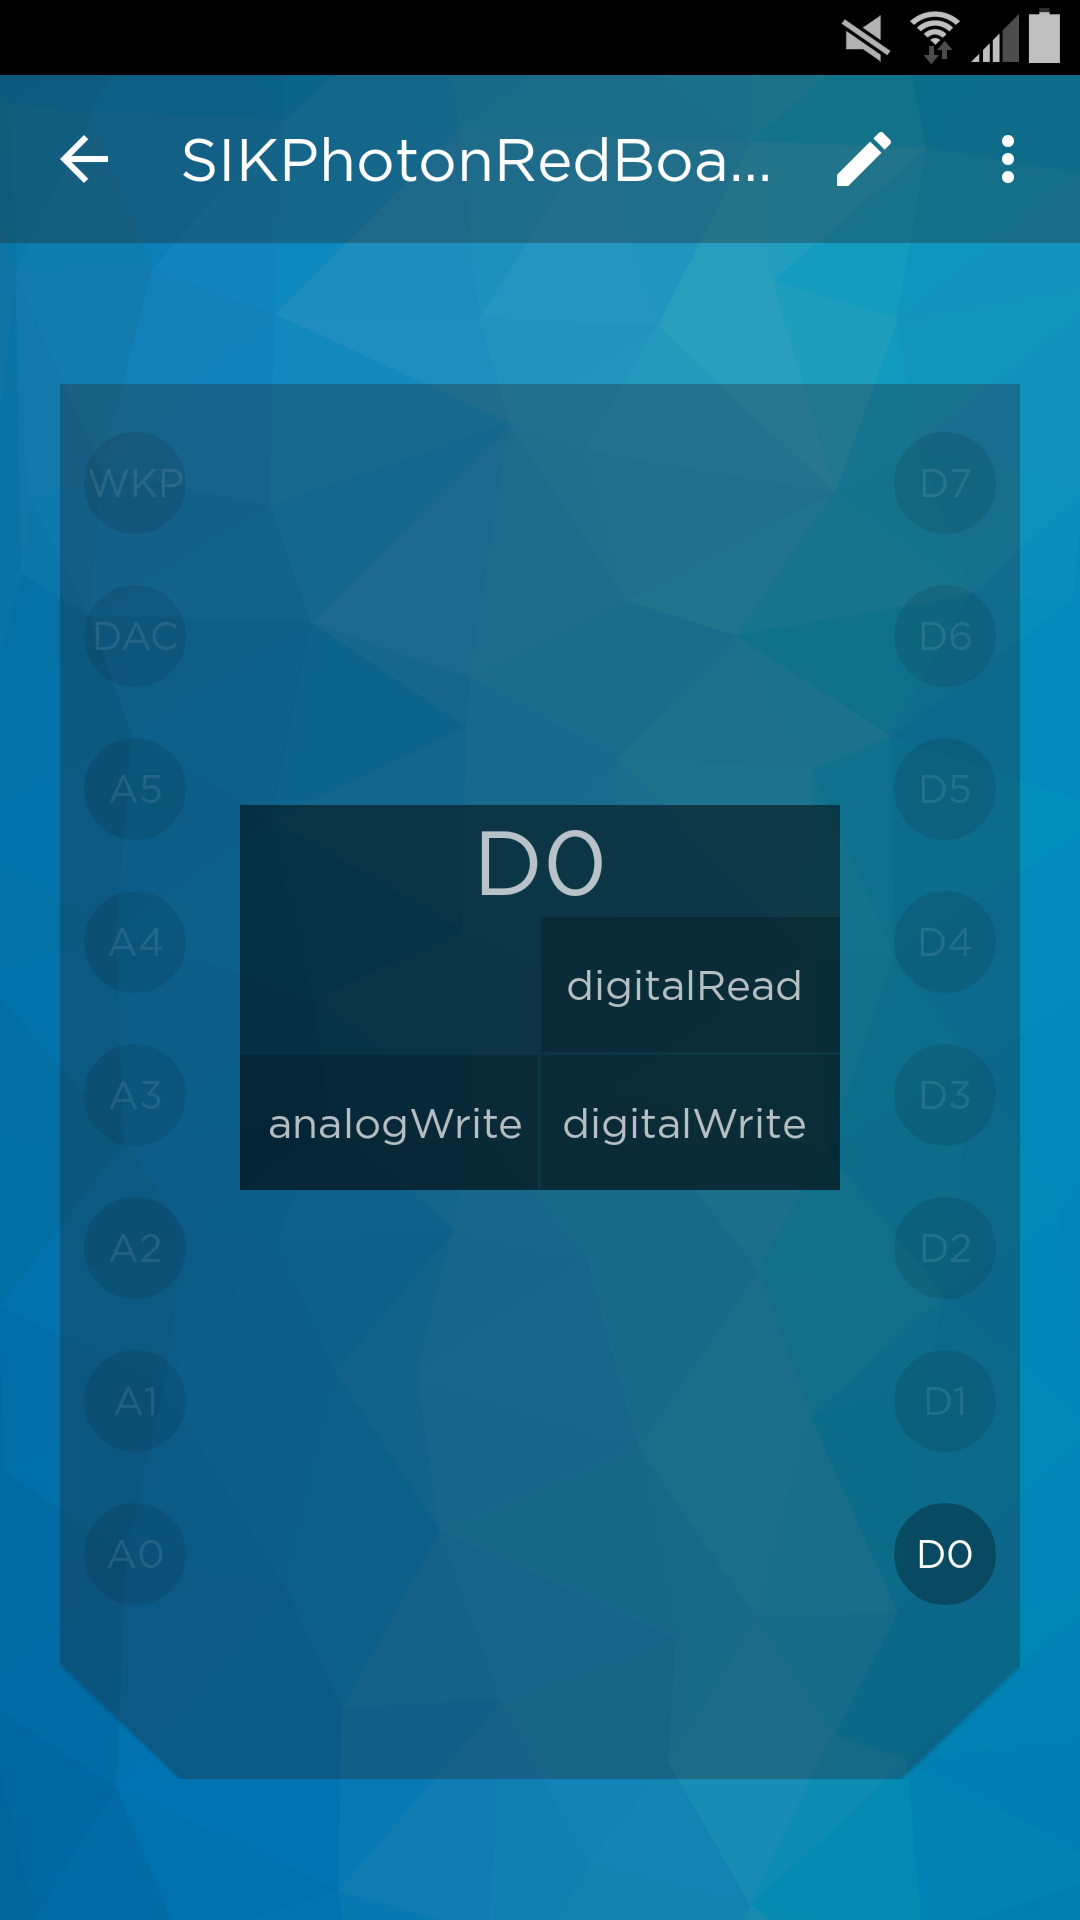
First, click the circle that is label with D0. Anytime you want to work with a pin, you will need to select it first. You can select multiple pins at a time.
You'll notice that you have a couple different options. For this example, we are going to control the LED ON and OFF, by clicking on digitalWrite.
New Photon Code (There is none!)
What is great about this mobile app, you do not have to do any coding! Once you are signed into Tinker, you can start playing with the pins.
What You Should See
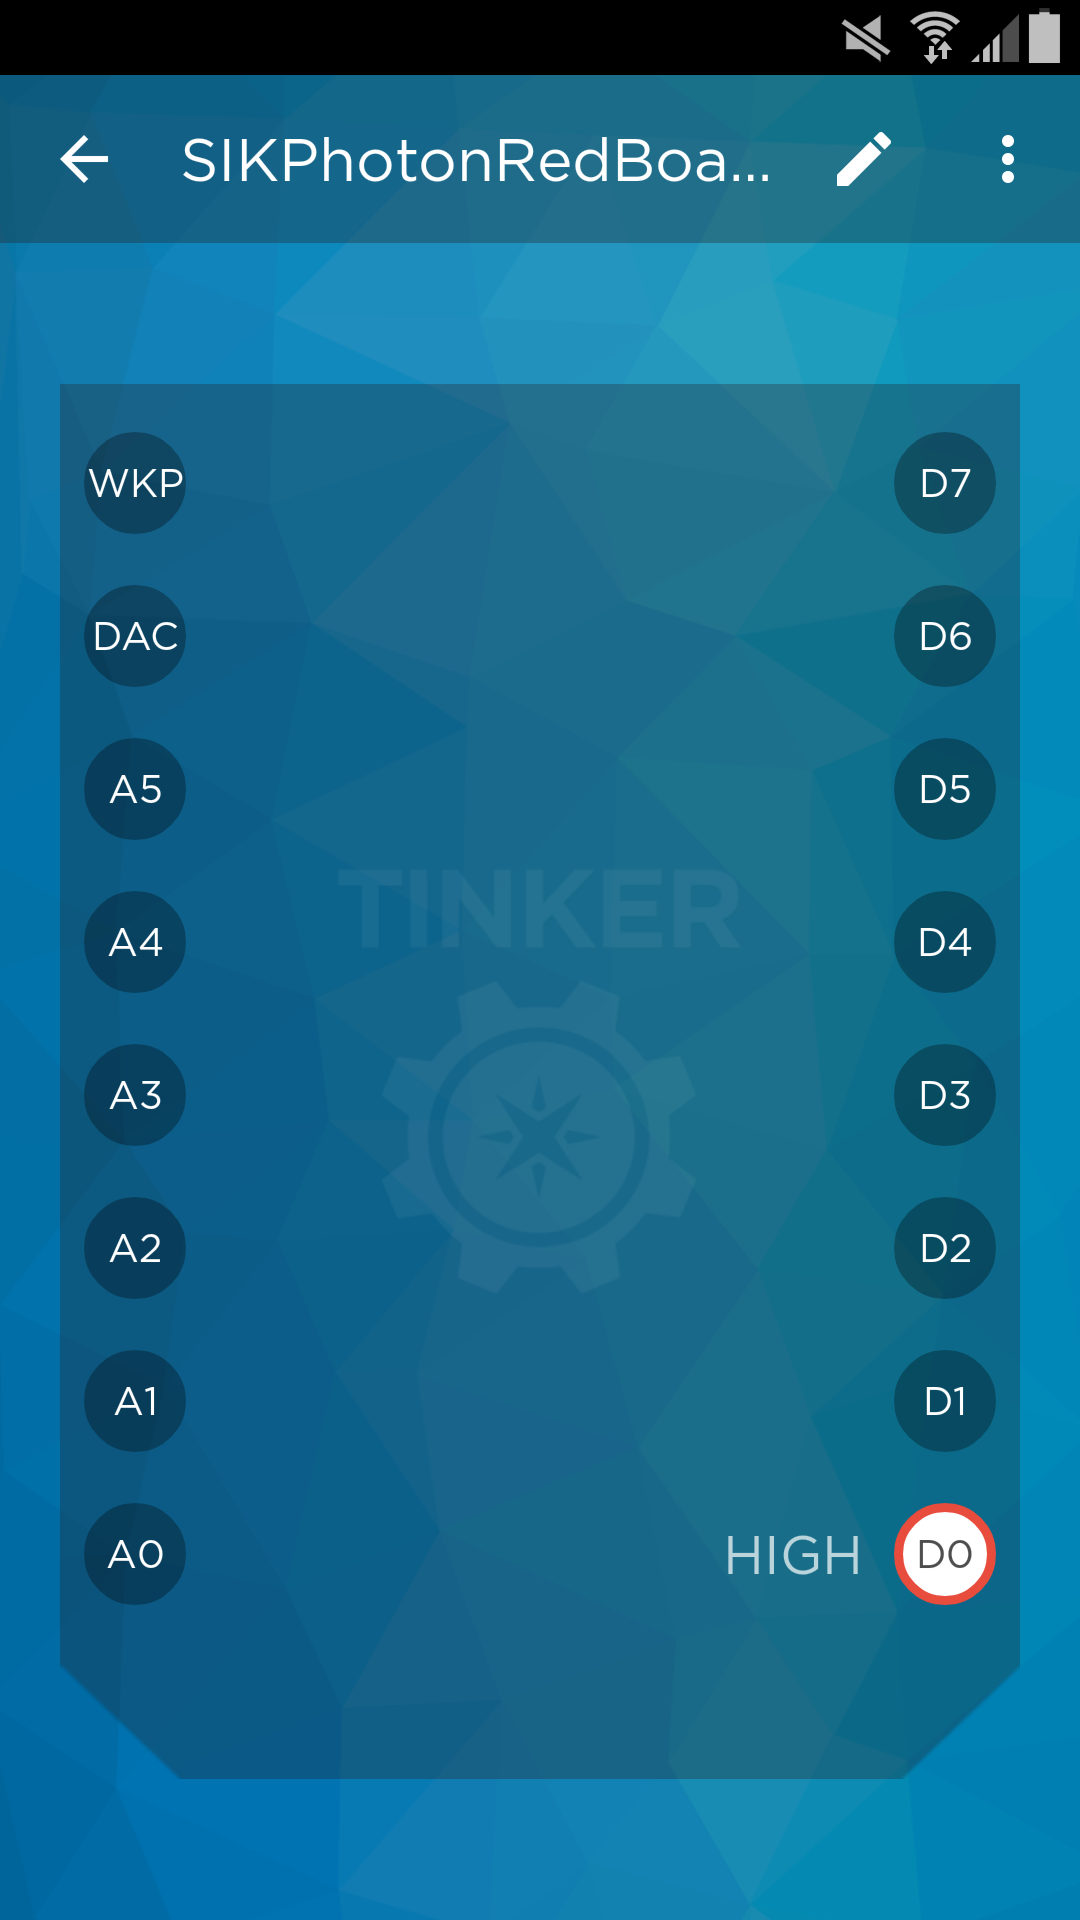
To turn the LED ON/HIGH, click the circle labeled D0 again. It should show the LED turn on.
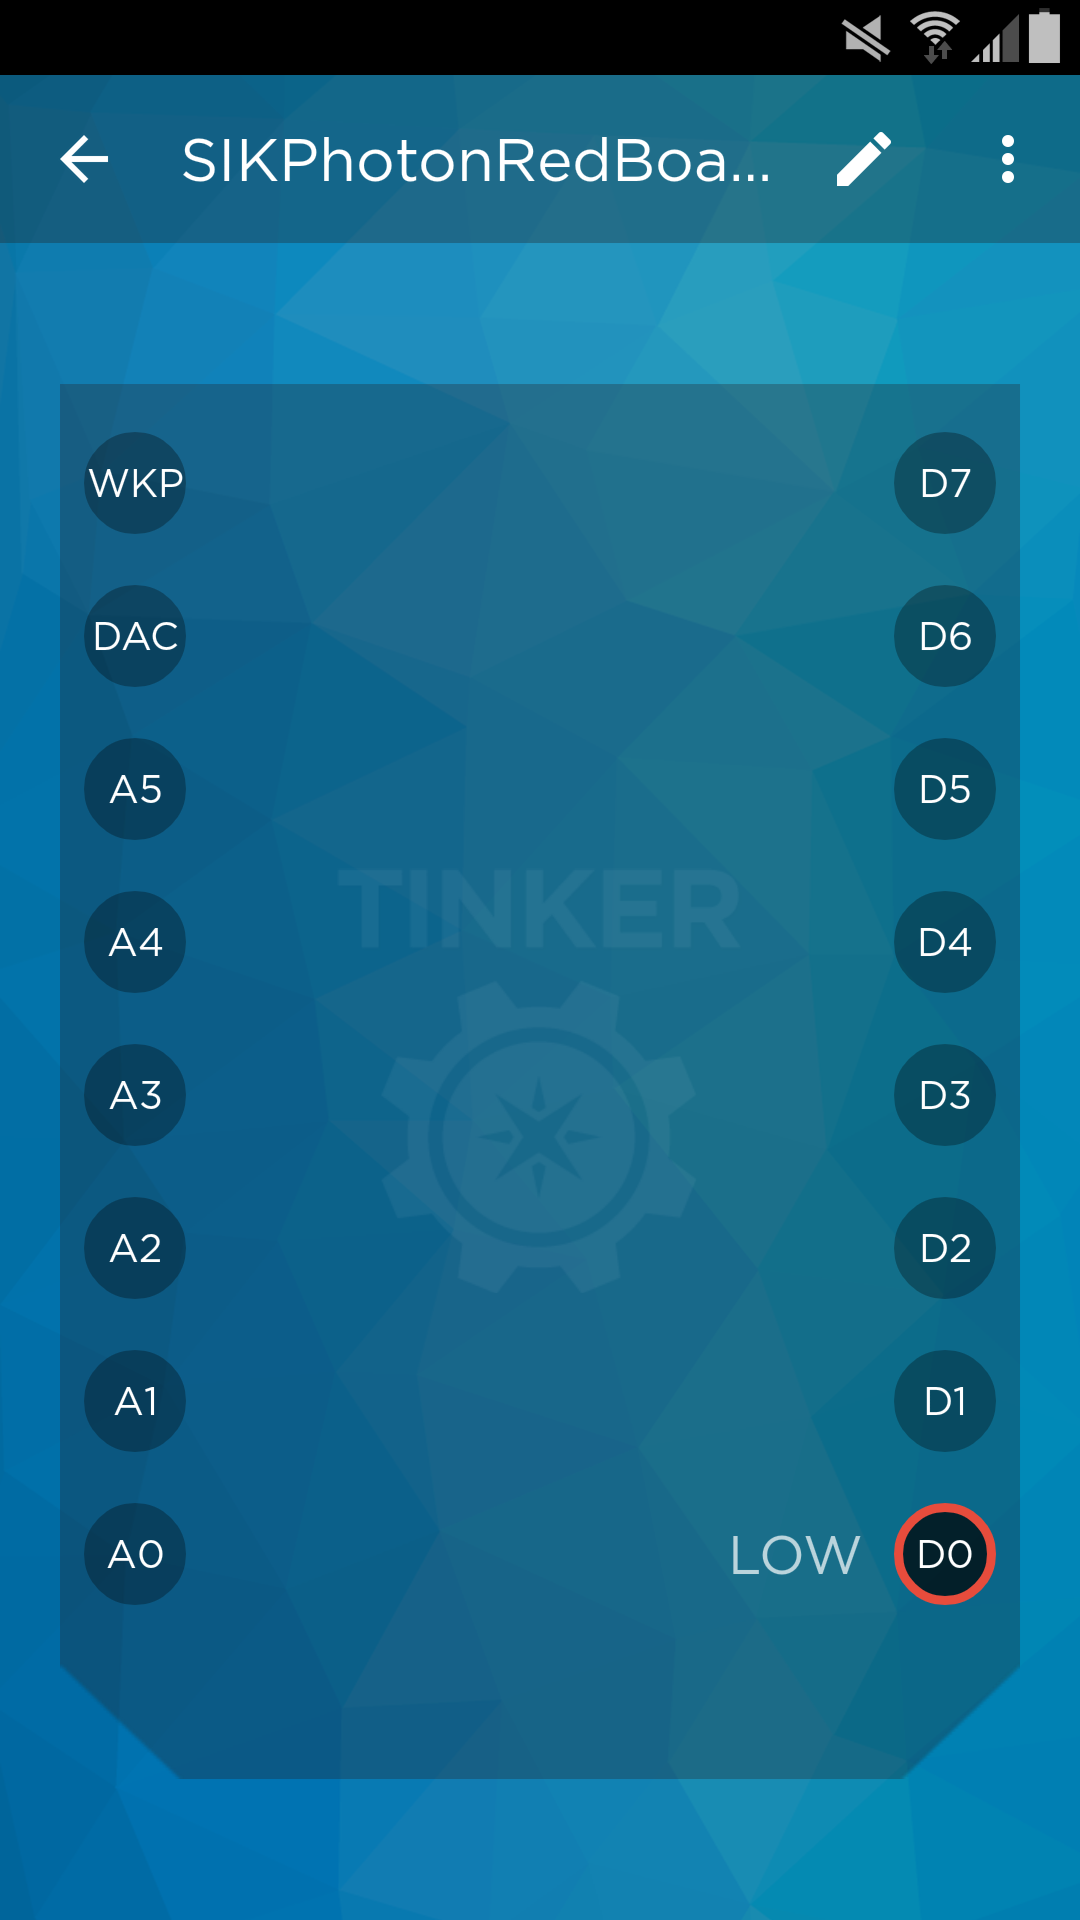
To turn the LED OFF/LOW, click the circle labeled D0 again. It should show the LED turn off.
This is a super fun and easy way to control an LED or any other hardware. To reset all the pins and start fresh, click on the more icon (three dots) on the top right. You will see Reset all pin functions option.
Dig into the app a little bit more! What happens when you click D0 and choose analogWrite? What happens when you select D7 instead? HINT: Take at look at your board!
Troubleshooting
The app froze -- If your app ever stops on you, close out the app and reopen. Report bugs to the wonderful Particle team on their forums.
I have a Windows phone -- Unfortunately, this extra feature is only for iOS and Android devices. Don't worry, this is the only bonus material that uses with the Tinker app.
There is a yellow circle and it says it is non-tinker -- All Photon RedBoards were shipped out with the latest firmware that works with Tinker. If you get the yellow circle, it means the firmware on your RedBoard was re-flashed with old firmware. You will need to flash with the latest firmware. Please follow the directions here for now. We are working with Particle to make sure the Tinker app is pushing the latest firmware when re-flashing.