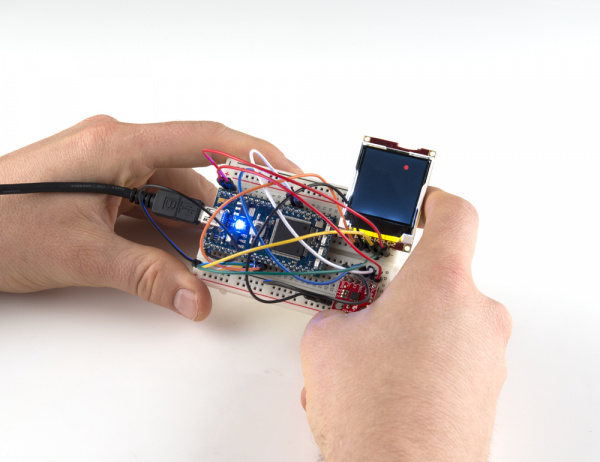
mbed Starter Kit Experiment Guide
This Tutorial is Retired!
This tutorial covers concepts or technologies that are no longer current. It's still here for you to read and enjoy, but may not be as useful as our newest tutorials.
Introduction
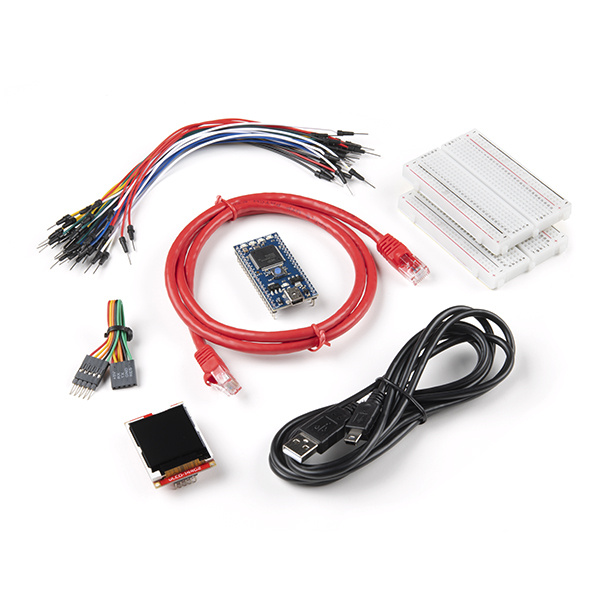
Whether you have just purchased the mbed Starter Kit or you are just checking out this page to see what mbed is all about, you are in for a treat. The mbed platform is a project created by ARM to assist with rapid prototyping on microcontrollers.
SparkFun mbed Starter Kit
KIT-19043Rapid prototyping? Come again?
Yes. Rapid prototyping. ARM has created a system for programming their microcontrollers with ease. This means no more fiddling with expensive and bloated development environments or fussing with confusing programming steps. mbed.org offers an online compiler that handles most of the setup and compiling steps for you.
Don't worry about the specific steps, we will cover them in detail in the first tutorial. By following the next few tutorials, you will become an mbed kung fu master*!
*Disclaimer: Kung fu not an actual part of mbed development.
Overview
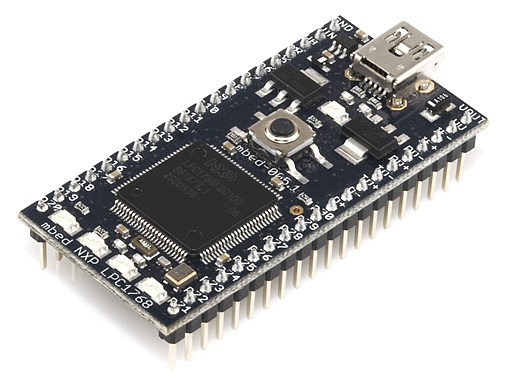
The mbed project actually contains a large variety of mbed platforms. For this kit and the following tutorials, we will be concerned with the LPC1768.
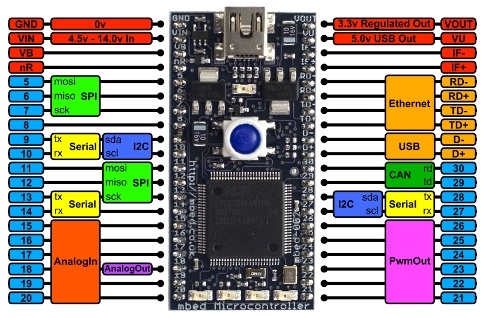
If you have purchased the mbed Starter Kit or the LPC1768, open up the LPC1768 box, and you will find a pinout card. This card is extremely useful for finding out which pins do what on the LPC1768.
Features
Here are the technical specifications of the LPC1768:
- NXP LPC1768 MCU
- ARM® Cortex™-M3 Core
- 96MHz
- 32KB RAM
- 512KB FLASH
- Ethernet, USB Host orDevice, SPI x2, I2C x2, UART x3, CAN, PWM x6, ADC x6, GPIO
- Platform form factor
- 54x26mm
- 40-pin 0.1" pitch DIP package
- 5V USB or 4.5-9V supply
- Built-in USB drag 'n' drop FLASH programmer
Suggested Reading
Table of Contents
Now for the part you have been waiting for. The tutorials! This is where you get to open your mbed kit and play with all those cool parts. You should start with Tutorial #1 in order to get familiar with mbed.org and the programming environment.
 |
Tutorial 1 - Getting Started
We setup the mbed.org development environment and create our first program: Blinky! |
 |
Tutorial 2 - Buttons and PWM
Let's make some light! We use some buttons to control the colors of an RGB LED |
 |
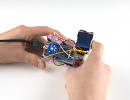
Tutorial 3 - Graphic LCD
The mbed kit includes a 1.44" LCD that we can make do cool things. We learn how to draw text and shapes on the LCD. |
 |
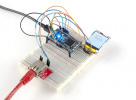
Tutorial 4 - Accelerometer
Now we start to pick things up. Literally. Using the accelerometer, we can interact with the mbed by tilting it in different directions. |
 |
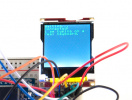
Tutorial 5 - Internet Clock
The LPC1768 has the ability to connect to the Internet. Using an Ethernet cable, we can read the current time from an Internet server and display the time on our LCD. |
 |
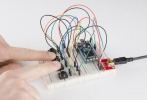
Tutorial 6 - USB Host and Threading
Our mbed board can act like a USB host. This means that we can connect things like keyboards to it. |
 |
Tutorial 7 - USB Device
In addition to acting like a USB host, the mbed can also act like a USB device! This means that we can have it control the mouse pointer on our computer, for example. |
 |
Tutorial 8 - Temperature Logging
Want to see how the temperature varies over time in an area? We connect a temperature sensor and an SD card to the mbed to log temperature measurements. |
 |
Tutorial 9 - PWM Sounds
Let's make some music! We can use pulse-width modulation (PWM) to control sounds out of a speaker or set of headphones. |
 |
Tutorial 10 - Hardware Soundboard
In the final project, we load some sound clips onto our SD card and use the mbed to play one whenever we push a button. |
Experiment 1: Blink an LED
Welcome to the world of mbed! In the following series of tutorials, we will show you how to configure your mbed.org account, connect some hardware, and program your mbed controller to do some cool things. Each tutorial will list the required components, but if you are just starting out with mbed, we recommend you get the mbed Starter Kit, which will provide all the necessary hardware to complete the tutorials.
In this tutorial, we will unbox the mbed LPC1768, connect it to our computer, configure our mbed.org profile, and write our first blinking LED program.
Account Setup
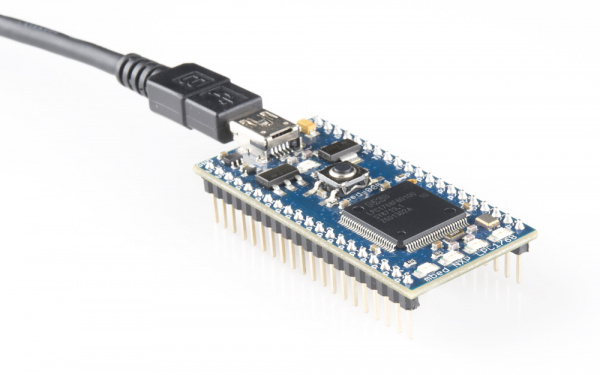
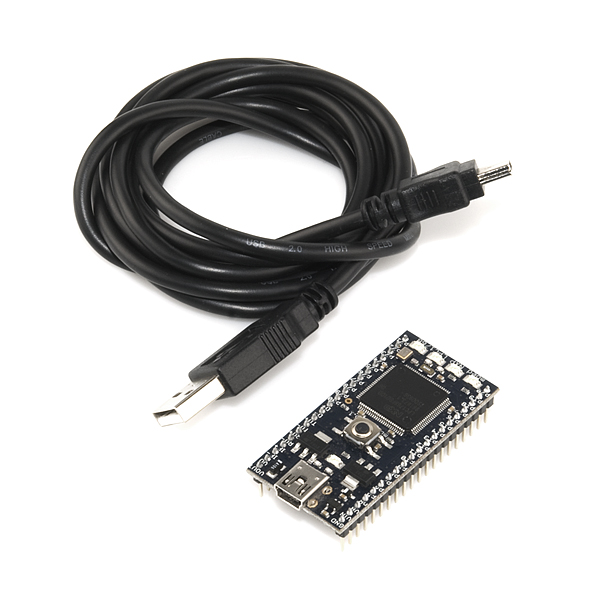
For this first tutorial, we will be using the LPC1768 and the USB mini-B cable. So, open your mbed NXP LPC1768 box and remove the LPC1768 controller and USB cable.
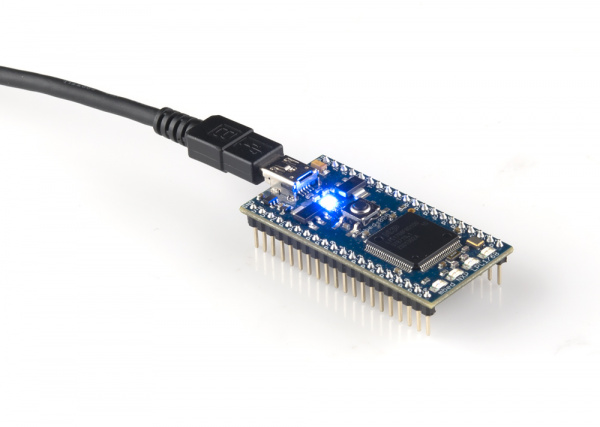
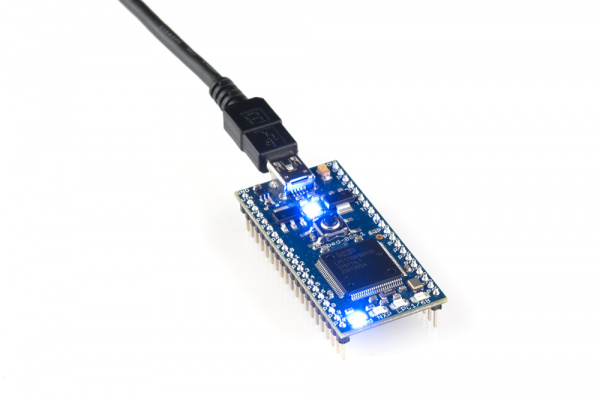
Plug one end of the USB cable into the LPC1768 and the other end into your computer. The blue power LED should light up.
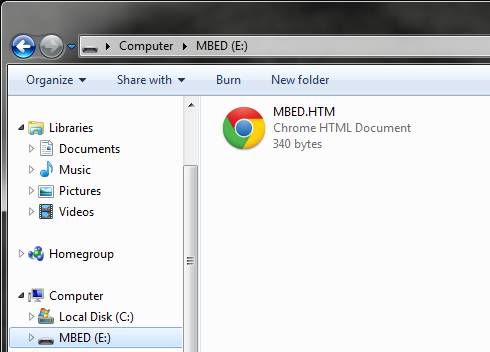
After a few seconds, your computer should recognize the mbed controller as a standard USB drive. Open up a Windows Explorer (Windows) or Finder (OS X) and navigate to the mbed drive.
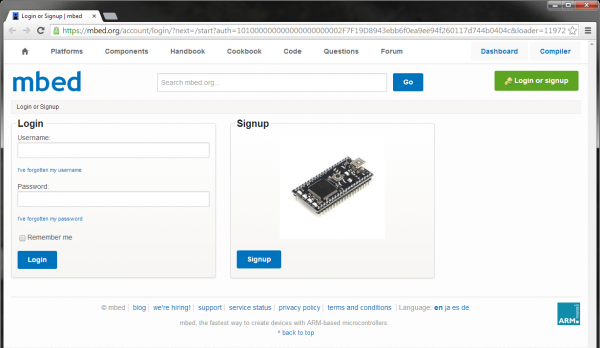
Double-click on the MBED.HTM link, which should open up a webpage that asks you to create a new mbed account.
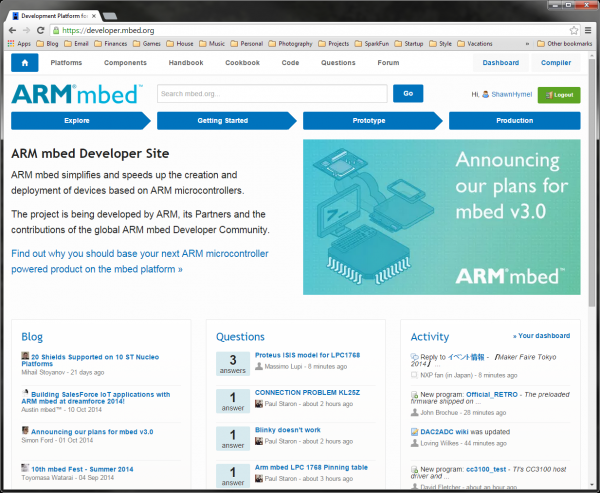
Click "Signup" and follow the prompts to create a new mbed.org account. Once you have created an account, navigate to developer.mbed.org.
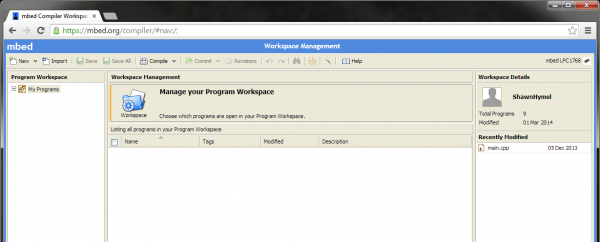
Click on "Login or signup" if you are not already signed in. Once signed in, click on "Compiler" in the top right. You will be presented with mbed's online compiler.
The Code
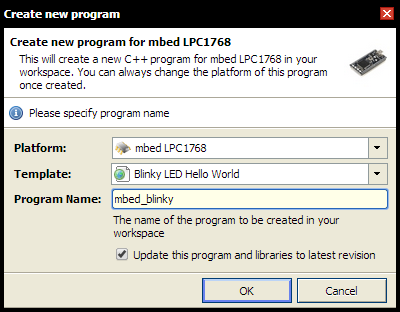
In the upper-left corner of the mbed Compiler, select "New" and then "New Program."
You will see a prompt appear asking you to name your new program. Make sure that "Blinky LED Hello World" is selected for your Template and that "mbed_blinky" is set as your Program Name.
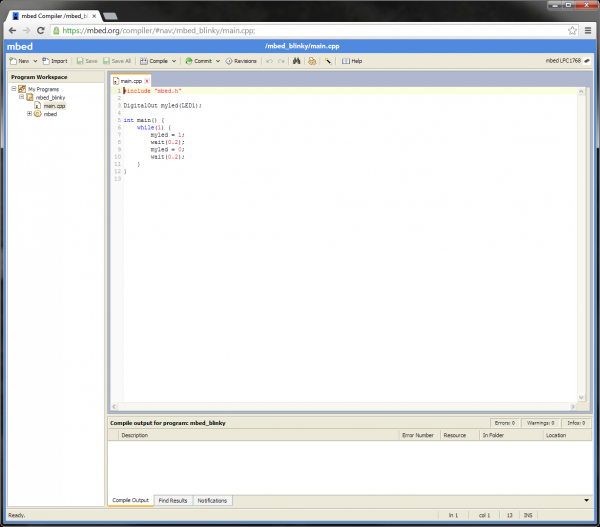
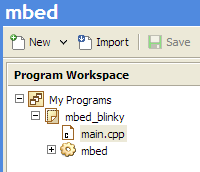
Click "OK" and you will see your new program appear in your workspace.
Click on "main.cpp" in the pane on the left side to open up our C++ program.
The code imports the mbed.h library, configures the pin for the LPC1768's onboard LED to output, and blinks the LED forever. It has been copied here for reference.
language:c
#include "mbed.h"

DigitalOut myled(LED1);

int main() {
    while(1) {
        myled = 1;
        wait(0.2);
        myled = 0;
        wait(0.2);
    }
}
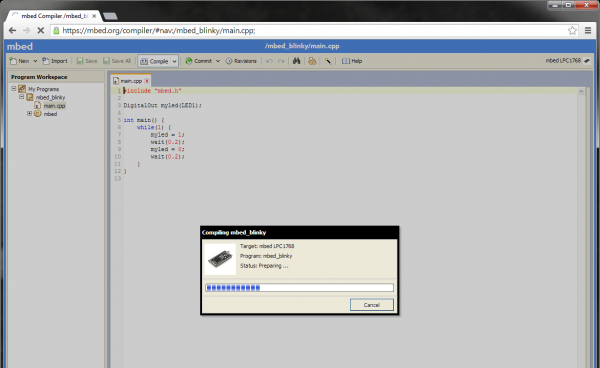
On the top bar, click "Compile."
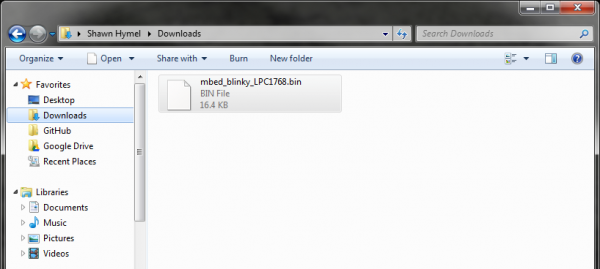
This will start the compile process and download the program as a binary file. Depending on your browser settings, this might be automatically downloaded. If you are asked where to download the file, choose your default Downloads folder.
Open up an Explorer (or Finder on OS X) window and navigate to your Downloads folder. You will see your blinky program as a .bin file.
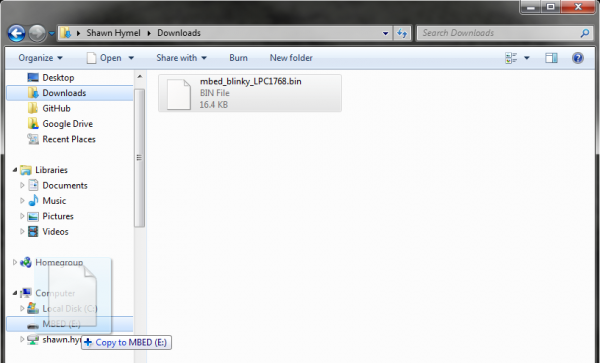
Copy the .bin file to your MBED drive.
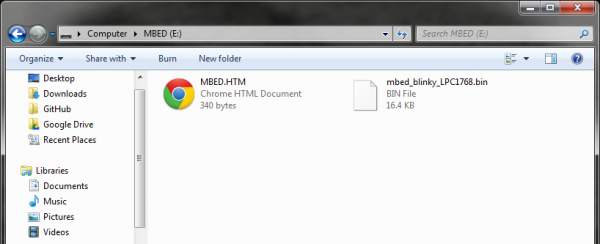
If you look in the MBED drive, you should see two files: the original MBED.HTM link and your new blinky program.
Without disconnecting the USB cable, press the button in the middle of the LPC1768. You should see the bottom left LED begin to flash off and on. The blinking LED shows that your code is running!
Concepts
This is our first program with the mbed, so we should talk about what is going on.
Setup and Loop
If you have used Arduino in the past, it might come as a surprise that you were writing code in a language very close to C and C++. One thing you should be aware of is that Arduino wraps up the setup and loop stages into nice functions for you. For example, you might see this in Arduino:
language:c
void setup() {

    // Your setup code goes here

}

void loop() {

    // Your loop code goes here

}
In Arduino, the setup code runs once, and the loop code runs forever.
In mbed (and most other embedded systems), we must create our own setup and loop sections within main(). Every C and C++ program must have a main() function, as this is the entry point for the program (i.e. this is where the program begins execution when you run it).
Using our concepts of setup and loop, this is what the basic template looks like in mbed:
language:c
int main() {

    // Your setup code goes here

    while(1) {

        // Your loop code goes here

    }
}
Much like in the Arduino example, the program executes the setup code once (as soon as it enters the main() function) and executes the loop code forever. Notice that we explicitly put the loop code inside of a while loop. It is possible to make the while loop exit, and the program would stop running. You would need to reset the microcontroller to restart the program.
Header Files
The very first line in our blinky program is
language:c
#include "mbed.h"
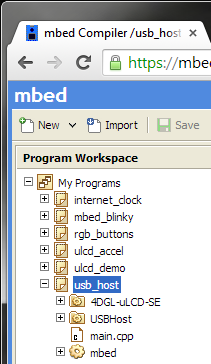
This tells the compiler to include (i.e. copy into our program) a separate file (mbed.h in this case) when we compile. mbed.h is a header file that declares a set of functions, constants, classes, etc. for our use. Many times, the implementation of these functions, constants, classes, etc. are defined in a separate library, and the header file provides an interface. As long as we include the header file and the header file and library are in our search path (for our mbed programs, just make sure that the library is copied into our project directory - shown by the little gear icon in this example), we can use the functions, constants, classes, etc. listed in the header file.
Going Further
This is just the beginning! You got a taste of the mbed Compiler and built your first program. Now that you understand how to use the mbed Compiler, we will move on to more advanced topics and show you how to connect other pieces of hardware to make the LPC1768 do fun and interesting things.
Beyond the Tutorial
- Can you make the LED blink slower?
- Can you make another LED blink?
- Can you make an LED blink exactly 10 times and then stop? (Hint: the while(1) loop continues forever. How would you modify that to stop after 10 times?)
Digging Deeper
Experiment 2: Buttons and PWM
Now that you have had a chance to set up your mbed account and blink an LED, we will move on to simple human interaction: pushbuttons! In this tutorial, we add 3 pushbuttons to the LPC1768 and use them to control the colors in an RGB LED.
The Circuit
This circuit can be made with parts in the SparkFun mbed Starter Kit. Also, keep in mind that the LPC1768 box contains a USB mini-B cable for programming and power.
Parts List
To follow this experiment, you would will need the following materials if you did not order the SparkFun mbed starter kit. You may not need everything though depending on what you have. Add it to your cart, read through the guide, and adjust the cart as necessary. The experiment will be using 3x 330Ohm and 3x 10kOhm resistors.
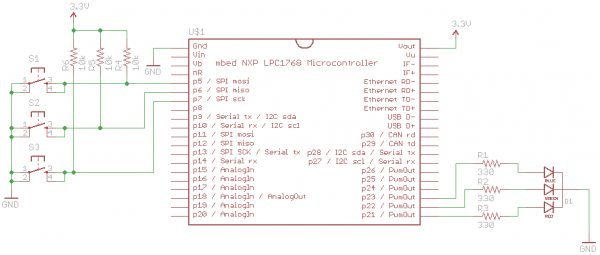
Schematic
Connections
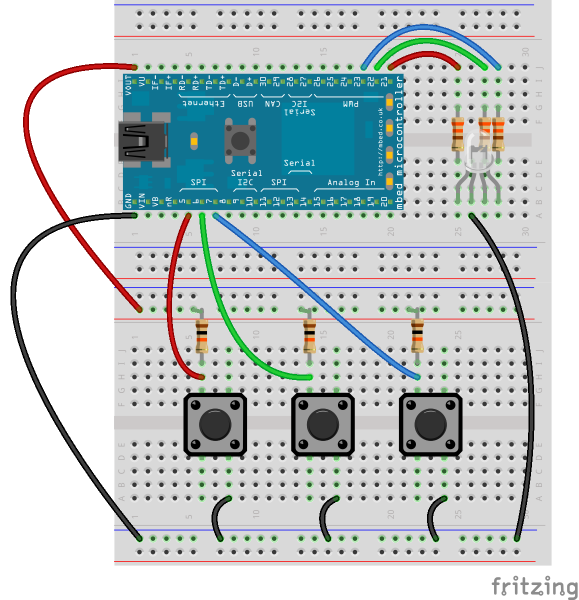
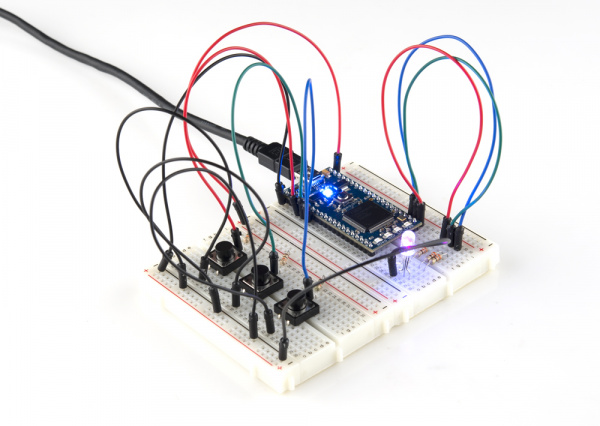
Connect the LPC1768 to the buttons and LED in the following fashion.
| Polarized Components | Pay special attention to the component’s markings indicating how to place it on the breadboard. Polarized components can only be connected to a circuit in one direction. Polarized components are highlighted with a yellow warning triangle in the table below. |
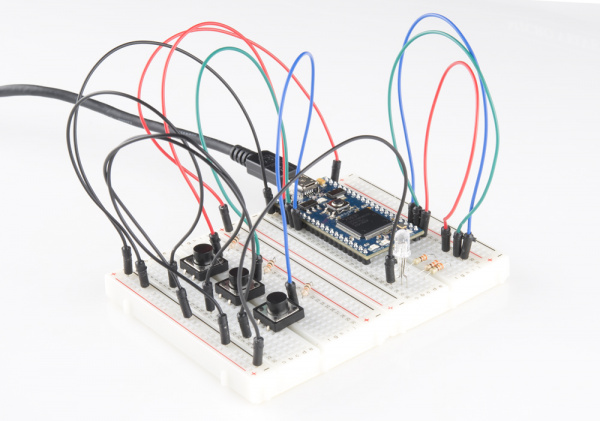
Fritzing Diagram
Note that the colors of the wires do not matter. Feel free to use any color you like! Do not worry if your kit does not have 5 black wires.
Hookup Table
Place the LPC1768 in the first breadboard with pin VOUT in position i1 and pin 20 in position b20.
Connect the rest of the components as follows:
| Component | Breadboard 1 | Breadboard 2 | ||||||
|---|---|---|---|---|---|---|---|---|
| RGB LED | b25 (RED) | b26 (GND) | b27 (GREEN) | b28 (BLUE) | ||||
| 330 Resistor | e25 | g25 | ||||||
| 330 Resistor | e27 | g27 | ||||||
| 330 Resistor | e28 | g28 | ||||||
| Pushbutton | d6 | d8 | g6 | g8 | ||||
| Pushbutton | d14 | d16 | g14 | g16 | ||||
| Pushbutton | d22 | d24 | g22 | g24 | ||||
| 10k Resistor | i6 | ( + ) | ||||||
| 10k Resistor | i14 | ( + ) | ||||||
| 10k Resistor | i22 | ( + ) | ||||||
| Jumper Wire | j1 | ( + ) | ||||||
| Jumper Wire | a1 | ( - ) | ||||||
| Jumper Wire | a5 | h6 | ||||||
| Jumper Wire | a6 | h14 | ||||||
| Jumper Wire | a7 | h22 | ||||||
| Jumper Wire | j20 | j25 | ||||||
| Jumper Wire | j19 | j27 | ||||||
| Jumper Wire | j18 | j28 | ||||||
| Jumper Wire | a26 | ( - ) | ||||||
| Jumper Wire | a8 | ( - ) | ||||||
| Jumper Wire | a16 | ( - ) | ||||||
| Jumper Wire | a24 | ( - ) | ||||||
Tips
Pushbuttons
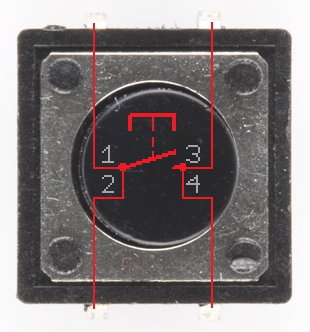
The leads across each other on the pushbuttons are always connected to each other. The leads on the same side are only connected when button is pressed.
LED
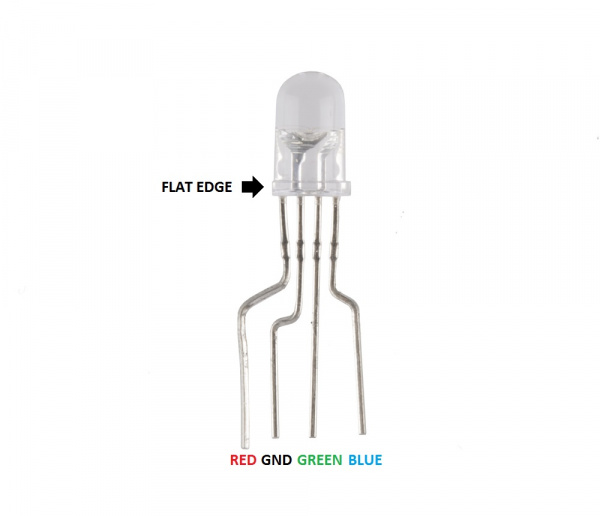
You can use a set of needle nose pliers to bend the LED's leads and a pair of cutters to fit the LED in the breadboard. Note that there is a flat side on the plastic ring around the bottom of the LED. This denotes the side with the pin that controls the red color. See this tutorial to learn more about polarity.
Resistors
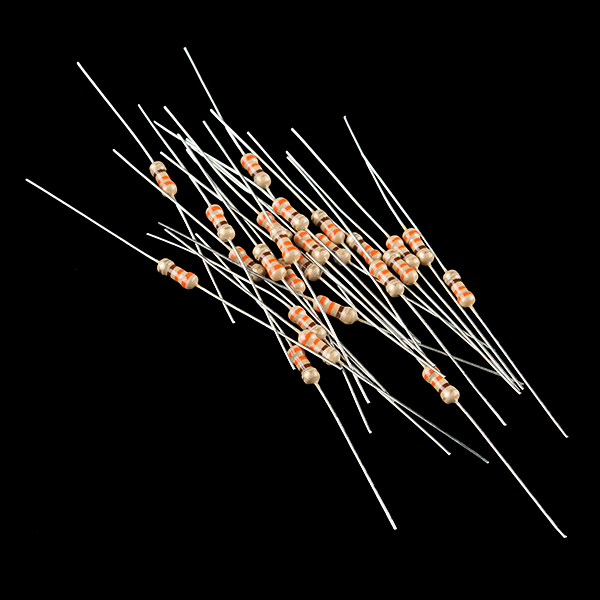
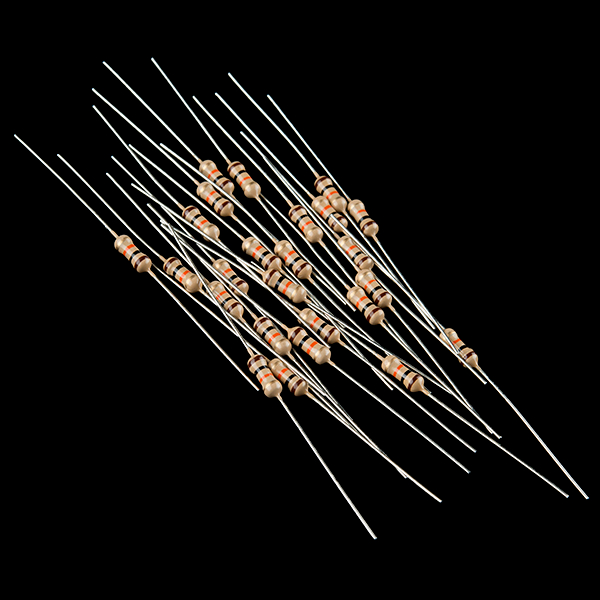
330 ohm resistors are given by the color code "orange orange brown."
10k ohm resistors are given by the color code "brown black orange."
The Code
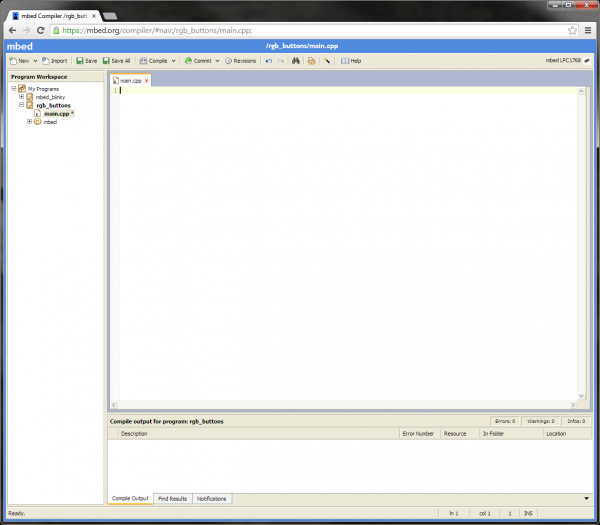
If you have not done so already, sign into your mbed.org account. Go to the Compiler and create a new program. Leave the template as "Blinky LED Hello World" and give it a name such as "rgb_buttons." Click OK and wait for your new program to be created.
Once that is done, click "main.cpp" under your project folder (e.g. "rgb_buttons") in the left "Program Workspace" pane. Delete all of the code in main.cpp so you are left with a blank project (we still want to use the "Blinky LED Hello World" template, as it automatically links "mbed.h" for us).
Program
Copy the following code into main.cpp of your rgb_buttons project.
language:c
#include "mbed.h"

// Define buttons
InterruptIn button_red(p5);
InterruptIn button_green(p6);
InterruptIn button_blue(p7);

// Define LED colors
PwmOut led_red(p21);
PwmOut led_green(p22);
PwmOut led_blue(p23);

// Interrupt Service Routine to increment the red color
void inc_red() {

    float pwm;

    // Read in current PWM value and increment it
    pwm = led_red.read();
    pwm += 0.1f;
    if (pwm > 1.0f) {
        pwm = 0.0f;
    }
    led_red.write(pwm);
}

// Interrupt Service Routine to increment the green color
void inc_green() {

    float pwm;

    // Read in current PWM value and increment it
    pwm = led_green.read();
    pwm += 0.1f;
    if (pwm > 1.0f) {
        pwm = 0.0f;
    }
    led_green.write(pwm);
}

// Interrupt Service Routine to increment the blue color
void inc_blue() {

    float pwm;

    // Read in current PWM value and increment it
    pwm = led_blue.read();
    pwm += 0.1f;
    if (pwm > 1.0f) {
        pwm = 0.0f;
    }
    led_blue.write(pwm);
}

// Main loop
int main() {

    // Initialize all LED colors as off
    led_red.write(0.0f);
    led_green.write(0.0f);
    led_blue.write(0.0f);

    // Define three interrupts - one for each color
    button_red.fall(&inc_red);
    button_green.fall(&inc_green);
    button_blue.fall(&inc_blue);

    // Do nothing! We wait for an interrupt to happen
    while(1) {
    }
}
Run
Click the "Compile" button to download a binary file with your compiled program. Copy that file to the LPC1768. You can choose to delete the previous mbed_blinky_LPC1768.bin or just leave it there. If you have more than one .bin file on the mbed when you press the restart button, the mbed will choose the newest file to load and run.
Press the LPC1768's restart button. You should be able to press any of the 3 buttons on your breadboard to increment the red, green, and blue intensity of the LED. Note that when you reach the maximum brightness, the intensity resets to 0.
Concepts
What is going on in our program? We should understand a few concepts about our seemingly simple RGB LED and button program that are crucial in embedded systems.
Pull-up Resistors
We use 10kΩ pull-up resistors to prevent shorting 3.3V to ground whenever we push one of the buttons. Additionally, the pull-up resistors on the microcontroller (LPC1768) pin holds the pin at 3.3V by default until the button is pushed. Once pushed, the line is pulled down to ground, so the pin goes from 3.3V to ground. We can use that falling edge (3.3V to 0V) to trigger an interrupt within the microcontroller. To learn more about pull-up resistors, see our tutorial here.
Functions
If you are not familiar with C syntax, you might want to brush up on some of the basics.
In the above code, we created 3 functions: inc_red(), inc_green(), inc_blue(). Functions generally perform some action when called, and replace the much-maligned GOTO statement. They also allow us to re-use code without having to copy-and-paste sections of code over and over again.
Each time we call one of the functions (e.g. inc_green()), the lines of code within that function are called, and then the function exits, returning program execution to just after the function call.
Notice that we placed the three functions above main(). When the compiler looks at the code, it needs to have functions declared before they are used in the code (within main() in this case).
If you put main() before the functions, you would get a compiler error. That's because the compiler does not know what int_red(), etc. are when it sees them in main(). Try it!
Objects
We are using C++ to write all of our programs. If you have never used C++ before, the syntax might appear a bit foreign. We recommend reading about some basic C++ syntax first.
In the program, we create objects for each of our buttons and LEDs. For example:
language:c
InterruptIn button_red(p5);
and
language:c
PwmOut led_red(p21);
button_red is an instance of class InterruptIn. Think of a class as a "blueprint" that lets us create any number of instances (i.e. objects). Each instance is tied to a variable (e.g. button_red). In this case, button_red is an InterruptIn object.
Objects have special properties that let us call functions within that object (called "member functions") and manipulate data stored in the object (data in objects is stored as "data members"). For example, we create a PwmOut object named led_red. Later in the code, we call the member function led_red.write(0.0f), which tells the led_red object to perform some action (change the PWM of the associated pin in this case - see PWM below!).
We pass in the parameter p5 (a special variable known to the mbed compiler - it points to the location of pin 5 in software) when we create an InterruptIn object. This tells the mbed which pin to bind the interrupt to.
Now that we have created an InterruptIn object, we can call member fucntions within that object. The InterruptIn class defines a fall() member function, which allows us to set a function to be called whenever a HIGH-to-LOW transition occurs on the pin (pin 5 in this case).
language:c
button_red.fall(&inc_red);
Note that the '&' symbol is used to indicate the address of the inc_red function.
Interrupts
Interrupts are an integral part of embedded systems and microcontrollers. Most programs that you might be used to run sequentially, meaning that the program executes each line in order (and jumps or loops where necessary). In contrast, many microcontrollers rely on subroutines known as "Interrupt Service Routines" to handle external and internal events.
In our mbed program, we "attach" an interrupt to our button pins and tie this interrupt to a function call (e.g. inc_red()). The line
button_red.fall(&inc_red);
says that whenever we see a falling digital signal (i.e. from 3.3V to 0V), we must stop whatever we were doing and execute the function inc_red(). This is similar to callbacks often found in programming but can be tied to external (i.e. outside the microcontroller) events.
YouTube user Patrick Hood-Daniel offers a great explanation of interrupts and some example code in a different microcontroller (Atmel AVR ATmega32):
PWM
To control the brightness of the LEDs, we do not vary the current going into the LED. Rather, we rapidly turn the LED off and on to give the appearance of a dimmer LED. This is known as "Pulse-Width Modulation" (PWM). Note that we are flipping the LED off and on so fast that generally our eyes cannot see the flickering.
We adjust the "duty cycle" of this flipping process in order to control the brightness. Duty cycle just refers to how long our LED stays on in relation to how long it stays off.
The higher the duty cycle (e.g. 75% in the image above), the brighter the LED will appear to be. At lower duty cycles (e.g. 25%) the LED will hardly appear to be on. For a full tutorial on PWM, see Pulse-width Modulation.
In our rgb_buttons program, we use mbed's built-in PwmOut object to control PWM on several of the LPC1768 pins. We can read the PWM value with the .read() method and set a new PWM value with .write(). We use a floating point number to specify the duty cycle. This can be between 0.0 (0% duty cycle) to 1.0 (100% duty cycle).
Going Further
We've covered three important concepts in this tutorial: user input with buttons (using pull-up resistors), interrupts, and PWM. If these topics provide some confusion, feel free to read through the "Digging Deeper" section to learn more about these topics in greater detail.
Beyond the Tutorial
- See how the LED changes when you press a button down? Can you make it so that the LED changes when you release a button?
- Since we are using interrupts, our while(1){} loop is empty. Make something happen while waiting for a button push! For example, flash another LED in that while loop.
- Can you re-create the functionality of the program without using any interrupts?
- You might notice that the LED changes accidentally sometimes when you release a button. This is caused by a phenomenon known as contact bounce. Can you create a way to remove contact bounce (known as "debouncing")? This can be done in hardware or software.
Digging Deeper
- If you are not familiar with C++, you may want to read up on Object Oriented Programming
- It might also be a good idea to brush up on C syntax and C++ syntax
- Read about pull-up resistors
- Read about embedded interrupts and about mbed's interrupt handling
- Read about pulse-width modulation and about how mbed built-in PWM features
Experiment 3: Graphic LCD
Let's make some graphics! In this tutorial, we walk you through connecting your Serial Miniature Graphic LCD to the mbed LPC1768 and making some shapes and text. This tutorial is important as we will use the LCD in the next few tutorials, so pay close attention!
Suggested Reading
The Circuit
This circuit can be made with parts in the SparkFun mbed Starter Kit. Also, keep in mind that the LPC1768 box contains a USB mini-B cable for programming and power.
Parts List
To follow this experiment, you would will need the following materials if you did not order the SparkFun mbed starter kit. You may not need everything though depending on what you have. Add it to your cart, read through the guide, and adjust the cart as necessary.
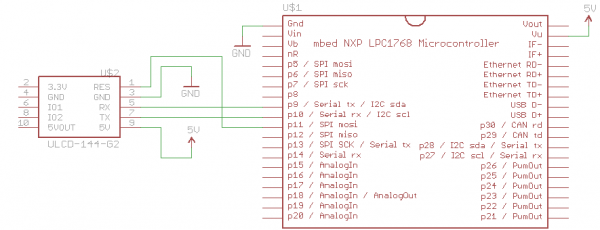
Schematic
Connections
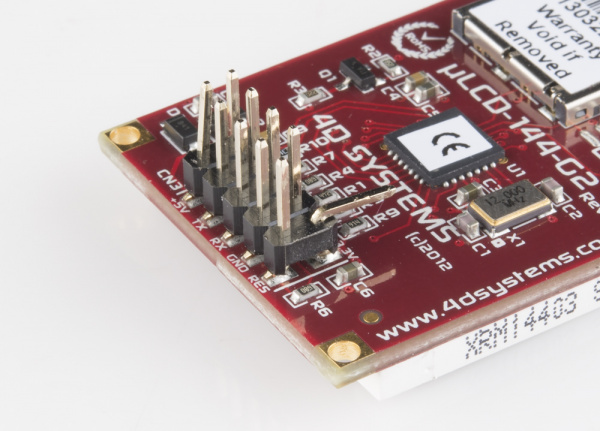
Before connecting the LCD to your breadboard, we recommend you carefully bend the 3.3V pin on the LCD back so that it does not short to the RESET pin. This can be accomplished with a set of needle nose pliers. You will likely never need 3.3V from the LCD, as you can get 3.3V from the VOUT pin on the LPC1768. The other pins in the second row can be shorted to pins in the first row and not affect the LCD's operation.
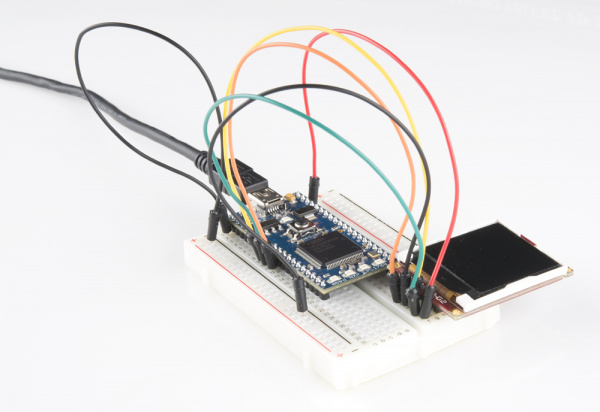
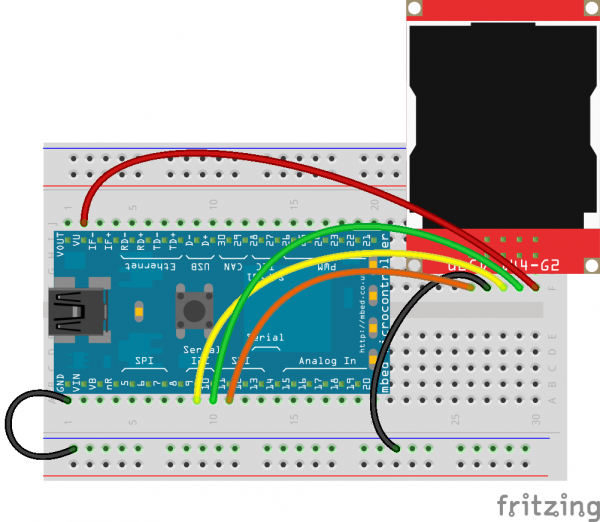
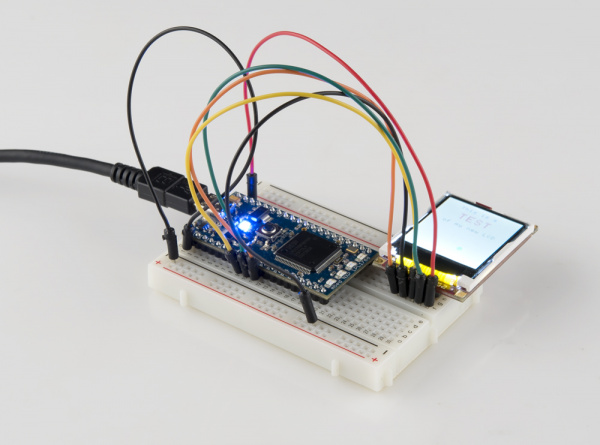
Plug the LCD into your breadboard and connect it to the LPC1768 as shown.
Fritzing Diagram
Hookup Table
Place the LPC1768 in a breadboard with pin VOUT in position i1 and pin 20 in position b20.
Connect the rest of the components as follows:
| Component | Breadboard | ||||
|---|---|---|---|---|---|
| uLCD-144-G2* | h26 (RES) | h27 (GND) | h28 (RX) | h29 (TX) | h30 (+5V) |
| Jumper Wire | j2 | f30 | |||
| Jumper Wire | a1 | ( - ) | |||
| Jumper Wire | a9 | f28 | |||
| Jumper Wire | a10 | f29 | |||
| Jumper Wire | a11 | f26 | |||
| Jumper Wire | ( - ) | f27 | |||
* Pins not listed are not used.
The Code
For this tutorial, we will be using an mbed library. Libraries can be found under the Handbook for official, mbed-supported libraries or the Cookbook for user-created mbed libraries.
Libraries
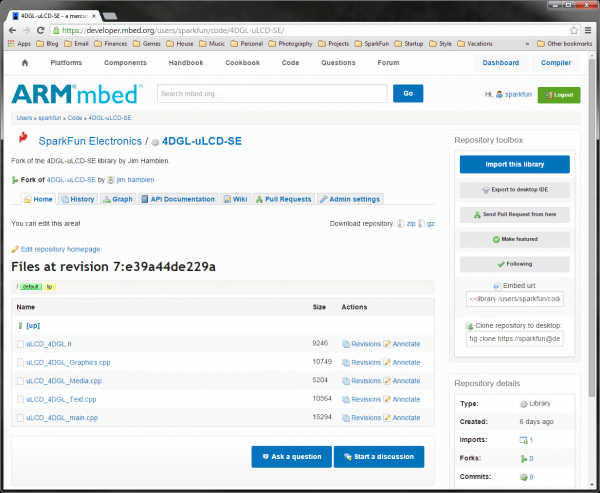
mbed.org user Jim Hamblen modified a 4D LCD library to work with our uLCD-144-G2. We copied (also known as "forked") his library for use in this tutorial.
Go to mbed.org and sign in to your account.
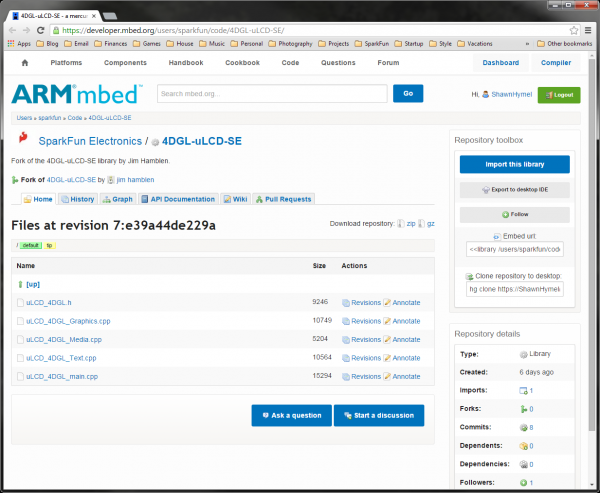
Navigate to the mbed 4DGL-uLCD-SE library page.
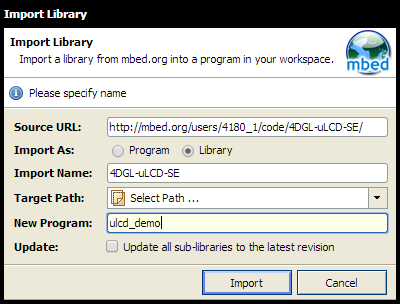
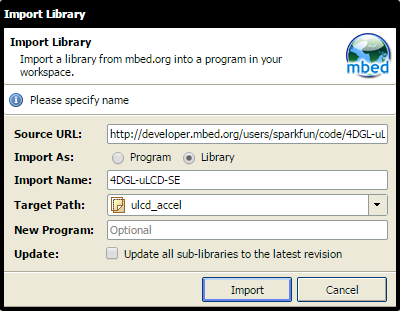
Click "Import this library" on the right side of the page. You will be brought to the mbed Compiler and asked to import the library. Fill in a program name (e.g. "ulcd_demo") for "New Program" and click "Import."
Since the import process imported only the 4DGL-uLCD-SE library, we need to add the mbed library.
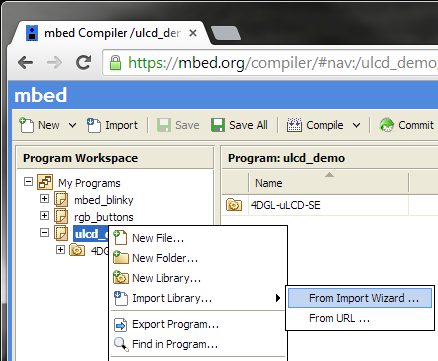
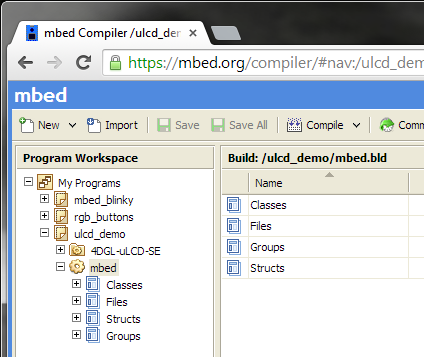
In the Compiler, right-click on the "ulcd_demo" project, highlight "Import Library..." and select "From Import Wizard..."
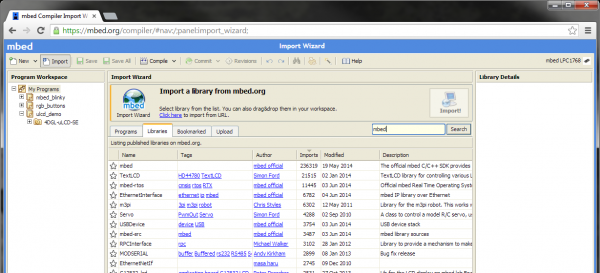
That will bring you to the Import Wizard page. In the "Search criteria..." on the right type in "mbed" and click the "Search" button (Note: the mbed library is likely already listed, but it is good practice to know how to search for libraries).
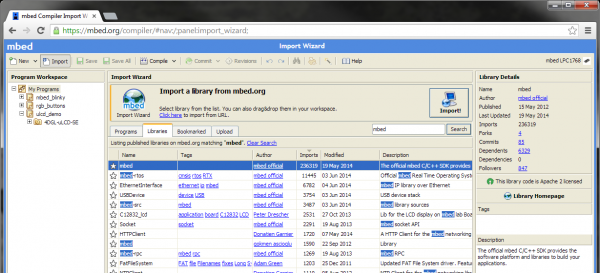
The mbed library should be the first listing.
Double-click the entry (highlighted in the picture) to import the library. This will automatically load the library into your "ulcd_demo" project.
Program
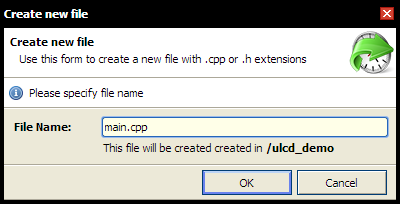
With our libraries loaded, we can create our LCD program. Create a new file in our project by right-clicking on the "ulcd_demo" project in the left pane and selecting "New File..."
You will be prompted to name your new file. Call it "main.cpp" and click the "OK" button.
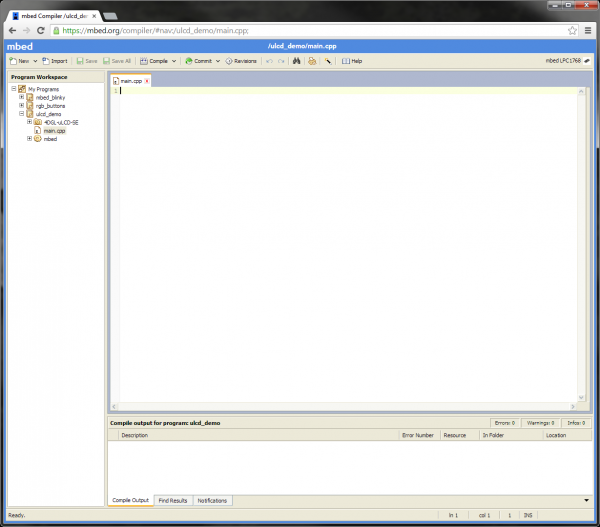
The Compiler will automatically open the new main.cpp in the workspace.
Enter the following code so that we can test out our 4D serial LCD.
language:c
// Demo for the uLCD-144-G2 based on the work by Jim Hamblen

#include "mbed.h"
#include "uLCD_4DGL.h"

// TX, RX, and RES pins
uLCD_4DGL uLCD(p9,p10,p11);

int main() {

    int x;
    int y;
    int radius;
    int vx;

    // Set our UART baudrate to something reasonable
    uLCD.baudrate(115200);

    // Change background color (must be called before cls)
    uLCD.background_color(WHITE);

    // Clear screen with background color
    uLCD.cls();

    // Change background color of text
    uLCD.textbackground_color(WHITE);

    // Make some colorful text
    uLCD.locate(4, 1);      // Move cursor
    uLCD.color(BLUE);
    uLCD.printf("This is a\n");
    uLCD.locate(5, 3);      // Move cursor
    uLCD.text_width(2);     // 2x normal size
    uLCD.text_height(2);    // 2x normal size
    uLCD.color(RED);        // Change text color
    uLCD.printf("TEST");
    uLCD.text_width(1);     // Normal size
    uLCD.text_height(1);    // Normal size
    uLCD.locate(3, 6);      // Move cursor
    uLCD.color(BLACK);      // Change text color
    uLCD.printf("of my new LCD");

    // Initial parameters for the circle
    x = 50;
    y = 100;
    radius = 4;
    vx = 1;

    // Make a ball bounce back and forth
    while (1) {

        // Draw a dark green
        uLCD.filled_circle(x, y, radius, 0x008000);

        // Bounce off the edges
        if ((x <= radius + 1) || (x >= 126 - radius)) {
            vx = -1 * vx;
        }

        // Wait before erasing old circle
        wait(0.02);         // In seconds

        // Erase old circle
        uLCD.filled_circle(x, y, radius, WHITE);

        // Move circle
        x = x + vx;
    }
}
Run
Compile the program and copy the downloaded file to the mbed. Press the mbed's restart button to see the LCD come to life with your program!
Concepts
We touched on a few important concepts in this tutorial that you may want to understand.
Serial Communications
To communicate between the mbed and the LCD, we are relying on a protocol known as UART. While you can create a program that emulates UART, it is far easier to rely on the mbed's built-in UART hardware peripherals. We are using pin 9 and pin 10, which are the TX and RX lines, respectively, of one of the LPC1768's UART peripherals. To read more about UART and serial communications, see this tutorial.
Libraries
Many software programs rely on "libraries." A library is a separate program or programs that may be called upon to perform one or several functions. We interface with libraries by linking to them in our project (the "Import" step in the mbed Compiler) and using the "#include" command in our main program. This tells the compiler to include the header file (".h"), which makes functions in the library available to us (e.g. the uLCD_4DGL class and methods, such as background_color()). Many mbed libraries can be found in the Handbook and the Cookbook.
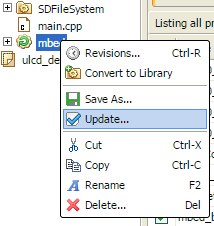
For this guide, we are using forked tutorials so that the versions stay the same. When you start making projects on your own, we highly recommend using libraries from the original author (or write your own!). As you start developing projects using other people's libraries, you'll notice that they might update their library from time to time. If you see a little green circular arrow around the library icon in your project, that means the library has been updated. To update the library to the latest revision, right-click on the library in your project viewer and select "Update..."
The Super Loop
Many simple embedded systems use the concept of "setup" and "loop" (more powerful embedded systems often use a Real-Time Operating System). For these tutorials, we rely on setting up some parameters and then looping forever within a while loop. This type of structure is known as a super loop architecture.
For mbed, the super loop architecture looks like:
language:c
int main() {

    // Setup code goes here

    while (1) {

        // Loop forever code goes here

    }
}
We can declare functions outside of main, which can be called within either our setup or loop code. Additionally, we can declare variables outside of main (and other functions), which are known as "global variables".
This super loop template is a great starting place for many simple embedded programs.
Graphics
The realm of computer graphics is vast. We only touched on the beginning with simple text and shapes. Even if we do not go in-depth into graphics, we recommend you familiarize yourself with some graphics terms such as framebuffer, frame rate, and refresh rate.
Going Further
Now that you have learned about libraries and graphical displays, you are well on your way to becoming an mbed expert. We will be using the LCD in the coming tutorials, so don't disconnect it yet!
Beyond the Tutorial
- Can you make the circle bounce up and down as well as side to side?
- Can you make the circle grow and shrink in size?
- Can you make the circle speed up and slow down?
- Can you make the text move around the screen?
- Can you make a scrolling text marquee? (Hint: Look at how we create text and how we move objects around the screen)
- Can you draw a rectangle instead of a circle? (Hint: see Jim Hamblen's Demo Code)
Digging Deeper
- Read more about UART and Serial Communications as well as mbed's Serial library
- Learn about the history of computer graphics
- Try out Jim Hamblen's other uLCD-144-G2 demo program. Can you get video to play on your LCD?
Experiment 4: Accelerometer
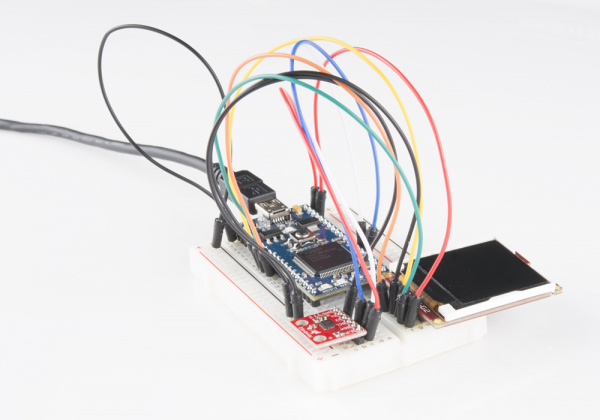
Using the graphic LCD from the previous tutorial, we will connect a sensor to add an interactive component to our project. We can use an MMA8452Q 3-axis accelerometer to move a ball around the screen for a cool demo.
Suggested Reading
The Circuit
This circuit can be made with parts in the SparkFun mbed Starter Kit. Also, keep in mind that the LPC1768 box contains a USB mini-B cable for programming and power.
Parts List
To follow this experiment, you would will need the following materials if you did not order the SparkFun mbed starter kit. You may not need everything though depending on what you have. Add it to your cart, read through the guide, and adjust the cart as necessary.
Schematic
Connections
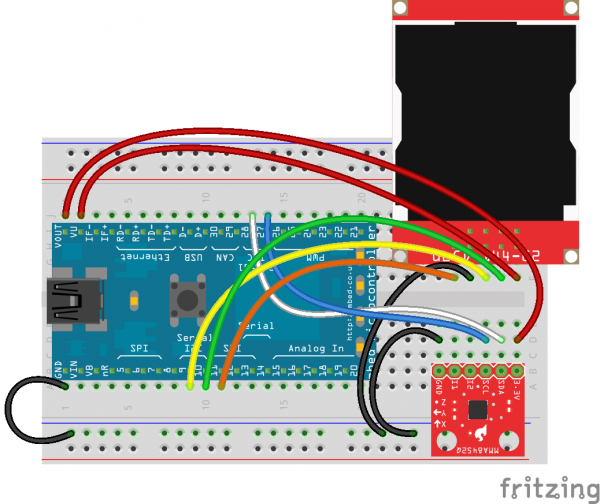
Connect the LPC1768 to the LCD and accelerometer in the following fashion. Note that the LCD uses the same connections as in Part 3.
Fritzing Diagram
Hookup Table
Place the LPC1768 in a breadboard with pin VOUT in position i1 and pin 20 in position b20.
Connect the rest of the components as follows:
| Component | Breadboard | ||||
|---|---|---|---|---|---|
| uLCD-144-G2* | h26 (RES) | h27 (GND) | h28 (RX) | h29 (TX) | h30 (+5V) |
| MMA8452* | b25 (GND) | b28 (SCL) | b29 (SDA) | b30 (3.3V) | |
| Jumper Wire | j2 | f30 | |||
| Jumper Wire | a1 | ( - ) | |||
| Jumper Wire | a9 | f28 | |||
| Jumper Wire | a10 | f29 | |||
| Jumper Wire | a11 | f26 | |||
| Jumper Wire | ( - ) | f27 | |||
| Jumper Wire | ( - ) | d25 | |||
| Jumper Wire | j14 | d28 | |||
| Jumper Wire | j13 | d29 | |||
| Jumper Wire | j1 | d30 | |||
* Pins not listed are not used.
The Code
We will be building on the previous tutorial. In addition to importing an mbed library from the Cookbook for the LCD, we will be building our own library for the MMA8452Q accelerometer.
Libraries
Navigate to the developer.mbed.org, login, and navigate to your Compiler.
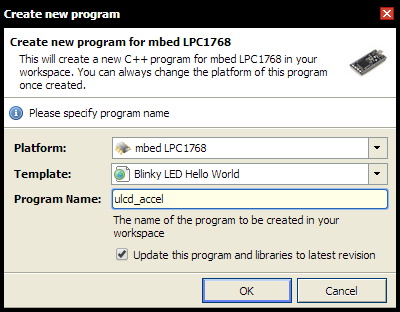
Right-click on "My Programs" and create a new program.
Give your program an appropriate name (such as "ulcd_accel"), keep the Template as "Blinky LED Hello World," and click OK.
Navigate to the 4DGL-uLCD-SE library page.
Click “Import this library” on the right side of the page. You will be brought to the mbed Compiler and asked to import the library. For "Target Path," select our "ulcd_accel" project and click "Import."
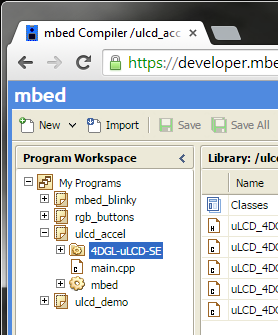
The library should now appear under our project in the Program Workspace.
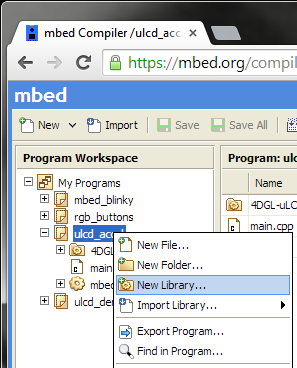
Now, we get to create our own library! Right-click on the program in the left pane and select "New Library..."
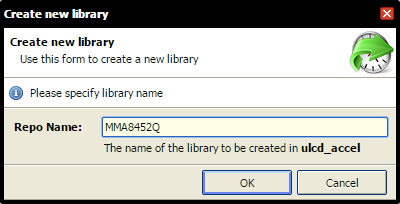
Name your library "MMA8452Q" and click OK.
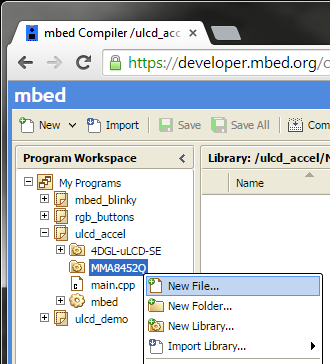
Right-click on the newly created library and select "New File..."
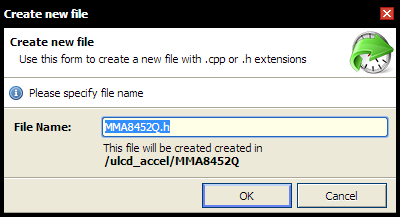
Name your new file "MMA8452Q.h" and click OK.
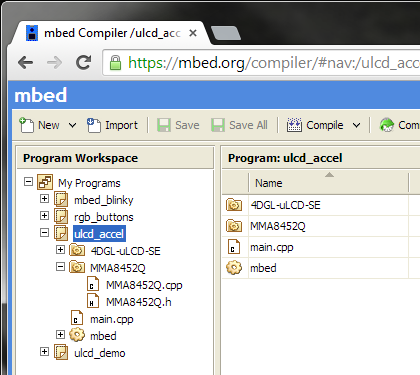
Repeat the same file creation process to make another file: "MMA8452Q.cpp". Your project folder should contain a main.cpp, the mbed library, the 4DGL-uLCD-SE library, and our newly created MMA8452Q library (with our blank .h and .cpp files).
Click on the "MMA8452Q.h" file to open up the blank header (.h) file. Copy the following code into the file.
language:c
// Library for our MMA8452Q 3-axis accelerometer
// Based on the MMA8452Q Arduino Library by Jim Lindblom (SparkFun Electronics)

#ifndef MMA8452Q_H
#define MMA8452Q_H

#include "mbed.h"

// Register definitions
#define REG_STATUS          0x00
#define OUT_X_MSB           0x01
#define OUT_X_LSB           0x02
#define OUT_Y_MSB           0x03
#define OUT_Y_LSB           0x04
#define OUT_Z_MSB           0x05
#define OUT_Z_LSB           0x06
#define REG_WHO_AM_I        0x0D
#define REG_XYZ_DATA_CFG    0x0E
#define REG_CTRL_REG1       0x2A

// WHO_AM_I check
#define FACTORY_ID          0x2A

// Scale definitions
#define SCALE_2G            2
#define SCALE_4G            4
#define SCALE_8G            8

// Data rates
#define ODR_800HZ           0
#define ODR_400HZ           1
#define ODR_200HZ           2
#define ODR_100HZ           3
#define ODR_50HZ            4
#define ODR_12_5HZ          5
#define ODR_6_25HZ          6
#define ODR_1_56HZ          7

// Init values
#define DEFAULT_FSR         SCALE_2G
#define DEFAULT_ODR         ODR_800HZ


// Class declaration
class MMA8452Q
{
    public:
        MMA8452Q(PinName sda, PinName scl, int addr);
        ~MMA8452Q();
        bool init();
        uint8_t available();
        void setScale(uint8_t fsr);
        void setODR(uint8_t odr);
        void standby();
        void active();
        float readX();
        float readY();
        float readZ();
        uint8_t readRegister(uint8_t reg);
        void writeRegister(uint8_t reg, uint8_t data);

    private:
        I2C m_i2c;
        int m_addr;
        int scale;
};

#endif
Click "Save". Note that since we are not compiling our library files right away, we want to save them so we can work on other files. That way, if we lose power or accidentally close our browser, we won't lose our work (don't worry, our library files will get compiled later). Save often!
Click on "MMA8452Q.cpp" to open the blank program (.cpp) file. Copy the following code into the file.
language:c
// Library for our MMA8452Q 3-axis accelerometer
// Based on the MMA8452Q Arduino Library by Jim Lindblom (SparkFun Electronics)

#include "mbed.h"
#include "MMA8452Q.h"

// Constructor
MMA8452Q::MMA8452Q(PinName sda, PinName scl, int addr) : m_i2c(sda, scl), m_addr(addr)
{
    // Initialize members
    scale = DEFAULT_FSR;
}

// Destructor
MMA8452Q::~MMA8452Q()
{

}

// Initialization
bool MMA8452Q::init()
{
    // Check to make sure the chip's ID matches the factory ID
    uint8_t c = readRegister(REG_WHO_AM_I);
    if( c != FACTORY_ID ) {
        return false;
    }

    // Set default scale and data rate
    standby();
    setScale(DEFAULT_FSR);
    setODR(DEFAULT_ODR);
    active();

    return true;
}

// Set the full-scale range for x, y, and z data
void MMA8452Q::setScale(uint8_t fsr)
{
    uint8_t config = readRegister(REG_XYZ_DATA_CFG);
    scale = fsr;
    config &= 0xFC;                     // Mask out FSR bits
    fsr = fsr >> 2;                     // Trick to translate scale to FSR bits
    fsr &= 0x03;                        // Mask out acceptable FSRs
    config |= fsr;                      // Write FSR bits to config byte
    writeRegister(REG_XYZ_DATA_CFG, config);              // Write config back to register
}

// Set the Output Data Rate
void MMA8452Q::setODR(uint8_t odr)
{
    uint8_t ctrl = readRegister(REG_CTRL_REG1);
    ctrl &= 0xCF;                       // Mask out data rate bits
    odr &= 0x07;                        // Mask out acceptable ODRs
    ctrl |= (odr << 3);                 // Write ODR bits to control byte
    writeRegister(REG_CTRL_REG1, ctrl); // Write control back to register
}

// Set accelerometer into standby mode
void MMA8452Q::standby()
{
    uint8_t c = readRegister(REG_CTRL_REG1);
    c &= ~(0x01);                       // Clear bit 0 to go into standby
    writeRegister(REG_CTRL_REG1, c);    // Write back to CONTROL register
}

// Set accelerometer into active mode
void MMA8452Q::active()
{
    uint8_t c = readRegister(REG_CTRL_REG1);
    c |= 0x01;                          // Set bit 0 to go into active mode
    writeRegister(REG_CTRL_REG1, c);    // Write back to CONTROL register
}

// Read X registers
float MMA8452Q::readX()
{
    int16_t x = 0;
    float cx = 0;

    // Read MSB and LSB from X registers
    x = readRegister(OUT_X_MSB);
    x = x << 8;
    x |= readRegister(OUT_X_LSB);
    x = x >> 4;

    // Calculate human readable X
    cx = (float)x / (float)2048 * (float)(scale);

    return cx;
}

// Read Y registers
float MMA8452Q::readY()
{
    int16_t y = 0;
    float cy = 0;

    // Read MSB and LSB from Y registers
    y = readRegister(OUT_Y_MSB);
    y = y << 8;
    y |= readRegister(OUT_Y_LSB);
    y = y >> 4;

    // Calculate human readable Y
    cy = (float)y / (float)2048 * (float)(scale);

    return cy;
}

// Read Z registers
float MMA8452Q::readZ()
{
    int16_t z = 0;
    float cz = 0;

    // Read MSB and LSB from Z registers
    z = readRegister(OUT_Z_MSB);
    z = z << 8;
    z |= readRegister(OUT_Z_LSB);
    z = z >> 4;

    // Calculate human readable Z
    cz = (float)z / (float)2048 * (float)(scale);

    return cz;
}

// Raw read register over I2C
uint8_t MMA8452Q::readRegister(uint8_t reg)
{
    uint8_t dev_addr;
    uint8_t data;

    // I2C address are bits [6..1] in the transmitted byte, so we shift by 1
    dev_addr = m_addr << 1;

    // Write device address with a trailing 'write' bit
    m_i2c.start();
    m_i2c.write(dev_addr & 0xFE);

    // Write register address
    m_i2c.write(reg);

    // Write a start bit and device address with a trailing 'read' bit
    m_i2c.start();
    m_i2c.write(dev_addr | 0x01);

    // Read single byte from I2C device
    data = m_i2c.read(0);
    m_i2c.stop();

    return data;
}

// Raw write data to a register over I2C
void MMA8452Q::writeRegister(uint8_t reg, uint8_t data)
{
    uint8_t dev_addr;

    // I2C address are bits [6..1] in the transmitted byte, so we shift by 1
    dev_addr = m_addr << 1;

    // Write device address with a trailing 'write' bit
    m_i2c.start();
    m_i2c.write(dev_addr & 0xFE);

    // Write register address
    m_i2c.write(reg);

    // Write the data to the register
    m_i2c.write(data);
    m_i2c.stop();
}
Click "Save".
And that's it! We just created our very first library in mbed. Because the library is contained within our project, everything is automatically linked at compile time. We just need to write #include "MMA8452Q.h" in our main program to use the MMA8452Q accerlerometer functions.
Program
Click on "main.cpp" under our "ulcd-accel" project to open up our main program file. Because we selected the "Blinky" template, there will be some code in the file already. Go ahead and delete everything in "main.cpp". Copy and paste in the following code.
language:c
// Demo for the uLCD-144-G2 and MMA8452Q 3-axis accelerometer

#include "mbed.h"
#include "MMA8452Q.h"
#include "uLCD_4DGL.h"

// Graphic LCD - TX, RX, and RES pins
uLCD_4DGL uLCD(p9,p10,p11);

// Accelerometer - SDA, SCL, and I2C address
MMA8452Q accel(p28, p27, 0x1D);

int main() {

    // Initialize uLCD
    uLCD.baudrate(115200);
    uLCD.background_color(BLACK);
    uLCD.cls();

    // Initialize accelerometer
    accel.init();

    // Initial parameters for the circle
    float x = 64;
    float y = 64;
    int radius = 4;
    int speed = 4;

    // Make a ball "fall" in direction of accelerometer
    while (1) {

        // Draw a red circle
        uLCD.filled_circle((int)x, (int)y, radius, RED);

        // Wait before erasing old circle
        wait(0.02);         // In seconds

        // Erase old circle
        uLCD.filled_circle((int)x, (int)y, radius, BLACK);

        // Move circle. IMPORTANT! Notice how we adjust for sensor orientation!
        x -= (speed * accel.readY());
        y -= (speed * accel.readX());

        // Make circle sit on edges
        if ( x <= radius + 1 ) {
            x = radius + 1;
        } else if ( x >= 126 - radius ) {
            x = 126 - radius;
        }
        if ( y <= radius + 1 ) {
            y = radius + 1;
        } else if ( y >= 126 - radius ) {
            y = 126 - radius;
        }
    }
}
Run
Compile the program and copy the downloaded file to the mbed. Press the mbed's restart button to see the LCD display a little red ball. Pick up the breadboard and tilt it in different directions. You should see the ball start to move around!
Concepts
We touched on a few important concepts in this tutorial that you may want to understand.
I2C
I2C (or "Inter-Integrated Circuit") is a communications protocol built by Philips in the 1980s. As I2C is a bus protocol, it allows for multiple masters and multiple devices to reside on the same bus and relies on addresses to communicate to specific devices. In our example, we used mbed's I2C library to talk to the accelerometer. To read more about the history of I2C, see this Wikipedia article.
Libraries
In the last tutorial, we imported an existing library. In this tutorial, we created a new library to make accessing the accelerometer easier. If you feel that you have a solid, well documented library that you want to share with others, read through mbed's Collaboration guide and specifically, how to write and publish a library.
Header Files
When we made our library, we created two files: a .h file and a .cpp file. The .h file is known as a header file. The header file contains declarations (variables, functions, classes, etc.) for other files in the program to use.
In our main file (main.cpp), we include all of the declarations from the header file (MMA8452Q.h) with the statement
language:c
#include "MMA8452Q.h"
This, in effect, copies everything from the header file to the #include line.
You will also notice that we included the same header file in the MMA8452Q.cpp file. We declare all of our classes, functions, and variables in the header file and define them in the .cpp file (read about the difference between declare and define).
When we compile our program, the compiler sees that we have declared the MMA8452Q class in the included header file, so we can use it in our main program. It will also compile the MMA8452Q.cpp file into an object file.
During the linking phase, the object files are combined into a single executable that is downloaded to your computer as a .bin file.
Floating Point
If you are carefully reviewing the example code, you might have noticed the keyword "float." If you have never dealt with floating point numbers, you might want to read up on how they work. Kip Irvine provides a great floating point tutorial. If you are interested in the history of floating point, see this Wikipedia article.
Going Further
We made an accelerometer do some cool stuff on a graphical display. If you are following the tutorials in order, you will need the LCD for one more!
Beyond the Tutorial
- Can you make a digital bubble level? (Hint: think about how a bubble works and adjust how we move the circle)
- Can you make the ball bounce off the sides? (Hint: look at how we make the ball "sit on edges" and make it bounce instead)
- Can you make a basic ball-in-a-maze game? (Hint: look at how we draw shapes with the LCD library and how to make the ball sit on edges)
Digging Deeper
- Official I2C Primer
- Read the actual I2C Specification (if you're looking for a cure for insomnia)
- Look into how someone else did an MMA8452 library
Experiment 5: Internet Clock
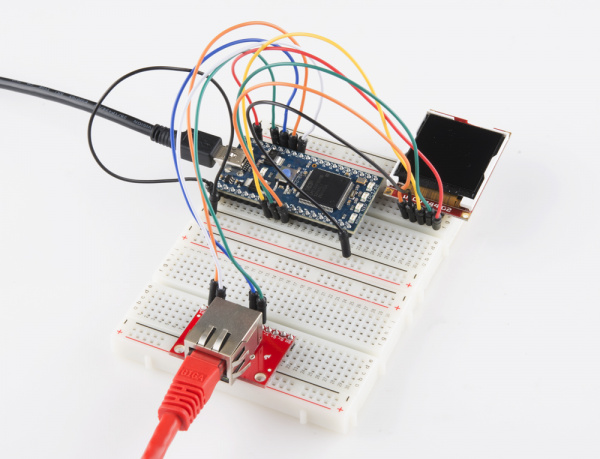
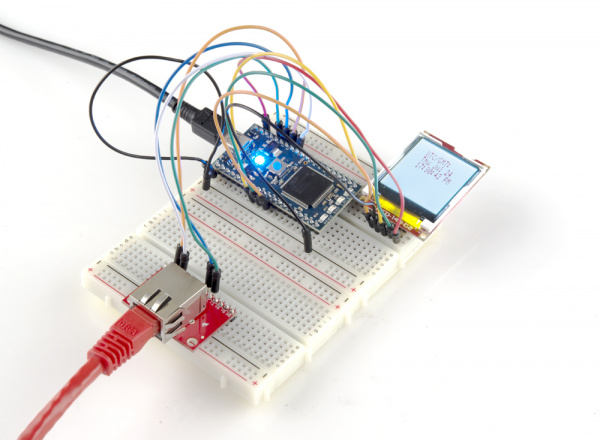
With the graphic LCD still connected, we hook up an Ethernet jack to our mbed to get it on the Internet. We will use the Network Time Protocol (NTP) to fetch the current time (in UTC/GMT) and display it on the LCD.
IMPORTANT: You will need access to an Internet-connected router with an open Ethernet port for this tutorial.
Suggested Reading
The Circuit
This circuit can be made with parts in the SparkFun mbed Starter Kit. Also, keep in mind that the LPC1768 box contains a USB mini-B cable for programming and power.
Parts List
To follow this experiment, you would will need the following materials if you did not order the SparkFun mbed starter kit. You may not need everything though depending on what you have. Add it to your cart, read through the guide, and adjust the cart as necessary.
Schematic
Connections
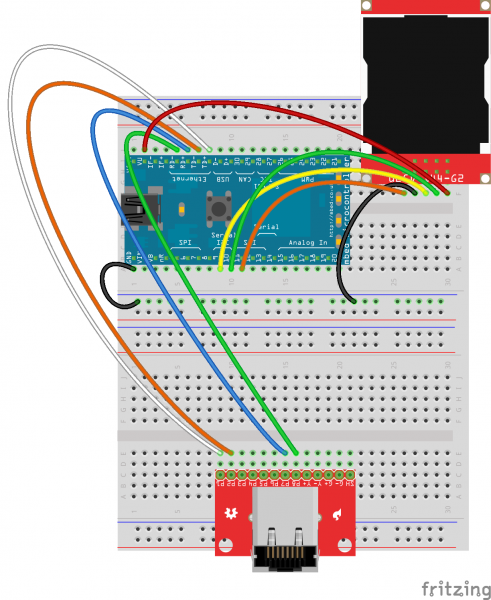
Connect the LPC1768 to the LCD and Ethernet jack in the following fashion. Note that the LCD uses the same connections as in Part 3.
Fritzing Diagram
Hookup Table
Place the LPC1768 in the first breadboard with pin VOUT in position i1 and pin 20 in position b20.
Connect the rest of the components as follows:
| Component | Breadboard 1 | Breadboard 2 | |||||||
|---|---|---|---|---|---|---|---|---|---|
| uLCD-144-G2* | h26 (RES) | h27 (GND) | h28 (RX) | h29 (TX) | h30 (+5V) | ||||
| RJ45 MagJack Breakout* | c9 (P1) | c10 (P2) | c15 (P7) | c16 (P8) | |||||
| Jumper Wire | j2 | f30 | |||||||
| Jumper Wire | a1 | ( - ) | |||||||
| Jumper Wire | a9 | f28 | |||||||
| Jumper Wire | a10 | f29 | |||||||
| Jumper Wire | a11 | f26 | |||||||
| Jumper Wire | ( - ) | f27 | |||||||
| Jumper Wire | j5 | e16 | |||||||
| Jumper Wire | j6 | e15 | |||||||
| Jumper Wire | j7 | e10 | |||||||
| Jumper Wire | j8 | e9 | |||||||
* Pins not listed are not used.
The Code
We will be relying heavily on pre-built libraries for this project. We need the same LCD library from the previous two tutorials as well as mbed's Ethernet and NTP libraries.
Libraries
Navigate to the mbed.org, login, and navigate to your Compiler.
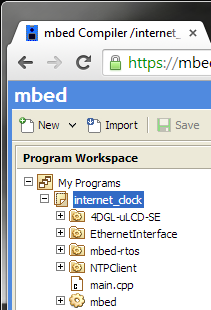
Create a new program with the "Blinky LED Hello World" template. Name it something like "internet_clock."
Navigate to the following pages and import each library into your "internet_clock" program.
The mbed library should already be imported if you used the "Blinky" template.
Program
Click on "main.cpp" in your project, remove the template code, and copy in the following code.
language:c
// Internet Clock with LCD based on the work by Jim Hamblen and Tyler Lisowski

#include "mbed.h"
#include "EthernetInterface.h"
#include "NTPClient.h"
#include "uLCD_4DGL.h"

// Parameters
char* domain_name = "0.uk.pool.ntp.org";
int port_number = 123;

// Networking
EthernetInterface eth;
NTPClient ntp_client;

// Graphic LCD - TX, RX, and RES pins
uLCD_4DGL uLCD(p9,p10,p11);

int main() {

    time_t ct_time;
    char time_buffer[80];

    // Initialize LCD
    uLCD.baudrate(115200);
    uLCD.background_color(BLACK);
    uLCD.cls();

    // Connect to network and wait for DHCP
    uLCD.locate(0,0);
    uLCD.printf("Getting IP Address\n");
    eth.init();
    if ( eth.connect() == -1 ) {
        uLCD.printf("ERROR: Could not\nget IP address");
        return -1;
    }
    uLCD.printf("IP address is \n%s\n\n",eth.getIPAddress());
    wait(1);

    // Read time from server
    uLCD.printf("Reading time...\n\r");
    ntp_client.setTime(domain_name, port_number);
    uLCD.printf("Time set\n");
    wait(2);
    eth.disconnect();

    // Reset LCD
    uLCD.background_color(WHITE);
    uLCD.textbackground_color(WHITE);
    uLCD.color(RED);
    uLCD.cls();
    uLCD.text_height(2);

    // Loop and update clock
    while (1) {
        uLCD.locate(0, 1);
        ct_time = time(NULL);
        strftime(time_buffer, 80, "    %a %b %d\n    %T %p %z\n    %Z\n", \
                                                localtime(&ct_time));
        uLCD.printf("    UTC/GMT:\n%s", time_buffer);
        wait(0.1);
    }
}
Run
Compile the program and copy the downloaded file to the mbed. Connect the Ethernet cable from an Internet-connected router/switch/hub to your project's MagJack breakout. Press the mbed's restart button, and you should see the LCD come to life with connection details. After a few seconds, the LCD should change to show the current time (in UTC/GMT format).
Concepts
Connecting something to the Internet opens up a whole new world. There is a lot going on to communicate to a remote server, so we recommend looking into a few concepts to familiarize yourself with how the Internet works.
OSI Model
Ethernet is just one small component in making devices talk over the Internet. Many protocols make up Internet communications and can be thought of like an onion. Each protocol layer corresponds to a layer within the onion, with your custom message (in this case, a request for time using NTP) in the middle. Several other layers are stacked on top of your message in order to make the communications through the Internet work. If you would like to understand how these protocols work, start with the 7-layer Open Systems Interconnection (OSI) model.
TCP and UDP
TCP and UDP are the two most important Transport Layer protocols. Transmission Control Protocol (TCP) is mostly used by services that require a guaranteed delivery, such as websites and email. On the other hand, we were using the User Datagram Protocol (UDP) to send and receive time information with NTP.
Application Layer Protocols
Luckily, the mbed handles most of the protocols for us, with the help of some libraries. When we are writing applications in the mbed (or any system), we are mostly concerned with the application layer to make devices talk to each other (as the lower levels are already implemented for us). In this tutorial, we relied on the Network Time Protocol (NTP) to talk to a time server on the Internet. When it comes to programming embedded devices, the Dynamic Host Configuration Protocol (DHCP), the Hypertext Transfer Protocol (HTTP), and the File Transfer Protocol (FTP) are also important.
Timekeeping
Embedded systems have several methods to keeping time. The two most popular ways are counting clock cycles and using a real-time clock (RTC).
If we know the frequency of the processor's clock, then we can calculate how many clock cycles we need to wait if we want to delay by a certain amount of time. For example, if we have a 100MHz clock, we know that a cycle happens every 0.01 microseconds (1 / 100MHz = 0.01 microseconds). If we want to delay 20 milliseconds, then we would have the processor do nothing for 2,000,000 cycles (0.01 microseconds x 2,000,000 = 20,000 microseconds = 20 milliseconds).
These delay functions have been wrapped up for you with mbed. To delay for a number of seconds, use wait(). The other two functions, wait_ms() and wait_us(), allow you to delay by a number of milliseconds and microseconds, respectively.
Unfortunately, waiting by cycles is often not precise. Your clock speed may be slightly off (thanks to things like temperature), or your wait() function might be interrupted by other code, which would throw off your ability to count exactly how much time has passed. Fortunately, there is a piece of hardware that can keep time much more accurately: the real-time clock.
RTCs are often a separate chip with its own clock that has the sole purpose of keeping track of time. Many times (such as in the case of your computer), the RTC will have a small battery attached so that it will remember the time even when you turn off your computer.
Luckily for us, the mbed has an RTC already built in to its circuitry. The mbed library handles talking to the RTC module so we can set and read the time. We call set_time() to set the current time on the RTC and localtime() to read the time. Note that in the Internet Clock example, we use setTime(), a method in NTPClient, to set the RTC time. We then use localtime() to retrieve the time.
To read more about real-time clocks, see this article.
Going Further
By connecting our mbed to the Internet, we opened up many new possibilities. We won't continue with the Internet in this tutorial series, but feel free to try out some of the suggested projects in "Beyond the Tutorial" to learn more about making devices talk to each other!
Beyond the Tutorial
- Adjust the clock to your timezone
- Display your current location using IP-based geolocation (Hint: read this article)
- Using HTTP, can you download the contents of a website and display the HTML on your LCD? (Hint: see the HTTPClient library)
- Make a feed on data.sparkfun.com and push some data to it (Hint: see this guide on pushing data to data.sparkfun)
- Try running an HTTP Server on the mbed
Digging Deeper
- The History of the Internet
- The actual HTTP Specification
- Read about the Internet of Things
Experiment 6: USB Host and Threading
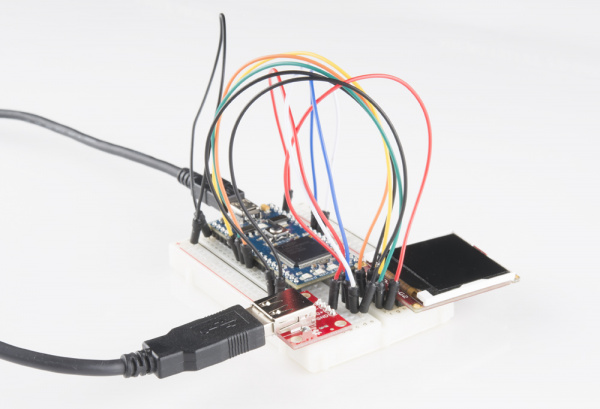
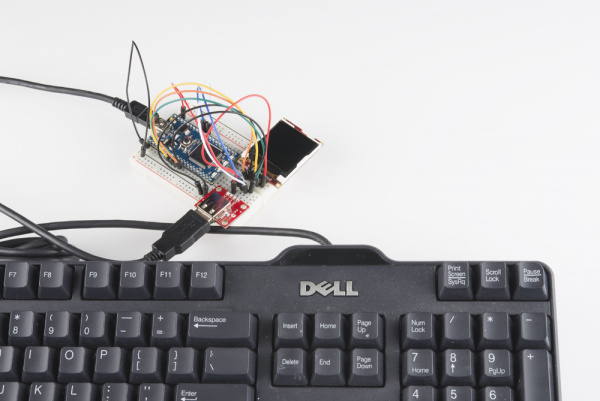
In this tutorial, we turn the mbed LPC1768 into a USB host. For this, we will use mbed's USBHost library and the USB Type A Female Breakout. Leave the LCD connected, as we will use it to display characters from a USB keyboard. Additionally, we introduce the concept of threading so that we can essentially do 2 things at once (specifically, listen for keystrokes and blink an LED).
IMPORTANT: You will need a USB keyboard for this tutorial.
Suggested Reading
The Circuit
This circuit can be made with parts in the SparkFun mbed Starter Kit. Also, keep in mind that the LPC1768 box contains a USB mini-B cable for programming and power.
Parts List
To follow this experiment, you would will need the following materials if you did not order the SparkFun mbed starter kit. You may not need everything though depending on what you have. Add it to your cart, read through the guide, and adjust the cart as necessary.
In addition to the listed parts, you will also need a USB keyboard to complete the tutorial.
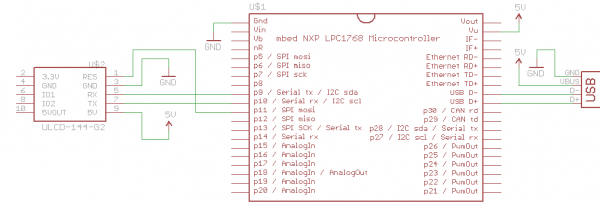
Schematic
Connections
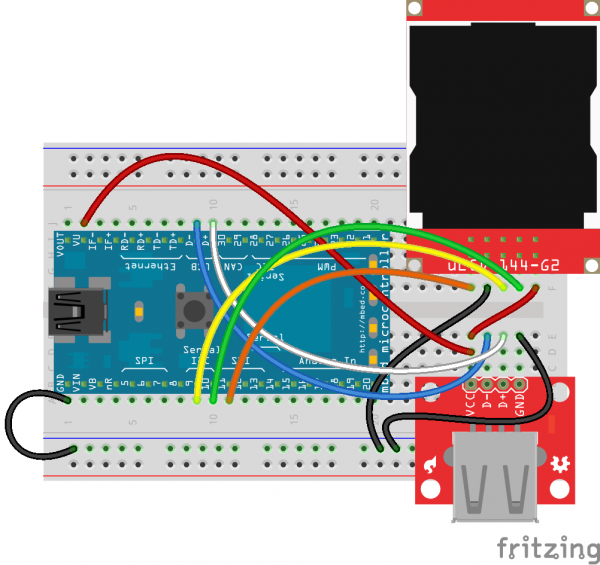
Connect the LPC1768 to the LCD and USB breakout in the following fashion. Note that the LCD uses the same connections as in Part 3.
Fritzing Diagram
Hookup Table
Place the LPC1768 in a breadboard with pin VOUT in position i1 and pin 20 in position b20.
Connect the rest of the components as follows:
| Component | Breadboard | ||||
|---|---|---|---|---|---|
| uLCD-144-G2* | h26 (RES) | h27 (GND) | h28 (RX) | h29 (TX) | h30 (+5V) |
| USB Type A Female Breakout | b26 (VCC) | b27 (D-) | b28 (D+) | b29 (GND) | |
| Jumper Wire | j2 | d26 | |||
| Jumper Wire | e26 | f30 | |||
| Jumper Wire | a1 | ( - ) | |||
| Jumper Wire | a9 | f28 | |||
| Jumper Wire | a10 | f29 | |||
| Jumper Wire | a11 | f26 | |||
| Jumper Wire | ( - ) | f27 | |||
| Jumper Wire | j9 | e27 | |||
| Jumper Wire | j10 | e28 | |||
| Jumper Wire | ( - ) | e29 | |||
* Pins not listed are not used.
The Code
For this tutorial, we will be using the LCD and USB Host libraries. In our main.cpp, we create a thread that runs the USB Host function separately from the rest of the program. This allows us to blink an LED and have it not interrupt or be interrupted by keyboard input.
Libraries
Navigate to the mbed.org, login, and navigate to your Compiler.
Create a new program with the "Blinky LED Hello World" template. Name it something like "usb_host."
Navigate to the following pages and import each library into your "usb_host" program.
The mbed library should already be imported if you used the "Blinky" template.
Program
Click on "main.cpp" in your project, remove the template code, and copy in the following code.
language:c
// USB host keyboard and LCD demo

#include "mbed.h"
#include "USBHostKeyboard.h"
#include "uLCD_4DGL.h"

// LED to demonstrate multi-threading
DigitalOut led(LED1);

// Graphic LCD - TX, RX, and RES pins
uLCD_4DGL uLCD(p9,p10,p11);

// Callback function from thread
void onKey(uint8_t key) {
    uLCD.printf("%c", key);
}

// Function that runs continuously in the thread
void keyboard_task(void const *) {

    USBHostKeyboard keyboard;

    while(1) {

        // Try to connect a USB keyboard
        uLCD.printf("Waiting...\n");
        while(!keyboard.connect()) {
            Thread::wait(500);
        }
        uLCD.printf("Connected!\n");

        // When connected, attach handler called on keyboard event
        keyboard.attach(onKey);

        // Wait until the keyboard is disconnected
        while(keyboard.connected()) {
            Thread::wait(500);
        }
        uLCD.printf("\nDisconnected!\n");
    }
}

// Main - the program enters here
int main() {

    // Initialize LCD
    uLCD.baudrate(115200);
    uLCD.background_color(BLACK);
    uLCD.cls();
    uLCD.locate(0,0);

    // Create a thread that runs a function (keyboard_task)
    Thread keyboardTask(keyboard_task, NULL, osPriorityNormal, 256 * 4);

    // Flash an LED forever
    while(1) {
        led=!led;
        Thread::wait(500);
    }
}
Run
Compile the program and copy the downloaded file to the mbed. Connect a USB keyboard to the USB breakout board.
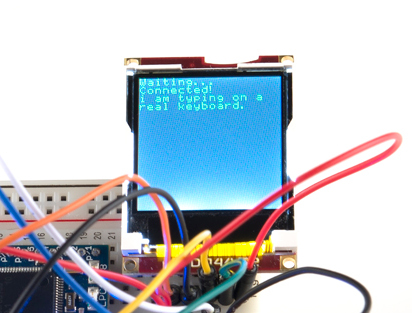
Press the mbed's restart button, and the LCD should show "Waiting..." If the keyboard was connected properly, you should see "Connected" on the LCD. Once you see "Connected," start typing! You will see your keystrokes appear on the LCD.
NOTE #1: If you have some trouble getting the keyboard to connect, make sure the keyboard is plugged in and try resetting the mbed.
NOTE #2: The USBHost library is in beta and has some issues connecting USB devices sometimes. Not all keyboards will work with this demo.
Also, if you try typing too fast, you will see repeat keys. This is because the mbed does not process two simultaneous key presses correctly.
Concepts
We covered two important concepts in this tutorial: USB and threading. Both create a unique set of opportunities for embedded systems.
Callbacks
In our program, we define an onKey() function. This is a callback.
onKey(uint8_t key) is a function that is declared in the USBHostKeyboard library, but the definition is left to us to implement. Callbacks are executed whenever an event occurs in another piece of code (within the USBHostKeyboard code, in this case).
We define onKey() in our code (it prints the received character to the LCD), and then we pass the onKey() function to our USBHostKeyboard object with the following line:
language:c
keyboard.attach(onKey);
This lets the USBHostKeyboard object know where to find the onKey() callback function. After that, whenever a keystroke occurs on the connected keyboard, the onKey() function is called.
USB Host
Universal Serial Bus (USB) has been around for many years. Created in the mid-1990s, USB has been the most popular way to connect peripherals to computers. As a result, many embedded systems support USB communications.
While many embedded systems can support being a USB Device, having USB Host capabilities is only seen in more powerful processors. Being able to act as a host means that we can plug in a number of devices normally reserved for computers: keyboards, mice, flash drives, etc. If you really want to get involved in USB development, this book is a great place to start.
Threading
If you are carefully reviewing the code, you might have noticed the keyword "Thread" appear. This is a function built into the mbed library that allows us to run multiple processes at the same time (well, not quite. The processor relies on a technique called Scheduling to determine which process gets run, since only one can run at a time in reality). It is important to understand that our mbed is powerful enough to allow us to run multiple threads (many, smaller microcontrollers, such as the ATmega 328p, of Arduino fame, have trouble with multiple threads).
When a Thread is created, as in our USB Host example, it calls the function given in its parameters (keyboard_task, in this case). The threaded function runs while the rest of the program continues at the same time (in theory, the "Flash an LED forever" section runs while "keyboard_task" is executing simultaneously).
If you would like more control over threads and the scheduling, take a look at mbed's Real Time Operating System (RTOS) library.
Going Further
Adding USB lets us connect many different peripherals to our mbed. Additionally, we learned about threading, which lets us run multiple processes at the same time.
Beyond the Tutorial
- Make the backspace key actually delete characters on the LCD
- Use the graphics functions of the LCD to control a ball with the keyboard's arrow keys
- Use a mouse to control a ball around the LCD (Hint: see USBHostMouse)
- Read some files on a USB flash drive (Hint: see USBHostMSD)
Digging Deeper
- HowStuffWorks has a great overview of USB
- If you are particularly bored (or need the real source material), take a look at the newest USB Specification
- Read about Real Time Operating Systems
Experiment 7: USB Device
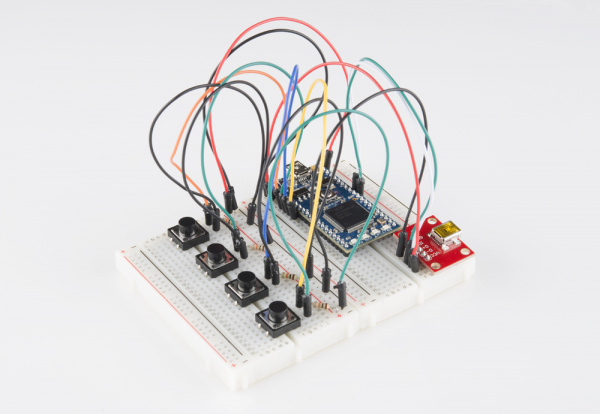
This tutorial covers USB devices with the mbed LPC1768. Using a USB mini-B breakout and some buttons, we enumerate the mbed as a USB mouse and control the computer's pointer with the buttons.
Suggested Reading
The Circuit
This circuit can be made with parts in the SparkFun mbed Starter Kit. Also, keep in mind that the LPC1768 box contains a USB mini-B cable for programming and power.
Parts List
To follow this experiment, you would will need the following materials if you did not order the SparkFun mbed starter kit. You may not need everything though depending on what you have. Add it to your cart, read through the guide, and adjust the cart as necessary. The experiment will be using 4x 10kOhm resistors.
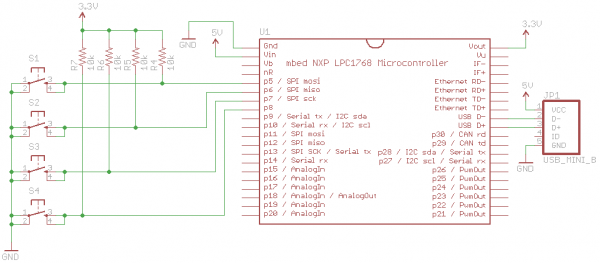
Schematic
Connections
Connect the LPC1768 to the USB mini-B breakout and buttons.
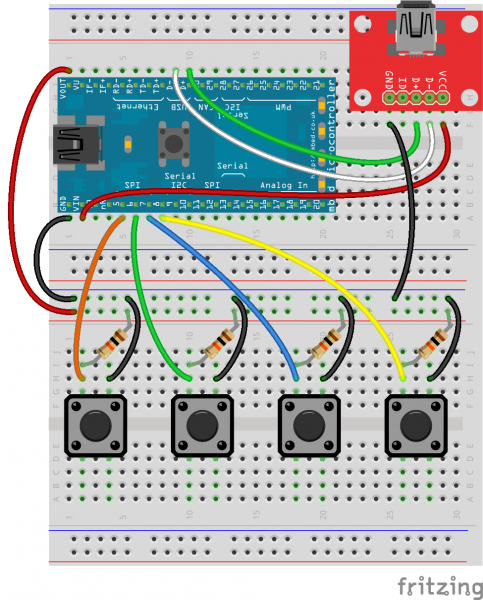
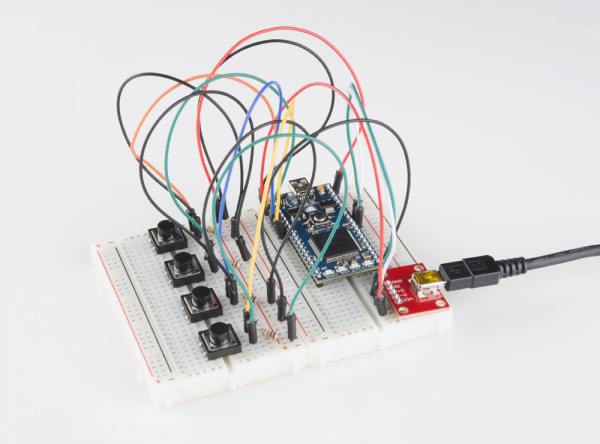
Fritzing Diagram
Hookup Table
Place the LPC1768 in the first breadboard with pin VOUT in position i1 and pin 20 in position b20.
Connect the rest of the components as follows:
| Component | Breadboard 1 | Breadboard 2 | ||||||
|---|---|---|---|---|---|---|---|---|
| Mini USB Breakout* | h25 (GND) | h27 (D+) | h28 (D-) | h29 (VCC) | ||||
| Pushbutton | d2 | d4 | g2 | g4 | ||||
| Pushbutton | d10 | d12 | g10 | g12 | ||||
| Pushbutton | d18 | d20 | g18 | g20 | ||||
| Pushbutton | d26 | d28 | g26 | g28 | ||||
| 10K Resistor | i2 | ( + ) | ||||||
| 10K Resistor | i10 | ( + ) | ||||||
| 10K Resistor | i18 | ( + ) | ||||||
| 10K Resistor | i26 | ( + ) | ||||||
| Jumper Wire | j1 | ( + ) | ||||||
| Jumper Wire | a1 | ( - ) | ||||||
| Jumper Wire | a2 | f29 | ||||||
| Jumper Wire | f25 | ( - ) | ||||||
| Jumper Wire | j9 | f28 | ||||||
| Jumper Wire | j10 | f27 | ||||||
| Jumper Wire | a5 | h2 | ||||||
| Jumper Wire | a6 | h10 | ||||||
| Jumper Wire | a7 | h18 | ||||||
| Jumper Wire | a8 | h26 | ||||||
| Jumper Wire | ( - ) | h4 | ||||||
| Jumper Wire | ( - ) | h12 | ||||||
| Jumper Wire | ( - ) | h20 | ||||||
| Jumper Wire | ( - ) | h28 | ||||||
* Pins not listed are not used.
The Code
In order to make the mbed act like a USB mouse for this walkthrough, we will rely on mbed's USBDevice library. This library contains all the necessary functions to enumerate as a USB device to a computer and function as a mouse.
Libraries
Navigate to the mbed.org, login, and navigate to your Compiler.
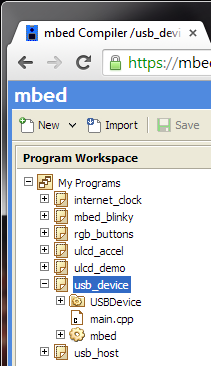
Create a new program with the "Blinky LED Hello World" template. Name it something like "usb_device."
Navigate to the following pages and import each library into your "usb_device" program.
The mbed library should already be imported if you used the "Blinky" template.
Program
Click on "main.cpp" in your project, remove the template code, and copy in the following code.
language:c
// USB Device demo - control mouse pointer with buttons

#include "mbed.h"
#include "USBMouse.h"

// USB Mouse object
USBMouse mouse;

// Define buttons
DigitalIn button_up(p5);
DigitalIn button_down(p6);
DigitalIn button_left(p7);
DigitalIn button_right(p8);

DigitalOut myled(LED1);

int main() {
    int x = 0;
    int y = 0;


    while (1) {

        // Determine mouse pointer horizontal direction
        x = button_left ^ button_right;
        if ( button_right ) {
            x = -1 * x;
        }

        // Determine mouse pointer vertical direction
        y = button_up ^ button_down;
        if ( button_down ) {
            y = -1 * y;
        }

        // Move mouse
        mouse.move(x, y);

        // Wait for next cycle
        wait(0.001);
    }
}
Run
Compile the program and copy the downloaded file to the mbed. Disconnect the USB mini-B that you used to program your mbed and connect it into the USB mini-B breakout board.
Make sure that the other end of the USB cable is plugged into your computer and press the mbed's restart button. Your computer should tell you that a USB input device has been detected. Start pressing the four buttons on the breadboard.
Your mouse pointer should start moving around!
Concepts
We really only covered one important new concept in this tutorial: USB devices. Instead of acting as a USB host to accept peripherals, we turned the mbed into a USB peripheral. This allowed us to plug the mbed into a computer and control some functions normally assigned to dedicated accessories (a mouse, in this case).
USB Device
A lot of things need to happen to show up as a USB device on a computer. The process of attaching a device, getting assigned a unique identifier and a driver is called "USB enumeration." Luckily, the mbed USBDevice library handles all of the device-side enumeration details for us.
Being able to enumerate as a USB device opens up a world of possibilities for us. We can make the mbed act as a mouse, a keyboard, an audio device, a mass storage device, and so on. Note that the LPC1768 only supports USB Full-Speed, which means that the higher rates of USB 2.0 and 3.0 are not available to us. If you wanted to make your own mbed Flash Drive, it would be quite slow.
If you want to get really involved in USB device development, see Jan Axelson's USB Complete book.
Going Further
Becoming a USB device lets us interact with many different computers and mobile devices. You could even make your own keyboard and mouse!
Beyond the Tutorial
- Make the buttons act as mouse clicks instead of moving the pointer
- Make the buttons act as keyboard keys (Hint: see USBDevice Keyboard)
- Create a program that automatically opens up a text editor and types out a message to the user whenever the mbed is plugged in as a USB device
Digging Deeper
- Look into the specifics of USB enumeration and messages
- Learn about making your own USB device drivers for Windows, OS X, and Linux
Experiment 8: Temperature Logging
We are going to move on to a very important topic for embedded systems: sensor data logging! Many microcontroller projects are built around the concept of taking some sort of measurement (temperature, distance, light, acceleration, GPS coordinates, heart rate, etc.) and logging it. This data is examined (later or in real time) to look for patterns or notify the user of some kind of anomoly.
In this tutorial, we will have the mbed LPC1768 take measurements from a temperature sensor, log the data to a micro SD card, and print out the contents of the SD card to a console.
Suggested Reading
- How does a temperature sensor work?
- Serial Peripheral Interface (SPI)
- mbed's SD Card File System Library
The Circuit
This circuit can be made with parts in the SparkFun mbed Starter Kit. Also, keep in mind that the LPC1768 box contains a USB mini-B cable for programming and power.
Parts List
To follow this experiment, you would will need the following materials if you did not order the SparkFun mbed starter kit. You may not need everything though depending on what you have. Add it to your cart, read through the guide, and adjust the cart as necessary.
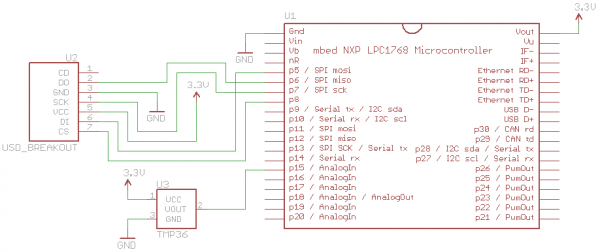
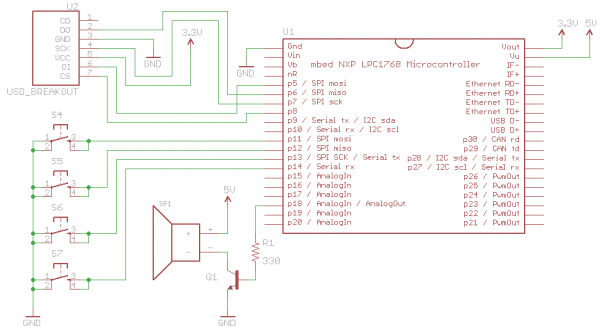
Schematic
Connections
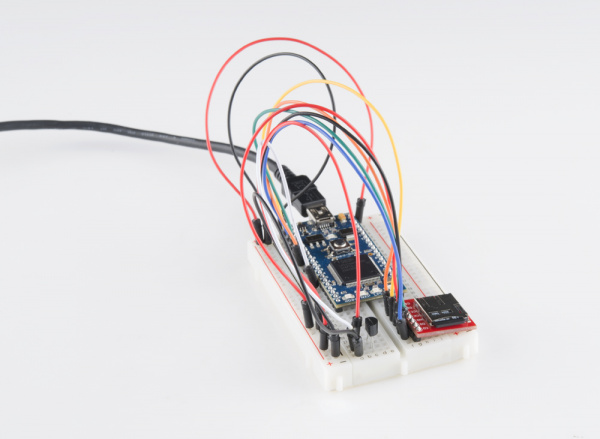
Connect the LPC1768 to the micro SD card breakout board and TMP36 temperature sensor. Insert a micro SD card into the breakout board.
| Polarized Components | Pay special attention to the component’s markings indicating how to place it on the breadboard. Polarized components can only be connected to a circuit in one direction. Polarized components are highlighted with a yellow warning triangle in the table below. |
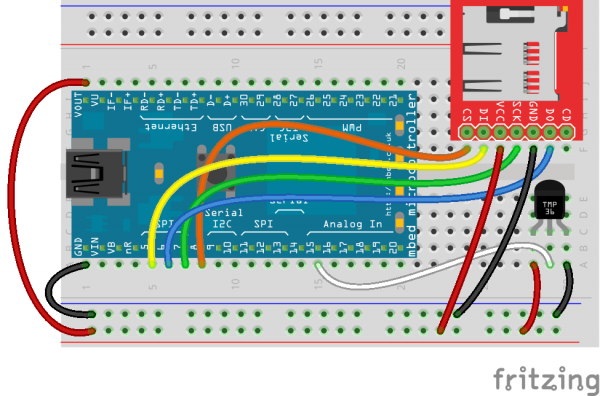
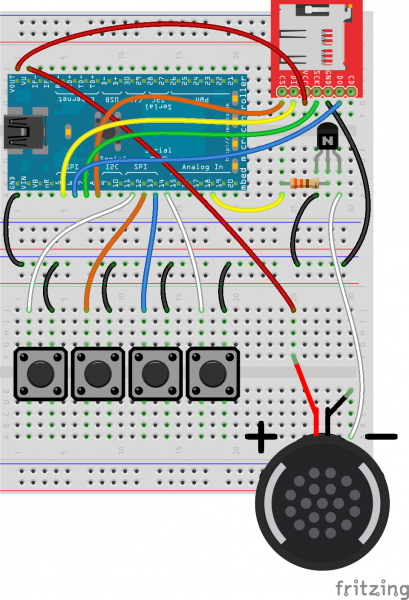
Fritzing Diagram
Hookup Table
Place the LPC1768 in a breadboard with pin VOUT in position i1 and pin 20 in position b20.
Connect the rest of the components as follows:
| Component | Breadboard | |||||
|---|---|---|---|---|---|---|
| MicroSD Transflash Breakout* | g24 (CS) | g25 (DI) | g26 (VCC) | g27 (SCK) | g28 (GND) | g29 (DO) |
| Temperature Sensor - TMP36 | c28 (V+) | c29 (SIGNAL) | c30 (GND) | |||
| Jumper Wire | j1 | ( + ) | ||||
| Jumper Wire | a1 | ( - ) | ||||
| Jumper Wire | a5 | f25 | ||||
| Jumper Wire | a6 | f29 | ||||
| Jumper Wire | a7 | f27 | ||||
| Jumper Wire | a8 | f24 | ||||
| Jumper Wire | ( - ) | f28 | ||||
| Jumper Wire | ( + ) | f26 | ||||
| Jumper Wire | a15 | a29 | ||||
| Jumper Wire | ( - ) | a30 | ||||
| Jumper Wire | ( + ) | a28 | ||||
* Pins not listed are not used.
Tips
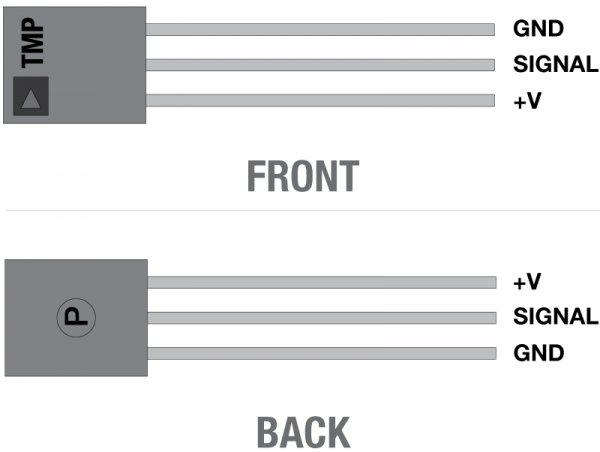
Make sure you face the TMP36 temperature sensor the correct way. The flat side of the black package body is considered the front. See this tutorial to learn more about polarity.
The Code
We plan to read an analog voltage from the sensor, and to do this, we rely on the mbed's analog-to-digital converter (ADC) built into the chip. Every time we read this value, we convert it to an actual temperature in degrees Celsius and log it to the SD card. Additionally, we will be using the mbed's built-in USB-to-Serial device to print our logged values to a console on our computer.
Software
Windows
If you are on Windows, we will be relying on a program called "PuTTY." You are also welcome to use any number of other serial terminal programs, such as CoolTerm or Realterm.
Navigate to the PuTTY homepage and download putty.exe.
There is no installation process, so just copy putty.exe to some place you will remember, such as your desktop.
Additionally, we need to install a Serial Port driver if you are on Windows. Navigate to mbed's Windows serial configuration page and download the latest driver.
Double click the downloaded file and follow the on-screen instructions to install the driver.
Mac OS X
Good news! If you are on a Mac, you already have the necessary serial drivers and program. We will be using the screen command.
Linux
Just like Mac, you should have the serial driver and tools already installed. If not, look into getting screen or another serial console tool.
If you need to install screen, see this guide for yum or this guide for apt-get.
Libraries
Navigate to the mbed.org, login, and navigate to your Compiler.
Create a new program with the "Blinky LED Hello World" template. Name it something like "temp_logging."
Navigate to the following pages and import each library into your "temp_logging" program.
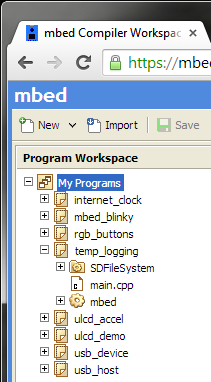
The SDFileSystem library should appear in your temp_logging project.
Program
Click on "main.cpp" in your project, remove the template code, and copy in the following code.
language:c
// Temperature logging demo - record temperatures to SD card and print them to
// the console every 10 seconds

#include "mbed.h"
#include "SDFileSystem.h"

// Analog input (pin 15)
AnalogIn ain(p15);

// USB serial (tx, rx)
Serial pc(USBTX, USBRX);

// SD card (SPI pins)
SDFileSystem sd(p5, p6, p7, p8, "sd");

// Timer for our timestamps
Timer timer;

int main() {

    FILE *file;
    float voltage_in;
    float degrees_c;
    int i;
    int c;

    // Start our timer
    timer.start();

    // Open file for writing
    file = fopen("/sd/temp_data.txt", "w");
    if ( file == NULL ) {
        error("ERROR: Could not open file for writing!\n\r");
        return -1;
    }

    // Tell the user we need to wait while we collect some data
    pc.printf("\nCollecting data (Do not remove SD Card!) ...\n\r");

    // Collect temperatures with timestamps every second
    for(i = 0; i < 10; i++) {
        voltage_in = ain * 3.3;
        degrees_c = (voltage_in - 0.5) * 100.0;
        fprintf(file, "%2.2fs: %3.1f deg C\n\r", timer.read(), degrees_c);
        wait(1);
    }

    // Close file and re-open it for reading
    fclose(file);
    file = fopen("/sd/temp_data.txt", "r");
    if ( file == NULL ) {
        error("ERROR: Could not open file for reading!\n\r");
        return -1;
    }

    // Print results to console
    pc.printf("Temperature data:\n\r");
    while(1) {
       c = fgetc(file);
       if ( c == EOF ) {
           break;
       }
       pc.putc(c);
    }

    // Close the file and finish
    fclose(file);
    pc.printf("Done! Safe to remove SD card\n\r");

    return 0;
}
Run
Windows
Compile the program and copy the downloaded file to the mbed.
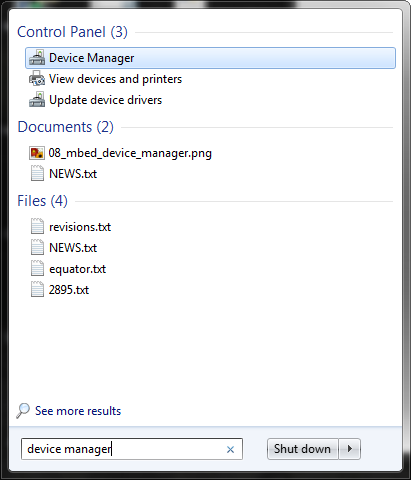
Click the Windows Start button and search for "device manager."
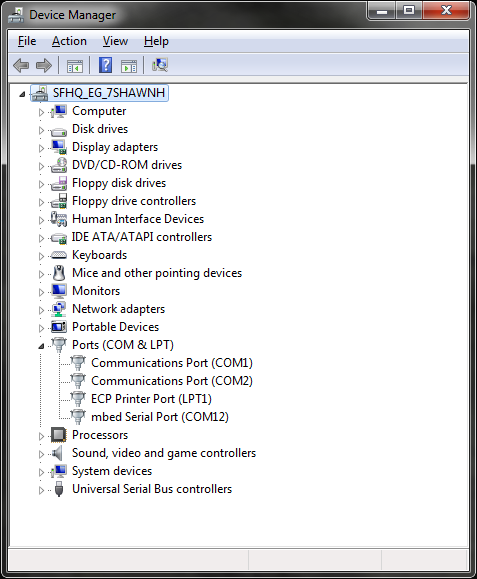
Click on "Device Manager." You should see the Device Manager open up. Click to expand "Ports (COM & LPT)." Make a note of which COM port is listed as the "mbed Serial Port" (COM12, in this example).
Note: If you do not see the mbed Serial Port listed, you need to install (or re-install) the mbed Windows serial driver.
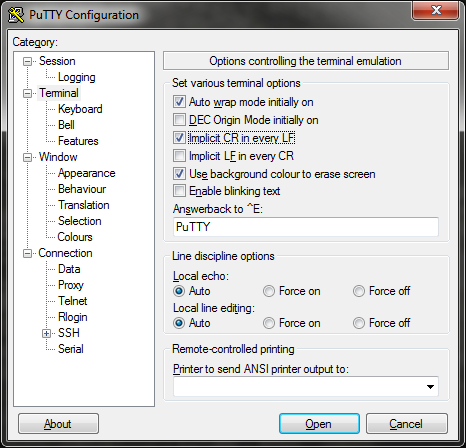
Double-click the putty.exe icon to start PuTTY. In the left pane, click "Terminal" to configure PuTTY. Check "Implicit CR in every LF" so that text appears properly aligned in our console.
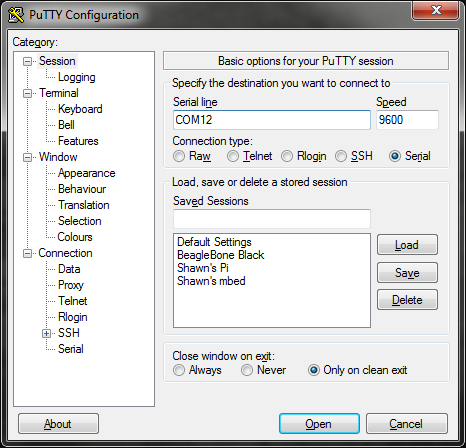
Click "Session" in the left pane. Click the "Serial" radio button and change "Serial line" to your COM port (COM12 in this example). Leave speed at 9600. Click "Open" to start a serial terminal.
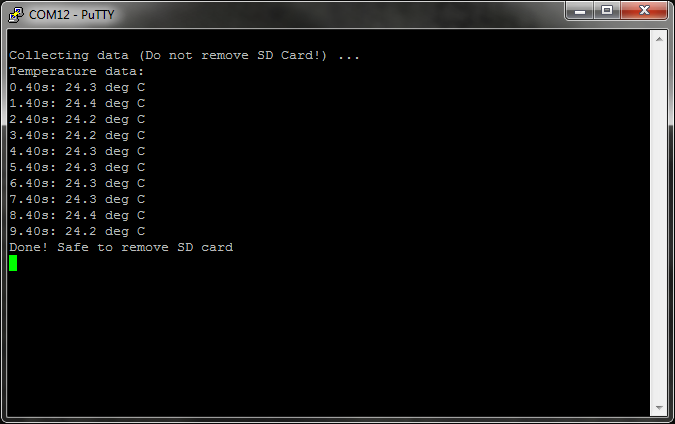
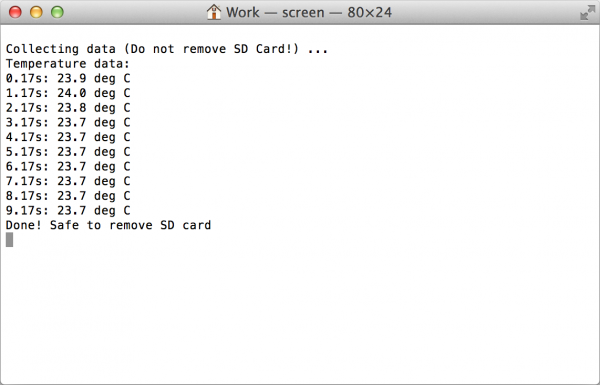
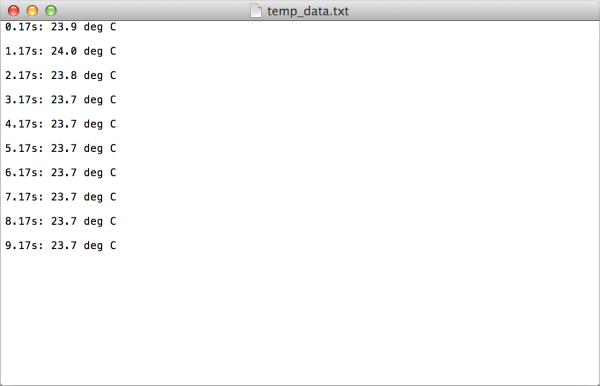
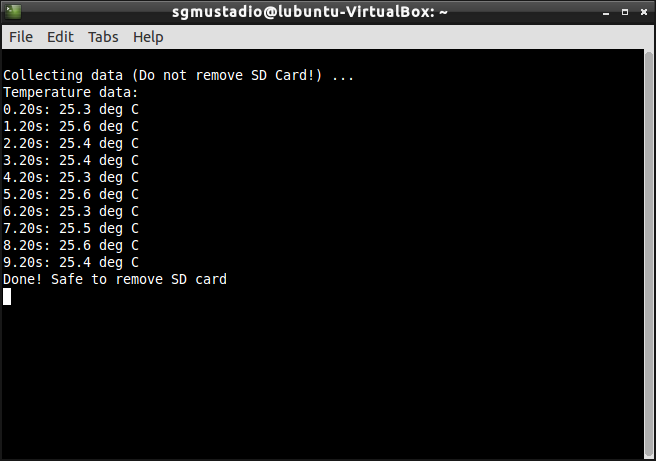
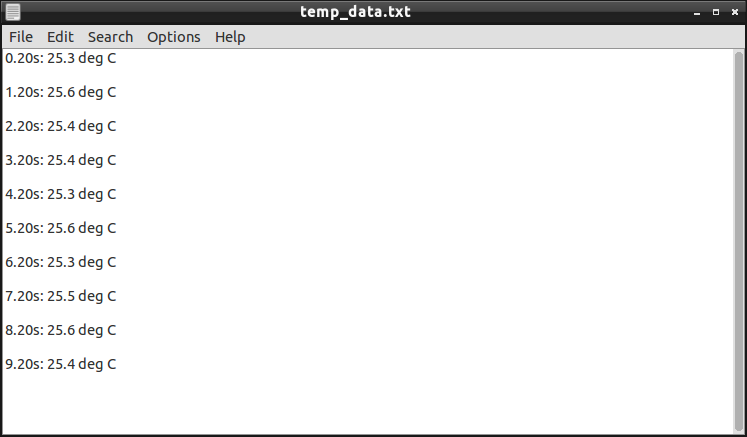
Press the mbed's reset button. You should see some text appear in the console. Wait 10 seconds while the mbed makes some temperature readings, and it will print them to the terminal.
If you see a message like "ERROR: Could not open file for writing!" it means that you do not have an SD card plugged in, you do not have the SD Card breakout connected properly, or the SD card is not formatted properly.
If you plug the SD card into your computer and open up the "temp_data.txt" file with a text editor (located in the SD card's root directory), you should see the logged data.
Mac OS X
First, we need to find out which USB serial port the mbed is attached to. Unplug the mbed. Open up Finder and navigate to Applications → Utilities → Terminal.
Enter the following command:
ls /dev/tty.*
Make a note of which devices appeared. Plug the mbed back into your Mac and enter the command again:
ls /dev/tty.*
A new tty device should appear. For example, in my case, I saw "tty.usbmodem1452" show up. Make a note of which new tty device appeared. Open a serial terminal using the screen command:
screen /dev/tty.<your USB serial device> 9960
Press the reset button on your mbed and wait while temperature data is collected. After about 10 seconds, you should see the temperature data appear in your Terminal.
You can also plug the SD card into your computer and open the "temp_data.txt" file with a text editor (located in the SD card's root directory).
Linux
To begin, we need to find out which USB serial port the mbed is attached to. Unplug the mbed. Open a terminal and enter:
ls /dev/tty*
Plug the mbed back into your computer and enter the command again:
ls /dev/tty*
A new tty device should appear. In my case, I saw "/dev/ttyACM0" show up. Make a note of which new tty device appeared. Use the screen command to open a serial terminal to the mbed:
sudo screen /dev/<your tty device> 9960
Note that you will likely need root access to open the serial terminal!
Press the reset button on your mbed and wait while temperature data is collected. After about 10 seconds, you should see the temperature data appear in your Terminal.
You can also plug the SD card into your computer and open the "temp_data.txt" file with a text editor (located in the SD card's root directory).
Concepts
In this tutorial, we introduced several new concepts. In particular, sending text over serial to a terminal is incredibly useful for debugging and interacting with your project.
Serial Terminal
The serial terminal dates back the first computers and mainframes of the 1960s. In order to interact with a mainframe, several terminals were connected to the mainframe, often with an RS-232 serial connection. These terminals offered a simple keyboard and monitor with a command line interface. Users could type commands and get a response back from the mainframe.
With the rise of the graphical user interface (GUI), such as Windows, terminal programs became emulated inside of the GUI and usually only reserved for more advanced functions. Because many low-power embedded systems, such as the LPC1768, are incapable of running a GUI, we rely on a serial terminal to communicate with the device. Check out our tutorial on Serial Terminal Emulators) for more info.
We use a USB cable to send and receiver serial commands from the computer to the LPC1768. The mbed platform converts the USB signals to UART, which is interpreted by the LPC1768 processor. By using a program like PuTTY, we can send serial commands over that USB channel. If we write serial commands in our mbed program, we can create a communications link between the mbed and our serial terminal. This allows us to interact with the mbed in real time!
Using a serial terminal like this is crucial in working with embedded systems. We can add printf statements in our program that provides status updates, gives the contents of variables, and informs us of errors. Using a serial terminal in this manner is extremely helpful in debugging our embedded programs.
Analog to Digital Converter (ADC)
We used the mbed's internal ADC to take measurements from the temperature sensor. The TMP36 Temperature Sensor works by amplifying the voltage drop across the base and emitter of a transistor as temperature changes.
Pins 15 - 20 on the LPC1768 are capable of analog to digital conversions. Voltages between 0V and 3.3V are broken up (quantized) into steps. The LPC1768 uses a 12-bit value to denote the ADC readings, which means that there are 4096 possible values for voltages. In other words, 0V - 3.3V are broken down into 0.0008057V steps. Reading 0 on the ADC indicates 0V, reading 1 indicates 0.0008057V, reading 2 indicates 0.0016114V and so on.
However, note that in our program, we read the analog value (ain) as a float value between 0.0 and 1.0, where 1.0 is 3.3V. So, in order to determine the actual measured voltage, we multiplied ain * 3.3. Using the measured voltage, we calculated the temperature in Celsius by the equation (Vmeas - 0.5) * 100.0, as per the TMP36 datasheet.
If you would like to read more about ADC, see this Wikipedia article.
Serial Peripheral Interface (SPI)
SPI is a de facto communications bus standard, which means that its pins and protocol are just accepted by industry (versus being spelled out in an actual standard by a governing body, like I2C). SPI generally requires 4 pins: SCK, MISO, MOSI, and CS. Because MISO and MOSI transmit data simultaneously, full duplex communications are possible. SPI is capable of faster transfer speeds than I2C, but can only have 1 master and usually needs 1 extra pin dedicated for each device added on the bus. Read more about SPI here.
SD Cards
Secure Digital (SD) cards grew out of MultiMediaCards (MMC) in 1999 as a small, transportable form factor for non-volatile flash memory. There are several ways to transfer data to and from SD cards: SPI Mode, One-Bit SD Bus Mode, and Four-Bit SD Bus Mode. We used SPI in this project, as it is the easiest to use and does not require an SD host license. Four-Bit mode, on the other hand, requires a host license and offers much faster transfer speeds. Read more about the SD format here.
FAT File System
The mbed SDFileSystem library relies on the File Allocation Table (FAT) file system to read and write files in the SD card. The FAT file system is an old and extremely simple file structure system that is still used by most low storage volume flash media (e.g. SD cards, flash drives, etc.) today. It is supported by every major operating system. In basic terms, the front section of the disk partition is reserved for the file allocation table, which is a simple index that contains the name of the file (or folder) and its location in the partition. Reading the FAT gives you all the files and folders within the disk partition, and you can use this information to read, write, and modify specific files. You can learn more about the FAT file system here.
File Descriptor
In order to read and write to a file (located in our FAT file system!), we need to use a file descriptor to access that file.
In our program, we create a file descriptor with
language:c
FILE *file;
The pointer *file will be used as a handle to manage all of our file operations.
We then open a file from our FAT file system (namely, the temp_data.txt file on our SD card) and assign it to our handle. Notice the "w" parameter, which asks for "write" permissions to the file. If the file does not exist, it is created.
language:c
file = fopen("/sd/temp_data.txt", "w");
After we attempt to open the file, we check to make sure that the file was indeed opened for writing:
langauge:c
if ( file == NULL ) {
    error("ERROR: Could not open file for writing!\n");
    return -1;
}
If the file was not opened successfully, the file variable does not point to anything (i.e. NULL). In this case, we print an error and stop the program.
We use the fprintf() function to write characters to the file.
language:c
fprintf(file, "%2.2fs: %3.1f deg C\n", timer.read(), degrees_c);
Notice that we passed in the file handle as our first parameter, which tells fprintf() where to put the characters.
Once we are done writing to the file, we close it with
language:c
fclose(file);
It's always a good idea to close a file when you are done with it! Otherwise, you might corrupt the file (or, worse, the filesystem) if your program starts to behave unexpectedly with a file still open.
We can perform a similar procedure to read from a file. In our example, we use fgetc() to read characters from the file one at a time.
Lack of Super Loop
What happened to our while(1) statement? All of our other examples included this loop-forever statement to make up our super loop architecture. In this tutorial, we only wanted the program to run once and then stop. To do this, we do not include a while(1) statement and exit main() with
language:c
return 0;
After our program executes the return line in main(), the program stops running. We need to restart the mbed board (with the button) to run the program again.
Generally, it is good practice to include an empty while loop:
language:c
while (1) { }
to end your program in an embedded system. We did not include it to show that you can get away without it, and the program will still execute (only once, though!).
You can read more about return values from main().
Going Further
Sensor reading and logging is one of the most useful features of embedded systems. Additionally, we looked at how we can use a terminal program to interact with the mbed, which is important for debugging projects.
Beyond the Tutorial
- Right now, the SD card is at risk for being ruined if you remove it or shut off power in the middle of a write operation. Change the code so that the file is only ever opened and written to just after a measurement is made.
- Change the code so that measurements are taken once per minute and do not stop after just 10 readings.
- Make the mbed consume less power between readings (Hint: see the PowerControl library)
- Have the mbed post the collected data once per day on a data.sparkfun.com data stream. You'll be able to see some interesting patterns in the temperature data after a few days!
Digging Deeper
- Read about the history of computer terminals
- Read more about the SD card format
- Look into the specifics of the FAT file system
Experiment 9: PWM Sounds
Let's make some music! By using the pulse-width modulation (PWM) pins on the mbed LPC1768 and a speaker (or headphones), we can make rudimentary sounds. By controlling the PWM frequency, we can create specific notes in the music scale. While it won't sound like a full-size orchestra, the notes (and perhaps the song) will be recognizable.
This tutorial will cover how to connect a headphone jack to the mbed and control the PWM pins to create basic sounds.
Note: You will need a set of headphones or speakers to hear the sounds.
Suggested Reading
The Circuit
This circuit can be made with parts in the SparkFun mbed Starter Kit. Also, keep in mind that the LPC1768 box contains a USB mini-B cable for programming and power.
Parts List
To follow this experiment, you would will need the following materials if you did not order the SparkFun mbed starter kit. You may not need everything though depending on what you have. Add it to your cart, read through the guide, and adjust the cart as necessary.
In addition to the listed parts, you will also need a set of headphones or speakers (with a 3.5mm plug) to complete the tutorial.
Schematic
Connections
Connect a PWM output pin of the LPC1768 to the TIP of the audio jack breakout. Also, connect the tip to RING1 of the audio jack in order to get sound out of both the left and right speakers. Do not connect anything to RING2!
Fritzing Diagram
Hookup Table
Place the LPC1768 in a breadboard with pin VOUT in position i1 and pin 20 in position b20.
Connect the rest of the components as follows:
| Component | Breadboard | ||
|---|---|---|---|
| TRRS 3.5mm Jack Breakout* | b27 (TIP) | b28 (RING1) | b30 (SLEEVE) |
| Jumper Wire | a1 | d30 | |
| Jumper Wire | j20 | e27 | |
| Jumper Wire | c27 | c28 | |
* Pins not listed are not used.
The Code
To make sounds, we need to modulate our PWM pin with a particular frequency. Luckily, we can control the precise frequency of the PWM within the mbed. If you looked into how PWM works, you'll notice that it is a square wave. Square waves do not make the most pleasant sound, but it will be good enough for our purposes.
Program
This demo is simple! We don't need any libraries.
Navigate to the mbed.org, login, and navigate to your Compiler.
Create a new program with the "Blinky LED Hello World" template. Name it something like "pwm_song."
Click on "main.cpp" in your project, remove the template code, and copy in the following code.
language:c
// Plays a familiar melody using PWM to the headphones. To find the frequencies
// of notes, see http://en.wikipedia.org/wiki/Piano_key_frequencies
// Based on the "speaker_demo_PWM" program by Jim Hamblen

#include "mbed.h"

#define VOLUME 0.01
#define BPM 100.0

PwmOut pwm_pin(p21);

// Plays a sound with the defined frequency, duration, and volume
void playNote(float frequency, float duration, float volume) {
    pwm_pin.period(1.0/frequency);
    pwm_pin = volume/2.0;
    wait(duration);
    pwm_pin = 0.0;
}

int main()
{
    float beat_duration;

    // Calculate duration of a quarter note from bpm
    beat_duration = 60.0 / BPM;

    // Loop forever
    while(1) {

        // First measure
        playNote(391.995, (beat_duration - 0.1), VOLUME);
        wait(0.1);
        playNote(391.995, (beat_duration - 0.1), VOLUME);
        wait(0.1);
        playNote(391.995, (beat_duration - 0.1), VOLUME);
        wait(0.1);
        playNote(311.127, (0.75 * beat_duration), VOLUME);
        playNote(466.164, (0.25 * beat_duration), VOLUME);

        // Second measure
        playNote(391.995, (beat_duration - 0.1), VOLUME);
        wait(0.1);
        playNote(311.127, (0.75 * beat_duration), VOLUME);
        playNote(466.164, (0.25 * beat_duration), VOLUME);
        playNote(391.995, ((2 * beat_duration) - 0.1), VOLUME);
        wait(0.1);

        // Third measure
        playNote(587.330, (beat_duration - 0.1), VOLUME);
        wait(0.1);
        playNote(587.330, (beat_duration - 0.1), VOLUME);
        wait(0.1);
        playNote(587.330, (beat_duration - 0.1), VOLUME);
        wait(0.1);
        playNote(622.254, (0.75 * beat_duration), VOLUME);
        playNote(466.164, (0.25 * beat_duration), VOLUME);

        // Fourth measure
        playNote(369.994, (beat_duration - 0.1), VOLUME);
        wait(0.1);
        playNote(311.127, (0.75 * beat_duration), VOLUME);
        playNote(466.164, (0.25 * beat_duration), VOLUME);
        playNote(391.995, ((2 * beat_duration) - 0.1), VOLUME);
        wait(0.1);
    }
}
Run
Compile the program and copy the downloaded file to the mbed. Connect a set of headphones or speakers to the audio jack. Press the mbed's reset button, and you should hear a tune come out of your headphones or speakers!
If the volume is too low, adjust the VOLUME constant in the program (try 0.1 or 1).
Concepts
Much like in our other PWM tutorial, we relied on pulse-width modulation to emulate an analog signal (sound, this time). We also connected a peripheral that allowed us to convert electrical signals into sound: a speaker (or headphones, but these are nothing more than tiny speakers that wrap around your head).
PWM for Sound
Much like in Part 2, we used a PWM to control the a signal. In this example, we adjusted the period of the PWM (the inverse of the frequency) to control the pitch of the musical note. We also adjusted the duty cycle of the PWM to control the volume of the note.
If you looked at the code, you'll notice that there is also a "duration" parameter in the playNote function. This told the function how long to play the note. So, by setting various volumes, frequencies (pitch), and durations, we can play an entire song!
To read more about PWM, see this Wikipedia article.
Speakers
Speakers are fascinating pieces of technology, despite their seemingly simple function. An electromagnet moves an attached membrane, or cone, through a permanent magnet. An electrical current causes the electromagnet to move at varying rates, which moves the cone in a similar fashion. The cone forces air back and forth, which creates sound! At certain frequencies, these moving airwaves can be heard by our ears.
To learn more about how speakers work, see this article.
Going Further
Making sounds with PWM can be useful for adding feedback into your project. You could make chirps and buzzes to notify the user of important information. That, or you could just make an R2-D2 clone.
Beyond the Tutorial
- Search for sheet music from your favorite song, and using a note/frequency chart, make the mbed play your song
- Try using the digital-to-analog converter (DAC) pins to play songs instead of PWM (Hint: see Jim Hamblen's example)
- Can you make the DAC play a chord instead of a single note?
Digging Deeper
- As it turns out, you can use a combination of DAC and PWM to make some interesting sounds. Read about their uses in synthesizers.
- In order to get louder sounds, we need to amplify our signal. Read about how amplifiers work.
- Headphones have a long and interesting history. Check it out here.
Experiment 10: Hardware Soundboard
In the final tutorial of our 10-part series, we will make a hardware soundboard using our mbed. We will store some .wav files on an SD card and play one whenever a button is pressed. You could use it to interject hilarious comments into any conversation!
Suggested Reading
The Circuit
This circuit can be made with parts in the SparkFun mbed Starter Kit. Also, keep in mind that the LPC1768 box contains a USB mini-B cable for programming and power.
Parts List
To follow this experiment, you would will need the following materials if you did not order the SparkFun mbed starter kit. You may not need everything though depending on what you have. Add it to your cart, read through the guide, and adjust the cart as necessary. The experiment will be using 1x 330Ohm resistor.
Schematic
Connections
Connect a digital-to-analog (DAC) pin of the mbed (pin 18, in this case) to a 330 Ω resistor and connect that resistor to the base of an NPN transistor (2N3904). Connect the emitter of the transistor to ground and the collector to the negative (-) side of the speaker. The positive side of the speaker should be attached to +5V (the VU pin on the mbed). Note that the +/- markings can be found on the underside of the speaker (there are no wires on the speaker like in the Fritzing diagram).
To hook up the buttons, connect one side of each pushbutton to ground and the other to pins 11, 12, 13, and 14 of the mbed.
| Polarized Components | Pay special attention to the component’s markings indicating how to place it on the breadboard. Polarized components can only be connected to a circuit in one direction. Polarized components are highlighted with a yellow warning triangle in the table below. |
Fritzing Diagram
Hookup Table
Place the LPC1768 in the first breadboard with pin VOUT in position i1 and pin 20 in position b20.
Connect the rest of the components as follows:
| Component | Breadboard 1 | Breadboard 2 | ||||||||
|---|---|---|---|---|---|---|---|---|---|---|
| MicroSD Transflash Breakout* | h24 (CS) | h25 (DI) | h26 (VCC) | h27 (SCK) | h28 (GND) | h29 (DO) | ||||
| Transistor - NPN (2N3904) | c27 (E) | c28 (B) | c29 (C) | |||||||
| 330 Resistor | b24 | b28 | ||||||||
| Pushbutton | d2 | d4 | g2 | g4 | ||||||
| Pushbutton | d7 | d9 | g7 | g9 | ||||||
| Pushbutton | d12 | d14 | g12 | g14 | ||||||
| Pushbutton | d17 | d19 | g17 | g19 | ||||||
| Speaker | f25 (+) | e30 (-) | ||||||||
| Jumper Wire | j1 | g26 | ||||||||
| Jumper Wire | a1 | ( - ) | ||||||||
| Jumper Wire | a5 | g25 | ||||||||
| Jumper Wire | a6 | g29 | ||||||||
| Jumper Wire | a7 | g27 | ||||||||
| Jumper Wire | a8 | g24 | ||||||||
| Jumper Wire | g28 | ( - ) | ||||||||
| Jumper Wire | a18 | a24 | ||||||||
| Jumper Wire | a27 | ( - ) | ||||||||
| Jumper Wire | a29 | a30 | ||||||||
| Jumper Wire | j2 | j25 | ||||||||
| Jumper Wire | a11 | j2 | ||||||||
| Jumper Wire | ( - ) | j4 | ||||||||
| Jumper Wire | a12 | j7 | ||||||||
| Jumper Wire | ( - ) | j9 | ||||||||
| Jumper Wire | a13 | j12 | ||||||||
| Jumper Wire | ( - ) | j14 | ||||||||
| Jumper Wire | a14 | j17 | ||||||||
| Jumper Wire | ( - ) | j19 | ||||||||
* Pins not listed are not used.
Tips
Transistor
Make sure you are using the 2N3904 transistor and not the temperature sensor! Note that the flat edge of the transistor is facing down in the Fritzing diagram.
Speaker
Notice that the speaker has the positive (+) and negative (-) pins labeled on the underside. The speaker will fit directly on the breadboard, as the Fritzing diagram has been modified to show where the speaker should be plugged in (otherwise it would cover up the rest of the components in the picture!).
Place the positive (+) terminal of the speaker into hole f25 of the breadboard and the negative (-) terminal into hole e30. The speaker will be angled across the breadboard, but it will leave enough room for wires to be plugged into j25 and a30.
The Code
For our soundboard, we need to read files from an SD card, which means using the SDFileSystem again. Additionally, we want to add another library that allows us to play .wav files.
Libraries
Navigate to the mbed.org, login, and navigate to your Compiler.
Create a new program with the "Blinky LED Hello World" template. Name it something like "soundboard."
Navigate to the following pages and import each library into your "soundboard" program.
The libraries should appear in your soundboard project.
Program
Click on "main.cpp" in your project, remove the template code, and copy in the following code.
language:c
// Soundboard that plays 1 of 4 .wav files stored on the SD card based on 1 of
// 4 buttons pressed

#include "mbed.h"
#include "wave_player.h"
#include "SDFileSystem.h"

// .wav files to play
const char *filenames[4] = { "/sd/good_morning.wav",
                             "/sd/questions.wav",
                             "/sd/lack_discipline.wav",
                             "/sd/stop_whining.wav"};

// Define buttons
DigitalIn button_1(p11);
DigitalIn button_2(p12);
DigitalIn button_3(p13);
DigitalIn button_4(p14);

// USB serial (tx, rx)
Serial pc(USBTX, USBRX);

// SD card
SDFileSystem sd(p5, p6, p7, p8, "sd");

// Audio out (DAC)
AnalogOut       DACout(p18);
wave_player     waver(&DACout);

// Play a .wav file
int playSound(int file_num) {

    FILE *file;

    // Open sound file for reading
    file = fopen(filenames[file_num], "r");
    if ( file == NULL ) {
        error("ERROR: Could not open file for reading!\n");
        return -1;
    }

    // Play the sound file
    pc.printf("Playing sound clip %i\r\n", (file_num + 1));
    waver.play(file);

    // Reset to beginning of file and close it
    fseek(file, 0, SEEK_SET);
    fclose(file);

    return 0;
}

int main() {

    // Use internal pull-up resistors
    button_1.mode(PullUp);
    button_2.mode(PullUp);
    button_3.mode(PullUp);
    button_4.mode(PullUp);

    pc.printf("\r\nHardware Soundboard\r\n");

    while(1) {

        // Figure out which button was pressed and play that file
        if ( button_1 == 0 ) {
            playSound(0);
        }
        if ( button_2 == 0 ) {
            playSound(1);
        }
        if ( button_3 == 0 ) {
            playSound(2);
        }
        if ( button_4 == 0 ) {
            playSound(3);
        }

        // Wait 10ms before sampling the buttons again
        wait(0.01);
    }
}
Run
Insert the micro SD card into the USB to micro SD card adapter and insert the USB adapter into your computer. Copy the following .wav files to the SD's root directory:
Remove the SD card from your computer and plug it into the breakout board on the soundboard project.
Compile the program and copy the downloaded file to the mbed. Press the mbed's reset button to start running the program. Press one of the 4 buttons to hear a sound clip!
Concepts
This project was larger than the others before it. There are a number of things going on, but most of them we covered in previous tutorials.
Amplifier
In addition to adding a speaker to play sounds, we created a very simple amplifier to increase the signal strength (and the volume). We used an NPN transistor (specifically, a 2N3904) that converts a small current through its base into a larger current through its collector. If we tried to power the speaker directly from the mbed's pin, we would likely draw enough power to hurt the processor. Audio amplifiers can be quite complex. Read more about them here.
Internal Pull-ups
When we used buttons in previous tutorials, we used external pull-up resistors on the buttons to prevent a floating pin. In order to save board space for this project, we used mbed's internal pull-ups. These are resistors internal to the mbed processor and can be enabled for each of the pins with the following line of code:
pin_name.mode(PullUp);
Going Further
In this demo, we combined many concepts to create a fun project. We made a simple amplifier to play sounds and relied on the wave_player library to read .wav files. Adding sound to a project can add a layer of interactivity and bring it to life.
Beyond the Tutorial
- Download or create your own .wav files and play them using our soundboard. Note: you might have to use an editing program like Audacity to convert sound clips into .wav files if they do not play on the mbed.
- Add lights! Program some LEDs to flash whenever a clip is being played.
- You might need some extra components not found in the kit, but can you get a sound recorder to work on the mbed? (Hint: see the Simple Wave Recorder & Player library)
Digging Deeper
- Read about the internals of a WAVE file
- Look into how analog-to-digital converters (ADC) work
- Want to talk to your mbed with voice recognition? Check out Jim Hamblen's EasyVR tutorial
The End!
This demo finishes up our 10-part series on the mbed. We covered a number of topics that are considered important to embedded systems: buttons, LEDs, GPIO, ADC, DAC, interrupts, SPI, I2C, UART, etc. You had the opportunity to search for libraries on mbed.org, import them into your program, and run some basic firmware on the LPC1768. By now, you have had a good exposure to the building blocks of embedded programming on the mbed and should be ready to tackle your first project.
Make something cool! Take a picture of it and tag @sparkfun or @mbedmicro on Twitter. Or, post your project to the mbed.org Cookbook.
