mbed Starter Kit Experiment Guide
This Tutorial is Retired!
This tutorial covers concepts or technologies that are no longer current. It's still here for you to read and enjoy, but may not be as useful as our newest tutorials.
Experiment 5: Internet Clock
With the graphic LCD still connected, we hook up an Ethernet jack to our mbed to get it on the Internet. We will use the Network Time Protocol (NTP) to fetch the current time (in UTC/GMT) and display it on the LCD.
IMPORTANT: You will need access to an Internet-connected router with an open Ethernet port for this tutorial.
Suggested Reading
The Circuit
This circuit can be made with parts in the SparkFun mbed Starter Kit. Also, keep in mind that the LPC1768 box contains a USB mini-B cable for programming and power.
Parts List
To follow this experiment, you would will need the following materials if you did not order the SparkFun mbed starter kit. You may not need everything though depending on what you have. Add it to your cart, read through the guide, and adjust the cart as necessary.
Schematic
Connections
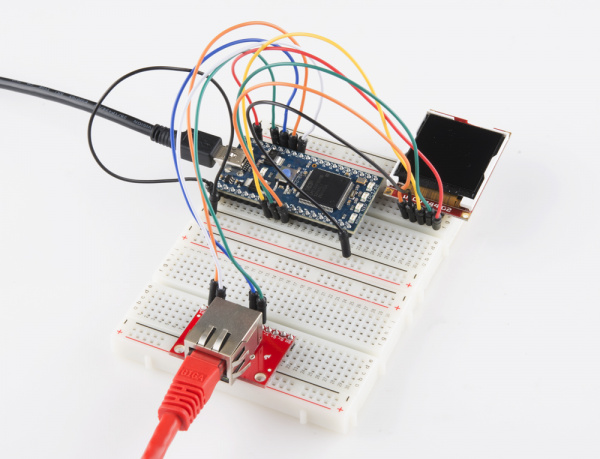
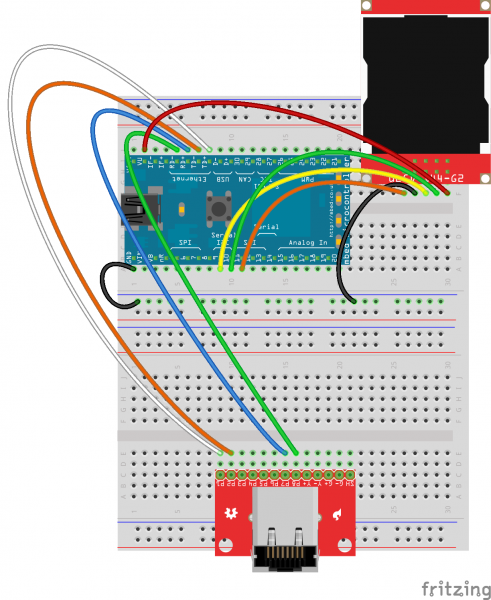
Connect the LPC1768 to the LCD and Ethernet jack in the following fashion. Note that the LCD uses the same connections as in Part 3.
Fritzing Diagram
Hookup Table
Place the LPC1768 in the first breadboard with pin VOUT in position i1 and pin 20 in position b20.
Connect the rest of the components as follows:
| Component | Breadboard 1 | Breadboard 2 | |||||||
|---|---|---|---|---|---|---|---|---|---|
| uLCD-144-G2* | h26 (RES) | h27 (GND) | h28 (RX) | h29 (TX) | h30 (+5V) | ||||
| RJ45 MagJack Breakout* | c9 (P1) | c10 (P2) | c15 (P7) | c16 (P8) | |||||
| Jumper Wire | j2 | f30 | |||||||
| Jumper Wire | a1 | ( - ) | |||||||
| Jumper Wire | a9 | f28 | |||||||
| Jumper Wire | a10 | f29 | |||||||
| Jumper Wire | a11 | f26 | |||||||
| Jumper Wire | ( - ) | f27 | |||||||
| Jumper Wire | j5 | e16 | |||||||
| Jumper Wire | j6 | e15 | |||||||
| Jumper Wire | j7 | e10 | |||||||
| Jumper Wire | j8 | e9 | |||||||
* Pins not listed are not used.
The Code
We will be relying heavily on pre-built libraries for this project. We need the same LCD library from the previous two tutorials as well as mbed's Ethernet and NTP libraries.
Libraries
Navigate to the mbed.org, login, and navigate to your Compiler.
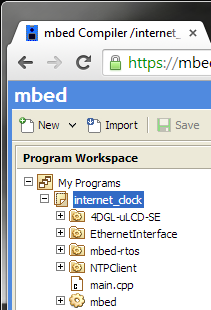
Create a new program with the "Blinky LED Hello World" template. Name it something like "internet_clock."
Navigate to the following pages and import each library into your "internet_clock" program.
The mbed library should already be imported if you used the "Blinky" template.
Program
Click on "main.cpp" in your project, remove the template code, and copy in the following code.
language:c
// Internet Clock with LCD based on the work by Jim Hamblen and Tyler Lisowski

#include "mbed.h"
#include "EthernetInterface.h"
#include "NTPClient.h"
#include "uLCD_4DGL.h"

// Parameters
char* domain_name = "0.uk.pool.ntp.org";
int port_number = 123;

// Networking
EthernetInterface eth;
NTPClient ntp_client;

// Graphic LCD - TX, RX, and RES pins
uLCD_4DGL uLCD(p9,p10,p11);

int main() {

    time_t ct_time;
    char time_buffer[80];

    // Initialize LCD
    uLCD.baudrate(115200);
    uLCD.background_color(BLACK);
    uLCD.cls();

    // Connect to network and wait for DHCP
    uLCD.locate(0,0);
    uLCD.printf("Getting IP Address\n");
    eth.init();
    if ( eth.connect() == -1 ) {
        uLCD.printf("ERROR: Could not\nget IP address");
        return -1;
    }
    uLCD.printf("IP address is \n%s\n\n",eth.getIPAddress());
    wait(1);

    // Read time from server
    uLCD.printf("Reading time...\n\r");
    ntp_client.setTime(domain_name, port_number);
    uLCD.printf("Time set\n");
    wait(2);
    eth.disconnect();

    // Reset LCD
    uLCD.background_color(WHITE);
    uLCD.textbackground_color(WHITE);
    uLCD.color(RED);
    uLCD.cls();
    uLCD.text_height(2);

    // Loop and update clock
    while (1) {
        uLCD.locate(0, 1);
        ct_time = time(NULL);
        strftime(time_buffer, 80, "    %a %b %d\n    %T %p %z\n    %Z\n", \
                                                localtime(&ct_time));
        uLCD.printf("    UTC/GMT:\n%s", time_buffer);
        wait(0.1);
    }
}
Run
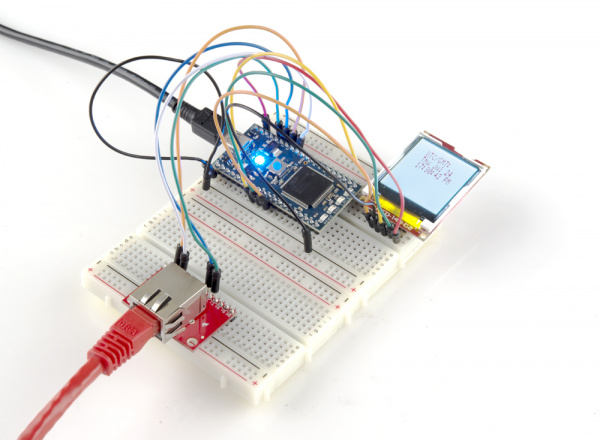
Compile the program and copy the downloaded file to the mbed. Connect the Ethernet cable from an Internet-connected router/switch/hub to your project's MagJack breakout. Press the mbed's restart button, and you should see the LCD come to life with connection details. After a few seconds, the LCD should change to show the current time (in UTC/GMT format).
Concepts
Connecting something to the Internet opens up a whole new world. There is a lot going on to communicate to a remote server, so we recommend looking into a few concepts to familiarize yourself with how the Internet works.
OSI Model
Ethernet is just one small component in making devices talk over the Internet. Many protocols make up Internet communications and can be thought of like an onion. Each protocol layer corresponds to a layer within the onion, with your custom message (in this case, a request for time using NTP) in the middle. Several other layers are stacked on top of your message in order to make the communications through the Internet work. If you would like to understand how these protocols work, start with the 7-layer Open Systems Interconnection (OSI) model.
TCP and UDP
TCP and UDP are the two most important Transport Layer protocols. Transmission Control Protocol (TCP) is mostly used by services that require a guaranteed delivery, such as websites and email. On the other hand, we were using the User Datagram Protocol (UDP) to send and receive time information with NTP.
Application Layer Protocols
Luckily, the mbed handles most of the protocols for us, with the help of some libraries. When we are writing applications in the mbed (or any system), we are mostly concerned with the application layer to make devices talk to each other (as the lower levels are already implemented for us). In this tutorial, we relied on the Network Time Protocol (NTP) to talk to a time server on the Internet. When it comes to programming embedded devices, the Dynamic Host Configuration Protocol (DHCP), the Hypertext Transfer Protocol (HTTP), and the File Transfer Protocol (FTP) are also important.
Timekeeping
Embedded systems have several methods to keeping time. The two most popular ways are counting clock cycles and using a real-time clock (RTC).
If we know the frequency of the processor's clock, then we can calculate how many clock cycles we need to wait if we want to delay by a certain amount of time. For example, if we have a 100MHz clock, we know that a cycle happens every 0.01 microseconds (1 / 100MHz = 0.01 microseconds). If we want to delay 20 milliseconds, then we would have the processor do nothing for 2,000,000 cycles (0.01 microseconds x 2,000,000 = 20,000 microseconds = 20 milliseconds).
These delay functions have been wrapped up for you with mbed. To delay for a number of seconds, use wait(). The other two functions, wait_ms() and wait_us(), allow you to delay by a number of milliseconds and microseconds, respectively.
Unfortunately, waiting by cycles is often not precise. Your clock speed may be slightly off (thanks to things like temperature), or your wait() function might be interrupted by other code, which would throw off your ability to count exactly how much time has passed. Fortunately, there is a piece of hardware that can keep time much more accurately: the real-time clock.
RTCs are often a separate chip with its own clock that has the sole purpose of keeping track of time. Many times (such as in the case of your computer), the RTC will have a small battery attached so that it will remember the time even when you turn off your computer.
Luckily for us, the mbed has an RTC already built in to its circuitry. The mbed library handles talking to the RTC module so we can set and read the time. We call set_time() to set the current time on the RTC and localtime() to read the time. Note that in the Internet Clock example, we use setTime(), a method in NTPClient, to set the RTC time. We then use localtime() to retrieve the time.
To read more about real-time clocks, see this article.
Going Further
By connecting our mbed to the Internet, we opened up many new possibilities. We won't continue with the Internet in this tutorial series, but feel free to try out some of the suggested projects in "Beyond the Tutorial" to learn more about making devices talk to each other!
Beyond the Tutorial
- Adjust the clock to your timezone
- Display your current location using IP-based geolocation (Hint: read this article)
- Using HTTP, can you download the contents of a website and display the HTML on your LCD? (Hint: see the HTTPClient library)
- Make a feed on data.sparkfun.com and push some data to it (Hint: see this guide on pushing data to data.sparkfun)
- Try running an HTTP Server on the mbed
Digging Deeper
- The History of the Internet
- The actual HTTP Specification
- Read about the Internet of Things


