mbed Starter Kit Experiment Guide
This Tutorial is Retired!
This tutorial covers concepts or technologies that are no longer current. It's still here for you to read and enjoy, but may not be as useful as our newest tutorials.
 Shawn Hymel
Experiment 8: Temperature Logging
We are going to move on to a very important topic for embedded systems: sensor data logging! Many microcontroller projects are built around the concept of taking some sort of measurement (temperature, distance, light, acceleration, GPS coordinates, heart rate, etc.) and logging it. This data is examined (later or in real time) to look for patterns or notify the user of some kind of anomoly.
In this tutorial, we will have the mbed LPC1768 take measurements from a temperature sensor, log the data to a micro SD card, and print out the contents of the SD card to a console.
Suggested Reading
- How does a temperature sensor work?
- Serial Peripheral Interface (SPI)
- mbed's SD Card File System Library
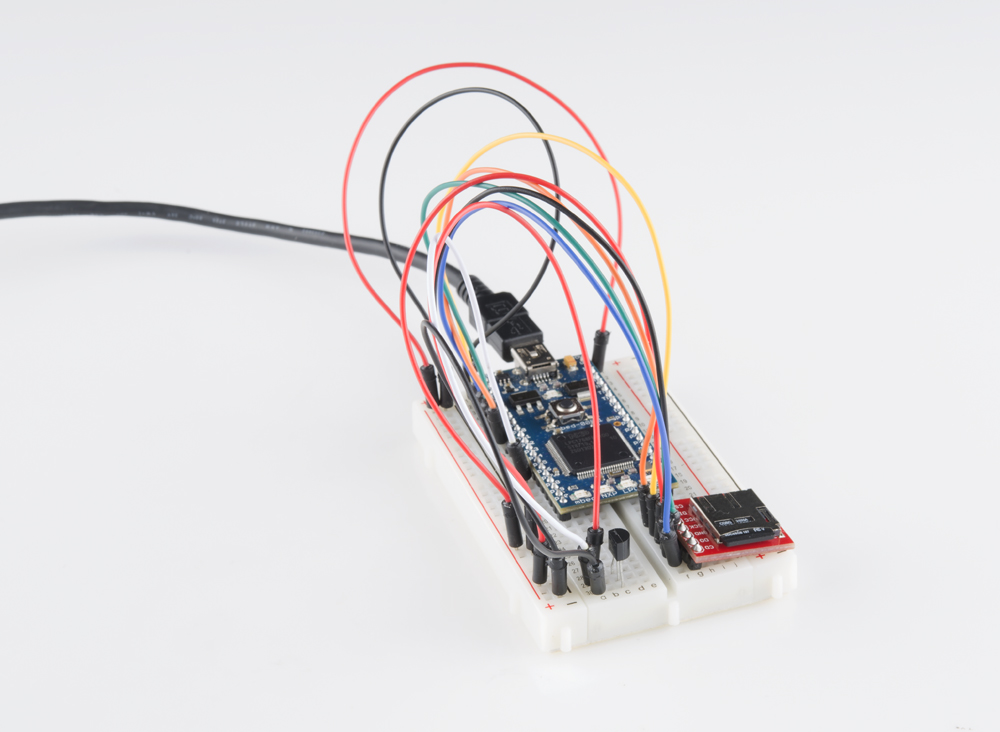
The Circuit
This circuit can be made with parts in the SparkFun mbed Starter Kit. Also, keep in mind that the LPC1768 box contains a USB mini-B cable for programming and power.
Parts List
To follow this experiment, you would will need the following materials if you did not order the SparkFun mbed starter kit. You may not need everything though depending on what you have. Add it to your cart, read through the guide, and adjust the cart as necessary.
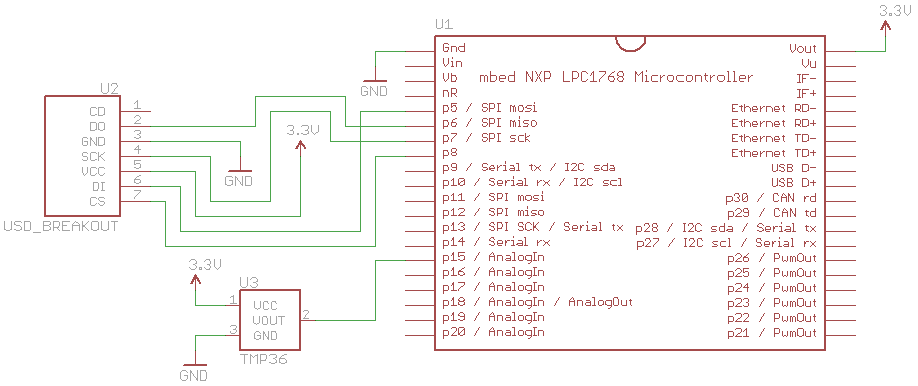
Schematic
Connections
Connect the LPC1768 to the micro SD card breakout board and TMP36 temperature sensor. Insert a micro SD card into the breakout board.
| Polarized Components | Pay special attention to the component’s markings indicating how to place it on the breadboard. Polarized components can only be connected to a circuit in one direction. Polarized components are highlighted with a yellow warning triangle in the table below. |
Fritzing Diagram

Hookup Table
Place the LPC1768 in a breadboard with pin VOUT in position i1 and pin 20 in position b20.
Connect the rest of the components as follows:
| Component | Breadboard | |||||
|---|---|---|---|---|---|---|
| MicroSD Transflash Breakout* | g24 (CS) | g25 (DI) | g26 (VCC) | g27 (SCK) | g28 (GND) | g29 (DO) |
| Temperature Sensor - TMP36 | c28 (V+) | c29 (SIGNAL) | c30 (GND) | |||
| Jumper Wire | j1 | ( + ) | ||||
| Jumper Wire | a1 | ( - ) | ||||
| Jumper Wire | a5 | f25 | ||||
| Jumper Wire | a6 | f29 | ||||
| Jumper Wire | a7 | f27 | ||||
| Jumper Wire | a8 | f24 | ||||
| Jumper Wire | ( - ) | f28 | ||||
| Jumper Wire | ( + ) | f26 | ||||
| Jumper Wire | a15 | a29 | ||||
| Jumper Wire | ( - ) | a30 | ||||
| Jumper Wire | ( + ) | a28 | ||||
* Pins not listed are not used.
Tips
Make sure you face the TMP36 temperature sensor the correct way. The flat side of the black package body is considered the front. See this tutorial to learn more about polarity.

The Code
We plan to read an analog voltage from the sensor, and to do this, we rely on the mbed's analog-to-digital converter (ADC) built into the chip. Every time we read this value, we convert it to an actual temperature in degrees Celsius and log it to the SD card. Additionally, we will be using the mbed's built-in USB-to-Serial device to print our logged values to a console on our computer.
Software
Windows
If you are on Windows, we will be relying on a program called "PuTTY." You are also welcome to use any number of other serial terminal programs, such as CoolTerm or Realterm.
Navigate to the PuTTY homepage and download putty.exe.
There is no installation process, so just copy putty.exe to some place you will remember, such as your desktop.
Additionally, we need to install a Serial Port driver if you are on Windows. Navigate to mbed's Windows serial configuration page and download the latest driver.
Double click the downloaded file and follow the on-screen instructions to install the driver.
Mac OS X
Good news! If you are on a Mac, you already have the necessary serial drivers and program. We will be using the screen command.
Linux
Just like Mac, you should have the serial driver and tools already installed. If not, look into getting screen or another serial console tool.
If you need to install screen, see this guide for yum or this guide for apt-get.
Libraries
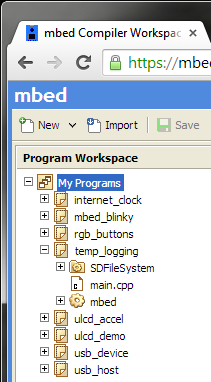
Navigate to the mbed.org, login, and navigate to your Compiler.
Create a new program with the "Blinky LED Hello World" template. Name it something like "temp_logging."
Navigate to the following pages and import each library into your "temp_logging" program.
The SDFileSystem library should appear in your temp_logging project.
Program
Click on "main.cpp" in your project, remove the template code, and copy in the following code.
language:c
// Temperature logging demo - record temperatures to SD card and print them to
// the console every 10 seconds

#include "mbed.h"
#include "SDFileSystem.h"

// Analog input (pin 15)
AnalogIn ain(p15);

// USB serial (tx, rx)
Serial pc(USBTX, USBRX);

// SD card (SPI pins)
SDFileSystem sd(p5, p6, p7, p8, "sd");

// Timer for our timestamps
Timer timer;

int main() {

    FILE *file;
    float voltage_in;
    float degrees_c;
    int i;
    int c;

    // Start our timer
    timer.start();

    // Open file for writing
    file = fopen("/sd/temp_data.txt", "w");
    if ( file == NULL ) {
        error("ERROR: Could not open file for writing!\n\r");
        return -1;
    }

    // Tell the user we need to wait while we collect some data
    pc.printf("\nCollecting data (Do not remove SD Card!) ...\n\r");

    // Collect temperatures with timestamps every second
    for(i = 0; i < 10; i++) {
        voltage_in = ain * 3.3;
        degrees_c = (voltage_in - 0.5) * 100.0;
        fprintf(file, "%2.2fs: %3.1f deg C\n\r", timer.read(), degrees_c);
        wait(1);
    }

    // Close file and re-open it for reading
    fclose(file);
    file = fopen("/sd/temp_data.txt", "r");
    if ( file == NULL ) {
        error("ERROR: Could not open file for reading!\n\r");
        return -1;
    }

    // Print results to console
    pc.printf("Temperature data:\n\r");
    while(1) {
       c = fgetc(file);
       if ( c == EOF ) {
           break;
       }
       pc.putc(c);
    }

    // Close the file and finish
    fclose(file);
    pc.printf("Done! Safe to remove SD card\n\r");

    return 0;
}
Run
Windows
Compile the program and copy the downloaded file to the mbed.
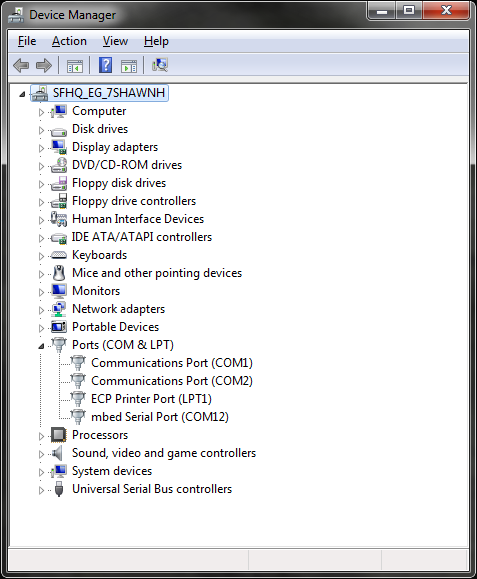
Click the Windows Start button and search for "device manager."
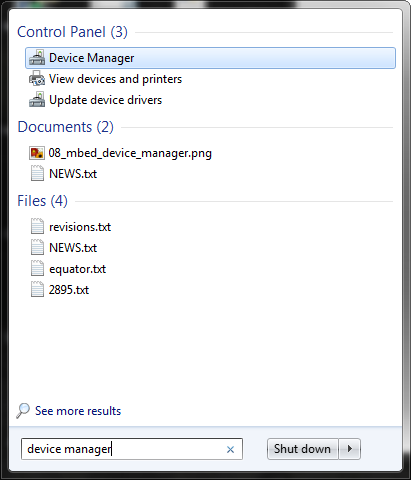
Click on "Device Manager." You should see the Device Manager open up. Click to expand "Ports (COM & LPT)." Make a note of which COM port is listed as the "mbed Serial Port" (COM12, in this example).
Note: If you do not see the mbed Serial Port listed, you need to install (or re-install) the mbed Windows serial driver.
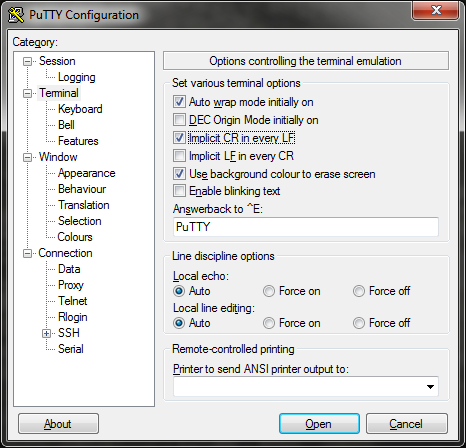
Double-click the putty.exe icon to start PuTTY. In the left pane, click "Terminal" to configure PuTTY. Check "Implicit CR in every LF" so that text appears properly aligned in our console.
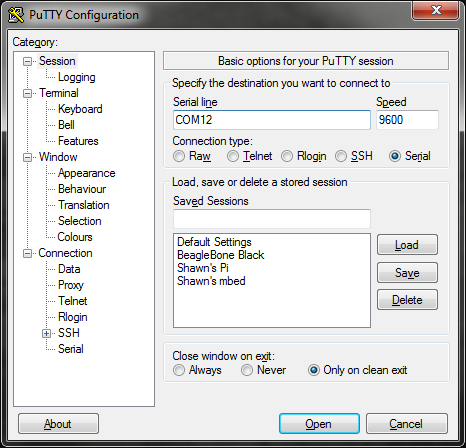
Click "Session" in the left pane. Click the "Serial" radio button and change "Serial line" to your COM port (COM12 in this example). Leave speed at 9600. Click "Open" to start a serial terminal.
Press the mbed's reset button. You should see some text appear in the console. Wait 10 seconds while the mbed makes some temperature readings, and it will print them to the terminal.
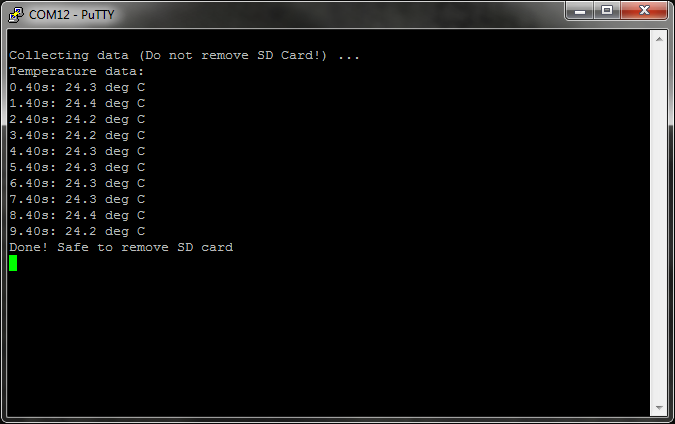
If you see a message like "ERROR: Could not open file for writing!" it means that you do not have an SD card plugged in, you do not have the SD Card breakout connected properly, or the SD card is not formatted properly.
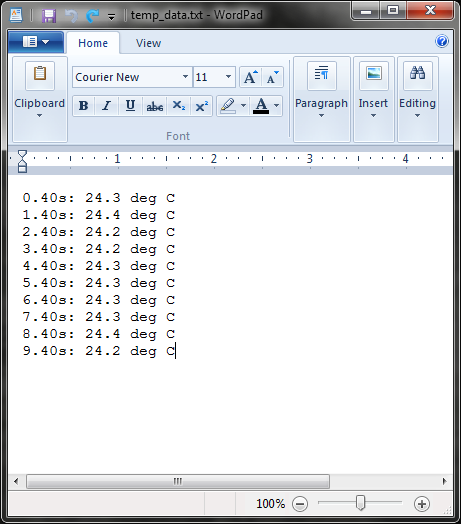
If you plug the SD card into your computer and open up the "temp_data.txt" file with a text editor (located in the SD card's root directory), you should see the logged data.
Mac OS X
First, we need to find out which USB serial port the mbed is attached to. Unplug the mbed. Open up Finder and navigate to Applications → Utilities → Terminal.
Enter the following command:
ls /dev/tty.*
Make a note of which devices appeared. Plug the mbed back into your Mac and enter the command again:
ls /dev/tty.*
A new tty device should appear. For example, in my case, I saw "tty.usbmodem1452" show up. Make a note of which new tty device appeared. Open a serial terminal using the screen command:
screen /dev/tty.<your USB serial device> 9960
Press the reset button on your mbed and wait while temperature data is collected. After about 10 seconds, you should see the temperature data appear in your Terminal.

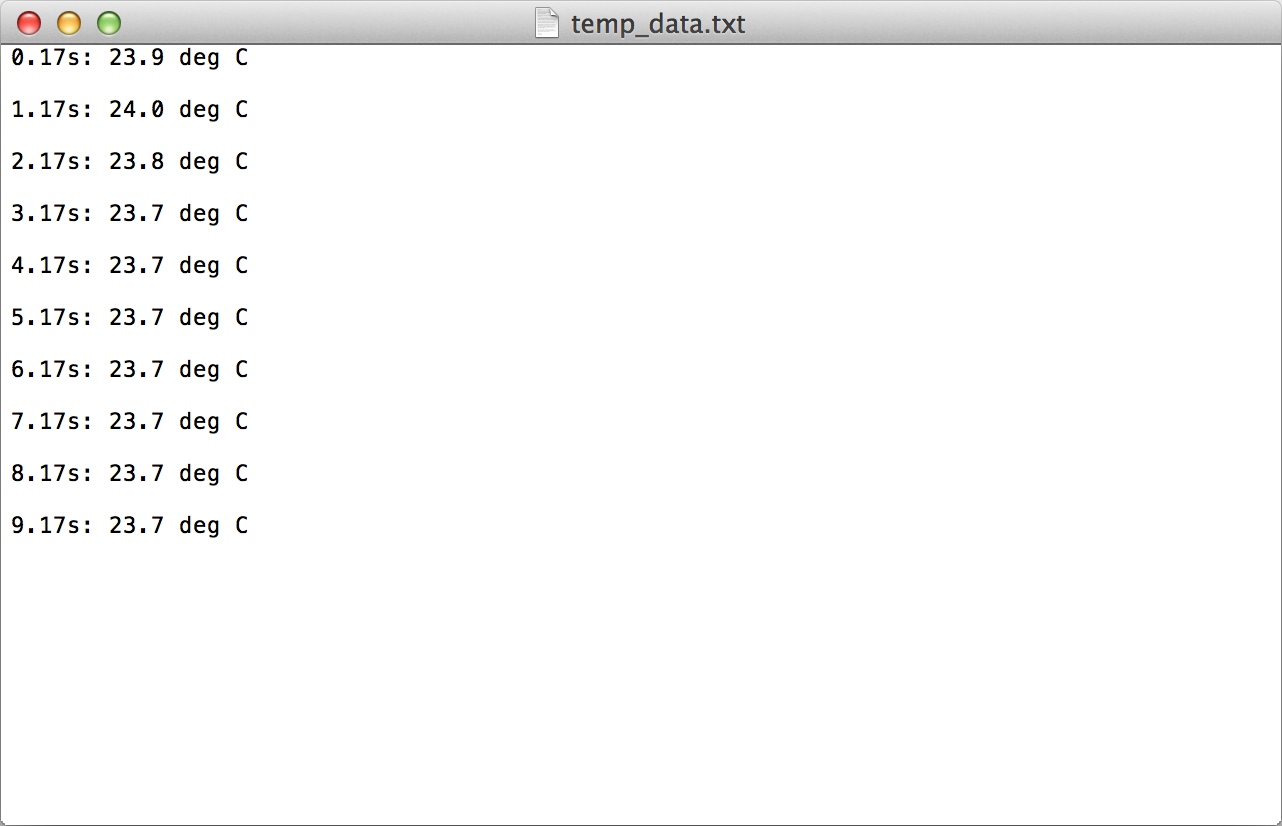
You can also plug the SD card into your computer and open the "temp_data.txt" file with a text editor (located in the SD card's root directory).
Linux
To begin, we need to find out which USB serial port the mbed is attached to. Unplug the mbed. Open a terminal and enter:
ls /dev/tty*
Plug the mbed back into your computer and enter the command again:
ls /dev/tty*
A new tty device should appear. In my case, I saw "/dev/ttyACM0" show up. Make a note of which new tty device appeared. Use the screen command to open a serial terminal to the mbed:
sudo screen /dev/<your tty device> 9960
Note that you will likely need root access to open the serial terminal!
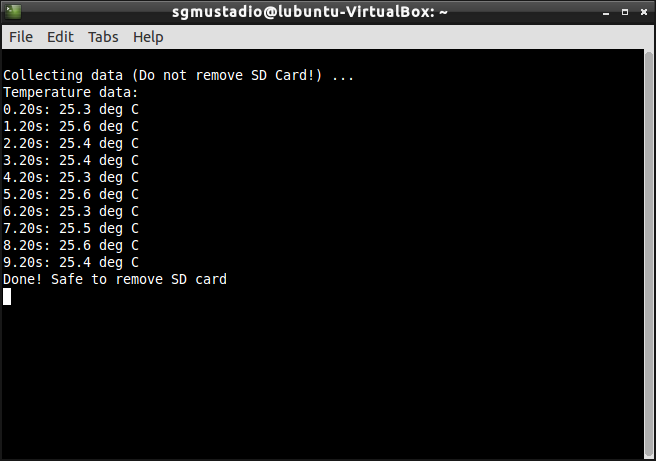
Press the reset button on your mbed and wait while temperature data is collected. After about 10 seconds, you should see the temperature data appear in your Terminal.
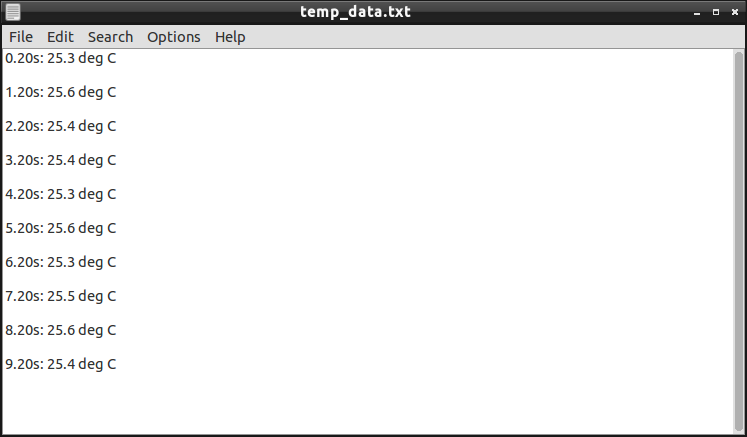
You can also plug the SD card into your computer and open the "temp_data.txt" file with a text editor (located in the SD card's root directory).
Concepts
In this tutorial, we introduced several new concepts. In particular, sending text over serial to a terminal is incredibly useful for debugging and interacting with your project.
Serial Terminal
The serial terminal dates back the first computers and mainframes of the 1960s. In order to interact with a mainframe, several terminals were connected to the mainframe, often with an RS-232 serial connection. These terminals offered a simple keyboard and monitor with a command line interface. Users could type commands and get a response back from the mainframe.
With the rise of the graphical user interface (GUI), such as Windows, terminal programs became emulated inside of the GUI and usually only reserved for more advanced functions. Because many low-power embedded systems, such as the LPC1768, are incapable of running a GUI, we rely on a serial terminal to communicate with the device. Check out our tutorial on Serial Terminal Emulators) for more info.
We use a USB cable to send and receiver serial commands from the computer to the LPC1768. The mbed platform converts the USB signals to UART, which is interpreted by the LPC1768 processor. By using a program like PuTTY, we can send serial commands over that USB channel. If we write serial commands in our mbed program, we can create a communications link between the mbed and our serial terminal. This allows us to interact with the mbed in real time!
Using a serial terminal like this is crucial in working with embedded systems. We can add printf statements in our program that provides status updates, gives the contents of variables, and informs us of errors. Using a serial terminal in this manner is extremely helpful in debugging our embedded programs.
Analog to Digital Converter (ADC)
We used the mbed's internal ADC to take measurements from the temperature sensor. The TMP36 Temperature Sensor works by amplifying the voltage drop across the base and emitter of a transistor as temperature changes.
Pins 15 - 20 on the LPC1768 are capable of analog to digital conversions. Voltages between 0V and 3.3V are broken up (quantized) into steps. The LPC1768 uses a 12-bit value to denote the ADC readings, which means that there are 4096 possible values for voltages. In other words, 0V - 3.3V are broken down into 0.0008057V steps. Reading 0 on the ADC indicates 0V, reading 1 indicates 0.0008057V, reading 2 indicates 0.0016114V and so on.
However, note that in our program, we read the analog value (ain) as a float value between 0.0 and 1.0, where 1.0 is 3.3V. So, in order to determine the actual measured voltage, we multiplied ain * 3.3. Using the measured voltage, we calculated the temperature in Celsius by the equation (Vmeas - 0.5) * 100.0, as per the TMP36 datasheet.
If you would like to read more about ADC, see this Wikipedia article.
Serial Peripheral Interface (SPI)
SPI is a de facto communications bus standard, which means that its pins and protocol are just accepted by industry (versus being spelled out in an actual standard by a governing body, like I2C). SPI generally requires 4 pins: SCK, MISO, MOSI, and CS. Because MISO and MOSI transmit data simultaneously, full duplex communications are possible. SPI is capable of faster transfer speeds than I2C, but can only have 1 master and usually needs 1 extra pin dedicated for each device added on the bus. Read more about SPI here.
SD Cards
Secure Digital (SD) cards grew out of MultiMediaCards (MMC) in 1999 as a small, transportable form factor for non-volatile flash memory. There are several ways to transfer data to and from SD cards: SPI Mode, One-Bit SD Bus Mode, and Four-Bit SD Bus Mode. We used SPI in this project, as it is the easiest to use and does not require an SD host license. Four-Bit mode, on the other hand, requires a host license and offers much faster transfer speeds. Read more about the SD format here.
FAT File System
The mbed SDFileSystem library relies on the File Allocation Table (FAT) file system to read and write files in the SD card. The FAT file system is an old and extremely simple file structure system that is still used by most low storage volume flash media (e.g. SD cards, flash drives, etc.) today. It is supported by every major operating system. In basic terms, the front section of the disk partition is reserved for the file allocation table, which is a simple index that contains the name of the file (or folder) and its location in the partition. Reading the FAT gives you all the files and folders within the disk partition, and you can use this information to read, write, and modify specific files. You can learn more about the FAT file system here.
File Descriptor
In order to read and write to a file (located in our FAT file system!), we need to use a file descriptor to access that file.
In our program, we create a file descriptor with
language:c
FILE *file;
The pointer *file will be used as a handle to manage all of our file operations.
We then open a file from our FAT file system (namely, the temp_data.txt file on our SD card) and assign it to our handle. Notice the "w" parameter, which asks for "write" permissions to the file. If the file does not exist, it is created.
language:c
file = fopen("/sd/temp_data.txt", "w");
After we attempt to open the file, we check to make sure that the file was indeed opened for writing:
langauge:c
if ( file == NULL ) {
    error("ERROR: Could not open file for writing!\n");
    return -1;
}
If the file was not opened successfully, the file variable does not point to anything (i.e. NULL). In this case, we print an error and stop the program.
We use the fprintf() function to write characters to the file.
language:c
fprintf(file, "%2.2fs: %3.1f deg C\n", timer.read(), degrees_c);
Notice that we passed in the file handle as our first parameter, which tells fprintf() where to put the characters.
Once we are done writing to the file, we close it with
language:c
fclose(file);
It's always a good idea to close a file when you are done with it! Otherwise, you might corrupt the file (or, worse, the filesystem) if your program starts to behave unexpectedly with a file still open.
We can perform a similar procedure to read from a file. In our example, we use fgetc() to read characters from the file one at a time.
Lack of Super Loop
What happened to our while(1) statement? All of our other examples included this loop-forever statement to make up our super loop architecture. In this tutorial, we only wanted the program to run once and then stop. To do this, we do not include a while(1) statement and exit main() with
language:c
return 0;
After our program executes the return line in main(), the program stops running. We need to restart the mbed board (with the button) to run the program again.
Generally, it is good practice to include an empty while loop:
language:c
while (1) { }
to end your program in an embedded system. We did not include it to show that you can get away without it, and the program will still execute (only once, though!).
You can read more about return values from main().
Going Further
Sensor reading and logging is one of the most useful features of embedded systems. Additionally, we looked at how we can use a terminal program to interact with the mbed, which is important for debugging projects.
Beyond the Tutorial
- Right now, the SD card is at risk for being ruined if you remove it or shut off power in the middle of a write operation. Change the code so that the file is only ever opened and written to just after a measurement is made.
- Change the code so that measurements are taken once per minute and do not stop after just 10 readings.
- Make the mbed consume less power between readings (Hint: see the PowerControl library)
- Have the mbed post the collected data once per day on a data.sparkfun.com data stream. You'll be able to see some interesting patterns in the temperature data after a few days!
Digging Deeper
- Read about the history of computer terminals
- Read more about the SD card format
- Look into the specifics of the FAT file system