Experiment Guide for the Johnny-Five Inventor's Kit
 rwaldron,
  reconbot,
  D___Run___,
  lyzadanger,
  Shawn Hymel
 Experiment 12: Using an LCD Screen
Introduction
In this experiment, you're going to learn how to get characters to display on a 32-character LCD screen (2 lines, 16 characters each). You'll start with 1s and 0s but quickly progress to "Hello" and displaying the date and time. Finally, you'll be able to use the LCD to show the current location of satellites in space!
Preflight Check
Whoa there, Turbo! If this is your first experiment with the Johnny-Five Inventor's Kit (J5IK) and the Tessel 2, there are a few things you gotta do first:Suggested Reading
The following tutorial provides in-depth background on some of the hardware concepts in this experiment:
Parts Needed
You will need the following parts for this experiment:
- 1x Tessel 2
- 1x Breadboard
- 1x Basic 16x2 Character LCD
- 1x Potentiometer
- 15x Jumper Wires


Tessel 2
DEV-13841Introducing the LCD screen

The J5IK includes a Liquid Crystal Display (LCD) screen. This screen is similar to one that you may find in your microwave, on your dashboard in your car, or if you are old enough to remember, a Speak and Spell. LCD screens are a great way to display data or information from your Tessel 2 board without having to have it connected to your laptop.
The LCD screen in this kit can display 16 characters on each of its two rows (32 characters total). The wiring in the diagram can look a little bit like a rat's nest, but it's not so bad if you take care with your connections. The potentiometer in the circuit can be used to adjust the display contrast on the LCD.
Hardware Hookup
Are you ready to print some text on your LCD? Let's get this circuit wired up!
| Polarized Components | Pay special attention to the component’s markings indicating how to place it on the breadboard. Polarized components can only be connected to a circuit in one direction. |
Build the LCD Circuit
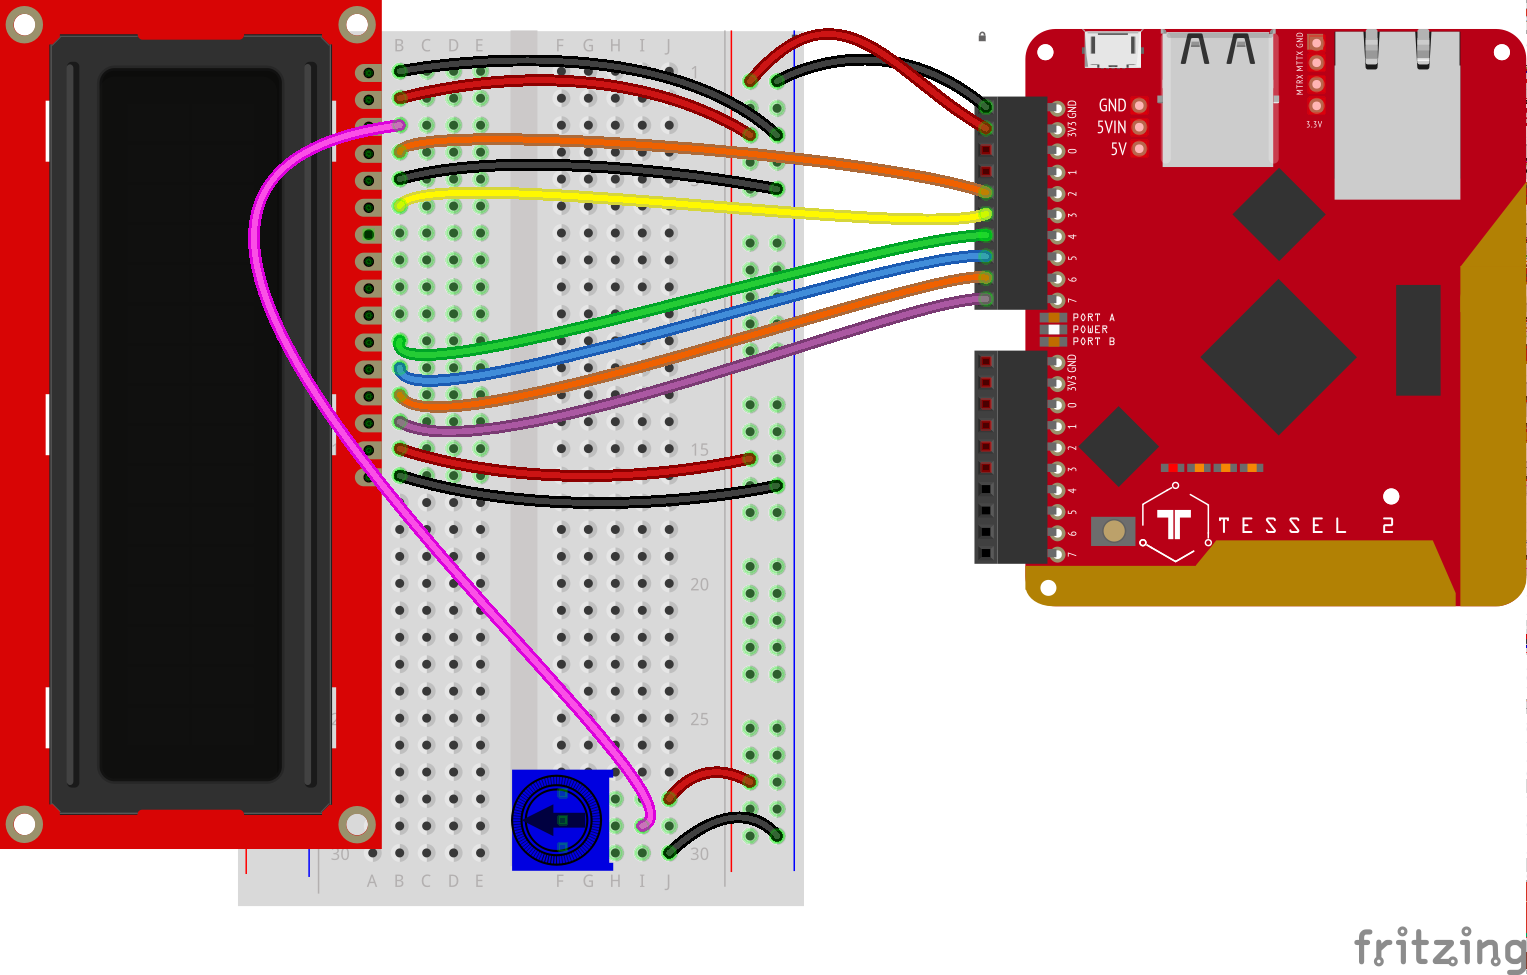
- Connect the LCD board to the left side of the breadboard.
- Connect the LCD board's pins using jumper wires:
- Connect LCD pins 1, 5 and 16 to the ground power rail.
- Connect LCD pins 2 and 15 to the supply power rail.
- Connect LCD pins to GPIO pins on the Tessel 2:
- LCD pin 4 to Port A, Pin 2.
- LCD pin 6 to Port A, Pin 3.
- LCD pin 11 to Port A, Pin 4.
- LCD pin 12 to Port A, Pin 5.
- LCD pin 13 to Port A, Pin 6.
- LCD pin 14 to Port A, Pin 7.
- Connect the potentiometer to the breadboard. Connect jumper wires between its outer two legs and the power rail on the breadboard. Connect its middle leg to the LCD's pin 3 with a jumper wire.
- Connect the Tessel's 3.3V and GND pins to the breadboard's power rail with jumper wires.
Printing Characters to an LCD With Johnny-Five
Open your favorite code editor, create a file called lcd.js and save it in the j5ik/ directory. Type—or copy and paste—the following JavaScript code into your lcd.js file:
language:javascript
var five = require("johnny-five");
var Tessel = require("tessel-io");
var board = new five.Board({
  io: new Tessel()
});

board.on("ready", () => {
  var lcd = new five.LCD({
    pins: ["a2", "a3", "a4", "a5", "a6", "a7"]
  });

  lcd.cursor(0, 0).print("10".repeat(8));
  lcd.cursor(1, 0).print("01".repeat(8));
});
Type—or copy and paste—the following into your terminal:
t2 run lcd.js
What You Should See
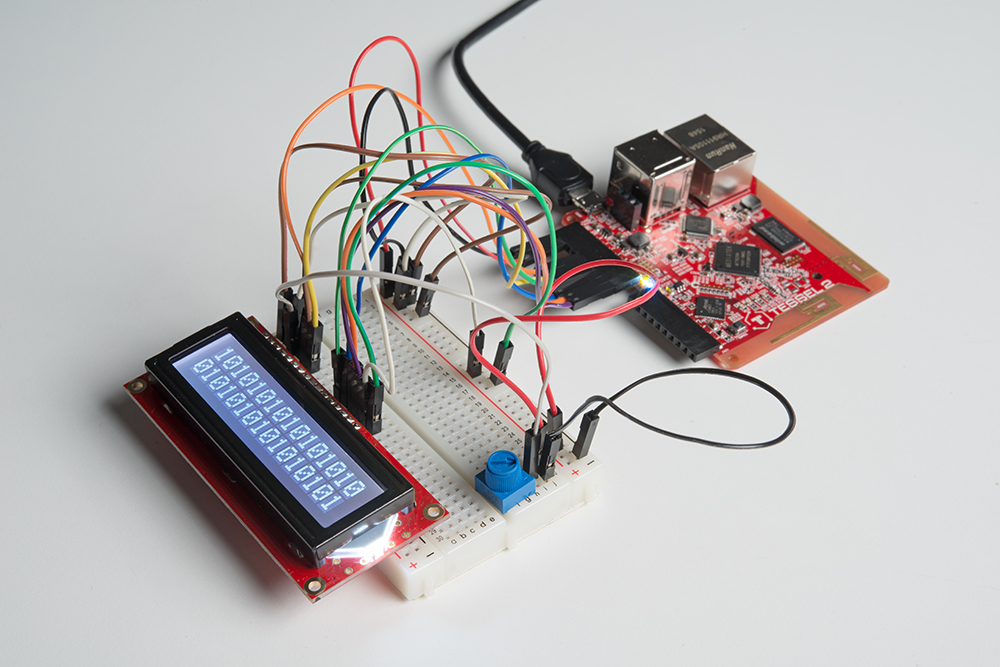
The LCD should display two rows of zeros and ones:
language:javascript
1010101010101010
0101010101010101
Troubleshooting
Not seeing any digits? Try turning the potentiometer—it adjusts contrast on the LCD.
Exploring the Code
There's nothing very exciting or interesting about this first example, but try to think of it as a gentle introduction to more robust subsequent fun. As with all Johnny-Five programs, once the board emits the ready event, the program can initialize an LCD object:
language:javascript
var lcd = new five.LCD({
  pins: ["a2", "a3", "a4", "a5", "a6", "a7"]
});
As shown in earlier experiments, this could also be written as:
language:javascript
var lcd = new five.LCD(["a2", "a3", "a4", "a5", "a6", "a7"]);
... Which would have the same meaning. As long as the pins are provided in the following order:
  RS    EN    D4    D5    D6    D7
["a2", "a3", "a4", "a5", "a6", "a7"]
These six pins (RS—Register Select, EN—Enable, and four data pins) are used by Johnny-Five to control the LCD.
The next two lines look nearly identical to each other:
language:javascript
lcd.cursor(0, 0).print("10".repeat(8));
lcd.cursor(1, 0).print("01".repeat(8));
The individual spaces for characters on LCDs are referenced using a grid system. The cursor(row, column) method instructs the lcd object to move the "cursor" to the specified row and column. Both rows and columns are "zero indexed," which means they start at zero and count up (just like JavaScript Array indices). This means that cursor(0, 0) puts the cursor on the first row, at the left-most column.
The print(message) method tells the lcd to print the provided string message to the display, starting at the present cursor position.
Now is a good time to try printing out different messages. Go ahead and replace those two lines with this:
language:javascript
lcd.cursor(0, 0).print("Hello!");
Type—or copy and paste—the following into your terminal:
t2 run lcd.js
The 1s and 0s should be cleared, and the message "Hello!" should be displayed. Before moving on, try changing that message to a message of your own.
- What happens when you try to print numbers? For example:
lcd.print(123456789)
Variation: Displaying the Date and Time With Johnny-Five
Before we get into the next program, you'll need to install a module that makes working with date and time less of a chore. Hands down, the most comprehensive module for this task is Moment.js.
Moment.js Parse, validate, manipulate, and display dates in JavaScript.
In your terminal, type---or copy and paste---the following command:
npm install moment
Open your favorite code editor, create a file called lcd-clock.js and save it in the j5ik/ directory. Type—or copy and paste—the following JavaScript code into your lcd-clock.js file:
language:javascript
var moment = require("moment");
var five = require("johnny-five");
var Tessel = require("tessel-io");
var board = new five.Board({
  io: new Tessel()
});

board.on("ready", function() {
  var lcd = new five.LCD({
    //      RS    EN    D4    D5    D6    D7
    pins: ["a2", "a3", "a4", "a5", "a6", "a7"],
  });

  var snapshots = [ "", "" ];

  board.loop(100, () => {
    var updates = [
      moment().format("MMM Do, YYYY"),
      moment().format("hh:mm:ss A"),
    ];

    updates.forEach((update, index) => {
      if (snapshots[index] !== update) {
        snapshots[index] = update;
        lcd.cursor(index, 0).print(update);
      }
    });
  });
});
Type—or copy and paste—the following into your terminal:
t2 run lcd-clock.js
What You Should See
The first row should display the date, and the second row should display the time. For example, today is June 24th, 2016, and the time is 10:19 p.m. EST (or UTC-0400) and the clock displays:
June 24th 2016
10:19:00 PM
Wait... 10?? Yes! That's why we made sure to point out which timezone this was running in. The Tessel 2's internal clock defaults to UTC; the timezone can be set in a number of different ways, but the easiest (for the purpose of this experiment) is to use the moment().utcOffset("-0400"). Try figuring out where this change should be made in your program!
Exploring the Code
The first thing you will have noticed is that there is a new dependency being required, which you've likely guessed is necessary for using Moment.js in your program:
language:javascript
var moment = require("moment");
Moving farther down, past the parts that have not changed, the next new line encountered is this one:
language:javascript
var snapshots = [ "", "" ];
This JavaScript Array keeps track of the characters currently displayed on each of the LCD's two lines. When we start out, nothing is being displayed on either line (thus, empty strings).
The next line portion sees the return of a familiar method: board.loop(ms, handler). This was used several times in earlier experiments to produce interesting, iterative LED lighting patterns. Here it's used to check the time every 1/10 of a second to see if an update to the LCD's display is necessary. The 10Hz timing frequency is arbitrary, and you're encouraged to experiment with other subsecond periods.
language:javascript
board.loop(100, () => {
  // ...
});
Within the loop(...) call's handler, the program creates another new temporary Array, this time storing a formatted date and time as the first and second entry, in that order:
language:javascript
var updates = [
  moment().format("MMMM Do YYYY"), // This should be displayed on first line
  moment().format("hh:mm:ss A"), // This should be displayed on second line
];
Then, those new values are iterated with forEach method:
language:javascript
updates.forEach((update, index) => {
  if (snapshots[index] !== update) {
    snapshots[index] = update;
    lcd.cursor(index, 0).print(update);
  }
});
If the update value for a line differs from what is currently displayed on that line (stored in snapshots), that line on the LCD is updated with print. This comparison makes sure we don't wastefully print to the LCD if nothing has changed.
Variation: Displaying ISS Location With Johnny-Five
OK, here's the cool part. We're going to use the LCD to display what's going on in space. We're going to display the location of the International Space Station on your LCD's screen. To do this, we'll need to install one last new module: iss.
iss a module that, given an ID and a request rate, returns a readable stream that emits location data for the corresponding satellite
In your terminal, type—or copy and paste—the following command:
npm install iss
This module wraps the data that's made available by Where the ISS At?.
Open your favorite code editor, create a file called lcd-iss.js and save it in the j5ik/ directory. Type—or copy and paste—the following JavaScript code into your lcd-iss.js file:
language:javascript
var iss = require("iss");
var five = require("johnny-five");
var Tessel = require("tessel-io");
var board = new five.Board({
  io: new Tessel()
});

board.on("ready", function() {
  var lcd = new five.LCD(["a2", "a3", "a4", "a5", "a6", "a7"]);

  // ISS Code: 25544
  // Max Requests: 20/s
  iss.locationStream(25544, 20).on("data", (buffer) => {
    var data = JSON.parse(buffer.toString());

    lcd.cursor(0, 0).print(data.latitude);
    lcd.cursor(1, 0).print(data.longitude);
  });
});
Type—or copy and paste—the following into your terminal:
t2 run lcd-iss.js
What You Should See

The current latitude of the ISS is displayed on the first row and the longitude on the second row!
Exploring the Code
First, your iss dependency is required:
language:javascript
var iss = require("iss");
Then, after the board is "ready" and the LCD is initialized, we call the iss.locationStream(...) function, passing the ISS ID (25544) and Max Requests-Per-Second (20) arguments. The "Max Request" count is a limit on the number of requests (for new location data) to the remote data server.
This call returns a Stream object. If you're new to JavaScript or programming, Streams may be a big new concept for you. We won't dive in to the nitty-gritty here, but there are still a few things we can observe.
The ReadableStream returned by iss.locationStream(...) emits data events too—just like our Johnny-Five sensors! The data event handler function receives a Buffer (again, don't worry if this is new to you). Buffers can be converted to Strings (buffer.toString()) and then parsed into a JSON object (data). That data object has latitude and longitude properties that can be printed to the LCD:
language:javascript
// ISS Code: 25544
// Max Requests: 20/s
iss.locationStream(25544, 20).on("data", buffer => {
  var data = JSON.parse(buffer.toString());

  lcd.cursor(0, 0).print(data.latitude);
  lcd.cursor(1, 0).print(data.longitude);
});
The data event handler will be called every time a new location object is received.
Building Further
- Use Moment Timezone to control the timezone of your clock application
- Create a "vertically scrolling" display of the ISS data.
Reading Further
- JavaScript — JavaScript is the programming language that you'll be using.
- Node.js — Node.js is the JavaScript runtime where your programs will be executed.
- Johnny-Five — Johnny-Five is a framework written in JavaScript for programming hardware interaction on devices that run Node.js.