SIK Experiment Guide for the Arduino 101/Genuino 101 Board
 D___Run___
Introduction: Arduino/Genuino SparkFun Inventor's Kit
This SparkFun Inventor's Kit Experiment Guide is your map for navigating the waters of beginning embedded electronics using the Intel® Curie-based Arduino 101® or Genuino 101® board. This guide contains all the information you will need to explore the 21 circuits of the SparkFun Inventor's Kit for the Arduino 101. At the center of this guide is one core philosophy -- that anyone can (and should) play around with cutting-edge electronics.
When you're done with this guide, you'll have the know-how to start creating your own projects and experiments, from building robots and game controllers to IoT (Internet of Things) and data logging, the world will be your oyster. Now enough talking -- let's start inventing!
Included Materials
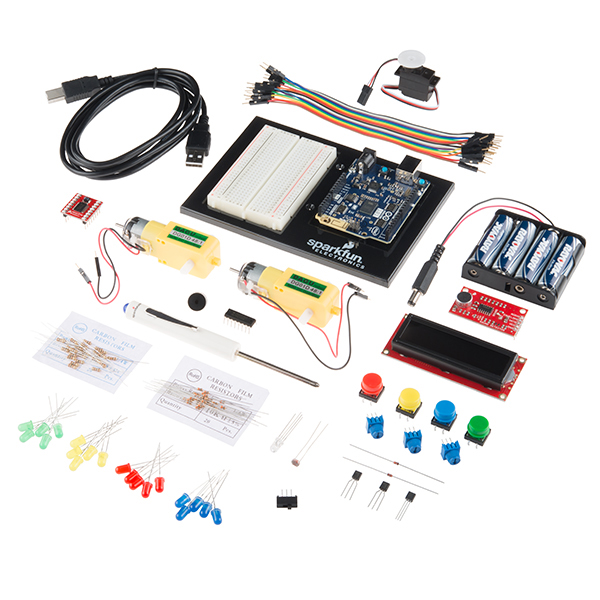
Here are all of the parts in the SparkFun Inventor's Kit for the Arduino 101/Genuino 101 Board (101 SIK):
- Arduino 101/Genuino 101 -- The Arduino 101 or Genuino 101 board.
- Arduino and Breadboard Holder -- A nice holder for your Arduino 101 / Genuino 101 board and breadboard.
- Breadboard -- Excellent for making circuits and connections off the Arduino.
- Carrying Case -- Take your kit anywhere with ease.
- SparkFun Mini Screwdriver -- To help you screw your RedBoard onto the holder.
- 3.3V 16x2 White on Black LCD (with headers) -- This is a basic 16-character by 2-line display with a snazzy black background with white characters and an operating voltage of 3.3V.
- 74HC595 Shift Register -- Simple shift register IC. Clock in data and latch it to free up IO pins on your RedBoard.
- NPN Transistors -- This little transistor can be used to help drive large loads, or to amplify or switch applications.
- Hobby Gearmotor Set -- A set of hobby level motors with gearboxes set to 120 RPM.
- Small Servo -- Here is a simple, low-cost, high-quality servo for all your mechatronic needs.
- SPDT Switch -- This is a high-quality Single Pole - Double Throw (SPDT) switch that fits well into a breadboard.
- TMP36 Temp Sensor -- A sensor for detecting temperature changes.
- ** USB A to B Cable** -- This 6' cable provides you with a USB-A connector at the host end and standard B connector at the device end.
- Male-to-Male Jumper Wires -- These are high-quality wires that allow you to connect the female headers on the Arduino to the components and breadboard.
- Photocell -- A sensor to detect ambient light. Perfect for detecting when a drawer is opened or when nighttime approaches.
- Tri-Color LED -- Because everyone loves a blinky.
- Red, Blue, Yellow and Green LEDs -- Light-Emitting Diodes make great general indicators.
- Red, Blue, Yellow and Green Tactile Buttons -- Go crazy with different colored buttons.
- 10K Trimpots -- Also known as a variable resistor, this is a device commonly used to control volume and contrast, and makes a great general user control input.
- Piezo Buzzer -- Use this to make sounds and play songs.
- 100 Ohm Resistors -- Great current-limiting resistors for LEDs at 3.3V, and strong pull-up resistors.
- 10K Ohm Resistors -- These make excellent pull-ups, pull-downs and current limiters.
- SparkFun Motor Driver -- This nifty little board is perfect for controlling the speed and direction of up to two separate motors.
- SparkFun Sound Detector Board -- A microphone breakout board that has three outputs: raw audio, envelope and GATE. This board is perfect for simple sound-based projects.
Experiment List
The following is a list of the experiements you will complteye using this 101 SIK Experiment Guide. Alternatively, you can navigate around using the buttons on the right.
- Experiment 1: Blinking an LED
- Experiment 2: Reading a Potentiometer
- Experiment 3: Driving an RGB LED
- Experiment 4: Driving Multiple LEDs
- Experiment 5: Reading a Button Press
- Experiment 6: Reading an SPDT Switch
- Experiment 7: Reading a Photoresistor
- Experiment 8: Color Mixing with the RGB
- Experiment 9: Reading a Temperature Sensor
- Experiment 10: Driving a Servo Motor
- Experiment 11: Using a Transistor
- Experiment 12: Using the Motor Driver
- Experiment 13: Motor Driver with Inputs
- Experiment 14: Using a Piezo Buzzer
- Experiment 15: Using the Sound Detector Board
- Experiment 16: Using a Shift Register
- Experiment 17: Using an LCD
- Experiment 18: Reading the On-Board Accelerometer
- Experiment 19: Tap Detection
- Experiment 20: Using the On-Board Real Time Clock
- Experiment 21: Using the On-Board Bluetooth Low Energy
Suggested Reading
Before continuing with this guide, we recommend you be somewhat familiar with the concepts in the following tutorials:
- Voltage, Current, Resistance, and Ohm's Law - The most basic concepts in electronics and electrical engineering. Get very familiar with these concepts as they will be used throughout your electronics adventure.
- What is a Circuit? - In this guide, we will be building a variety of circuits. Understanding what that means is a vital to understanding the Inventor's Kit.
- How to Use a Breadboard -- First time working with a breadboard? Please check out this tutorial! It will help you understand why the breadboard is great for prototyping and how to use one.
Open Source!
At SparkFun, our engineers and educators have been improving this kit and coming up with new experiments for a long time. We would like to give attribution to Oomlout, since we originally started working off the Arduino Kit material many years ago. Both the Oomlout and SparkFun versions are licensed under the Creative Commons Attribution Share-Alike 3.0 Unported License.
To view a copy of this license visit this link, or write: Creative Commons, 171 Second Street, Suite 300, San Francisco, CA 94105, USA.