SIK Experiment Guide for the Arduino 101/Genuino 101 Board
 D___Run___
 Experiment 18: Reading the On-Board Accelerometer
Introduction
In Experiment 13, you played around with using different inputs to control a motor's speed and direction. In this experiment you will do something similar but use the on-board accelerometer on the Arduino 101 board as an input.
The accelerometer measures gravitational forces being applied to the sensor in different directions. You can extrapolate a lot of information from accelerometer data if it is being moved around. But it is also handy for figuring out which way is down when it is sitting still! Earth's gravity is an ever-present force that can be measured by the accelerometer. We will use it in this way to determine the orientation of your Arduino 101 board, and from there have your motor drive forward, backward or do nothing. Lets get to it!
Parts Needed
You will need the following parts:
- 1x Breadboard
- 1x Arduino 101 or Genuino 101 board
- 1x SparkFun Motor Driver
- 1x 42:1 Hobby Gearmotor
- 13x Jumper Wires
Didn't Get the SIK?
If you are conducting this experiment and didn't get the SIK, we suggest using these parts:


You will also need either an Arduino 101 OR Genuino 101 board.

Arduino 101
DEV-13787
Genuino 101
DEV-13984Suggested Reading
Before continuing with this experiment, we recommend you be familiar with the concepts in the following tutorials:
Introducing the Accelerometer
Accelerometers are devices that measure acceleration, which is the rate of change of the velocity of an object. They measure in meters per second squared (m/s2) or in G-forces (g). A single G-force for us here on planet Earth is equivalent to 9.8 m/s2, but this does vary slightly with elevation (and will be a different value on different planets due to variations in gravitational pull). Accelerometers are useful for sensing vibrations in systems or for orientation applications.
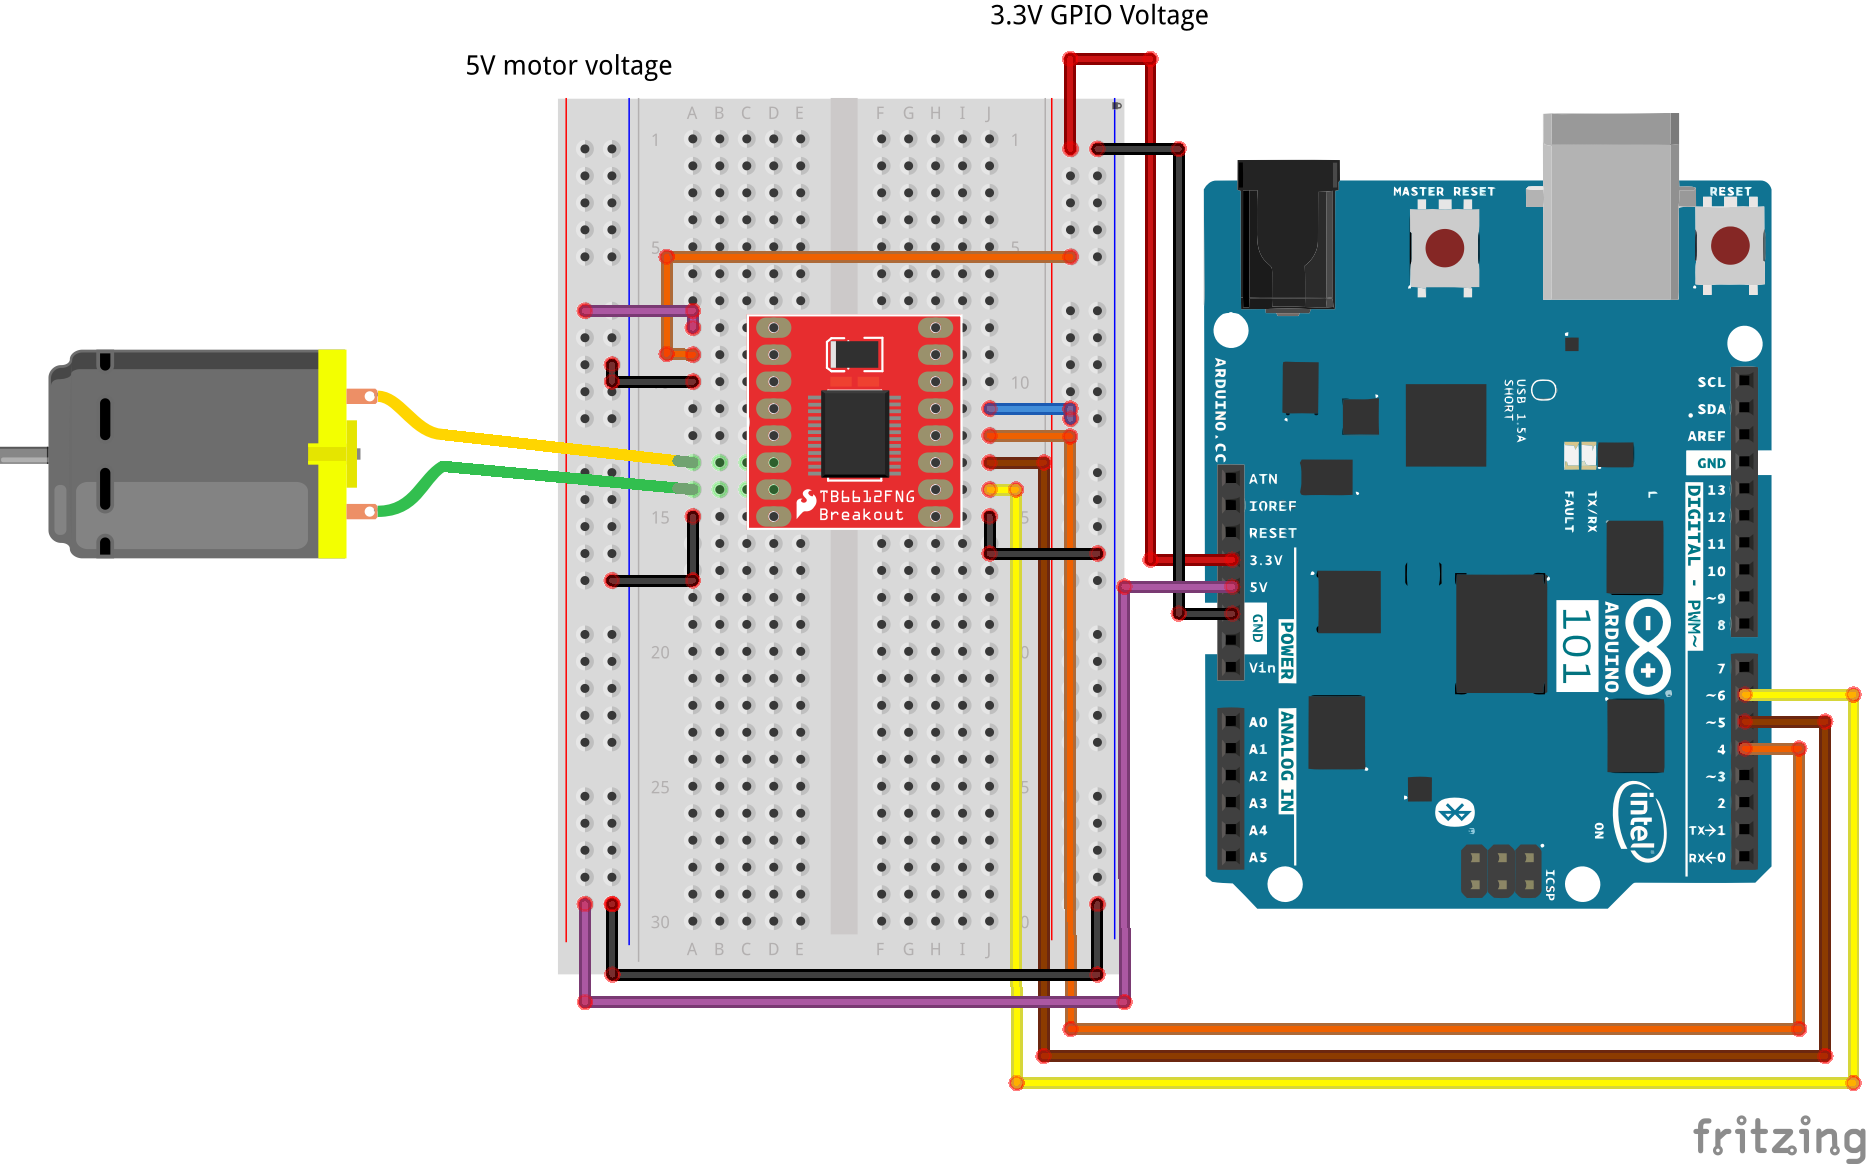
Hardware Hookup
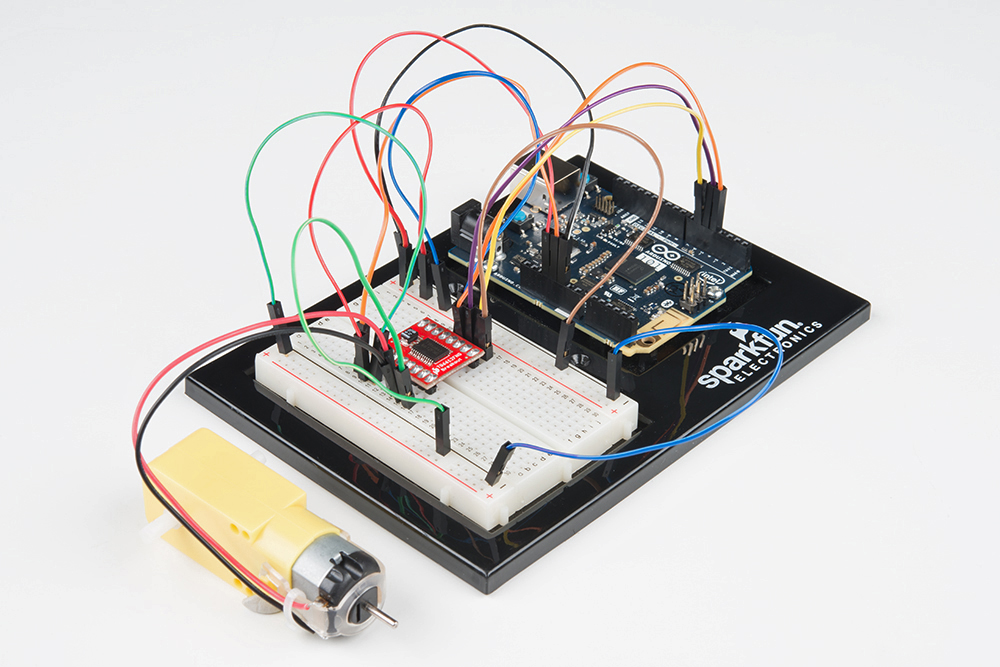
Ready to start hooking everything up? Check out the wiring diagram below to see how everything is connected.
| Polarized Components | Pay special attention to the component’s markings indicating how to place it on the breadboard. Polarized components can only be connected to a circuit in one direction. |
Wiring Diagram for the Experiment
Open the Sketch
Open the Arduino IDE software on your computer. Coding in the Arduino language will control your circuit. Open the code for Circuit 18 by accessing the “101 SIK Guide Code” you downloaded and placed into your “Examples” folder earlier.
To open the code go to: File > Examples > 101 SIK Guide Code > Circuit_18
You can also copy and paste the following code into the Arduino IDE. Hit upload, and see what happens!
language:cpp
/*
SparkFun Inventor's Kit
Example sketch 18

Controlling a Motor Using an Accelerometer

  Use the on-board accelerometer of the 101 board as an input to control
  a motor based on its orientation in space. If you tilt the 101 to the left,
  the motor spins in one direction; tilted to the right, it spins the opposite direction; and if it
  is flat, the motor stops.

This sketch was written by SparkFun Electronics, and based on the Orientation example
in the CurieIMU Library Examples
This code is completely free for any use.
Visit http://learn.sparkfun.com/products/2 for SIK information.
Visit http://www.arduino.cc to learn more about Arduino.
*/

#include "CurieIMU.h"

const int DIR_A = 4;
const int DIR_B = 5;
const int PWM = 6;

// previous orientation (for comparison). Start at (-1) to start with


void setup()
{
 //set motor control pins to OUTPUT
pinMode(DIR_A, OUTPUT);
pinMode(DIR_B, OUTPUT);
pinMode(PWM, OUTPUT);

 // Start the acceleromter
 CurieIMU.begin();

// Set the accelerometer range to 2G
CurieIMU.setAccelerometerRange(2);
}

void loop()
{
 // read accelerometer:
 int x = CurieIMU.readAccelerometer(X_AXIS);
 int y = CurieIMU.readAccelerometer(Y_AXIS);
 int z = CurieIMU.readAccelerometer(Z_AXIS);

 // calculate the absolute values, to determine the largest
 int absX = abs(x);
 int absY = abs(y);
 int absZ = abs(z);

if ( (absZ > absX) && (absZ > absY))
{
 // base orientation on Z
 if (z > 0)
 {
  brake();
 }
}

 //else if Y is greater than X and Z its on edge
 else if ( (absY > absX) && (absY > absZ))
 {
  // if Y is positive orientation (digital pins up)and is set to 1
  if (y > 0)
  {
    forward();
  }
  //the Y is in the negative orientation (analog pins up) and is set to 2
  else
  {
    reverse();
  }
}
}
//custom function for driving the motor forward
void forward()
{
  digitalWrite(DIR_A, HIGH);
  digitalWrite(DIR_B, LOW);
  digitalWrite(PWM, HIGH);
}

//custom function for driving the motor in reverse
void reverse()
{
  digitalWrite(DIR_A, LOW);
  digitalWrite(DIR_B, HIGH);
  digitalWrite(PWM, HIGH);
}

//custom function for braking the motor
void brake()
{
  digitalWrite(DIR_A, LOW);
  digitalWrite(DIR_B, LOW);
  digitalWrite(PWM, LOW);
}
Code to Note
#include "CurieIMU.h"
The Arduino's serial port can be used to receive as well as send data. Because data could arrive at any time, the Arduino 101 board stores, or "buffers," data coming into the port until you're ready to use it. The Serial.available() command returns the number of characters that the port has received, but haven't been used by your sketch yet. Zero means no data has arrived.
int x = CurieIMU.readAccelerometer(X_AXIS);
We read the accelerometer value by passing the constant of X_AXIS to the readAccelerometer method of the CurieIMU. This will return the real time reading from the sensor. To read other Axis you can pass it the constants of X_AXIS, Y_AXIS and Z_AXIS.
int absX = abs(x);
In this experiment we are not necessarily interested in the positive or negative values. We just want to know which ones are the largest, and we can make a decision from there. We used the 'abs()' function which takes the absolute value of a number (basically removes the (-) sign). We store that in a local variable called 'absX' so that if we ever want to access the raw x value, we can still do that.
language:cpp
//if Z axis is greater than X and Y its facing upright
if ( (absZ > absX) && (absZ > absY))
{
 // base orientation on Z
 if (z > 0)
 {
  brake();
 }
}

 //else if Y is greater than X and Z its on edge
 else if ( (absY > absX) && (absY > absZ))
 {
  // if Y is positive orientation (digital pins up)and is set to 1
  if (y > 0)
  {
    forward();
  }
  //the Y is in the negative orientation (analog pins up) and is set to 2
  else
  {
    reverse();
  }
}
Once we have the accelerometer readings in absolute value, we can compare them using an if() statement. In this example we are only looking to compare the values that have to do with tipping the board to the left and right, but it still takes all three axes to figure that out. For example, if Y is greater than X, the Y axis is pointed down (pointed at the direction of gravity). We then do a final comparison to see if it's greater than 0 to make sure it is in the positive direction. We set the direction of the motor based on those comparisons.
What You Should See
Once the code is uploaded to the 101 board, pick up the 101 and tip it to the left (analog input pins down). The motor should start running in one direction. Now tip it in the opposite direction (digital GPIO pins down), and the motor should run in the opposite direction. When you lay the board flat the motor should stop. If not, see the Troubleshooting section below.
Troubleshooting
Motor Not Spinning
Make sure you have the motor controller wired up correctly. That is a lot of wires!
Still No Luck
Double check that your code uploaded to your 101. Sometimes it takes awhile to upload to the 101 board, so be patient!
Still Not Working
Sometimes the Arduino will disconnect from the computer. Try unplugging and then replugging it into your USB port.