SIK Experiment Guide for Arduino - V3.3
This Tutorial is Retired!
View the updated tutorial: SparkFun Inventor's Kit Experiment Guide - v4.0
 HelloTechie,
  Toni_K
Experiment 16: Simon Says
Introduction
Now that we've learned all the basics behind the components in the SIK experiments, let's put them all together to make something fun! This circuit will show you how to create your own Simon Says game. Using some LEDs, some buttons, a buzzer, and some resistors, you can create this and other exciting games with the RedBoard or Arduino Uno R3.
Parts Needed
You will need the following parts:
- 1x RedBoard + USB mini-B Cable or Arduino Uno R3 + USB A-to-B Cable
- 1x Breadboard
- 17x Jumper Wires
4x LEDs - 1x Piezo Buzzer
- 4x 330Ω Resistors
4x Push Buttons
Hardware Hookup
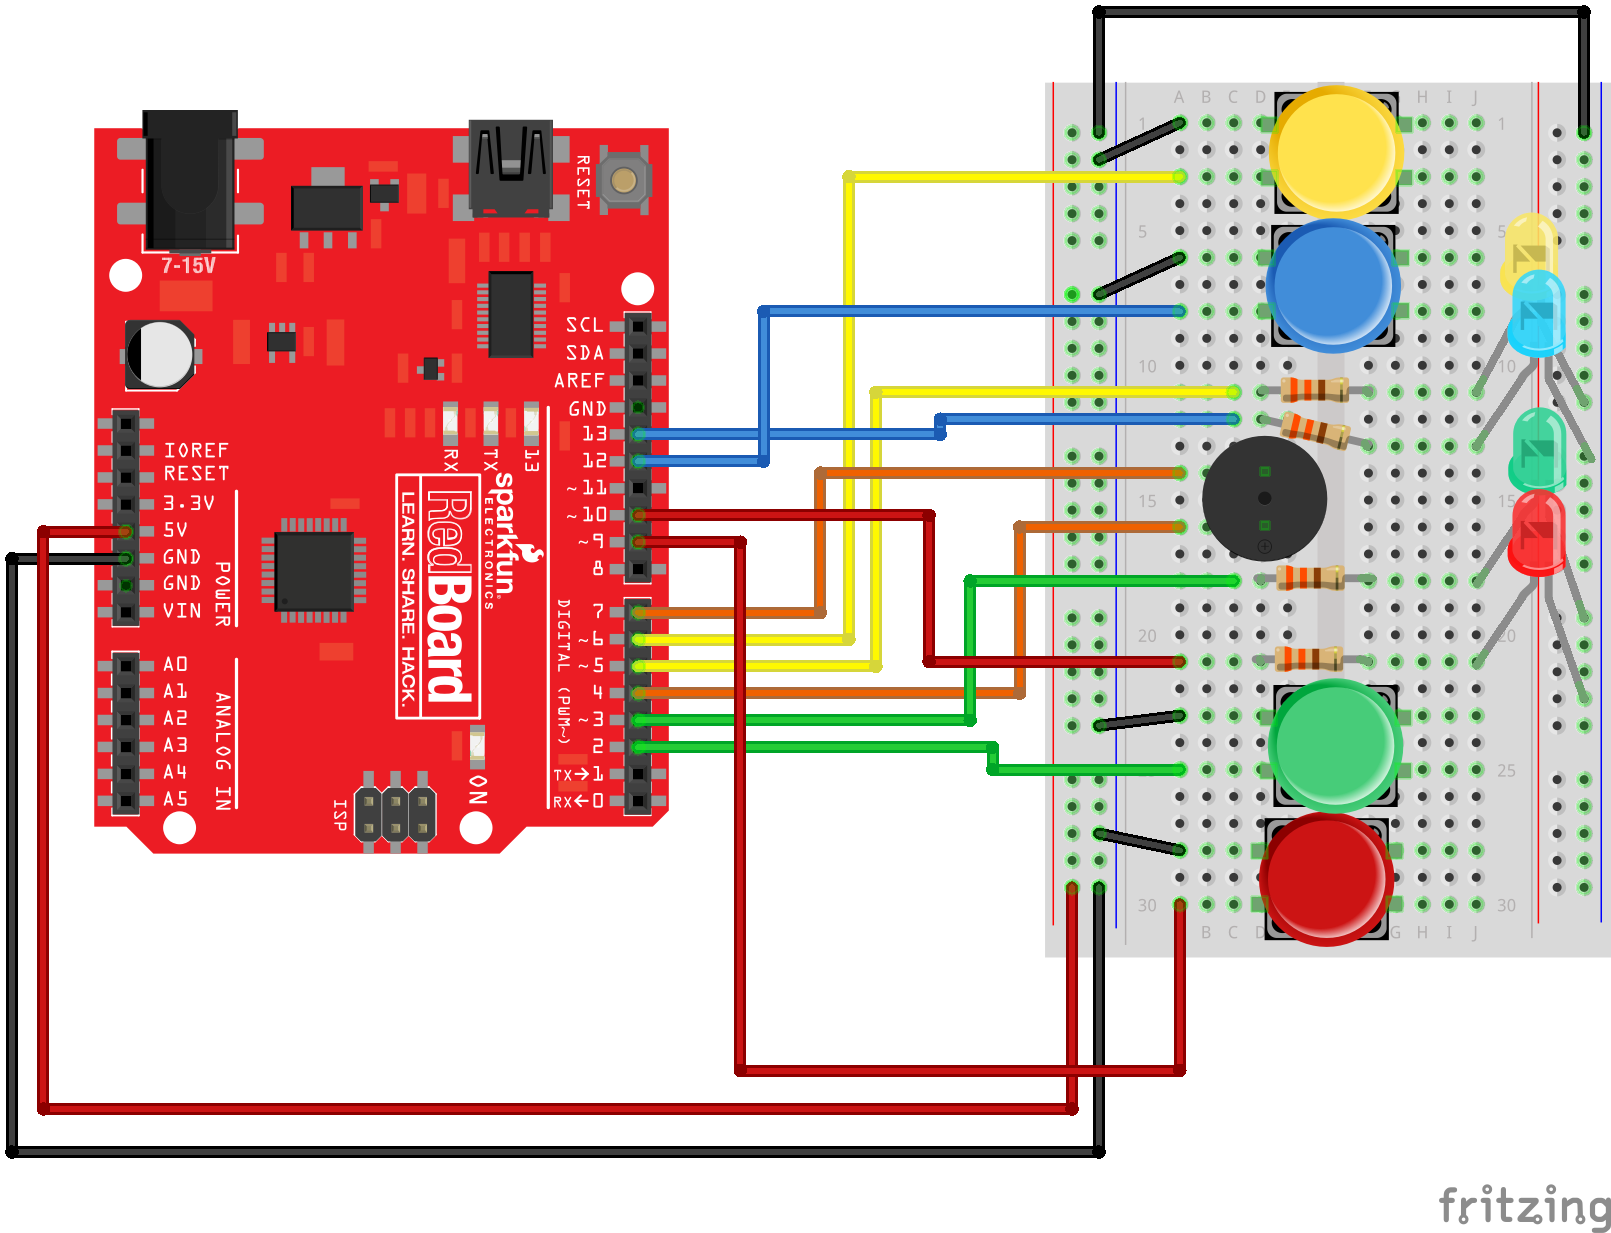
Ready to start hooking everything up? Check out the Fritzing diagram below, to see how everything is connected.
| Polarized Components | Pay special attention to the component’s markings indicating how to place it on the breadboard. Polarized components can only be connected to a circuit in one direction. |
Fritzing Diagram for RedBoard
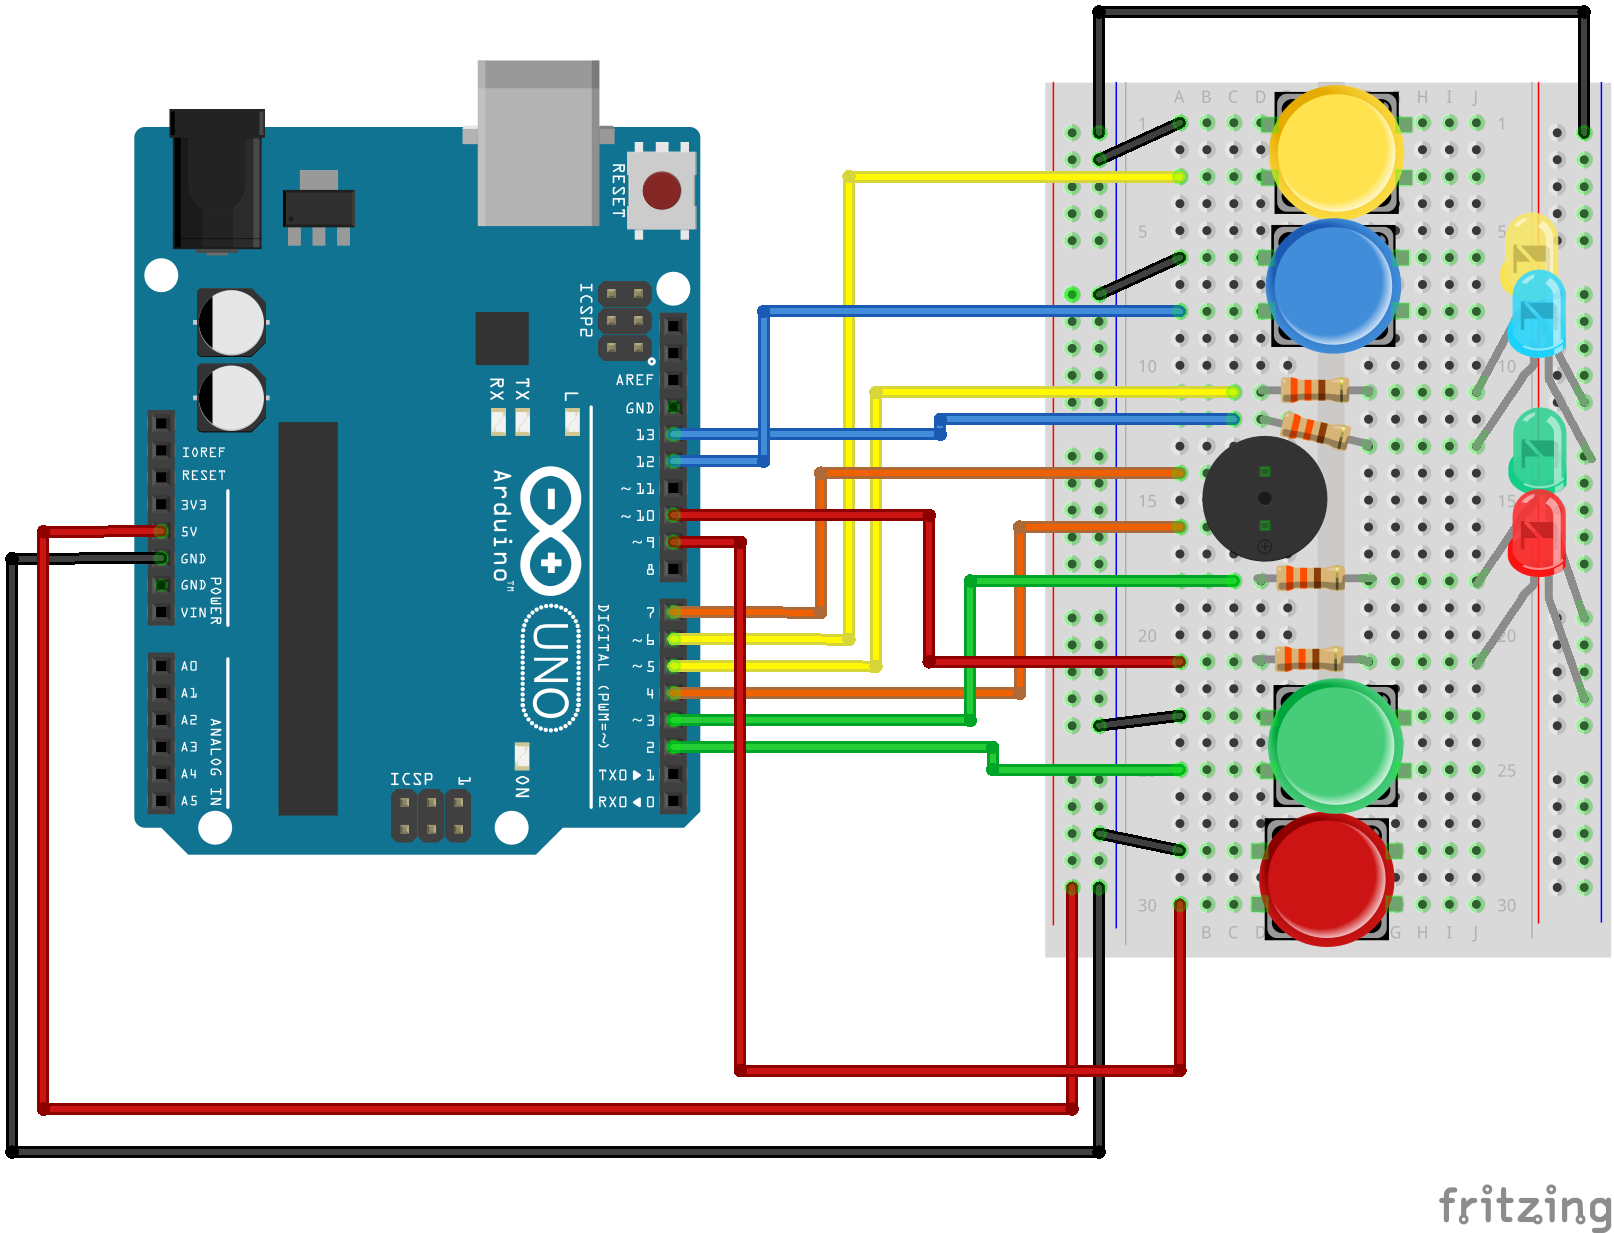
Fritzing Diagram for Arduino
Open the Sketch
Open Up the Arduino IDE software on your computer. Coding in the Arduino language will control your circuit. Open the code for Circuit 16 by accessing the “SIK Guide Code” you downloaded and placed into your “Examples” folder earlier.
To open the code go to: File > Examples > SIK Guide Code > SIK_circuit16_simonGame
You can also copy and paste the following code into the Arduino IDE. Hit upload, and see what happens!
language:cpp
/*
 SparkFun Inventor's Kit
 Example sketch 16

 SIMON SAYS
 Simon Says is a memory game. Start the game by pressing one of the four buttons. When a button lights up,
 press the button, repeating the sequence. The sequence will get longer and longer. The game is won after
 13 rounds.
 Generates random sequence, plays music, and displays button lights.
 Simon tones from Wikipedia
 - A (red, upper left) - 440Hz - 2.272ms - 1.136ms pulse
 - a (green, upper right, an octave higher than A) - 880Hz - 1.136ms,
 0.568ms pulse
 - D (blue, lower left, a perfect fourth higher than the upper left)
 587.33Hz - 1.702ms - 0.851ms pulse
 - G (yellow, lower right, a perfect fourth higher than the lower left) -
 784Hz - 1.276ms - 0.638ms pulse
 Simon Says game originally written in C for the PIC16F88.
 Ported for the ATmega168, then ATmega328, then Arduino 1.0.
 Fixes and cleanup by Joshua Neal <joshua[at]trochotron.com>
 This sketch was written by SparkFun Electronics,
 with lots of help from the Arduino community.
 This code is completely free for any use.
 Visit http://www.arduino.cc to learn about the Arduino.

 */

/*************************************************
* Public Constants
*************************************************/
#define NOTE_B0 31
#define NOTE_C1 33
#define NOTE_CS1 35
#define NOTE_D1 37
#define NOTE_DS1 39
#define NOTE_E1 41
#define NOTE_F1 44
#define NOTE_FS1 46
#define NOTE_G1 49
#define NOTE_GS1 52
#define NOTE_A1 55
#define NOTE_AS1 58
#define NOTE_B1 62
#define NOTE_C2 65
#define NOTE_CS2 69
#define NOTE_D2 73
#define NOTE_DS2 78
#define NOTE_E2 82
#define NOTE_F2 87
#define NOTE_FS2 93
#define NOTE_G2 98
#define NOTE_GS2 104
#define NOTE_A2 110
#define NOTE_AS2 117
#define NOTE_B2 123
#define NOTE_C3 131
#define NOTE_CS3 139
#define NOTE_D3 147
#define NOTE_DS3 156
#define NOTE_E3 165
#define NOTE_F3 175
#define NOTE_FS3 185
#define NOTE_G3 196
#define NOTE_GS3 208
#define NOTE_A3 220
#define NOTE_AS3 233
#define NOTE_B3 247
#define NOTE_C4 262
#define NOTE_CS4 277
#define NOTE_D4 294
#define NOTE_DS4 311
#define NOTE_E4 330
#define NOTE_F4 349
#define NOTE_FS4 370
#define NOTE_G4 392
#define NOTE_GS4 415
#define NOTE_A4 440
#define NOTE_AS4 466
#define NOTE_B4 494
#define NOTE_C5 523
#define NOTE_CS5 554
#define NOTE_D5 587
#define NOTE_DS5 622
#define NOTE_E5 659
#define NOTE_F5 698
#define NOTE_FS5 740
#define NOTE_G5 784
#define NOTE_GS5 831
#define NOTE_A5 880
#define NOTE_AS5 932
#define NOTE_B5 988
#define NOTE_C6 1047
#define NOTE_CS6 1109
#define NOTE_D6 1175
#define NOTE_DS6 1245
#define NOTE_E6 1319
#define NOTE_F6 1397
#define NOTE_FS6 1480
#define NOTE_G6 1568
#define NOTE_GS6 1661
#define NOTE_A6 1760
#define NOTE_AS6 1865
#define NOTE_B6 1976
#define NOTE_C7 2093
#define NOTE_CS7 2217
#define NOTE_D7 2349
#define NOTE_DS7 2489
#define NOTE_E7 2637
#define NOTE_F7 2794
#define NOTE_FS7 2960
#define NOTE_G7 3136
#define NOTE_GS7 3322
#define NOTE_A7 3520
#define NOTE_AS7 3729
#define NOTE_B7 3951
#define NOTE_C8 4186
#define NOTE_CS8 4435
#define NOTE_D8 4699
#define NOTE_DS8 4978

#define CHOICE_OFF      0 //Used to control LEDs
#define CHOICE_NONE     0 //Used to check buttons
#define CHOICE_RED  (1 << 0)
#define CHOICE_GREEN    (1 << 1)
#define CHOICE_BLUE (1 << 2)
#define CHOICE_YELLOW   (1 << 3)

#define LED_RED     10
#define LED_GREEN   3
#define LED_BLUE    13
#define LED_YELLOW  5

// Button pin definitions
#define BUTTON_RED    9
#define BUTTON_GREEN  2
#define BUTTON_BLUE   12
#define BUTTON_YELLOW 6

// Buzzer pin definitions
#define BUZZER1  4
#define BUZZER2  7

// Define game parameters
#define ROUNDS_TO_WIN      13 //Number of rounds to succesfully remember before you win. 13 is do-able.
#define ENTRY_TIME_LIMIT   3000 //Amount of time to press a button before game times out. 3000ms = 3 sec

#define MODE_MEMORY  0
#define MODE_BATTLE  1
#define MODE_BEEGEES 2

// Game state variables
byte gameMode = MODE_MEMORY; //By default, let's play the memory game
byte gameBoard[32]; //Contains the combination of buttons as we advance
byte gameRound = 0; //Counts the number of succesful rounds the player has made it through

void setup()
{
  //Setup hardware inputs/outputs. These pins are defined in the hardware_versions header file

  //Enable pull ups on inputs
  pinMode(BUTTON_RED, INPUT_PULLUP);
  pinMode(BUTTON_GREEN, INPUT_PULLUP);
  pinMode(BUTTON_BLUE, INPUT_PULLUP);
  pinMode(BUTTON_YELLOW, INPUT_PULLUP);

  pinMode(LED_RED, OUTPUT);
  pinMode(LED_GREEN, OUTPUT);
  pinMode(LED_BLUE, OUTPUT);
  pinMode(LED_YELLOW, OUTPUT);

  pinMode(BUZZER1, OUTPUT);
  pinMode(BUZZER2, OUTPUT);

  //Mode checking
  gameMode = MODE_MEMORY; // By default, we're going to play the memory game

  // Check to see if the lower right button is pressed
  if (checkButton() == CHOICE_YELLOW) play_beegees();

  // Check to see if upper right button is pressed
  if (checkButton() == CHOICE_GREEN)
  {
    gameMode = MODE_BATTLE; //Put game into battle mode

    //Turn on the upper right (green) LED
    setLEDs(CHOICE_GREEN);
    toner(CHOICE_GREEN, 150);

    setLEDs(CHOICE_RED | CHOICE_BLUE | CHOICE_YELLOW); // Turn on the other LEDs until you release button

    while(checkButton() != CHOICE_NONE) ; // Wait for user to stop pressing button

    //Now do nothing. Battle mode will be serviced in the main routine
  }

  play_winner(); // After setup is complete, say hello to the world
}

void loop()
{
  attractMode(); // Blink lights while waiting for user to press a button

  // Indicate the start of game play
  setLEDs(CHOICE_RED | CHOICE_GREEN | CHOICE_BLUE | CHOICE_YELLOW); // Turn all LEDs on
  delay(1000);
  setLEDs(CHOICE_OFF); // Turn off LEDs
  delay(250);

  if (gameMode == MODE_MEMORY)
  {
    // Play memory game and handle result
    if (play_memory() == true)
      play_winner(); // Player won, play winner tones
    else
      play_loser(); // Player lost, play loser tones
  }

  if (gameMode == MODE_BATTLE)
  {
    play_battle(); // Play game until someone loses

    play_loser(); // Player lost, play loser tones
  }
}

//-=-=-=-=-=-=-=-=-=-=-=-=-=-=-=-=-=-=-=-=-=-=-=-=-=-=-=-=-=-=
//The following functions are related to game play only

// Play the regular memory game
// Returns 0 if player loses, or 1 if player wins
boolean play_memory(void)
{
  randomSeed(millis()); // Seed the random generator with random amount of millis()

  gameRound = 0; // Reset the game to the beginning

  while (gameRound < ROUNDS_TO_WIN)
  {
    add_to_moves(); // Add a button to the current moves, then play them back

    playMoves(); // Play back the current game board

    // Then require the player to repeat the sequence.
    for (byte currentMove = 0 ; currentMove < gameRound ; currentMove++)
    {
      byte choice = wait_for_button(); // See what button the user presses

      if (choice == 0) return false; // If wait timed out, player loses

      if (choice != gameBoard[currentMove]) return false; // If the choice is incorect, player loses
    }

    delay(1000); // Player was correct, delay before playing moves
  }

  return true; // Player made it through all the rounds to win!
}

// Play the special 2 player battle mode
// A player begins by pressing a button then handing it to the other player
// That player repeats the button and adds one, then passes back.
// This function returns when someone loses
boolean play_battle(void)
{
  gameRound = 0; // Reset the game frame back to one frame

  while (1) // Loop until someone fails
  {
    byte newButton = wait_for_button(); // Wait for user to input next move
    gameBoard[gameRound++] = newButton; // Add this new button to the game array

    // Then require the player to repeat the sequence.
    for (byte currentMove = 0 ; currentMove < gameRound ; currentMove++)
    {
      byte choice = wait_for_button();

      if (choice == 0) return false; // If wait timed out, player loses.

      if (choice != gameBoard[currentMove]) return false; // If the choice is incorect, player loses.
    }

    delay(100); // Give the user an extra 100ms to hand the game to the other player
  }

  return true; // We should never get here
}

// Plays the current contents of the game moves
void playMoves(void)
{
  for (byte currentMove = 0 ; currentMove < gameRound ; currentMove++)
  {
    toner(gameBoard[currentMove], 150);

    // Wait some amount of time between button playback
    // Shorten this to make game harder
    delay(150); // 150 works well. 75 gets fast.
  }
}

// Adds a new random button to the game sequence, by sampling the timer
void add_to_moves(void)
{
  byte newButton = random(0, 4); //min (included), max (exluded)

  // We have to convert this number, 0 to 3, to CHOICEs
  if(newButton == 0) newButton = CHOICE_RED;
  else if(newButton == 1) newButton = CHOICE_GREEN;
  else if(newButton == 2) newButton = CHOICE_BLUE;
  else if(newButton == 3) newButton = CHOICE_YELLOW;

  gameBoard[gameRound++] = newButton; // Add this new button to the game array
}

//-=-=-=-=-=-=-=-=-=-=-=-=-=-=-=-=-=-=-=-=-=-=-=-=-=-=-=-=-=-=
//The following functions control the hardware

// Lights a given LEDs
// Pass in a byte that is made up from CHOICE_RED, CHOICE_YELLOW, etc
void setLEDs(byte leds)
{
  if ((leds & CHOICE_RED) != 0)
    digitalWrite(LED_RED, HIGH);
  else
    digitalWrite(LED_RED, LOW);

  if ((leds & CHOICE_GREEN) != 0)
    digitalWrite(LED_GREEN, HIGH);
  else
    digitalWrite(LED_GREEN, LOW);

  if ((leds & CHOICE_BLUE) != 0)
    digitalWrite(LED_BLUE, HIGH);
  else
    digitalWrite(LED_BLUE, LOW);

  if ((leds & CHOICE_YELLOW) != 0)
    digitalWrite(LED_YELLOW, HIGH);
  else
    digitalWrite(LED_YELLOW, LOW);
}

// Wait for a button to be pressed.
// Returns one of LED colors (LED_RED, etc.) if successful, 0 if timed out
byte wait_for_button(void)
{
  long startTime = millis(); // Remember the time we started the this loop

  while ( (millis() - startTime) < ENTRY_TIME_LIMIT) // Loop until too much time has passed
  {
    byte button = checkButton();

    if (button != CHOICE_NONE)
    {
      toner(button, 150); // Play the button the user just pressed

      while(checkButton() != CHOICE_NONE) ;  // Now let's wait for user to release button

      delay(10); // This helps with debouncing and accidental double taps

      return button;
    }

  }

  return CHOICE_NONE; // If we get here, we've timed out!
}

// Returns a '1' bit in the position corresponding to CHOICE_RED, CHOICE_GREEN, etc.
byte checkButton(void)
{
  if (digitalRead(BUTTON_RED) == 0) return(CHOICE_RED);
  else if (digitalRead(BUTTON_GREEN) == 0) return(CHOICE_GREEN);
  else if (digitalRead(BUTTON_BLUE) == 0) return(CHOICE_BLUE);
  else if (digitalRead(BUTTON_YELLOW) == 0) return(CHOICE_YELLOW);

  return(CHOICE_NONE); // If no button is pressed, return none
}

// Light an LED and play tone
// Red, upper left:     440Hz - 2.272ms - 1.136ms pulse
// Green, upper right:  880Hz - 1.136ms - 0.568ms pulse
// Blue, lower left:    587.33Hz - 1.702ms - 0.851ms pulse
// Yellow, lower right: 784Hz - 1.276ms - 0.638ms pulse
void toner(byte which, int buzz_length_ms)
{
  setLEDs(which); //Turn on a given LED

  //Play the sound associated with the given LED
  switch(which)
  {
  case CHOICE_RED:
    buzz_sound(buzz_length_ms, 1136);
    break;
  case CHOICE_GREEN:
    buzz_sound(buzz_length_ms, 568);
    break;
  case CHOICE_BLUE:
    buzz_sound(buzz_length_ms, 851);
    break;
  case CHOICE_YELLOW:
    buzz_sound(buzz_length_ms, 638);
    break;
  }

  setLEDs(CHOICE_OFF); // Turn off all LEDs
}

// Toggle buzzer every buzz_delay_us, for a duration of buzz_length_ms.
void buzz_sound(int buzz_length_ms, int buzz_delay_us)
{
  // Convert total play time from milliseconds to microseconds
  long buzz_length_us = buzz_length_ms * (long)1000;

  // Loop until the remaining play time is less than a single buzz_delay_us
  while (buzz_length_us > (buzz_delay_us * 2))
  {
    buzz_length_us -= buzz_delay_us * 2; //Decrease the remaining play time

    // Toggle the buzzer at various speeds
    digitalWrite(BUZZER1, LOW);
    digitalWrite(BUZZER2, HIGH);
    delayMicroseconds(buzz_delay_us);

    digitalWrite(BUZZER1, HIGH);
    digitalWrite(BUZZER2, LOW);
    delayMicroseconds(buzz_delay_us);
  }
}

// Play the winner sound and lights
void play_winner(void)
{
  setLEDs(CHOICE_GREEN | CHOICE_BLUE);
  winner_sound();
  setLEDs(CHOICE_RED | CHOICE_YELLOW);
  winner_sound();
  setLEDs(CHOICE_GREEN | CHOICE_BLUE);
  winner_sound();
  setLEDs(CHOICE_RED | CHOICE_YELLOW);
  winner_sound();
}

// Play the winner sound
// This is just a unique (annoying) sound we came up with, there is no magic to it
void winner_sound(void)
{
  // Toggle the buzzer at various speeds
  for (byte x = 250 ; x > 70 ; x--)
  {
    for (byte y = 0 ; y < 3 ; y++)
    {
      digitalWrite(BUZZER2, HIGH);
      digitalWrite(BUZZER1, LOW);
      delayMicroseconds(x);

      digitalWrite(BUZZER2, LOW);
      digitalWrite(BUZZER1, HIGH);
      delayMicroseconds(x);
    }
  }
}

// Play the loser sound/lights
void play_loser(void)
{
  setLEDs(CHOICE_RED | CHOICE_GREEN);
  buzz_sound(255, 1500);

  setLEDs(CHOICE_BLUE | CHOICE_YELLOW);
  buzz_sound(255, 1500);

  setLEDs(CHOICE_RED | CHOICE_GREEN);
  buzz_sound(255, 1500);

  setLEDs(CHOICE_BLUE | CHOICE_YELLOW);
  buzz_sound(255, 1500);
}

// Show an "attract mode" display while waiting for user to press button.
void attractMode(void)
{
  while(1)
  {
    setLEDs(CHOICE_RED);
    delay(100);
    if (checkButton() != CHOICE_NONE) return;

    setLEDs(CHOICE_BLUE);
    delay(100);
    if (checkButton() != CHOICE_NONE) return;

    setLEDs(CHOICE_GREEN);
    delay(100);
    if (checkButton() != CHOICE_NONE) return;

    setLEDs(CHOICE_YELLOW);
    delay(100);
    if (checkButton() != CHOICE_NONE) return;
  }
}

//-=-=-=-=-=-=-=-=-=-=-=-=-=-=-=-=-=-=-=-=-=-=-=-=-=-=-=-=-=-=
// The following functions are related to Beegees Easter Egg only

// Notes in the melody. Each note is about an 1/8th note, "0"s are rests.
int melody[] = {
  NOTE_G4, NOTE_A4, 0, NOTE_C5, 0, 0, NOTE_G4, 0, 0, 0,
  NOTE_E4, 0, NOTE_D4, NOTE_E4, NOTE_G4, 0,
  NOTE_D4, NOTE_E4, 0, NOTE_G4, 0, 0,
  NOTE_D4, 0, NOTE_E4, 0, NOTE_G4, 0, NOTE_A4, 0, NOTE_C5, 0};

int noteDuration = 115; // This essentially sets the tempo, 115 is just about right for a disco groove :)
int LEDnumber = 0; // Keeps track of which LED we are on during the beegees loop

// Do nothing but play bad beegees music
// This function is activated when user holds bottom right button during power up
void play_beegees()
{
  //Turn on the bottom right (yellow) LED
  setLEDs(CHOICE_YELLOW);
  toner(CHOICE_YELLOW, 150);

  setLEDs(CHOICE_RED | CHOICE_GREEN | CHOICE_BLUE); // Turn on the other LEDs until you release button

  while(checkButton() != CHOICE_NONE) ; // Wait for user to stop pressing button

  setLEDs(CHOICE_NONE); // Turn off LEDs

  delay(1000); // Wait a second before playing song

  digitalWrite(BUZZER1, LOW); // setup the "BUZZER1" side of the buzzer to stay low, while we play the tone on the other pin.

  while(checkButton() == CHOICE_NONE) //Play song until you press a button
  {
    // iterate over the notes of the melody:
    for (int thisNote = 0; thisNote < 32; thisNote++) {
      changeLED();
      tone(BUZZER2, melody[thisNote],noteDuration);
      // to distinguish the notes, set a minimum time between them.
      // the note's duration + 30% seems to work well:
      int pauseBetweenNotes = noteDuration * 1.30;
      delay(pauseBetweenNotes);
      // stop the tone playing:
      noTone(BUZZER2);
    }
  }
}

// Each time this function is called the board moves to the next LED
void changeLED(void)
{
  setLEDs(1 << LEDnumber); // Change the LED

  LEDnumber++; // Goto the next LED
  if(LEDnumber > 3) LEDnumber = 0; // Wrap the counter if needed
}
Code To Note
#define
The #define statement is used to create constants in your code. Constants are variables that will likely only have one value during the lifespan of your code. Thus, you can assign constants a value, and then use them throughout your code wherever. Then, if you need to change that value, you can change that one line instead of going through all the code to find every instance of that variable.
byte
Bytes are another variable type. In the world of computing, a byte is a chunk of space that contains 8 bits, and a bit is a single binary value. Binary is another way of counting and uses only 1's and 0's. So a byte can hold all 1's: 11111111, all 0's: 00000000, or a combination of the two: 10010110.
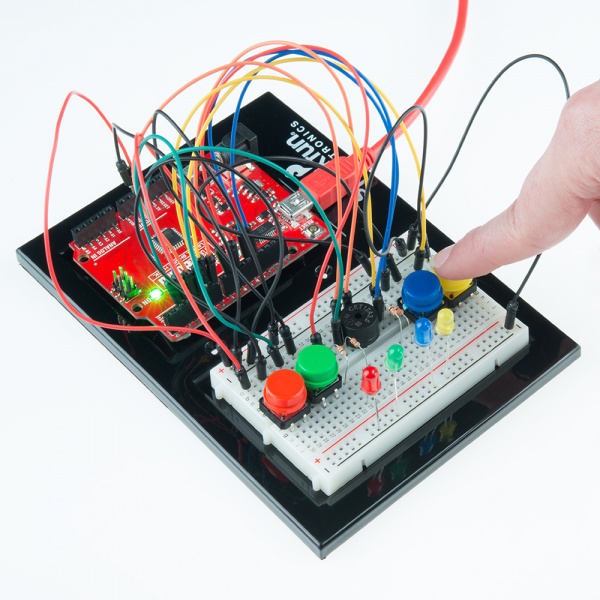
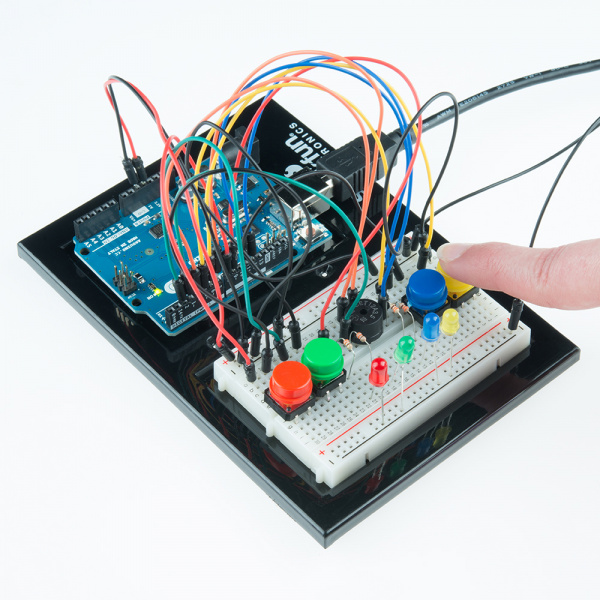
What You Should See
Once the code is uploaded, the buzzer will beep a few times, and all four LEDs should begin blinking. The game begins once you press any of the four buttons. Once the game has been started, a random LED will blink. Press the button associated with that color LED to replicate the pattern. With a successful guess, the pattern will repeat, this time adding another random LED. The player is to follow the pattern for as long as possible, with each successful guess resulting in an additional layer of complexity added to the original pattern.
Real World Application
Toys and Games, such as the original Simon from Milton Bradley, have relied on electronics to provide fun and entertainment to children across the world.
Troubleshooting
LEDs not working, but the buttons and sound do
If only half of you circuit is working, make sure you added the additional wire from one ground rail to the other. Remember that breadboards have two power rails on each side and that these can be connected, or bussed, together to provide the power to both sides of the same circuit.
No Sound
Once the piezo buzzer is in the breadboard, it's hard to see the legs and to which row they are connected. If you aren't hearing any sound, make sure your wires are on the same row as the piezo buzzer legs.
Game is Not Working
If everything starts up ok, but you're having trouble when it comes time to play the game, you may have a button or two misplaced. Pay close attention to which pin is connected to each button as it matters which button is pressed when a particular color lights up.