SIK Experiment Guide for Arduino - V3.3
This Tutorial is Retired!
View the updated tutorial: SparkFun Inventor's Kit Experiment Guide - v4.0
Experiment 15: Using an LCD
Introduction
In this circuit, you’ll learn about how to use an LCD. An LCD, or liquid crystal display, is a simple screen that can display commands, bits of information, or readings from your sensor - all depending on how you program your board. In this circuit, you’ll learn the basics of incorporating an LCD into your project.
Parts Needed
You will need the following parts:
- 1x RedBoard + USB mini-B Cable or Arduino Uno R3 + USB A-to-B Cable
- 1x Breadboard
- 16x Jumper Wires
- 1x Potentiometer
1x LCD with headers
Hardware Hookup
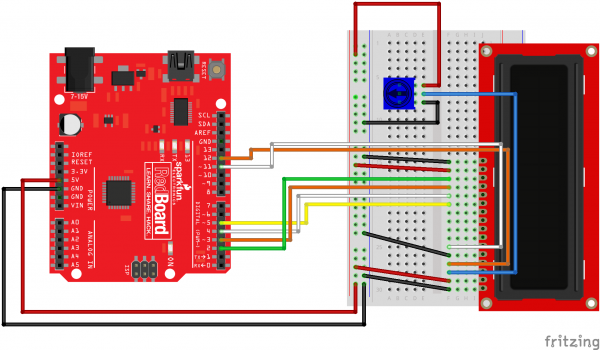
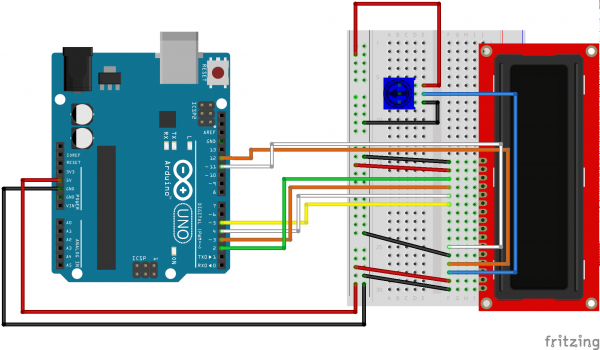
Ready to start hooking everything up? Check out the Fritzing diagram below, to see how everything is connected.
| Polarized Components | Pay special attention to the component’s markings indicating how to place it on the breadboard. Polarized components can only be connected to a circuit in one direction. |
Fritzing Diagram for RedBoard
Fritzing Diagram for Arduino
Open the Sketch
Open Up the Arduino IDE software on your computer. Coding in the Arduino language will control your circuit. Open the code for Circuit 15 by accessing the “SIK Guide Code” you downloaded and placed into your “Examples” folder earlier.
To open the code go to: File > Examples > SIK Guide Code > SIK_circuit15_LCDscreen
You can also copy and paste the following code into the Arduino IDE. Hit upload, and see what happens!
language:cpp
/*
SparkFun Inventor's Kit
Example sketch 15
LIQUID CRYSTAL DISPLAY (LCD)
  A Liquid Crystal Display (LCD) is a sophisticated module
  that can be used to display text or numeric data. The display
  included in your SIK features two lines of 16 characters, and
  a backlight so it can be used at night.
  If you've been using the Serial Monitor to output data,
  you'll find that a LCD provides many of the same benefits
  without needing to drag a large computer around.
  This sketch will show you how to connect an LCD to your Arduino
  and display any data you wish.
This sketch was written by SparkFun Electronics,
with lots of help from the Arduino community.
This code is completely free for any use.
Visit http://learn.sparkfun.com/products/2 for SIK information.
Visit http://www.arduino.cc to learn about the Arduino.
Version 1.0 2/2013 MDG
*/

// Load the LiquidCrystal library, which will give us
// commands to interface to the LCD:

#include <LiquidCrystal.h>

// Initialize the library with the pins we're using.
// (Note that you can use different pins if needed.)
// See http://arduino.cc/en/Reference/LiquidCrystal
// for more information:

LiquidCrystal lcd(12, 11, 5, 4, 3, 2);

void setup()
{

    lcd.begin(16, 2); //Initialize the 16x2 LCD


    lcd.clear();    //Clear any old data displayed on the LCD


    lcd.print("hello, world!"); // Display a message on the LCD!


}

void loop()
{

    lcd.setCursor(0, 1);    //Set the (invisible) cursor to column 0,
                            // row 1.

    lcd.print(millis() / 1000); //Print the number of seconds
                                //since the Arduino last reset.
}
Code To Note
#include <LiquidCrystal.h>
This bit of code tells your Arduino IDE to include the library for a simple LCD display. Without it, none of the commands will work, so make sure you include it!
lcd.print(“hello, world!”);
This is the first time you’ll fire something up on your screen. You may need to adjust the contrast to make it visible. Twist the potentiometer until you can clearly see the text!
What You Should See
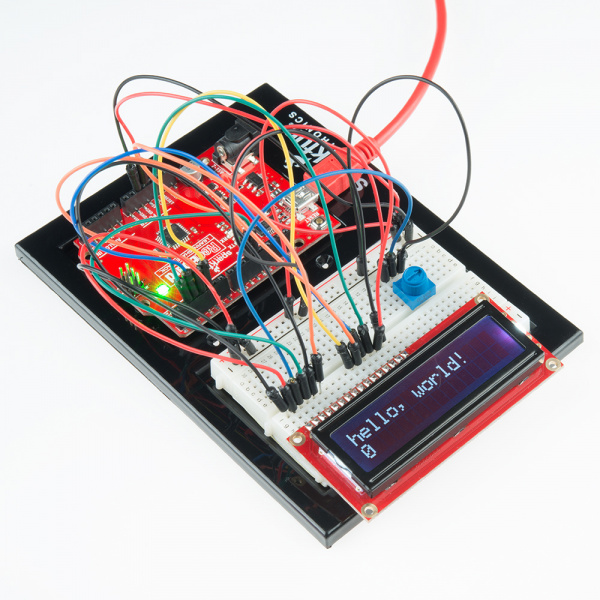
Initially, you should see the words “hello, world!” pop up on your LCD. Remember you can adjust the contrast using the potentiometer if you can’t make out the words clearly. If you have any issues, make sure your code is correct and double-check your connections.
Real World Application
LCDs are everywhere! From advanced LCDs like your television, to simple notification screens, this is a very common and useful display!
Troubleshooting
The Screen is Blank or Completely Lit?
Fiddle with the contrast by twisting the potentiometer. If it’s incorrectly adjusted, you won’t be able to read the text.
Not Working At All?
Double check the code, specifically that you include the LCD library.
Screen Is Flickering
Double check your connections to your breadboard and Arduino.
Black Rectangles in First Row?
If you see 16x black rectangles (like "█") on the first row, it may be due to the jumper wires being loose on the breadboard. This is normal and it can happen with other LCDs wired in parallel with an Arduino. This example should work as expected if you make sure that the wires are fully inserted to the breadboard, hitting the reset button the Arduino, and adjusting the contrast using the potentiometer.


