Getting Started with the SparkFun Blynk Board
 jimblom
Troubleshooting
If, for any reason, you can't successfully provision the Blynk Board through the Blynk app, you have a few alternatives. But first, you'll need to create a new Blynk project.
Creating a Blynk Project
Each of the alternative provisioning methods below will require a Blynk project to be previously created. The new Blynk project will be assigned a Blynk auth token -- a 32-character, unique string, which connects the Blynk Board to your Blynk project. That's what we're after in this process.
Follow these steps to create a new Blynk project and get a new auth token:
Step 1: Create a Blynk Project
Open the Blynk app, and log in if you haven't. Make sure your phone is connected to an Internet-connected Wi-Fi network. On the Blynk main page, select Create new project.

Step 2: Configure the Blynk Project
On the next page, select SparkFun Blynk Board under the "Hardware Model" list. You can give the project any name you please -- the provisioning process sets it to "BlynkMe".
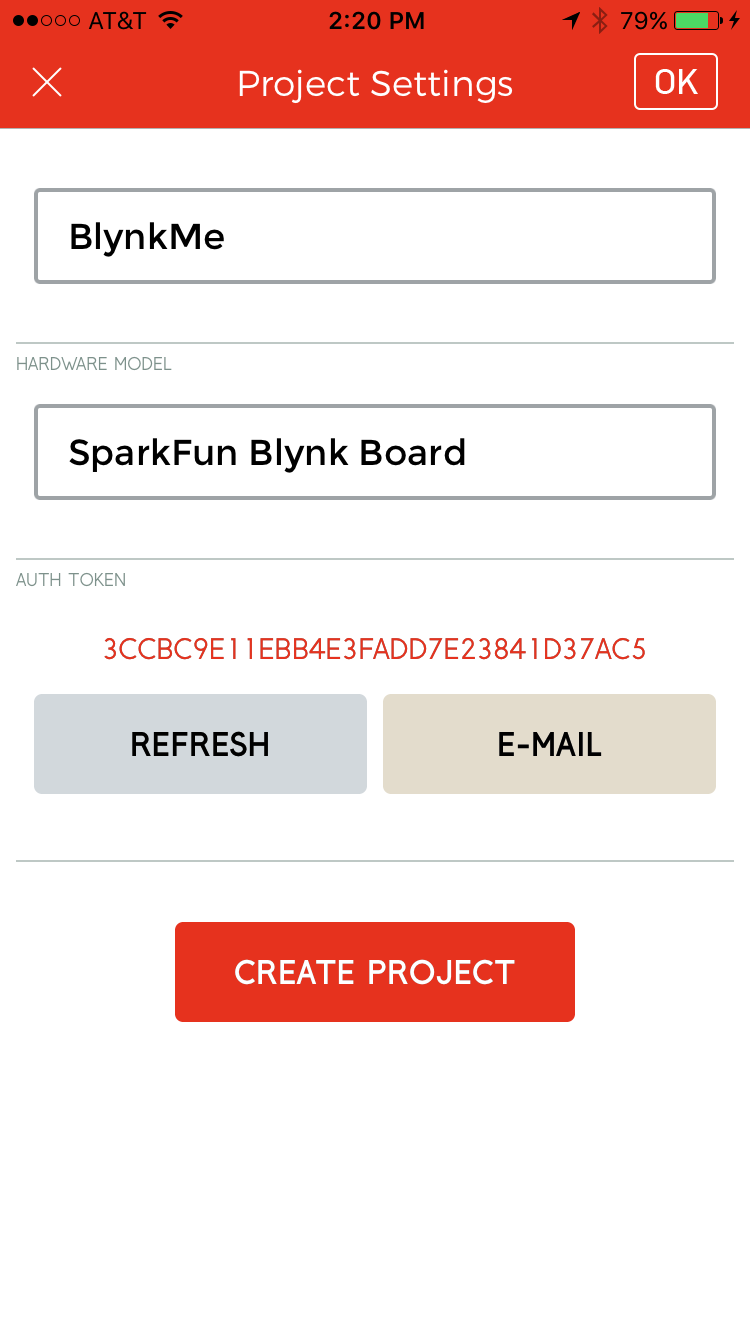
Do not hit Create Project yet!
Step 3: Email and Copy the Auth Token
Depending on which alternative provisioning option you choose, you'll either need the auth token copied to your phone's clipboard, or sitting in your email inbox. Might as well do both while we're here!
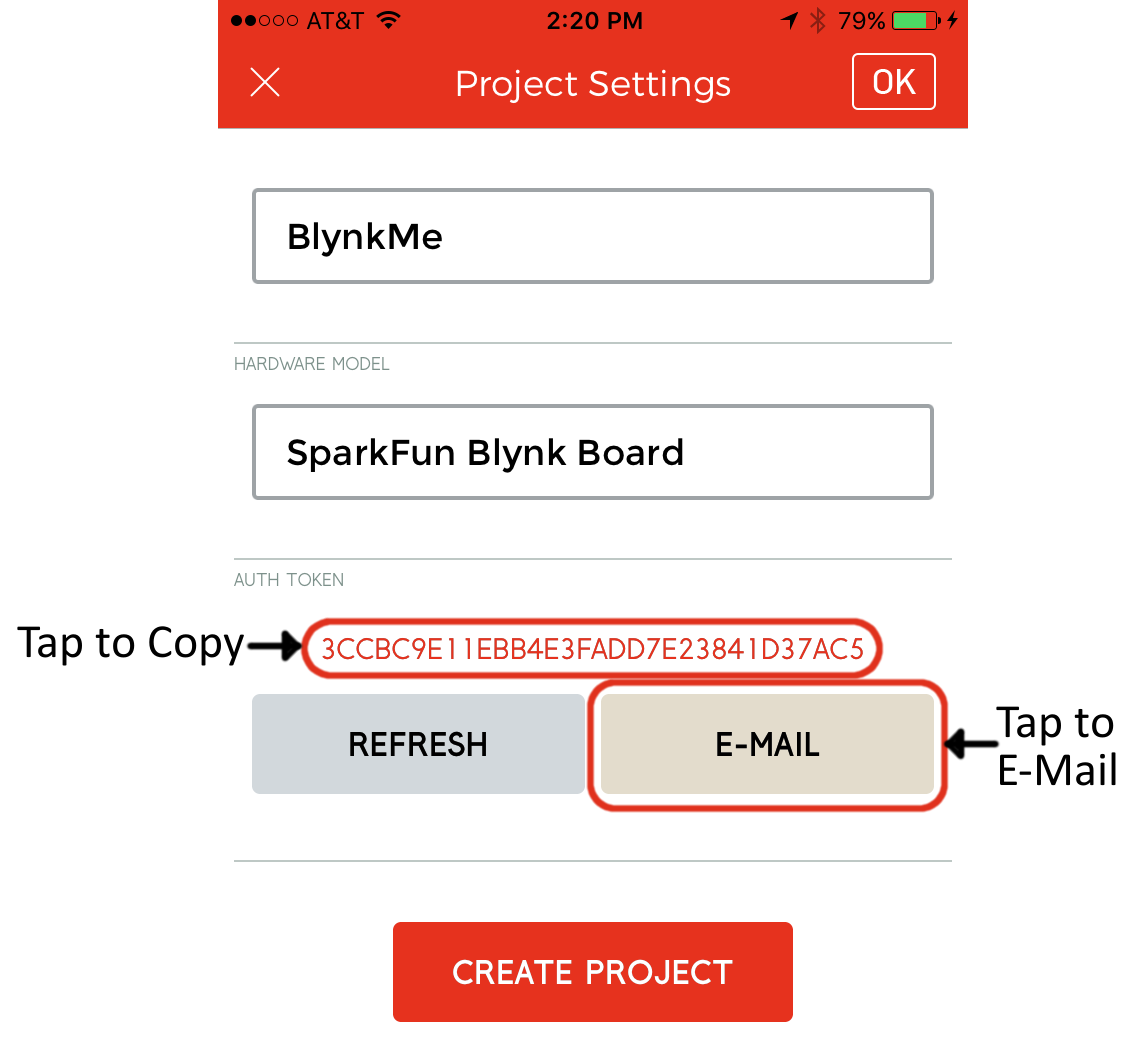
Tap the E-Mail button to send the auth token to your Blynk-connected email account. Then tap the Auth token itself to copy the string to your phone's clipboard. The phone should pop up a notification confirming that the token was copied.
Step 4: Create Project
Finally, with the token emailed and copied, click Create or Create Project. You should be brought to a new, blank project -- perfect for now!
Alternative Provisioning
There are a few options available for alternatively provisioning the Blynk board. In order of our recommendation, you can:
- Connect the Blynk Board to Wi-Fi/Blynk using a laptop or Wi-Fi-enabled computer.
- Configure the Blynk Board through a serial terminal on a computer connected over USB to the Blynk Board.
- Creatively use copy/paste, and app-switching on your smartphone to provision the Blynk Board.
Click one of the links below to see how.
Option 1: Laptop/Computer, Browser-Based Provisioning
If the Blynk app isn’t correctly provisioning your Blynk Board and you have a computer with Wi-Fi capability nearby, you can use your computer and smartphone to join forces to get your Blynk Board configured. Just follow these steps:
Step 1: Get the Auth Token From Your E-Mail Inbox
Make sure you've followed the steps from above – created a project, and emailed the auth token to yourself. Then open your email on your computer and copy the auth token – either to your clipboard or a simple text editor.
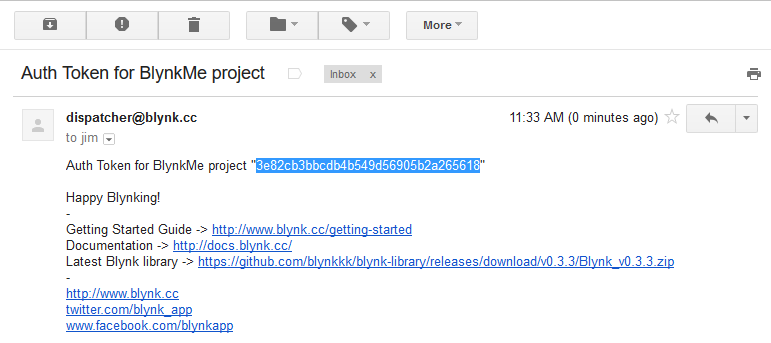
Check your email, and copy the Auth token.
Step 2: Connect to Your Computer to the Blynk Board’s Wi-Fi Network
Find your computer’s Wi-Fi settings, and have it scan for nearby Wi-Fi networks. You should see something that starts with BlynkMe-. The last four characters should match the four-color sequence your board is blinking.

Connect your computer to the BlynkMe Wi-Fi network.
Select the “BlynkMe-CCCC” network to connect your computer to it. On successful connection your Blynk Board should begin to blink purple.
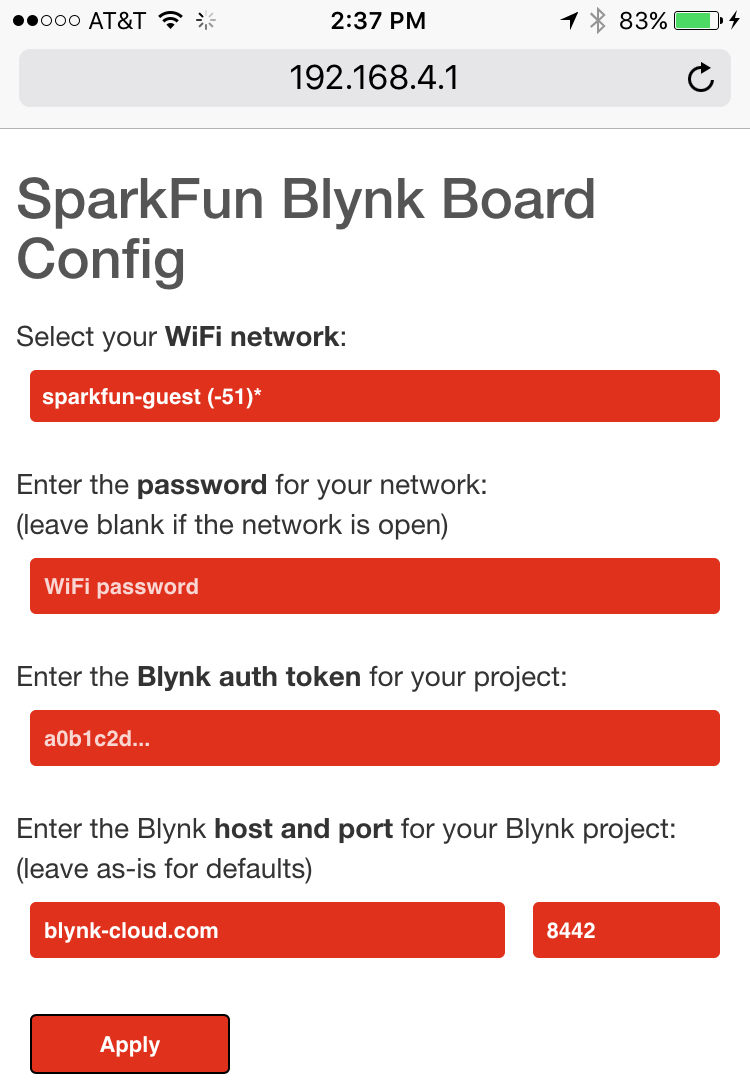
Step 3: Point a Web Browser to 192.168.4.1
Open Safari, Chrome, Firefox, Edge, or whatever your favorite web browser may be, and navigate to 192.168.4.1 (that link will only work on a device connected to the Blynk Board).
After a couple seconds, the Blynk Board should serve up the Blynk Board Config Page. It may take a couple of tries to load the page; if your browser says “Failed to load webpage,” or something to that effect, try refreshing.
Step 4: Send your Wi-Fi Network and Blynk Auth Token
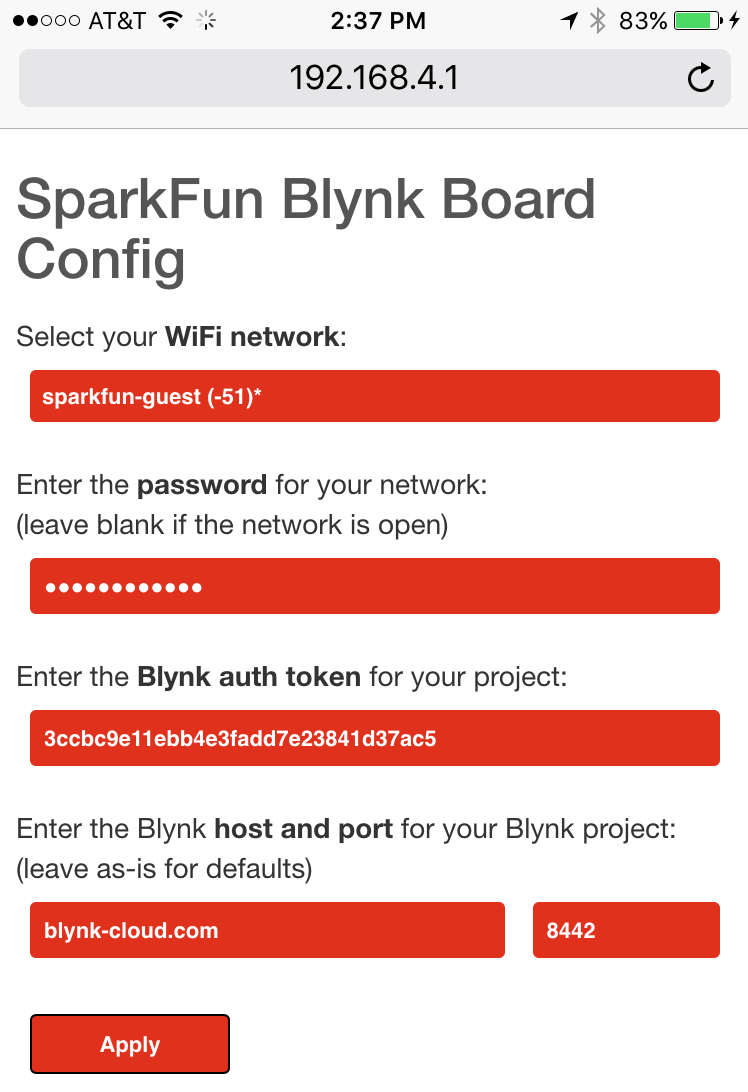
The config page will present a list of visible Wi-Fi networks within range. If you see your network on there, great! Select that. If your network is hidden, scroll down to “[Enter manually …]”, and type it in yourself.
Next enter the password for your Wi-Fi network. If it’s an open network (no password), leave the box blank.
Finally, paste the auth token into the Blynk auth token box. This process varies by phone, either a light tap (iOS) or a tap-and-hold should bring up the paste option.

Unless you’re connecting to the Blynk Board to a custom server (which you’re most likely not), leave the Blynk host and port entries as-is.
Now click Apply.
Step 5: Monitor the Blynk Board
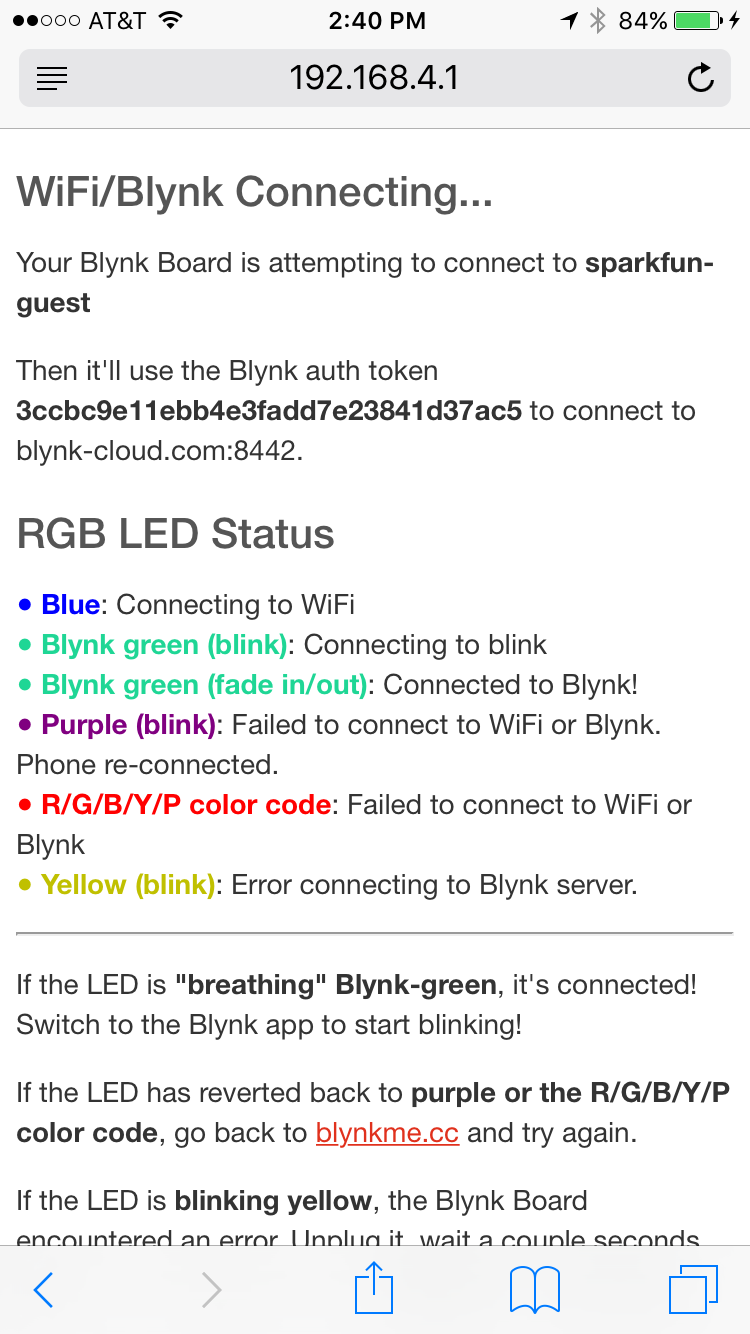
After hitting apply, the Blynk Board should begin to blink blue as it attempts to connect to your Wi-Fi network.
If that’s successful, it’ll begin to blink Blynk-green while it establishes a connection with the Blynk server.
Once both parties are happy, the Blynk Board’s RGB LED should “breathe” Blynk-green, fading in-and-out, in-and-out. That’s a great sign! Swap back to your phone, open the Blynk app and we’ll set up a zeRGBa.
If that didn't work, go back to the provisioning options, and try something else. Or consider getting in touch with our technical support team.
Option 2: Serial Terminal Over a USB-Connected Computer/Laptop
If Wi-Fi-based commissioning doesn't seem to be working out, you can provision the board over a hard-wire – and get a little debug info at the same time – using a serial terminal. In order to use the serial terminal method, you’ll need:
- The Blynk Board connected over USB to a computer or laptop
- FTDI drivers installed on your computer
- Serial terminal software
Step 1: Install FTDI Drivers
The Blynk Board uses a specialized chip called an “FTDI” to convert USB data to a more simple serial interface. If you’ve never used an FTDI-based device before, you’ll probably need to install drivers on your computer. Our How to Install FTDI Drivers tutorial should help get your drivers installed, whether you’re on a Mac, Windows, or Linux machine.
Once you’ve installed the drivers, your Blynk Board should show up on your computer as either COM# (if you’re on a Windows machine) or /dev/tty.usbserial-######## (if you’re on a Mac/Linux computer), where the #’s are unique numbers or alphabetic characters.
Step 2: Select, Download, Install, Run Terminal Software
There are many, many software variants on the serial terminal out there. If you don’t already have one, read through our Serial Terminal Basics tutorial for some suggestions.
Step 3: Configure the Serial Terminal Settings, Open the Connection
Once you’ve selected terminal software – and found your Blynk Board’s serial port number – open it and set the baud rate to 9600.
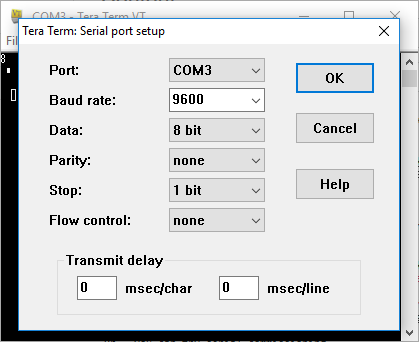
Using TeraTerm to communicate with the Blynk Board over a serial interface on COM3.
After opening the terminal connecting press 'h' to print a help menu. This will also confirm that your Blynk Board and terminal are talking to each other. 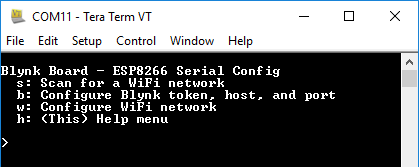
Step 4: Configure Wi-Fi
There are four single-character commands available for configuring the Blynk Board’s Wi-Fi network, password, and Blynk token. Typing any of these characters will initiate the command:
- h – Prints a help menu.
- s – Scan for Wi-Fi networks, and select from a list of visible networks.
- w – Manually enter a Wi-Fi network.
- b – Initiates Blynk Token configuration.
Press ’s' in the terminal to scan for Wi-Fi networks and begin configuration. After a couple seconds, you should be presented with a list of visible Wi-Fi networks.
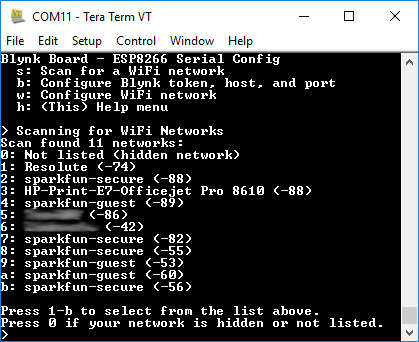
If you see your Wi-Fi network, type the number or letter next to which it’s listed. If you don’t see the network – or if it’s supposed to be hidden – hit 0 to type it in manually.
Following the network selection, the configuration tool will immediately ask you for the Wi-Fi network password – type that in, and hit enter. If you’re Wi-Fi network is open, just hit enter, leaving the password blank.
Step 5: Configure Blynk
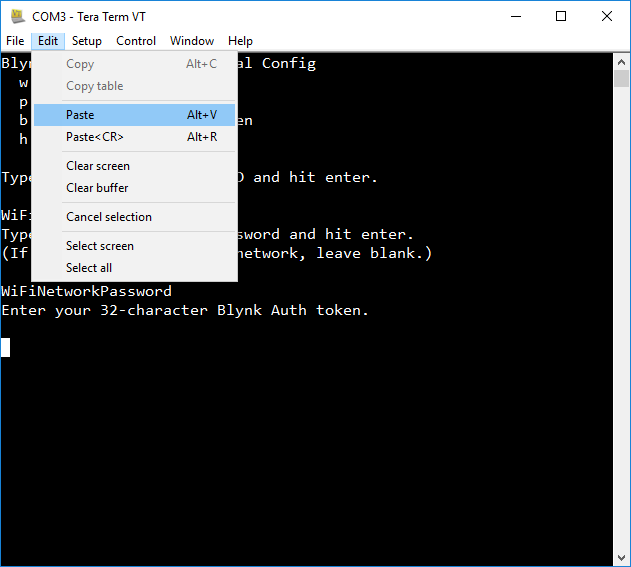
After following the "Create a Blynk Project" directions, you should have an email sitting in your inbox containing your Blynk project's auth token. Load up your e-mail, and copy that auth token to your computer's clipboard.
Once you have the token copied to your clipboard, type ‘b’ to enter Blynk Auth Token config mode. Then paste your token in, and hit enter. Terminal programs all deal with copying/pasting differently, but you usually can’t go wrong with Edit > Paste.
Step 6: Monitor the Blynk Board
After sending over your Wi-Fi and Blynk credentials, the Blynk Board should begin to blink blue as it attempts to connect to your Wi-Fi network.
If that’s successful, it’ll begin to blink Blynk-green while it establishes a connection with the Blynk server.
Once both parties are happy, the Blynk Board’s RGB LED should “breathe” Blynk-green, fading in-and-out, in-and-out. That’s a great sign! Swap back to your phone, open the Blynk app and we’ll set up a zeRGBa.
If that didn't work, go back to the provisioning options, and try something else. Or consider getting in touch with our technical support team.
Option 3: Smartphone Browser-Based Provisioning
If the Blynk app isn’t correctly provisioning your Blynk Board, you can still use your phone to go about the process manually. Follow these steps to manually set up your Blynk Board:
From the "Create a Blynk Project" directions above, you should have a 32-character Blynk auth token copied to your phone's clipboard. Make sure you do before proceeding – you'll be cut off from the Internet for the next few steps.
Step 1: Connect Your Phone to the Blynk Board’s Wi-Fi Network
Temporarily jump out of the Blynk app, and find your phone’s Wi-Fi settings. On an iOS device, this will be the “Wi-Fi” entry under the Settings app. On an Android, it should be in the Wi-Fi section of the phone's settings.
Have your phone scan for Wi-Fi networks, and look for something that starts with BlynkMe-. The last four characters should match the four-color sequence your board is blinking.
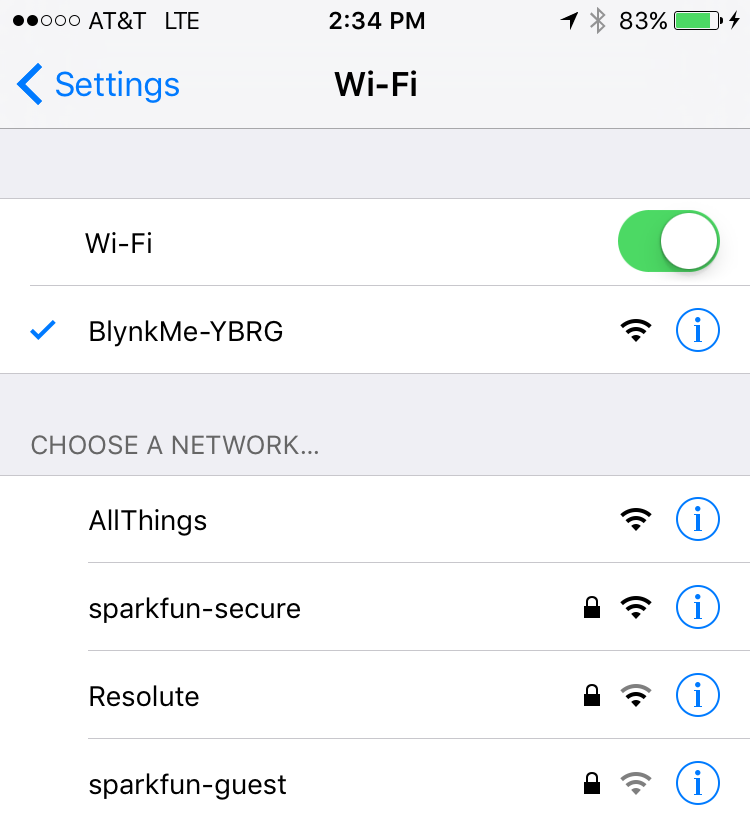
Connect your phone to the “BlynkMe-CCCC” network. Upon a successful connection, your Blynk Board should begin to blink purple.
Step 2: Point a Web Browser to 192.168.4.1
Open Safari, Chrome, Firefox, “Internet”, or whatever your favorite phone web browser may be, and navigate to 192.168.4.1 (that link will only work on a device connected to the Blynk Board).
After a couple seconds, the Blynk Board should serve up a webpage like this:
It may take a couple refreshes to load the Blynk Board Config page. If your browser says “Failed to load webpage”, or something to that effect, try refreshing.
Step 3: Send your Wi-Fi Network and Blynk Auth Token
The config page will present a list of visible Wi-Fi networks within range. If you see your network on there, great! Select that. If your network is hidden, scroll down to “[Enter manually …]”, and type it in yourself.
Next, enter the password for your Wi-Fi network. If it’s an open network (no password), leave the box blank.
Finally, paste the auth token into the Blynk auth token box. This process varies by phone, either a light tap (iOS) or a tap-and-hold should bring up the paste option.
Unless you’re connecting to the Blynk Board to a custom server (which you’re most likely not), leave the Blynk host and port entries as-are (blynk-cloud.com and 8442).
Now click Apply.
Step 4: Monitor the Blynk Board
After hitting apply, you should be served a confirmation page, informing you of what the Blynk Board is attempting to do.
The Blynk Board should immediately begin to blink blue as it attempts to connect to your Wi-Fi network.
If that’s successful, it’ll begin to blink Blynk-green while it establishes a connection with the Blynk server.
Once both parties are happy there, the Blynk Board’s RGB LED should “breathe” Blynk-green, fading in-and-out, in-and-out. That’s a great sign! Swap back to the Blynk app and we’ll set up a zeRGBa.
If that didn't work, go back to the provisioning options, and try something else. Or consider getting in touch with our technical support team.
Manually Adding a zeRGBa Widget
Hopefully one of the three alternative provisioning processes has worked for you. If not, please don't hesitate to get in touch with our technical support team.
If your Blynk Board is breathing Blynk-green, open the Blynk app on your phone, and select the bare project you've created. Look at that blank canvas -- room for so many widgets!
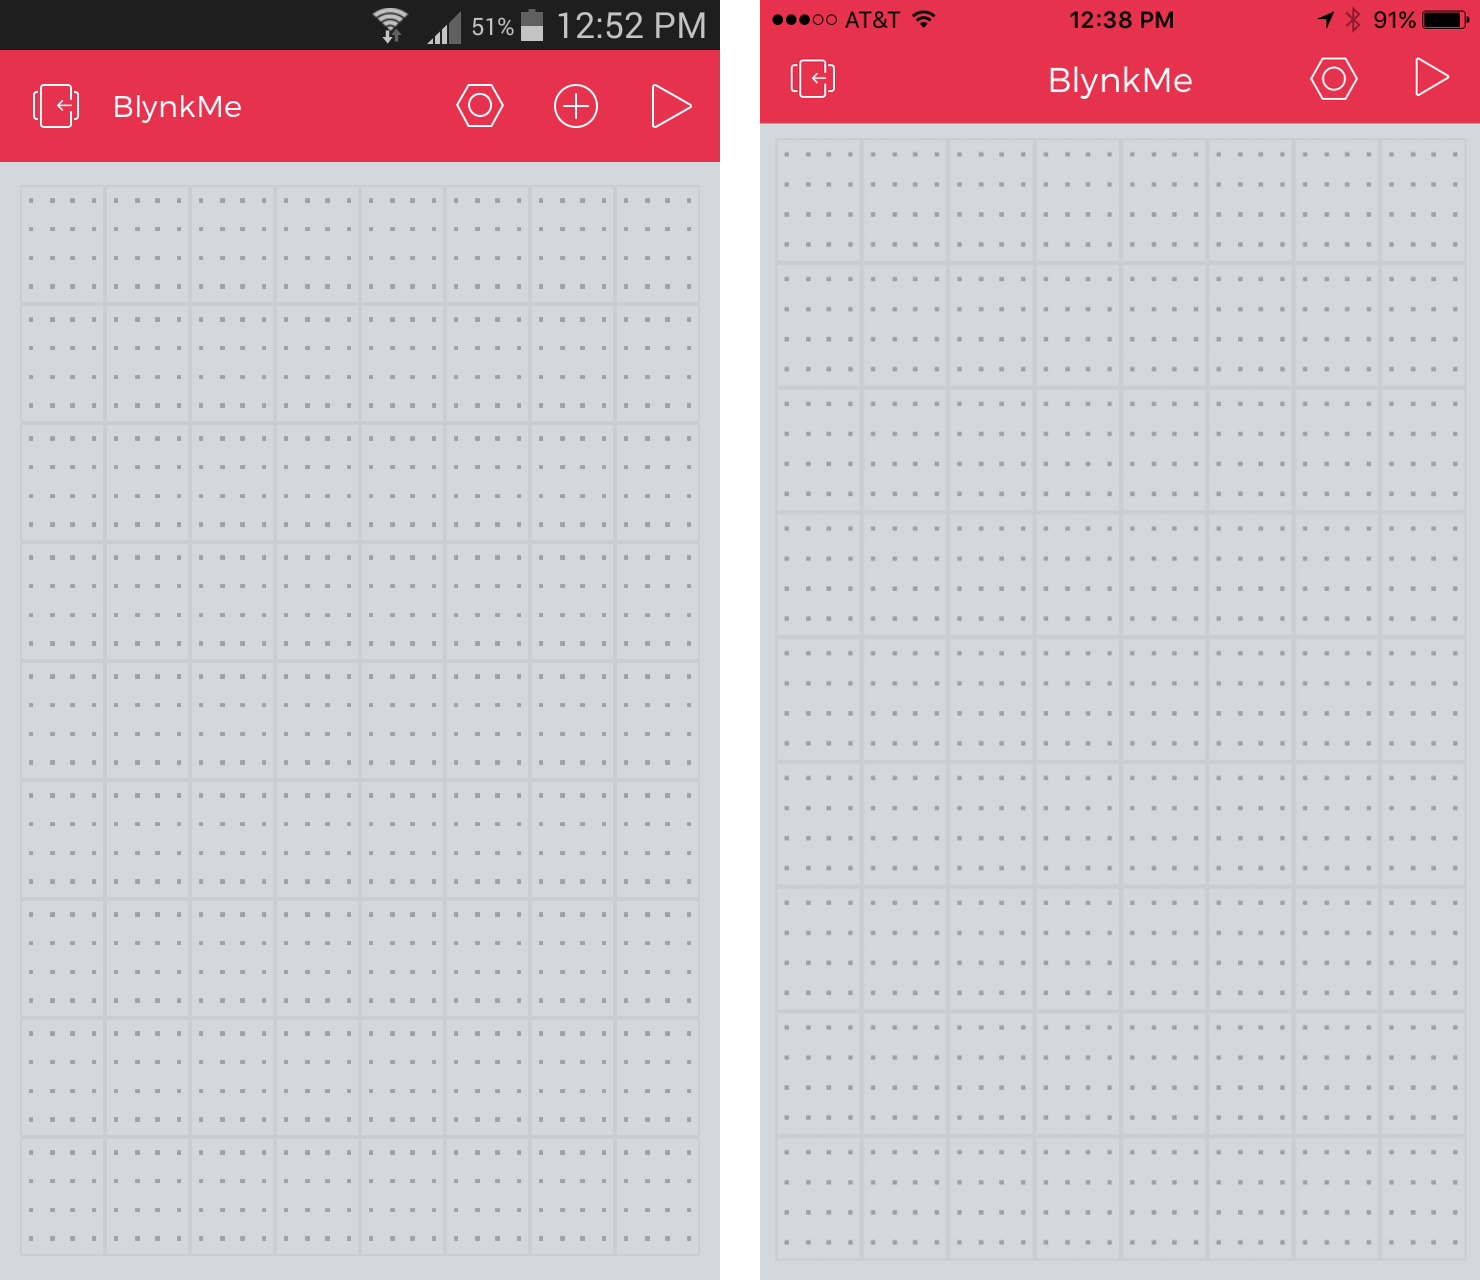
To add a widget to the Blynk app, first make sure the project isn't running -- you should see a triangular-shaped "play" icon in the upper-right-hand corner. Now tap anywhere in the grey project space to bring up the Blynk widget box.
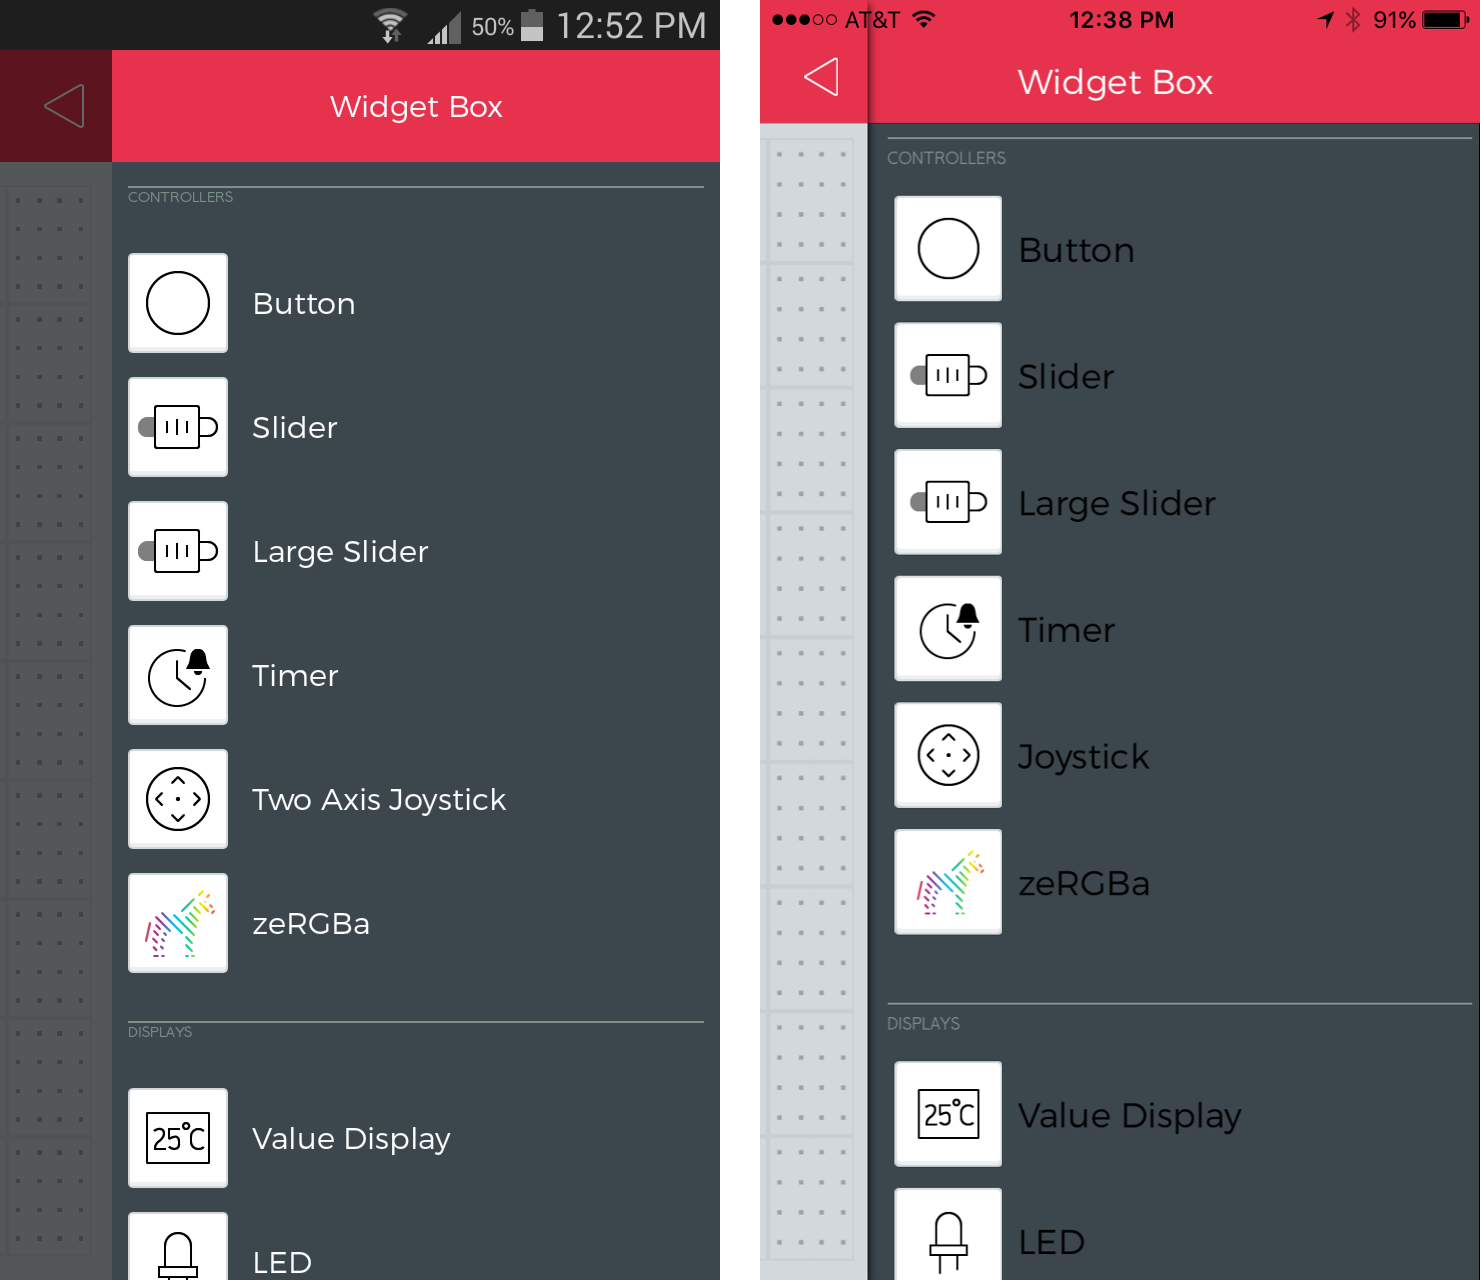
Select the zeRGBa widget to add it to your project. You can tap-and-hold the widget to drag it around the project space. We find the zeRGBa prefers to be the center-of-attention.
Now tap the zeRGBa to enter the widget settings -- you'll get very used to this. Slide the Split/Merge switch over to Merge. Then tap "PIN", and set the box to V0. The widget settings should look like this:
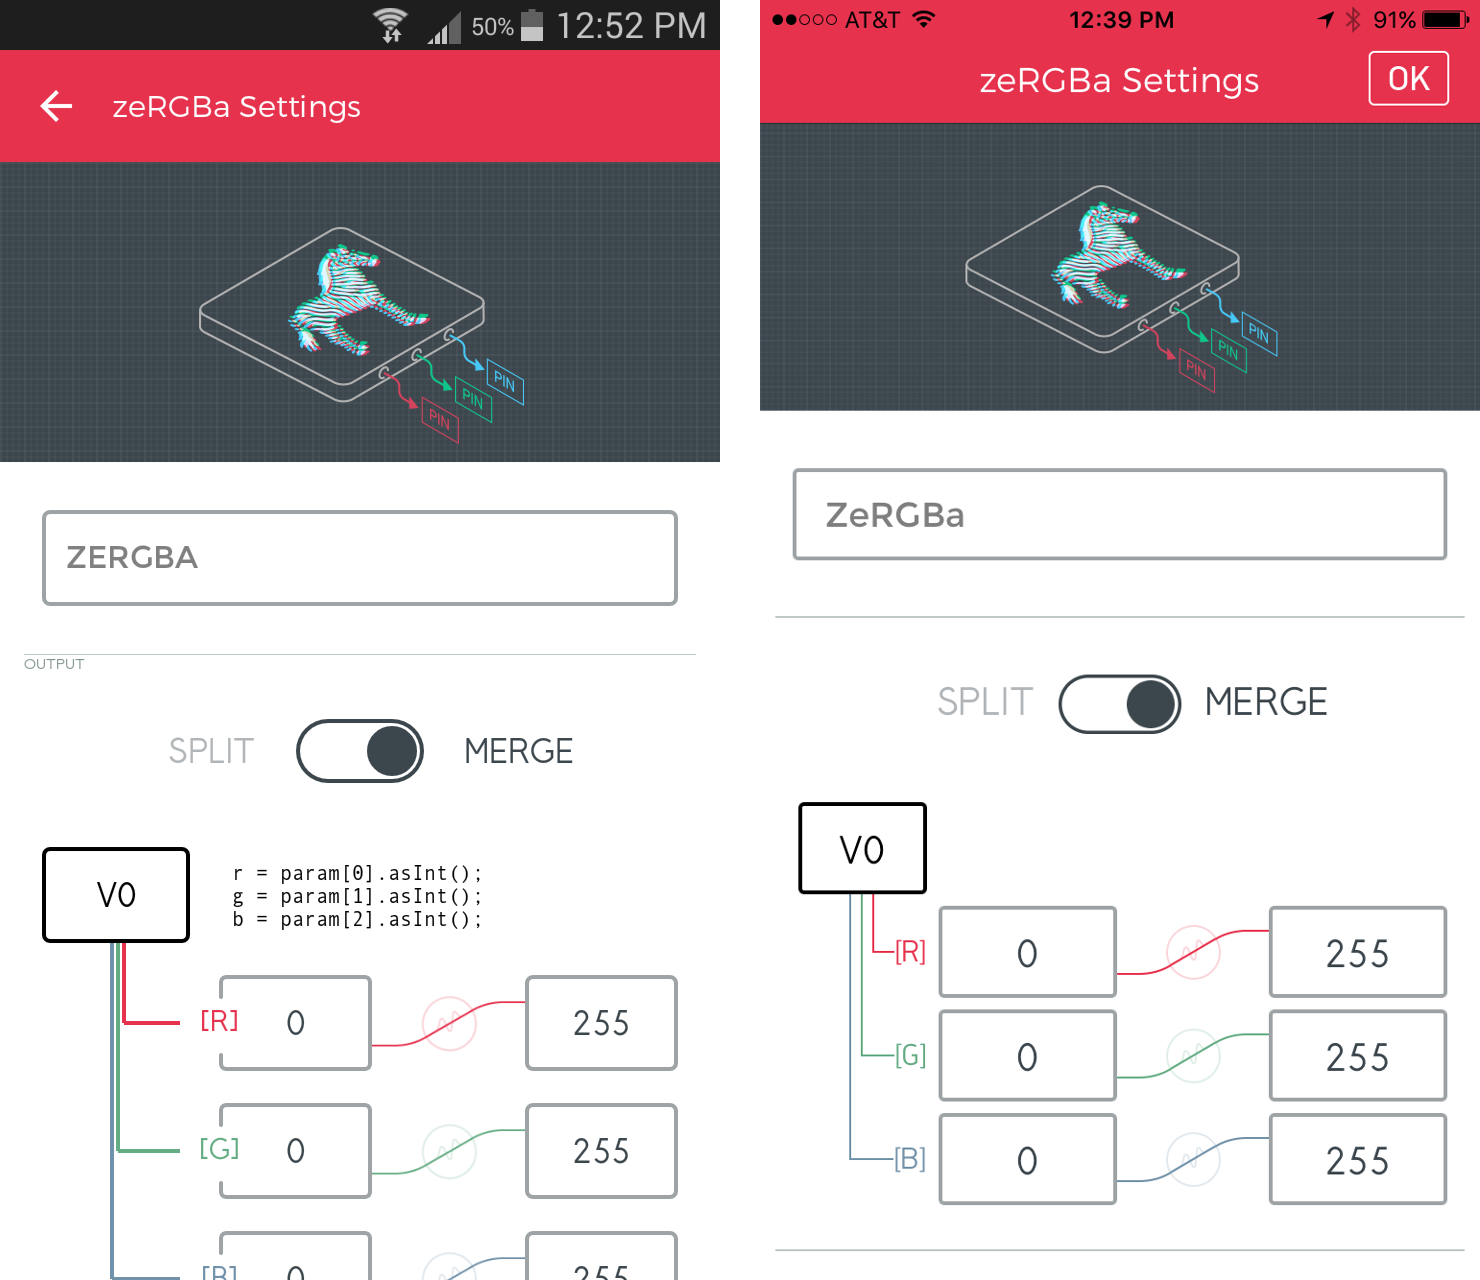
To back out of the settings tab, hit OK on iOS or the upper-left back arrow on an Android.
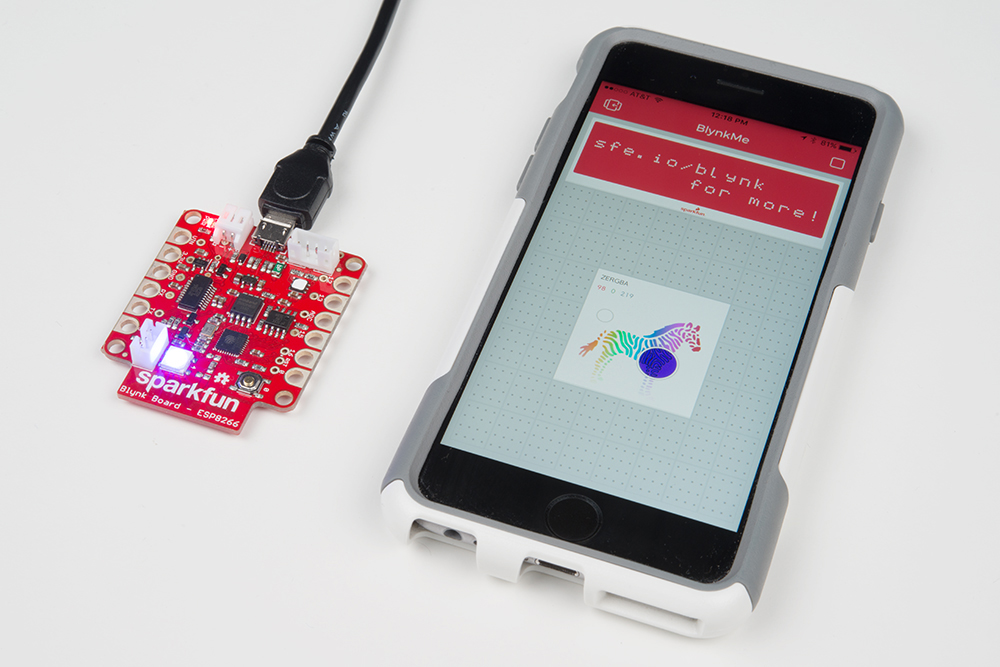
Back at the project screen, tap the play button in the upper-right corner to start Blynking! Once you've got the project running, poke-and-prod that colorful zebra!
Congratulations! You're well on-your-way to being a professional Blynker. From here we recommend you visit the Blynk Board Project Guide to explore over a dozen Blynk projects built into the Blynk Board.
Blynk Board Project Guide
Or, you may want to check out some of these other Blynk-related tutorials: