Blynk Board Arduino Development Guide
 jimblom
Introduction
After successfully provisioning a SparkFun Blynk Board, and exhausting all of the examples in the Blynk Board Project Guide, you may be asking yourself: "What's next?" The answer to that question is: "It's completely up to you!" Now that you're a professional Blynker, you have all of the tools necessary to create a Blynk project of your own!

This tutorial demonstrates how to add Blynk Board support to the Arduino IDE, so you can get started writing and uploading Blynk firmware of your own. If you really liked the BotaniTweet project from the Project Guide, but just wanted to tweak a few things, this tutorial will provide you with the tools necessary to start down that road.
The Blynk Board Tutorial Trilogy
This tutorial is structured as a follow-up to the Blynk Board Project Guide, which is itself a sequel to the Getting Started With the Blynk Board tutorial.
Uploading new code to the Blynk Board will (at least temporarily) remove the pre-loaded Blynk Board projects from the board. It will also remove provisioning functionality.
The firmware is open-source, however. So if you want to get the Blynk Board's default firmware loaded back up, all you have to do is load it back on!
Install FTDI Drivers
The Blynk Board uses a specialized chip called an "FTDI" to convert USB data to a more simple serial interface. It's over this serial interface that the Blynk Board downloads new code.
If you've never used an FTDI-based device before, you'll probably need to install drivers on your computer. Our How to Install FTDI Drivers tutorial should help get your drivers installed, whether you're on a Mac, Windows, or Linux machine.
Once you've installed the drivers, your Blynk Board should show up on your computer as either COM# (if you're on a Windows machine) or /dev/tty.usbserial-######## (if you're on a Mac/Linux computer), where the #'s are unique numbers or alphabetic characters.
Install the Blynk Board Arduino Addon
Download, Install Arduino
If you've never used an Arduino Board, or the Arduino IDE before, we apologize in advanced for potentially feeding a new addiction. Arduino is an open-source development environment for embedded microcontrollers. But, beyond that, it's a simplified programming language, standardized hardware layout, and a helpful community.Head over to Arduino.cc to download the software. It'll run on Windows, Mac, Linux – almost anything you can throw at it!
To use the Blynk Board in Arduino, you'll need to install a few additional files on top of the core Arduino program. Fortunately for us, Arduino's new Board Manager feature makes that just a few copy/pastes and button-clicks away!
Install the Blynk Board Addon
We'll use the Arduino Board Manager feature to help set the IDE up for the Blynk Board. Follow the steps below to instill the IDE with Blynk Board compatibility.
Step 1: Give Arduino the Link
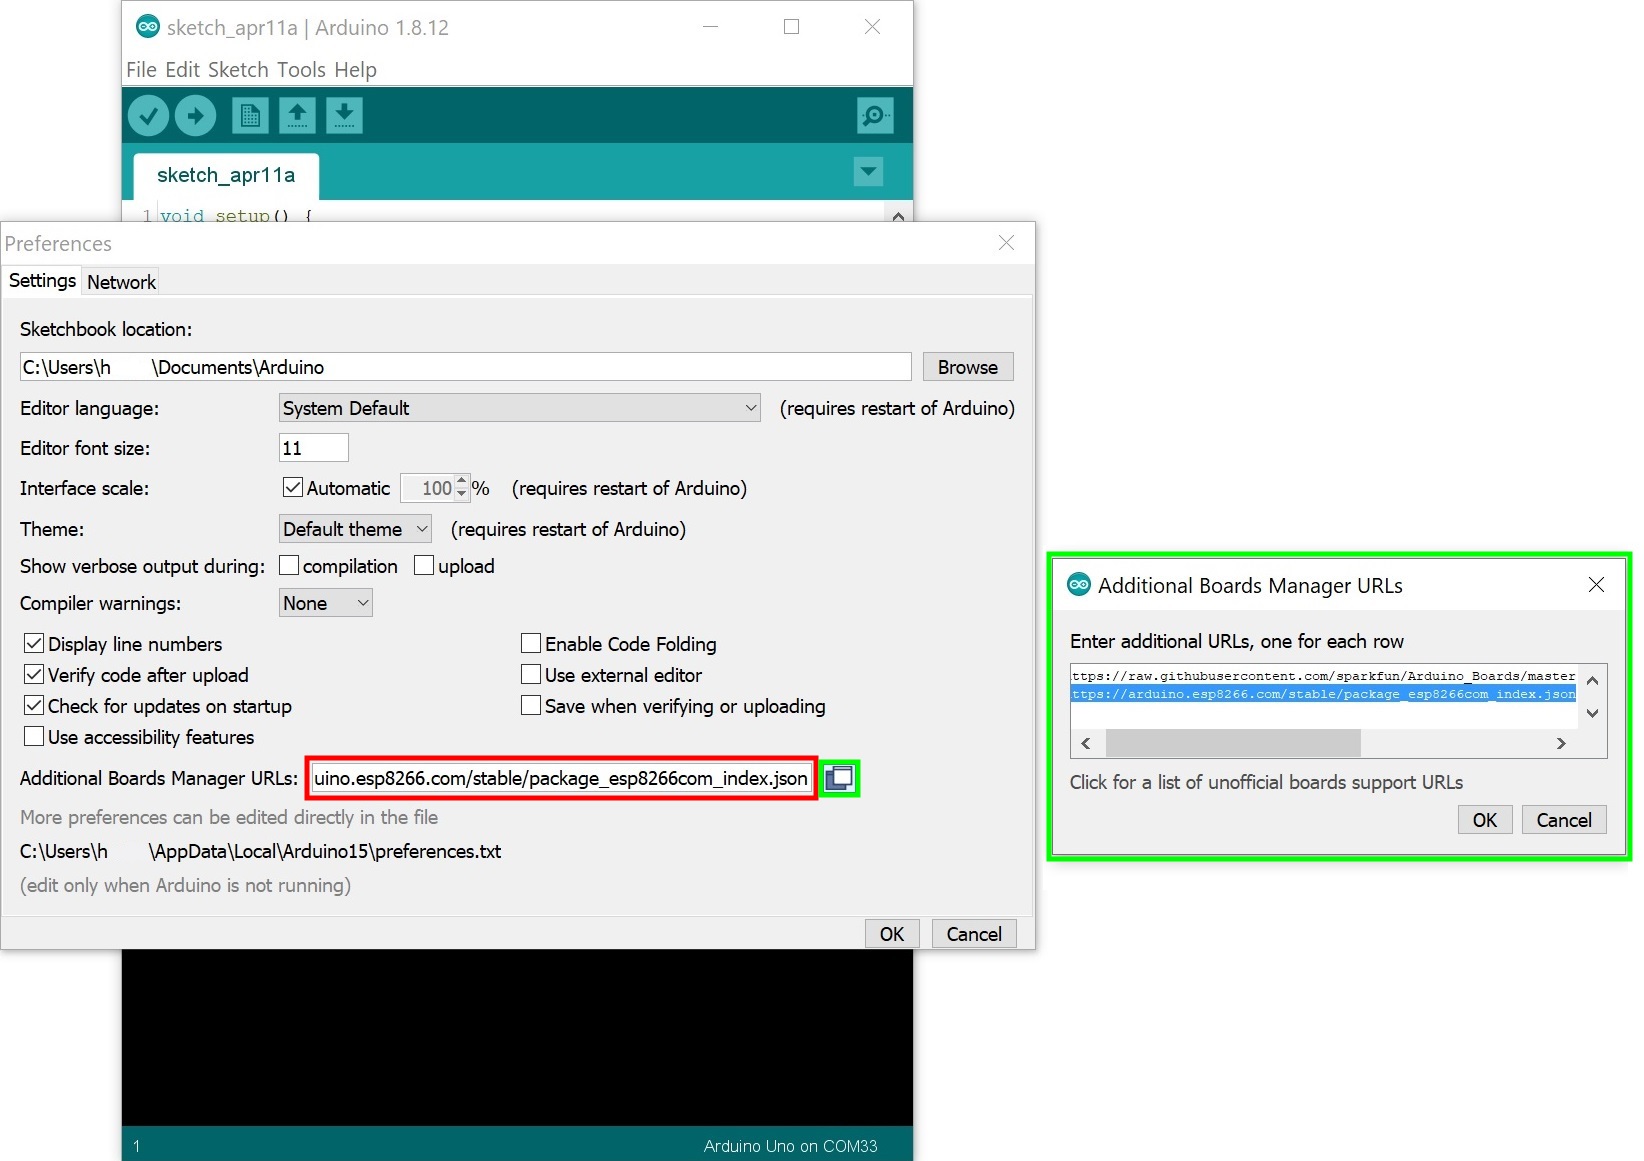
To tell Arduino where to get the board definitions from, open the Arduino preferences, which you'll find under the File > Preferences menu.
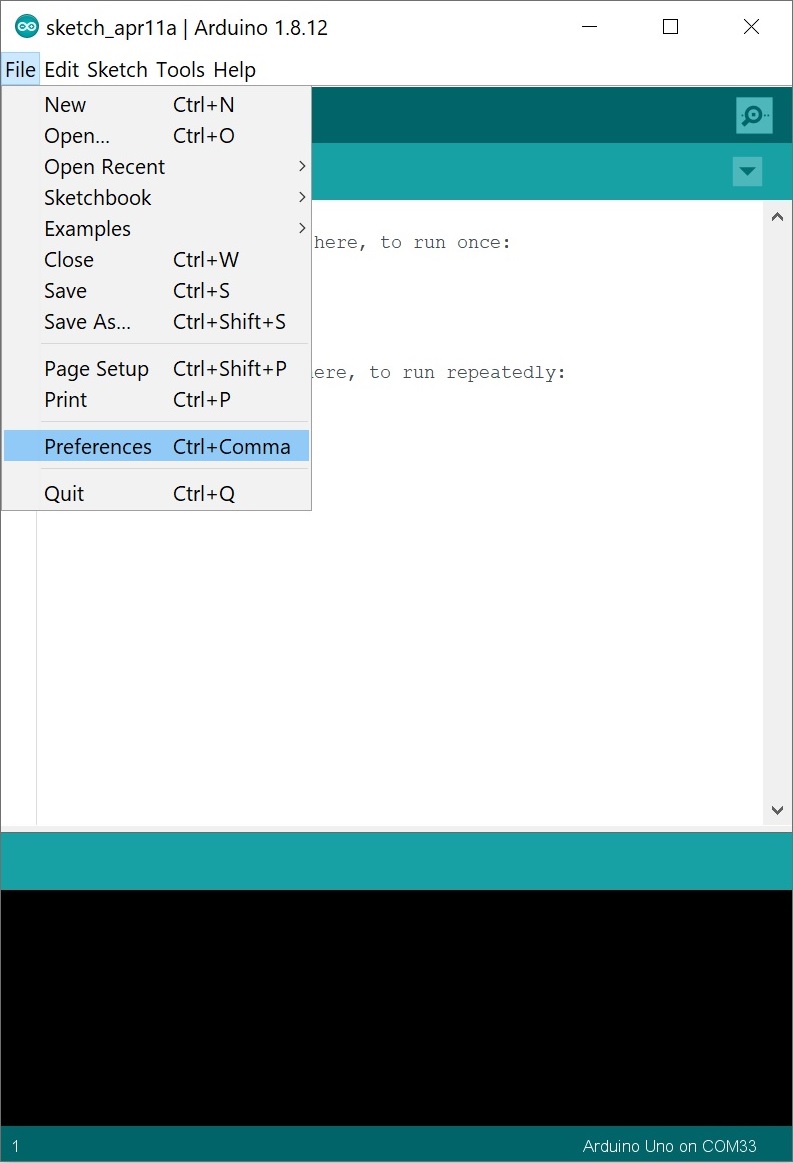
Then copy this URL:
http://arduino.esp8266.com/stable/package_esp8266com_index.json
And, paste it into the "Additional Board Manager URLs" text box (as shown in red in the image below). If you have more than one board add on, you can click on the button to the right of the text box (as shown in the smaller green box). This will open another window (as shown in the bigger green box) and pasting the URL under a new line.
Step 2: Install the Definitions
With the link pasted, hit OK in the preferences box. Then navigate to Tools > Board > Boards Manager....
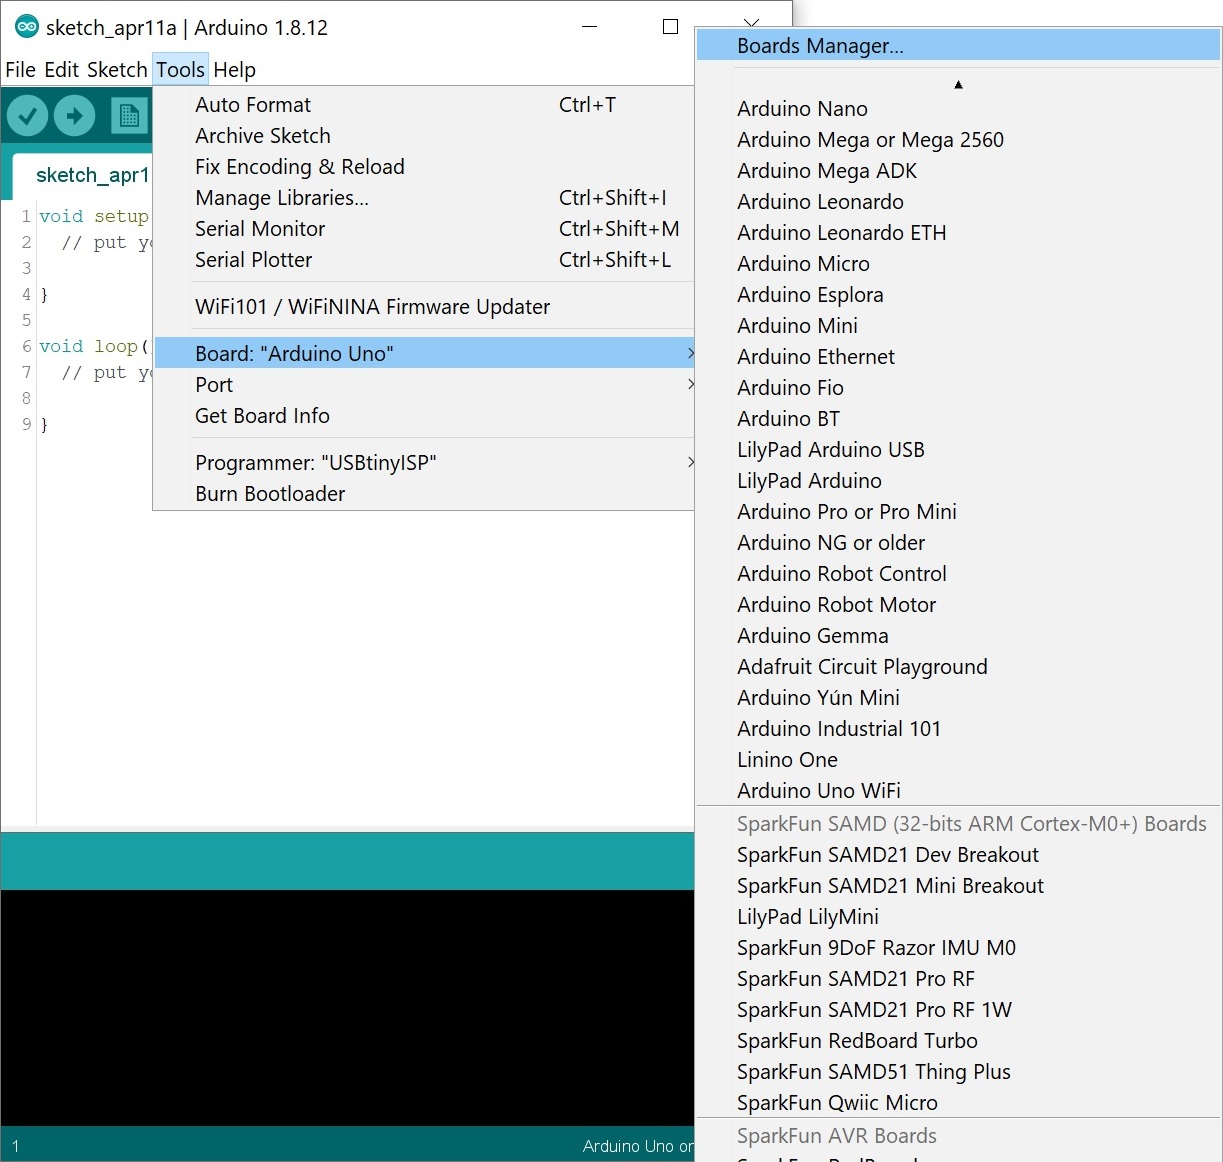
In the window that pops open next, search for "esp8266". The "esp8266 by ESP8266 Community" menu entry should be the only survivor.

Select that, and click Install. The process may take a couple minutes to download, as the tools are about 100MB.
Without going into too much detail, if you have both board definitions installed and get an error when trying to upload, this might be your issue. If you decide to use the depreciated SparkFun board definitions, you can uninstall both board definitions and re-install only the SparkFun ESP8266 folder. Check out the detailed instructions with screenshots in the following .pdf file using a Mac (the instructions are the same for a Windows computer) if you decide to use the older board files.
* Although unlikely, if your file systems are corrupted, you may need to go in and delete the associated esp8266 folders from the User and/or AppData folder (Look up how to do this first. Avoid if you are not sure what you are doing, you could do more damage and make it harder to fix.).
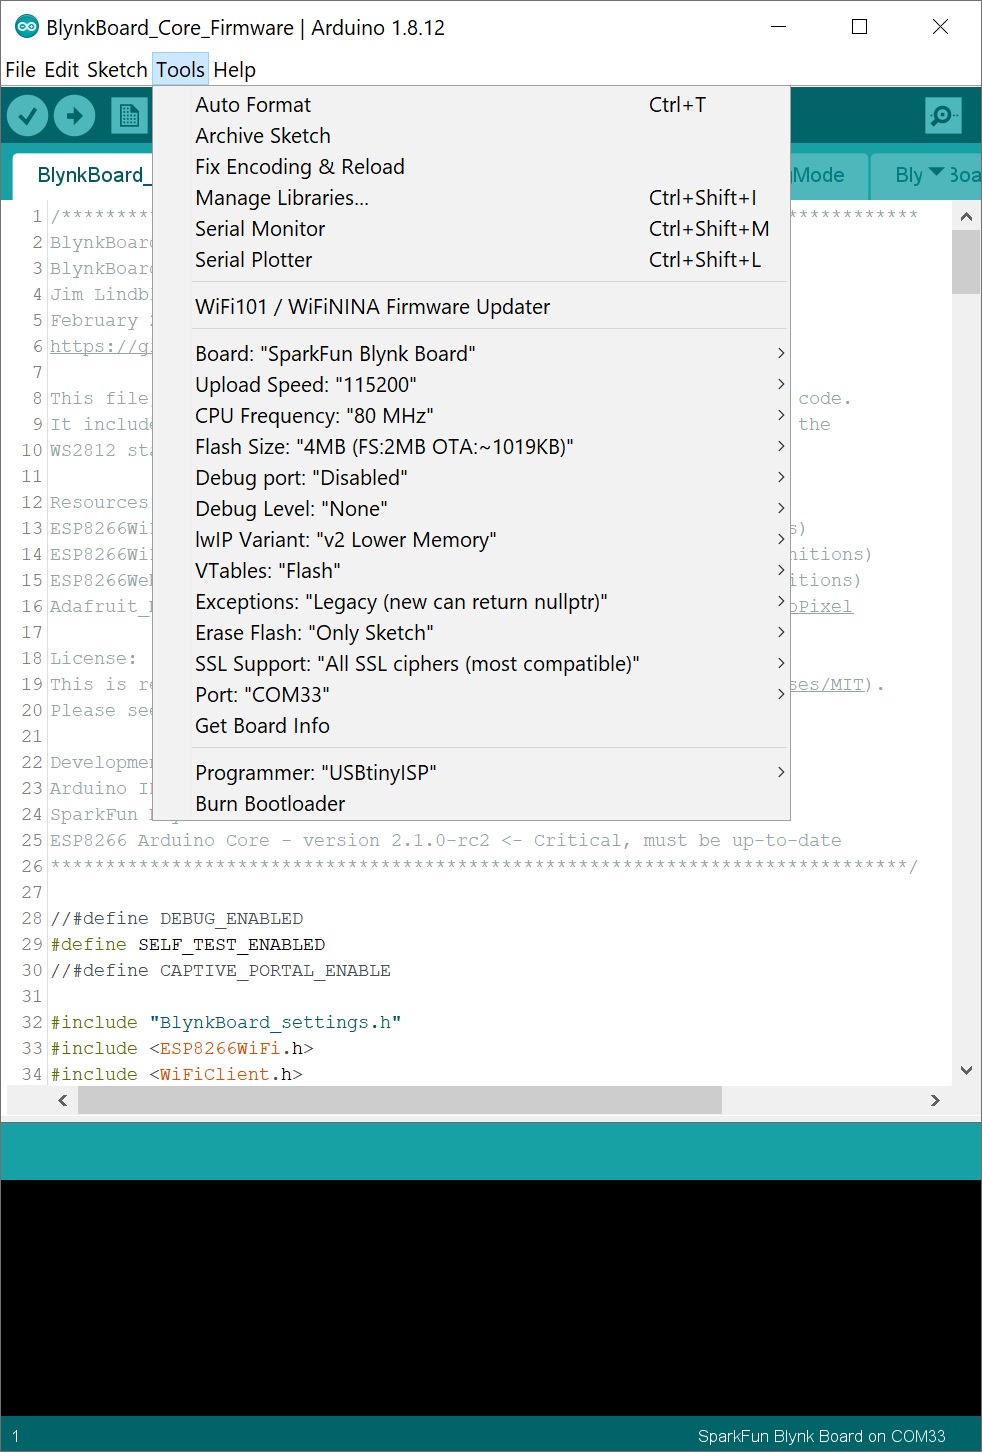
Step 3: Select the Blynk Board
After the board manager successfully grabs the Blynk Board definitions, look under the Tools > Board menu again -- you should see a menu entry for SparkFun Blynk Board.
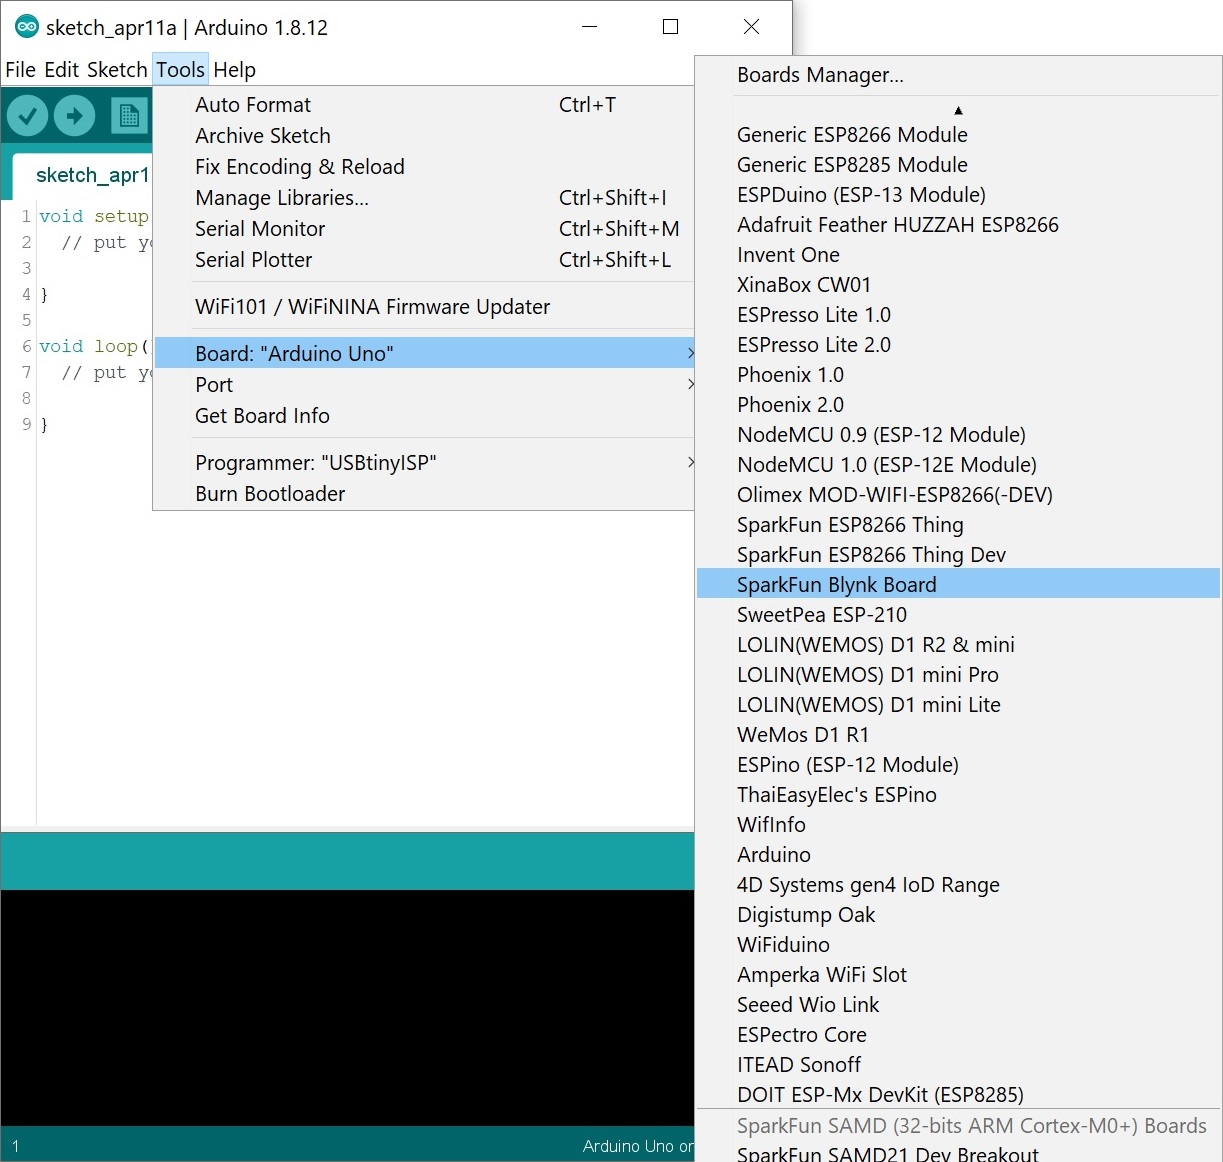
Select that, and you're just about there. If you reopen the window, you'll notice a few options for the SparkFun Blynk Board's ESP8266. Besides adjusting the upload speed to 921600, we recommend leaving the other options as their default configuration. Head to the Tools > Port and select the COM port that the FTDI enumerated to. In this case, it was COM33 but it will be different on your computer.
Time to load some Blynk code!
Get a Blynk Auth Token
The Blynk Board Arduino addon includes the Blynk Arduino library, so you should have almost everything you need to start Blynking.
Almost...
Every Blynk project is assigned a unique 32-byte string called the "auth token", which allows your hardware communicate with a specific project in the app. When you upload a new program to the Blynk Board, you need to program the auth token into it on top of any other code you may want to add.
To get a new Blynk auth token, you have two options: use the same project from before, or create a new project.
Option 1: Getting the Code From a Previously Created Blynk Project
Reusing a Blynk project is a great way to save energy, as long as you don't mind deleting or modifying a few widgets.
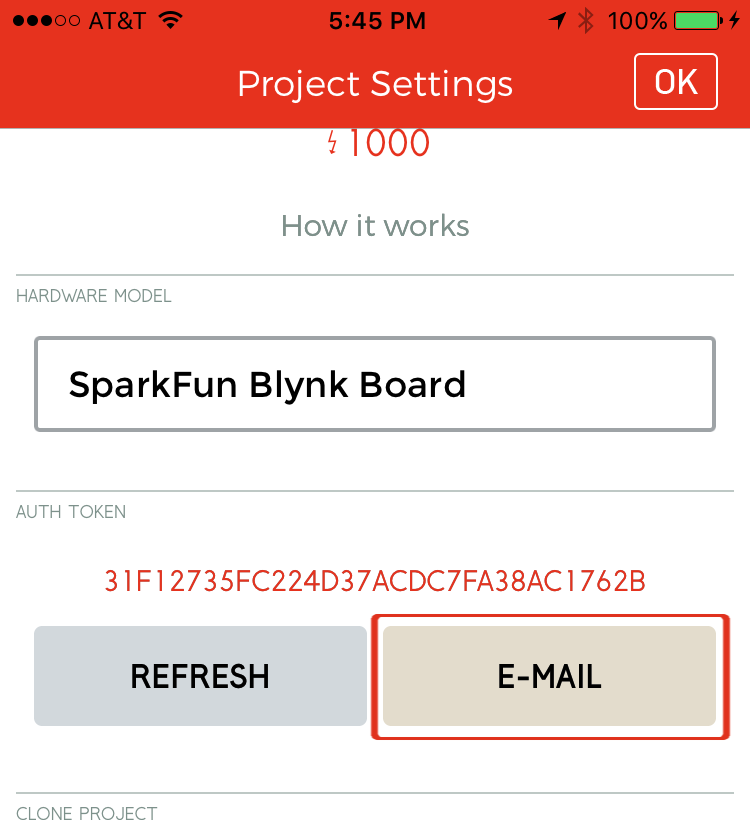
To find an existing Blynk project's auth token, stop the project, then hit the hexagon-shaped nut in the upper right corner to open the project settings.

On the settings page, scroll down a bit to find the "Auth Token" section, where you'll find a long, incomprehensible 32-character string and a couple handy buttons. Tap the E-MAIL button, to have the code e-mailed to your Blynk-connected email address.
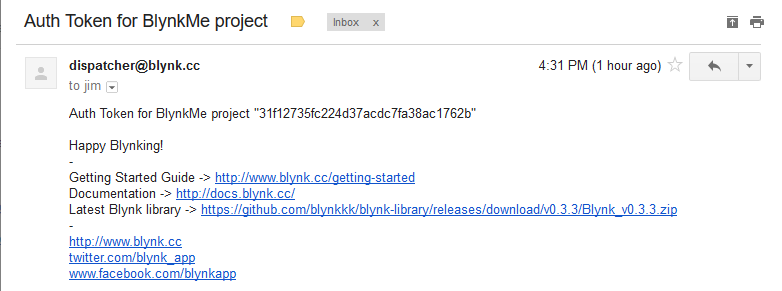
Turn your computer towards your inbox, and look for an email from dispatcher@blynk.cc.
Keep the auth token handy! You can hit "OK" (iOS) or the upper-left back arrow (Android) to exit your project's settings page.
Option 2: Create a New Blynk Project
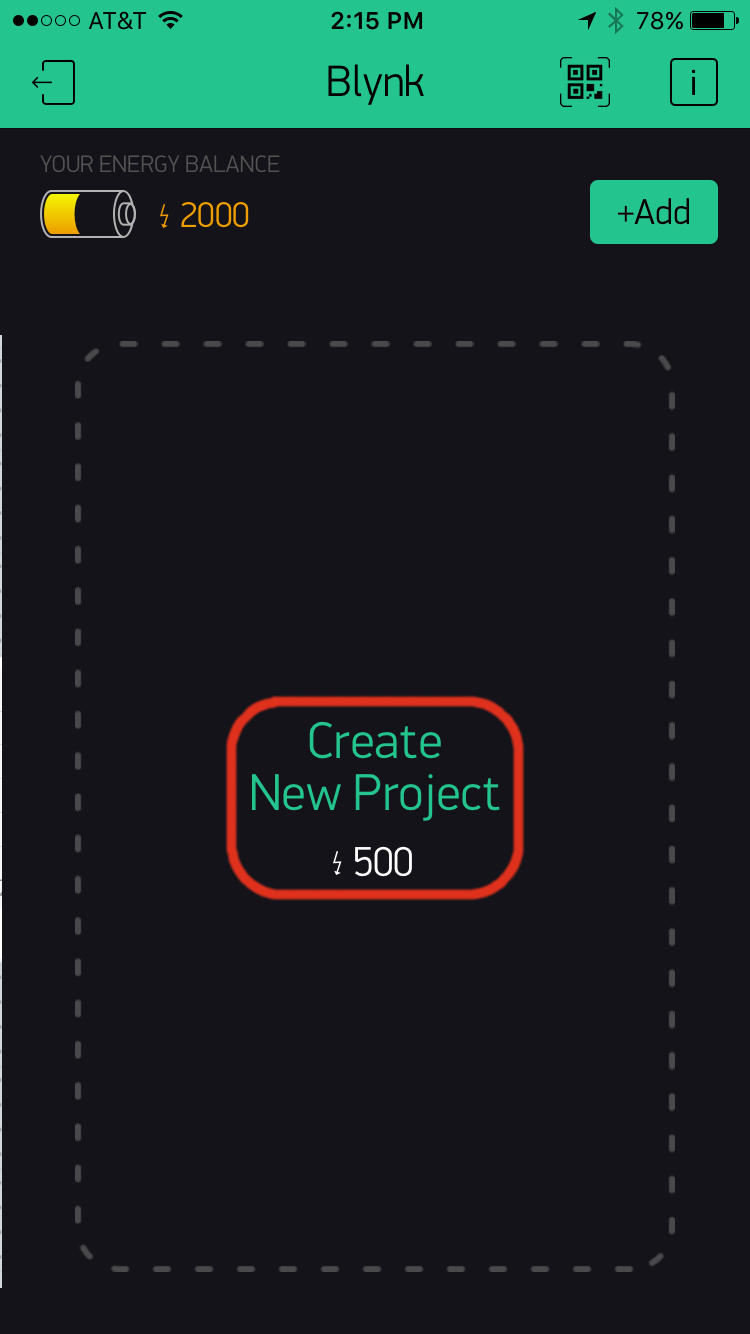
If you want to start fresh, with a new Blynk project, begin by backing out to the Blynk project navigator screen -- hit the upper-left "back" button if you're in a project.
Next, scroll as far to the right of the project navigator screen as you can, and find the Create New Project button.
Clicking that will lead you to the "Project Settings" page. Name your project, and set the Hardware Model to SparkFun Blynk Board.
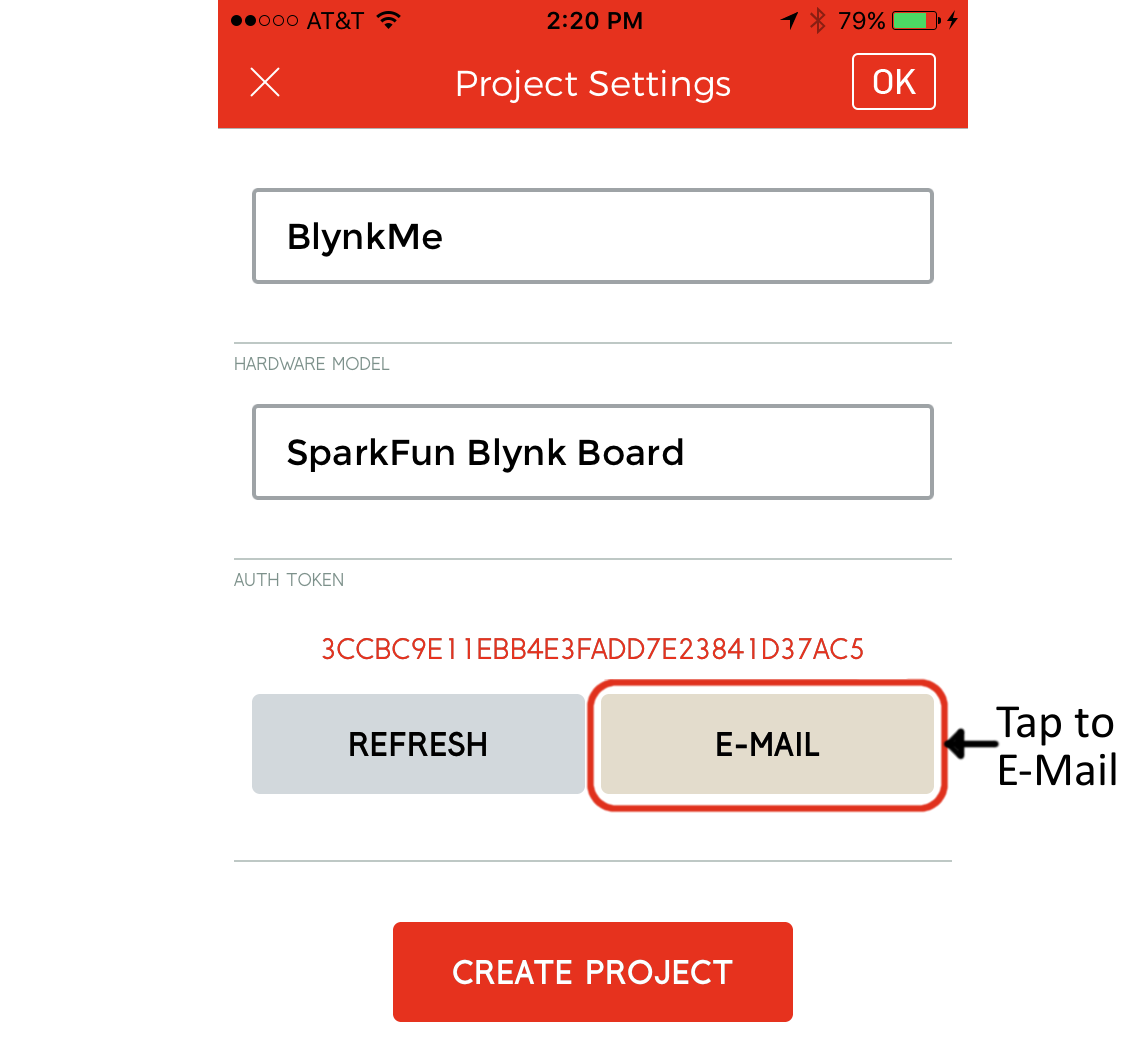
Most importantly on this screen, tap E-Mail under the Auth Token to send yourself a copy of the 32-byte string.
Finally, tap Create Project to find yourself on a blank Blynk project.
Set Up the Blynk Project
This example Blynk program only specifies functionality for the RGB LED, but you can use any of the hardware pins regardless of what the firmware specifies.
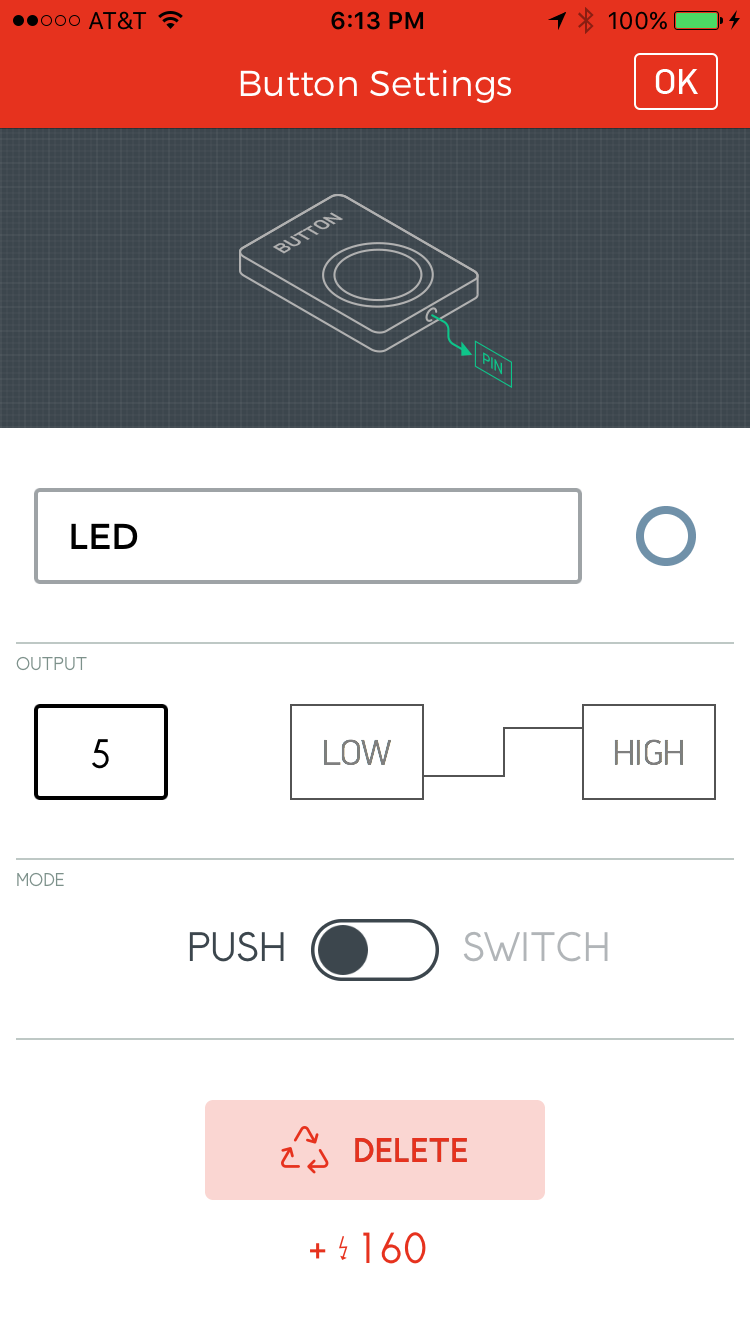
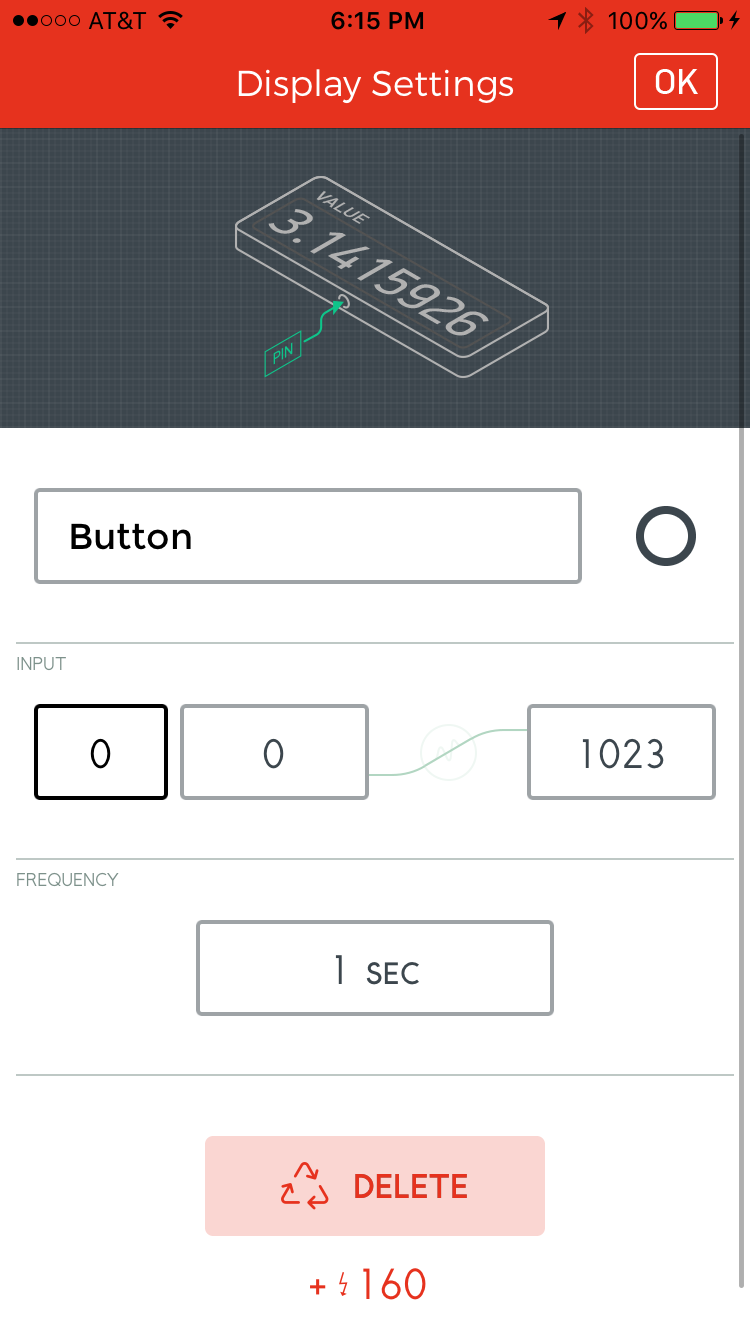
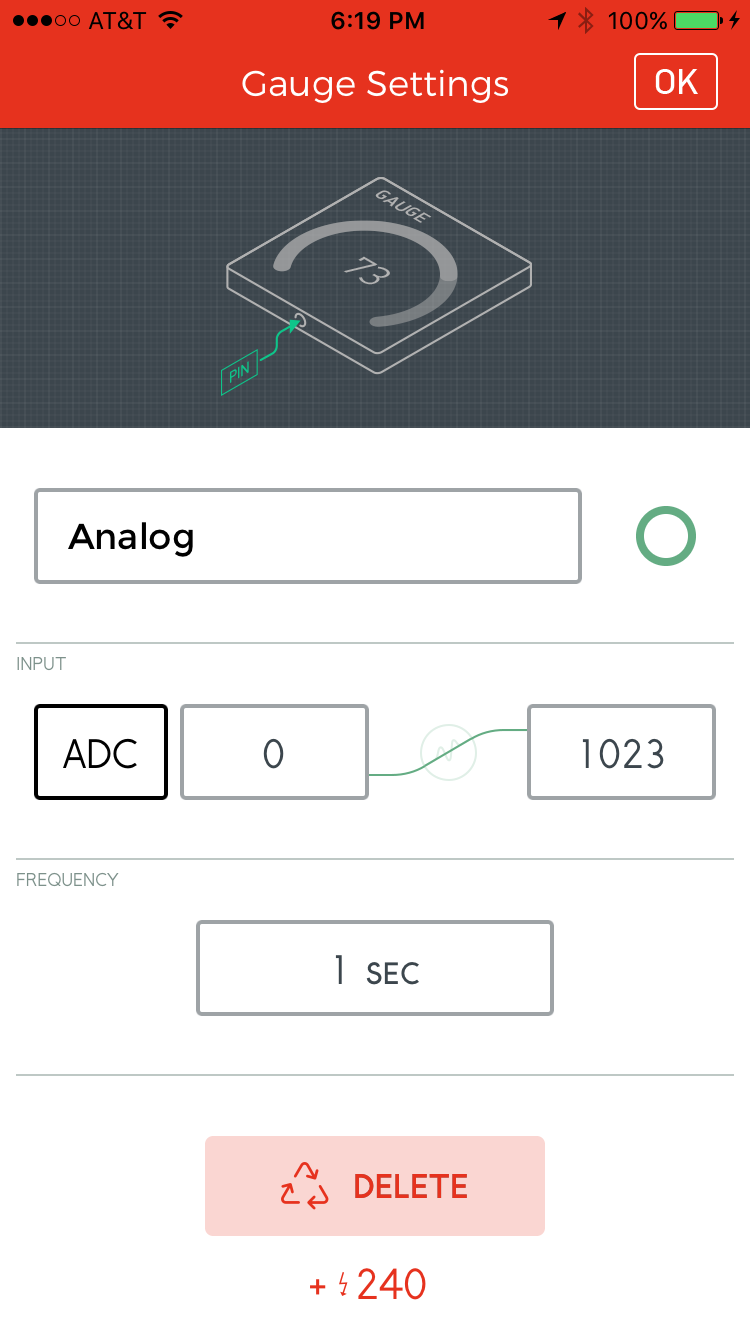
Configure the Button, LED, and ADC
You can use the button widget to drive the tiny, blue, pin 5 LED. Configure it as either push or pull; just make sure the pin is set to 5.
The Blynk Board's physical button can trigger a value widget. Set the widget's pin to 0.
Finally, you can use either a gauge or value widget to display the value of the ADC. Just make sure to set the pin to ADC.
Configure the zeRGBa
To use the zeRGBa widget, add it, set the switch to Merge and set the pin to V0.
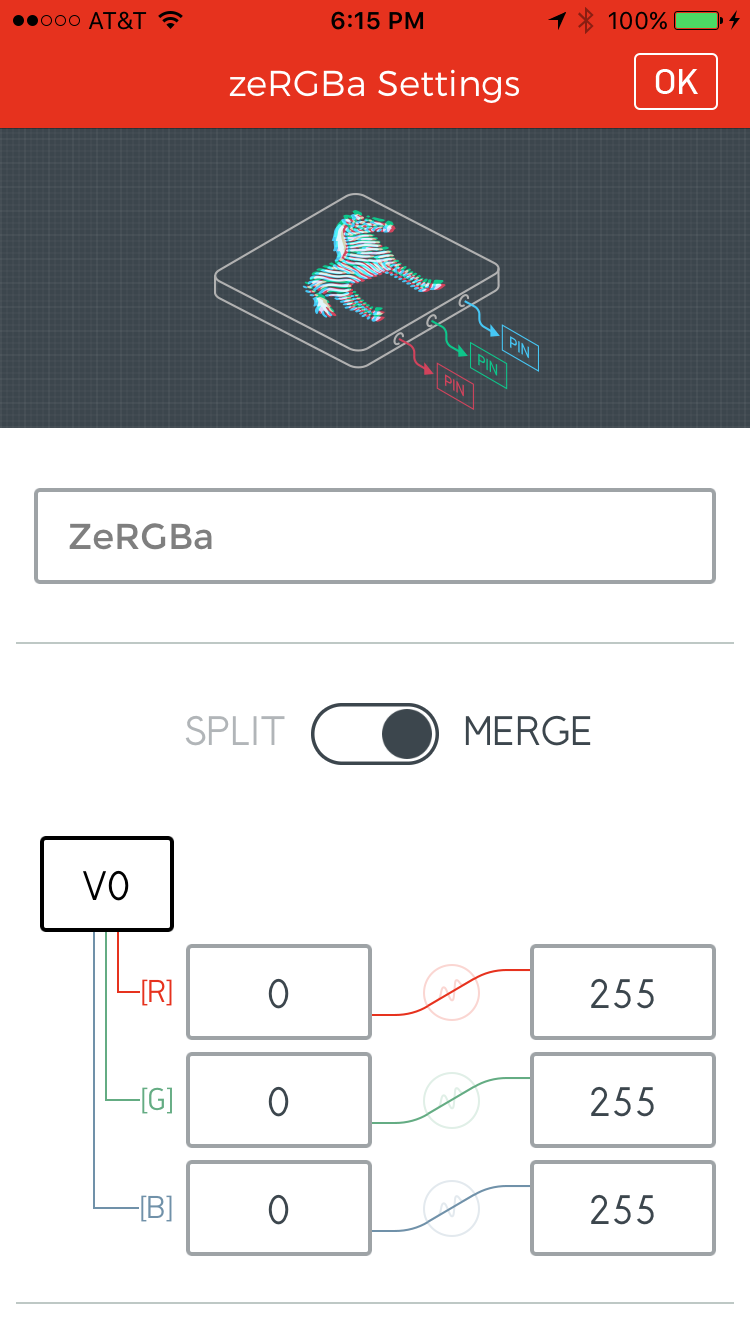
Your project may look a little something like this when it's all configured:

Load an Example Program
- Blynk by Volodymyr Shymanskyy v0.6.1
- NeoPixel by Adafruit v1.2.1
With the Blynk auth token at hand and the project set up, you're armed with all of the information you'll need to get your board Blynking again.
Configure the Code
Copy and paste this code into your Arduino IDE, but don't upload it yet!
language:c
#define BLYNK_PRINT Serial    // Comment this out to disable prints and save space
#include <ESP8266WiFi.h>
#include <BlynkSimpleEsp8266.h>  // http://librarymanager/All#blynk
#include <Adafruit_NeoPixel.h>   // http://librarymanager/All#neopixel

////////////////////
// Blynk Settings //
////////////////////
char BlynkAuth[] = "Your_Auth_Token";
char WiFiNetwork[] = "Your_WiFi_Network";
char WiFiPassword[] = "Your_WiFi_Password";

///////////////////////
// Hardware Settings //
///////////////////////
#define WS2812_PIN 4 // Pin connected to WS2812 LED
#define BUTTON_PIN 0
#define LED_PIN    5
Adafruit_NeoPixel rgb = Adafruit_NeoPixel(1, WS2812_PIN, NEO_GRB + NEO_KHZ800);

BLYNK_WRITE(V0) // Handle RGB from the zeRGBa
{
  if (param.getLength() < 5)
    return;

  byte red = param[0].asInt();
  byte green = param[1].asInt();
  byte blue = param[2].asInt();

  uint32_t rgbColor = rgb.Color(red, green, blue);
  rgb.setPixelColor(0, rgbColor);
  rgb.show();
}

void setup()
{
  // Initialize hardware
  Serial.begin(9600); // Serial
  rgb.begin(); // RGB LED
  pinMode(BUTTON_PIN, INPUT); // Button input
  pinMode(LED_PIN, OUTPUT); // LED output

  // Initialize Blynk
  Blynk.begin(BlynkAuth, WiFiNetwork, WiFiPassword);
}

void loop()
{
  // Execute Blynk.run() as often as possible during the loop
  Blynk.run();
}
Before uploading the code, you'll need to adjust three variables towards the top of the sketch:
- Paste your Blynk auth token over
Your_Auth_Token, setting theBlynkAuthvariable. - Paste your WiFi network name over
Your_WiFi_Network, setting theWiFiNetworkvariable. - Paste your WiFi password over
Your_WiFi_Password, setting theWiFiPasswordvariable- If the network is open, leave the string empty (
"").
- If the network is open, leave the string empty (
Upload the Code
Before uploading, you'll need to configure the serial port -- the "COM#" or "/dev/tty.usbserial-########" number you discovered way back at the FTDI driver-installation phase. Knowing that, navigate to Tools > Port, and select your port number.
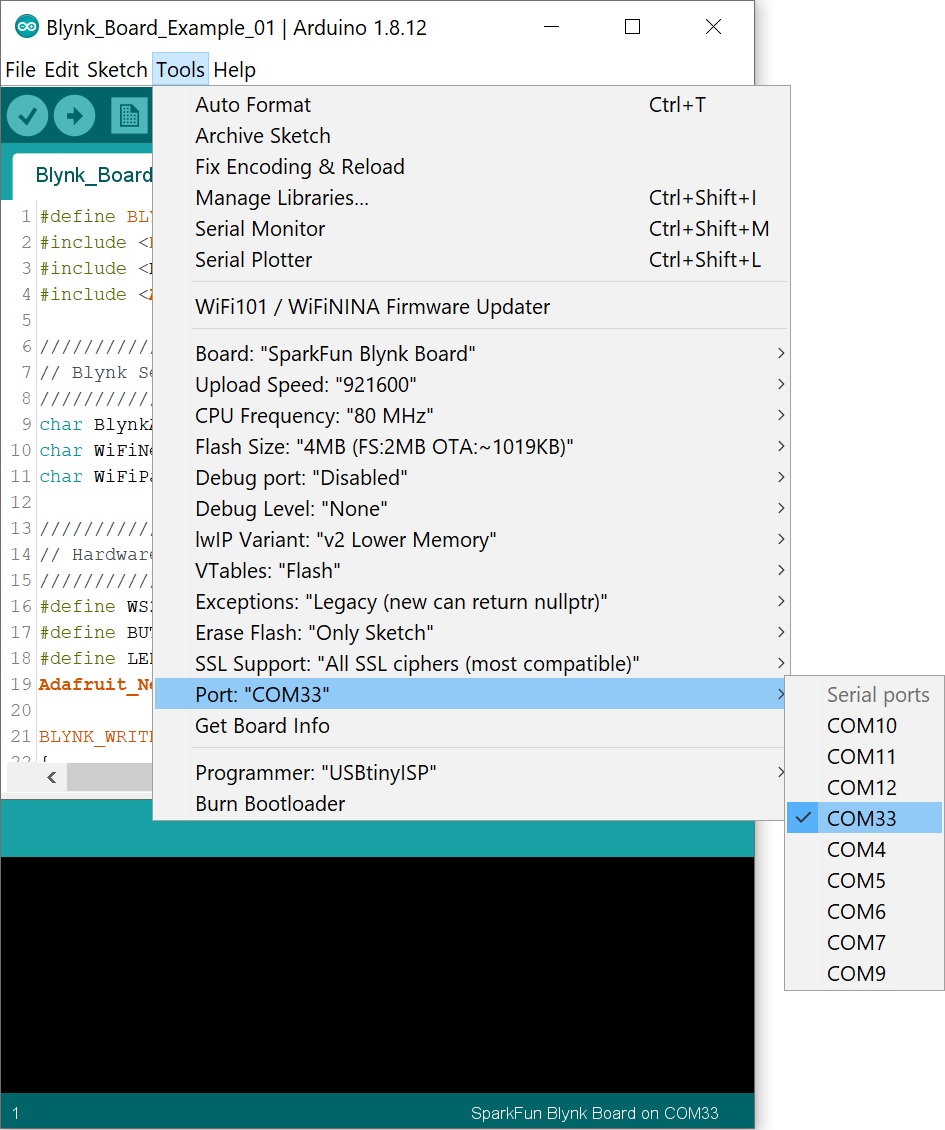
We also suggest increasing the upload rate to 921600. You'll find that setting under the Tools > Upload Speed option.
This is the moment of truth! Once the code has been configured, hit the Upload button (the right-pointing arrow).
Your computer may take a minute-or-so to compile the code and send it over to the Blynk board. Arduino should inform you if the upload was successful or not. If not -- double check the board and port settings, and give it another try. Sometimes that's all it takes.
Check the Serial Monitor
If the code successfully uploads, open the serial monitor -- the magnifying glass icon, in the upper right portion of the Arduino IDE.
This window will pass some handy debug information. It'll tell you if the Blynk Board successfully connected to your WiFi network and the Blynk server.
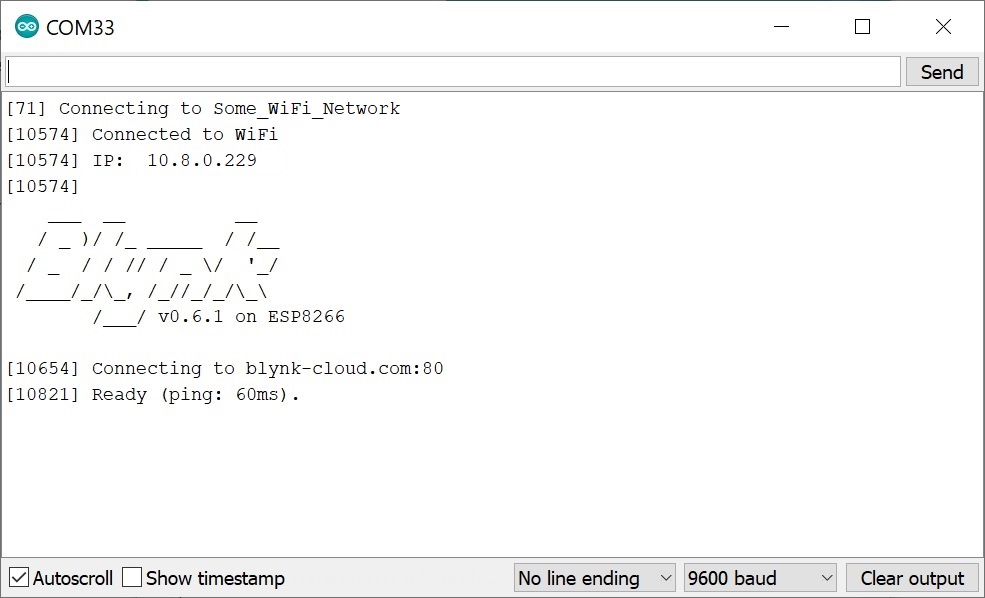
If you see a "Ready" message -- you should be good to Blynk! Do some zeRGBa'ing, press some buttons, and adjust some analog inputs! You're well on your way to making your own Blynk projects.
Reinstalling the Default Blynk Board Core Fimware
- Blynk by Volodymyr Shymanskyy v0.6.1
- SparkFun HTU21D by SparkFun v1.1.1
- SparkFun TSL2561 Library by SparkFun v1.1.0
- NeoPixel by Adafruit v1.2.1
If you are interested in reinstalling the default Blynk Board core firmware, have no fear! You will need to download the BlynkBoard_Core_Firmware.ino and associated files from the GitHub repository:
After downloading, unzip the files. Open the core firmware's folder by heading to Blynk_Board_ESP8266 > Firmware > BlynkBoard_Core_Firmware and clicking on BlynkBoard_Core_Firmware.ino. This will open Arduino IDE with the example with a few of the assiciated files as additional tabs. Make sure that you select the correct board file and COM port. When ready, click on the upload button to upload the default firmware back to the board. Then follow the instructions to setup your Blynk Board.
Troubleshooting
Board Add-On Issue and Interrupts
If you compiled and uploaded code with an interrupt like the default Blynk Board core firmware, you may receive a message similar to the output below in the Arduino serial monitor when set at 9600 baud.
language:c
[1079] SparkFun Blynk Board Hardware v1.0.0
[1079] SparkFun Blynk Board Firmware v1.0.2
ISR not in IRAM!

User exception (panic/abort/assert)
Abort called

>>>stack>>>

ctx: cont
sp: 3ffffe80 end: 3fffffc0 offset: 0000
3ffffe80:  00000005 00000030 3fffff30 4020c50a
3ffffe90:  000000fe 00000000 00000000 00000000
3ffffea0:  00000000 00000000 00000000 00ff0000
3ffffeb0:  5ffffe00 5ffffe00 7552000a 00000000
3ffffec0:  00000003 00000000 3fff05f0 4020dd4a
3ffffed0:  40100c02 000003e8 3fff05c4 4020dd60
3ffffee0:  3ffe8937 008afd80 3fff05f0 4020eb05
3ffffef0:  00000000 3fff07e8 3ffe89b7 3fff0918
3fffff00:  3ffe8937 000003e8 3fff05c4 3fff0918
3fffff10:  3ffe8937 3ffe87b6 3fff05f0 4020ebb4
3fffff20:  3ffe8937 3ffe87b6 3fff05f0 40202809
3fffff30:  3fffff40 3ffe87b6 00000000 4020814d
3fffff40:  2e302e00 feef0032 80efeffe feefeffe
3fffff50:  3fffdad0 00000000 3fff08d8 40206729
3fffff60:  feefeffe feefeffe feefeffe feefeffe
3fffff70:  feefeffe feefeffe feefeffe feefeffe
3fffff80:  feefeffe feefeffe feefeffe feefeffe
3fffff90:  feefeffe feefeffe feefeffe 3fff0918
3fffffa0:  3fffdad0 00000000 3fff08d8 4020d730
3fffffb0:  feefeffe feefeffe 3ffe852c 4010155d
<<<stack<<<
c_?rS?f?[1080]
If you see this output, this error is due to the ESP8266 crashing with the board definition that you are using. For anyone using ESP8266 Community's board files (v2.5.1 and above), you must include ICACHE_RAM_ATTR before an interrupt service routine's function definition. In this case, BlynkBoard_Setup.ino setup an interrupt with the following line of code:
language:c
.
.
.
attachInterrupt(BUTTON_PIN, buttonChange, CHANGE);
By doing a search for the location of the interrupt service routine buttonChange, it was defined in an older BlynkBoard_Core_Firmware.ino file that was used.
language:c
void buttonChange(void){
.
.
.
Including the ICACHE_RAM_ATTR before the ISR definition resolves the issue.
language:c
ICACHE_RAM_ATTR void buttonChange(void){
.
.
.
Resources and Going Further
Now that you have an Arduino-programmable, Blynking Blynk Board, what new amazing IoT project are you going to make? Need some inspiration? Check out some of these tutorials:
LED Cloud-Connected Cloud
Blynk Board Project Guide
Blynk Board Bridge Widget Demo
Blynk Board Washer/Dryer Alarm
If you need general Blynk Board or Blynk App resources, these may help:
- SparkFun Blynk Board Resources
- Blynk Resources
If you need any technical assistance with your Blynk Board, don't hesitate to contact our technical support team via either e-mail, chat, or phone.