Getting Started with the SparkFun Blynk Board
 jimblom
Provisioning the Blynk Board
In order to connect the Blynk Board to your local Wi-Fi network -- and the Blynk app -- you'll need to send it a few pieces of information, including the name and password of your Wi-Fi network. This is a process called provisioning.
Provisioning?
In the provisioning process, we'll use a smartphone, laptop, or computer to connect to directly (over Wi-Fi) to the Blynk Board. Once connected, your smart-device will send the necessary data and tell the Blynk Board to go connect to your Internet-connected wireless network and Blynk.
The Blynk Board is initially configured to operate as a Wi-Fi access point (abbreviated "AP", kind of like a router). A smartphone or Wi-Fi-enabled computer can briefly connect to the Blynk Board, and, using either the Blynk app or a browser, send all of the necessary information over to it. After the Blynk Board receives that info, it'll transition from AP to Wi-Fi device and connect to your Wi-Fi network.
Blynk QR-Code Card
The Blynk Board has plenty of backup provisioning options, but the easiest method is through the Blynk app. Both iOS and Android versions of the Blynk app support Blynk Board provisioning. All you'll need is the Blynk QR-Code Card, included with your Blynk Board.

Don't Throw Away Your Blynk QR-Code Card!
Although you'll only be able to benefit from the 15,000 energy points once, the QR-Code card can be used to re-provision your Blynk Board, should the need ever arise. We recommend you keep it hand, for now, just in case!
Provisioning on a Smartphone (or Tablet)
The setup process in each OS looks and feels a little different. Select one of the sections below to get directions for your phone (or tablet) OS.
iOS Provisioning Android Provisioning
iOS Provisioning
If you haven’t already, download the Blynk App from the App store. Then open it, create an account and log in.
If you already have the Blynk app installed on your phone, make sure it’s updated to the latest release!
Step 1: Scan the Blynk Board QR Code
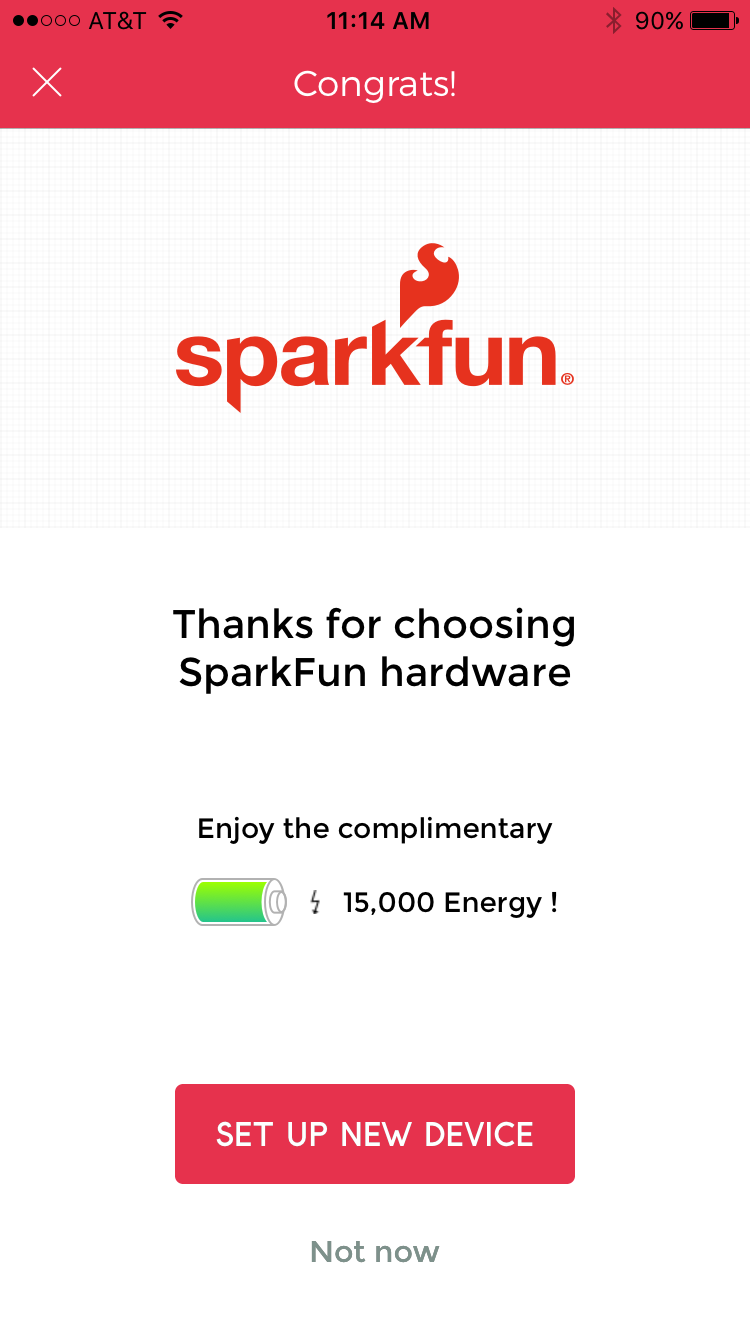
Click the QR-code icon in the top-right corner of the Blynk app.

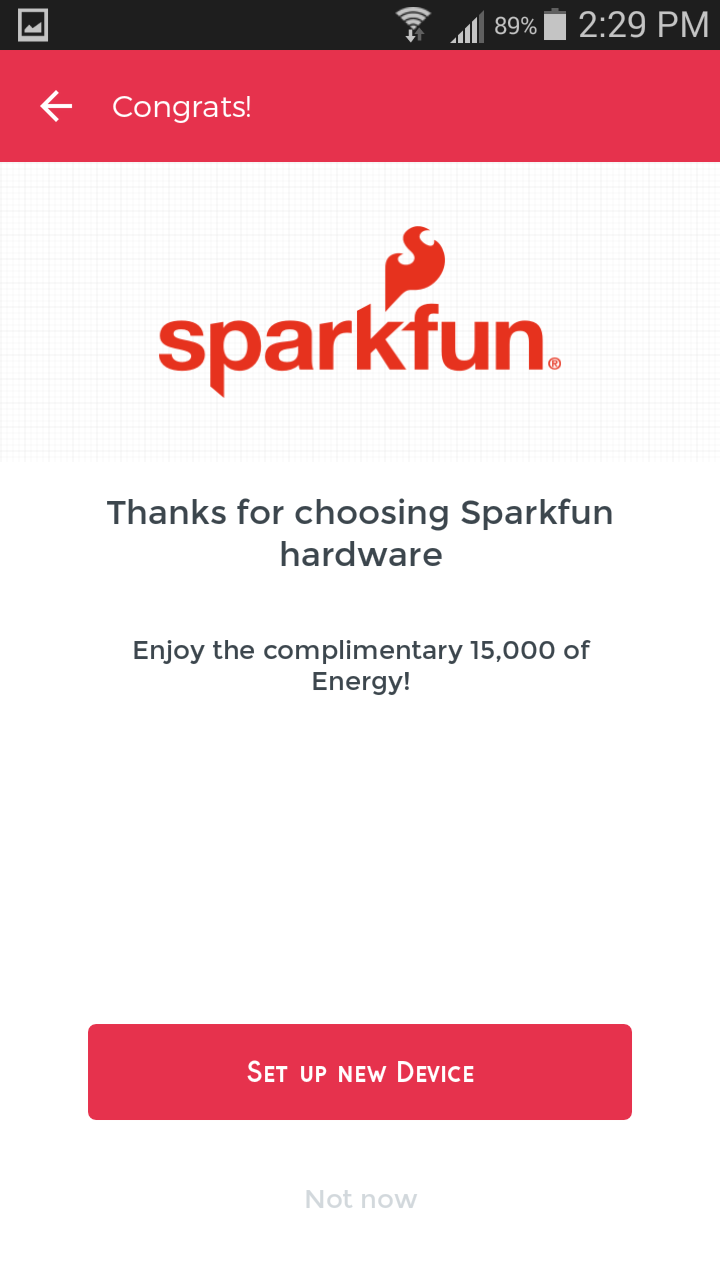
Then scan your phone camera over the QR code on your Blynk Board card. Blynk should pop up a new screen – congrats, you’ve got some new Blynk energy to play with!
Step 2: Connect to the Blynk Board
From the “Congrats!” page, hit Set Up New Device, read through the "Pre-Flight Checklist", and – as long as your Blynk Board is powered up and blinking the unique color code – hit Continue.
Read through the "Connect to Device" screen, and hit Open Wi-Fi Settings to swap over to your iDevice’s Wi-Fi settings.
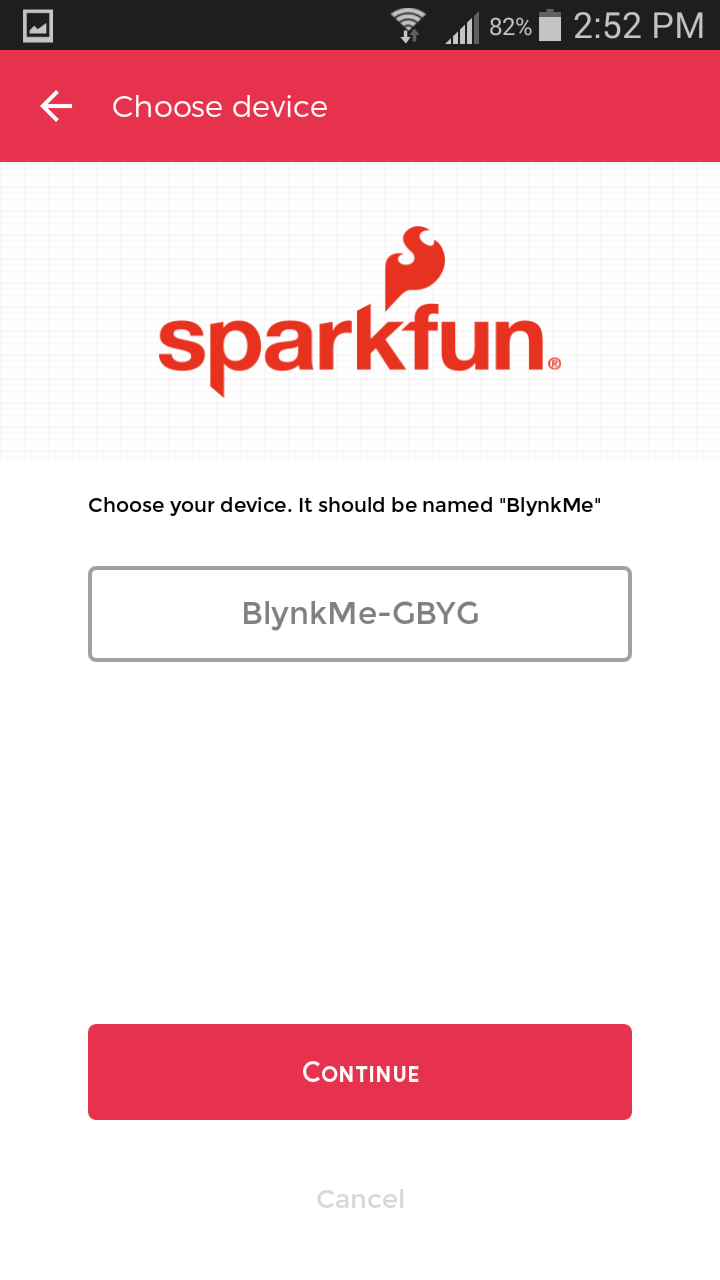
You may have to wait a few seconds for your device to scan for networks, but you should eventually see a Wi-Fi network named BlynkMe-CCCC. If that color code matches your Blynk Board’s pattern, select that network.
The connecting process may take up to a minute to complete – eventually, though, you should see a checkmark next to the BlynkMe network. The Blynk Board will begin to blink purple – faster than before – when a device has connected to it.
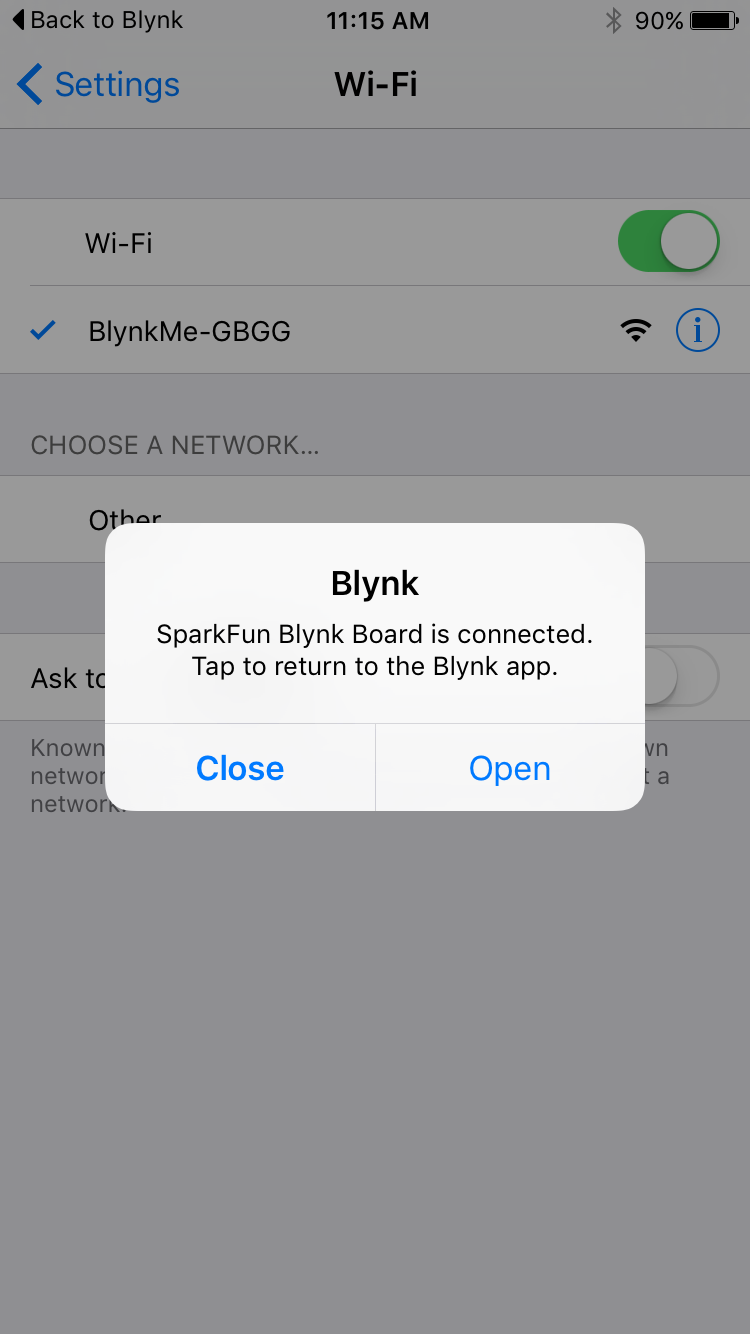
The Blynk app may (or may not) pop up a notification indicating it has sensed a connection to a BlynkMe network. If so, hit open. If the notification isn’t popping up, but you have a checkmark next to the BlynkMe network, hit Back to Blynk in the upper-left corner.
Step 3: Connect the Blynk Board to Wi-Fi/Blynk
On the next screen, enter the name and password of your Wi-Fi network. While typing the password, hit the eye icon (eyecon?) if you want/need to show your password.
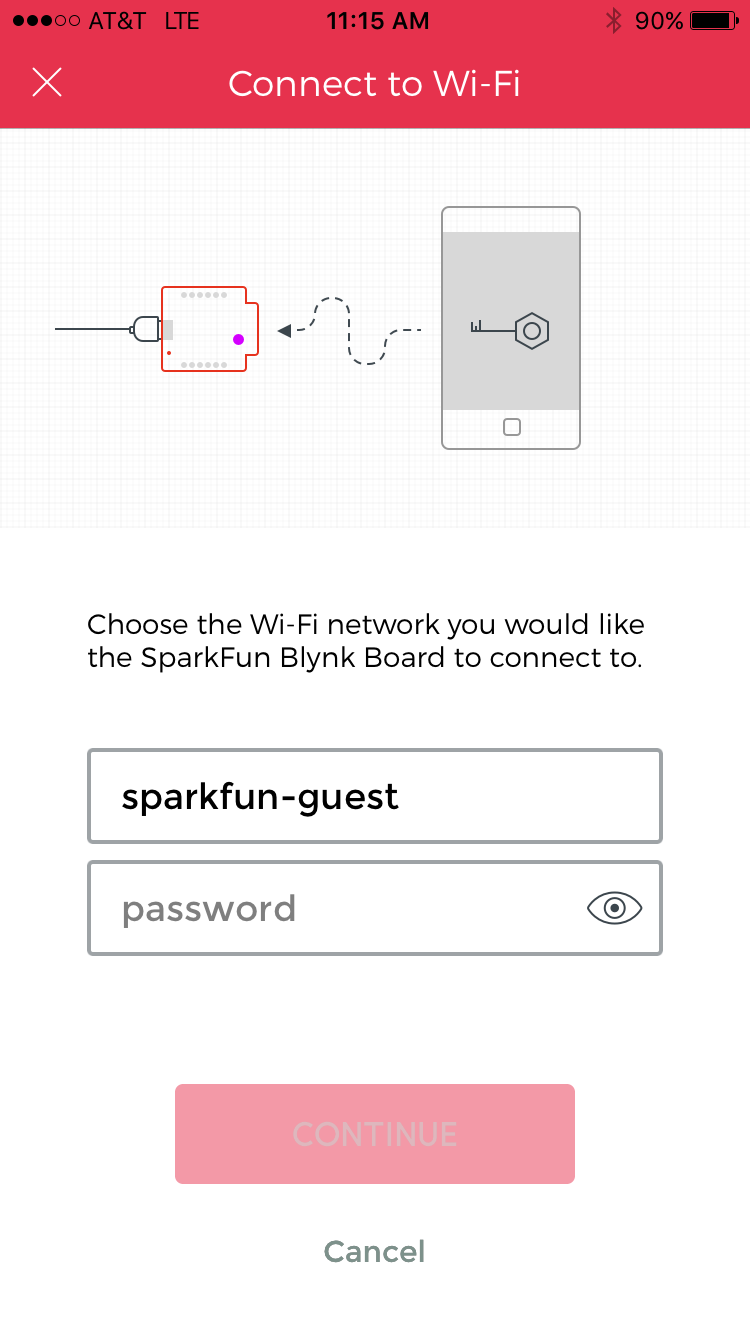
After typing both your network name and password in exactly (both fields are case-sensitive, and be careful not to add any spaces at the end), hit continue.
Step 4: Monitor the Blynk Board's RGB LED
While it connects to Wi-Fi and Blynk, the Blynk Board will use the RGB LED to keep you informed on its progress.
After hitting "Continue", your Blynk Board should begin to blink blue, which indicates it’s attempting to connect to your Wi-Fi network. This process usually takes around 10 seconds, but if it still hasn’t connected after 30 seconds, it will give up and go back to setup mode.
If the provisioning process isn't going as planned – whether it's failing to connect to Wi-Fi or Blynk – try cycling power to your Blynk Board (unplug and re-plug the USB cable in), and starting from the beginning.
If you're still not having any luck provisioning through the app, you may have to use an alternative provisioning process.
After the Blynk Board successfully connects to your Wi-Fi network, it will establish a connection with the Blynk Cloud. During this process, it will blink a soft, Blynk-colored green.
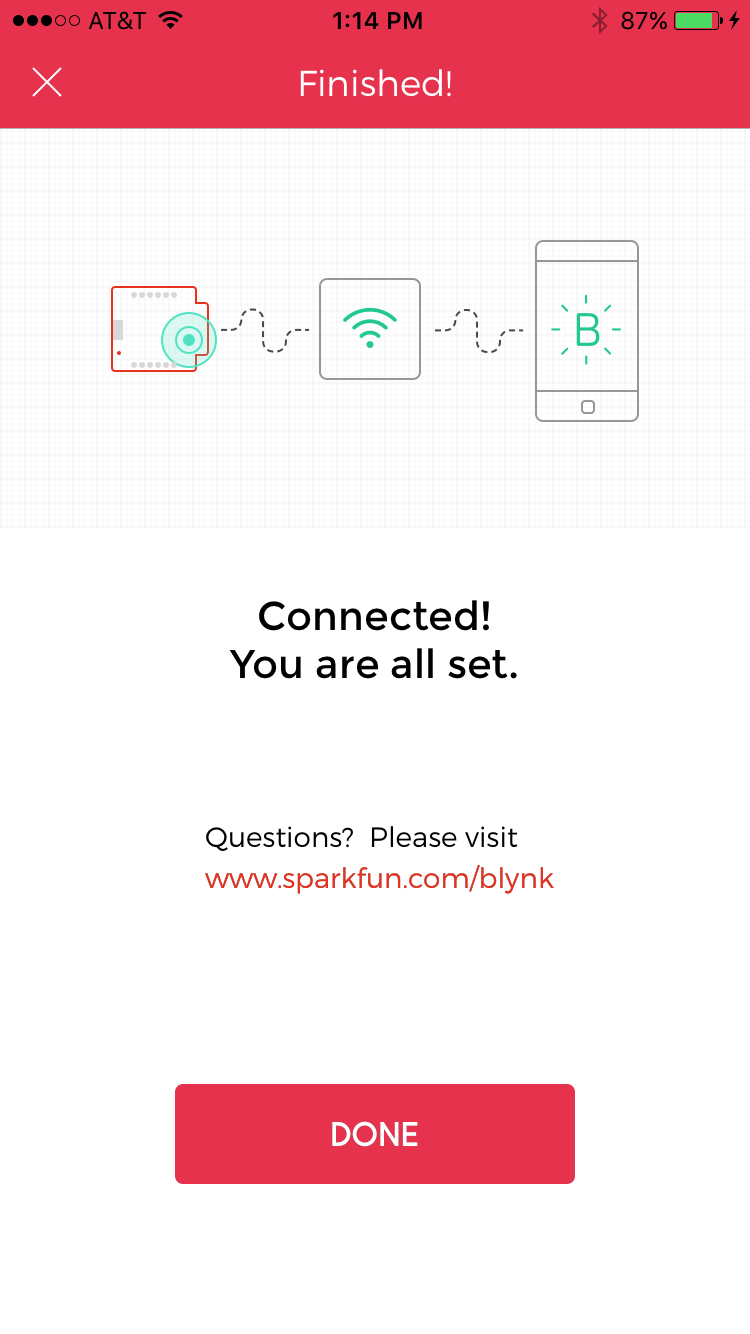
Finally, after a successful Blynk cloud connection, you should see the “Finished!” page. The RGB should be smoothly fading in-and-out. If so, click Done and Blynk will take you to a fresh Blynk Board project. Head over to the Do the zeRGBa section of this tutorial to start Blynking!
If you had trouble provisioning your Blynk Board, try giving the whole process one more shot. Cycle power to your Blynk Board, by unplugging it and plugging it back in. Then try again from step 1.
If you're still not having any luck, consult the Troubleshooting section of this tutorial.
Android Provisioning
If you haven’t already, download the Blynk App from the Google Play store. Then open it, create an account and log in.
Or, if you already have the Blynk app installed on your phone, make sure it’s updated to the latest release!
Step 1: Scan the Blynk Board QR Code
Click the QR-code icon in the top-right corner of the Blynk app (or the bigger icon on the main screen).

Then scan your phone over the QR code on your Blynk Board card. Blynk should pop up a new screen – congrats, you’ve got some new Blynk energy to play with!
Step 2: Connect to the Blynk Board
From the “Congrats!” page, hit Set Up New Device, read through the Pre-flight checklist and – as long as your Blynk Board is powered up and blinking the unique color code – hit Continue.
This next page is where you’ll select your Blynk Board. Scroll through the device list and select a network named BlynkMe-CCCC (one may already be selected). Make sure that color code suffix matches your Blynk Board’s RGB LED blinking.
Hit Continue. The app should attempt to connect to your Blynk Board. After a few seconds you should see the Blynk Board’s RGB LED blink purple – faster than before – and the app should present you with a “Connected to BlynkMe” page.

From there hit Continue to proceed to the Wi-Fi provisioning.
📌 Troubleshooting Tip: When connecting to the board in the app, you may need to manually connect to the board in the phone’s wifi settings. Temporarily jump out of the Blynk app, and find your phone’s Wi-Fi settings. On an Android, it should be in the Wi-Fi section of the phone's settings.
Have your phone scan for Wi-Fi networks, and look for something that starts with BlynkMe-. The last four characters should match the four-color sequence your board is blinking. Connect your phone to the “BlynkMe-CCCC” network. Upon a successful connection, your Blynk Board should begin to blink purple. Once you see this status, head back into the Blynk app to continue. Here is a .pdf file with screenshots for reference.
If you're still not having any luck provisioning through the app, you may have to use an alternative provisioning process.
Step 3: Connect the Blynk Board to Wi-Fi/Blynk
On the next screen, select your Wi-Fi network from the scroll bar. Then enter your network’s password.
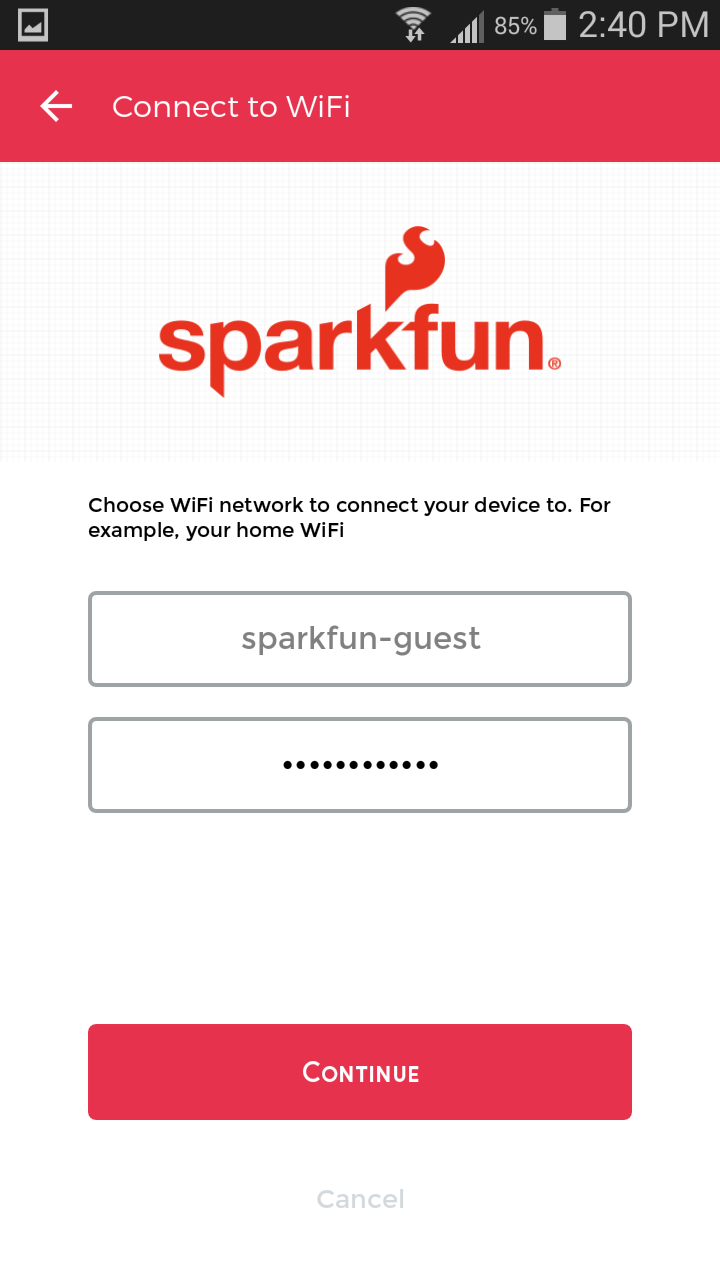
After both network and password are correctly entered (both fields are case-sensitive! be careful not to add any spaces at the end), hit continue.
Step 4: Monitor the Blynk Board's RGB LED
While it connects to Wi-Fi and Blynk, the Blynk Board will use the RGB LED to keep you informed on its progress.
Your Blynk Board will begin to blink blue, which indicates it’s attempting to connect to your Wi-Fi network. This process usually takes around 10 seconds, if it still hasn’t connected after 30 seconds, it will give up and go back to setup mode.
If the provisioning process isn't going as planned – whether it's failing to connect to Wi-Fi or Blynk – try cycling power to your Blynk Board (unplug and re-plug the USB cable in), and starting from the beginning.
If you're still not having any luck provisioning through the app, you may have to use an alternative provisioning process.
After the Blynk Board successfully connects to your Wi-Fi network, it will establish a connection with the Blynk Cloud. During this process it will blink a soft, Blynk-colored green.
After a successful Blynk cloud connection, you should see the “Finished!” page. And the RGB should be smoothly fading in-and-out.
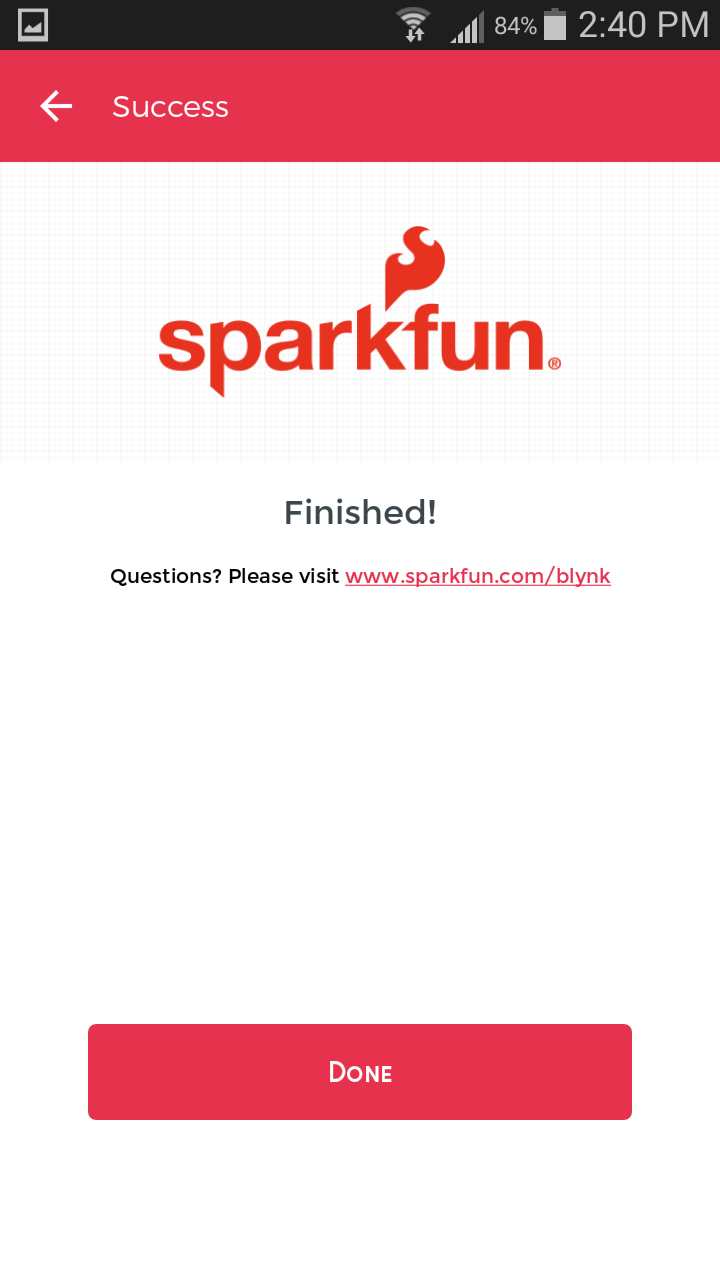
From there, click Done and Blynk will take you to a fresh Blynk Board project. Head over to the Do the zeRGBa section of this tutorial to start Blynking!
If you had trouble provisioning your Blynk Board, try giving the whole process one more shot. Cycle power to your Blynk Board, by unplugging it and plugging it back in. Then try again from step 1.
If you're still not having any luck, consult the Troubleshooting section of this tutorial.