STK-node
 D___Run___
**Experiment 10: Going Wireless
Introduction
Note: If you ARE using the Chrome App you will skip any console commands and run the example code directly in the app
Letting You Off the Leash!
Ok, up to this point you have been working with your Arduino tethered to your computer. Which is great and all for basic learning, but who wants to deal with a USB cable? You want to go wireless, you want to place your project 20 feet away, down the hall or across your yard! Enter Xbee!
Xbee is a wireless module system created to take your project wireless and we have built a shield and breakout board kit so that you can use Xbee to take your Johnny-Five project to the next level.
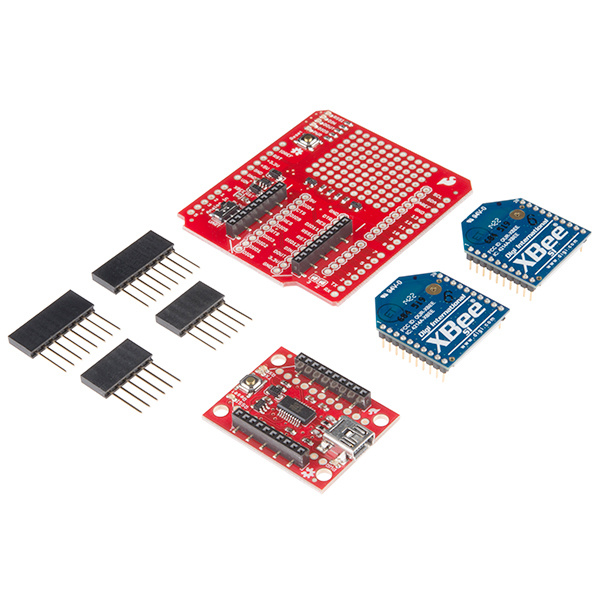
SparkFun XBee Wireless Kit
KIT-13197To get setup with Xbee we have created a hookup guide that will walk you through assembling the shield for your Arduino, setting the Xbee units up through using X-CTU which is the configuration software for Xbees and then getting your Arduino to talk to your computer through the shield, wireless modules and breakout board.
XBee Shield Hookup Guide
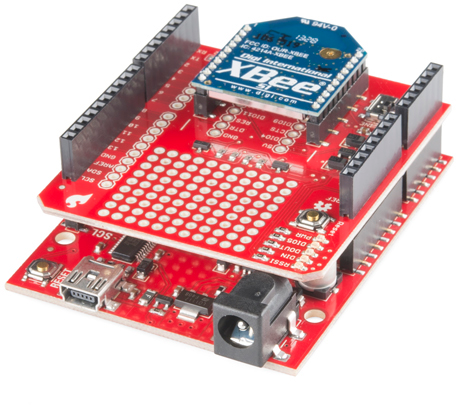
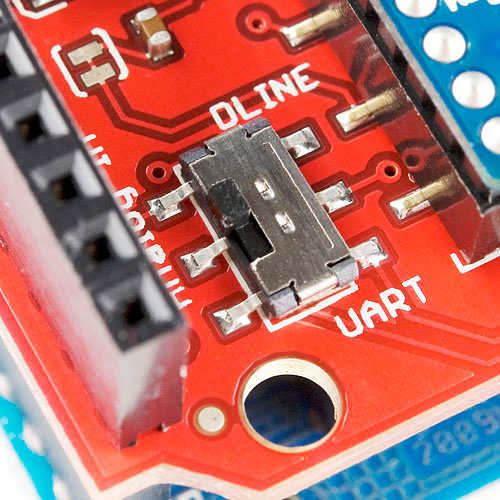
One you get your shield assembled and placed on your Arduino, go ahead and configure the Xbee modules as mentioned in the tutorial. Make sure that your Serial selection switch is on UART and not on DLINE as shown in the image below.
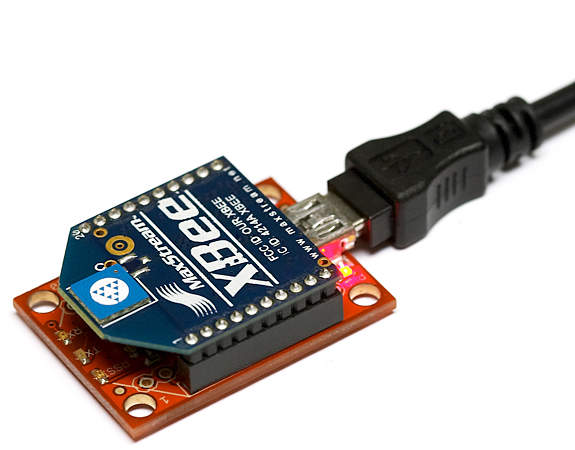
With the Arduino end setup, now plug in your second Xbee module that has been configured for the pair into the explorer board and use your USB cable to plug that into your computer.
With that you are ready to go and text your Johnny-Five script. For the sake of a quick test, you can just run a basic blink script on pin 13 with a an LED inserted into the headers as shown in the wiring diagram below with the Arduino powered from a seperate power source other than a USB port of your computer. These power sources could be a wall wart power supply plugged into the barrel jack, a battery pack or even a USB wall charger.
Now, either run your original blink script from Experiment 1 or create a new blink.js file by typing the following command.
touch blinkXbee.js
Then open the file and copy and paste the following code into it.
language:javascript
const five = require('johnny-five');
const board = new five.Board();

board.on('ready', ()=>{
   const led = new five.Led(13);

   led.blink();
});
Make sure that you save your script and then run your script with the following command.
node blinkXbee.js
Your script will execute the same way it would as if you had it plugged into a USB cable, but this time the Xbees are doing the communication work. Your project should now be portable and you can place it wherever you want within the Xbees range and then control it from your computer. Pretty snazzy!
Exploring Node.js
OK, so blink isn't that great of example. But, how about a robot? Let's build a quick cardboard robot to put your skills as an embedded Javascript developer to good use. We are going to building a NodeBot!
NodeBots?

NodeBots isnt really a Node module or a some fancy new developers tool. It's an idea! A group of people with a foot in Javascript and one in the world of robotics.
In fact, there is a whole day allocated to learning about and building NodeBots... International Nodebots Day
NodeBots Day is world wide event where people learn how to control the physical world with JavaScript. We want you to leave with the satisfaction of making something awesome! Each event has experts on hand to help you build your project and start you on the path to building awesome devices. Overall we're going to get together, collaborate and hack. The focus of NodeBots Day is on sharing and enjoying each other's company and JavaScript. Lots of JavaScript.
Let's Build a NodeBot using what we have learned!
Building a NodeBot
We are going to split this project into three sections. The chassis or the physical structure of your robot, the electronic circuits and finally the code to run your bot.
Before you dive in there are a few parts that are required to build a complete NodeBot. You may have some of these parts already depending on what hardware kit you are working from. Here is a list of the required commercial products from us.
The Chassis
We are going to build a super cheap and quick chassis out of some cardboard that you may have laying around, perhaps from the box that your kit came in. You will need a sheet that is about the size of a piece of printer paper (8.5" x 11").
Our basic robot will end up looking something like the robot below. It's not fancy, but it gets the job done.
We will start by cutting the shape out of the cardboard. For your reference we have included a cutting template if you are a person that is not skilled in measuring and accuracy, or you just want to get it done correctly. You can download the template here and print it out at full scale on a plain piece of printer paper and then cut it out.
You can then trace that template onto a piece of cardboard and then cut that our using a craft knife or scissors.
With the body cut from the cardboard you can now punch a hole through the center as shown with a pencil. This is where the motor wires and battery pack barrel jack will pass through so we can hook them up to the Arduino.
Now, find your two motors and glue them to the bottom of the chassis with a couple of dabs of hot glue as shown in the image below.
Once the glue cools you can do the same with the battery pack. Glue it to the bottom of your robot between the two motors, just behind the hole for the wires.
Now, add your wheels to your motor hubs
Pass the motor wires and the battery pack wires through the hole in the center of the chassis.
You can now mount your Arduino with the Xbee shield on it and a breadboard as shown below.
The final step in the chassis build is adding a skid for the robot to slide around on. With the way the robot is weighted in this configuration we found that putting a skid in the back of the robot works best. If you find that your robot is different than ours, feel free to make the neccesary modifications.
We built our skid from a piece of cardboard bent into a "V" and then hot glued to the bottom of our robot in the back. Again, we are going for simple not pretty.
With that, you have a finished chassis! Since this thing is made out of cardboard it is easy to modify and make better. Once you get it up and running feel free to add parts to it, decorate it or even take it apart and rebuild it with different materials.
The Circuit
The basic circuit for this Nodebot is an expansion of Experiment 9 where you wired a motor using an H-Bridge. This time you will be using 2 motors with an included potentiometer. The potentiometer will be the way that you will set the speed of your nodebot.
Using the breadboard on the robot, and the H-Bridge included in your kit, build the following circuit.
The Circuit Diagram
The Script
In terms of your script, let's write a simple test script to make sure your motors are up and running and spinning in the correct direction.
In your project directory create a new javascript filed called "drive.js" by typing the following command.
touch drive.js
Now open your drive.js file in your text editor and type out or copy and paste the following script.
language:javascript
const five = require('johnny-five');
const board = new five.Board();

board.on('ready', ()=>{
    const motors = new five.Motors([
     { dir: 4, cdir: 5, pwm: 6 },
     { dir: 7, cdir: 8, pwm: 9 },
     ]);

   const pot = new five.Sensor('A0');

   pot.on('change', ()=>{
      motors.forward(pot.analog);
   });
});
Once you are done, go ahead and save this file and then run it by typing the following command in your console.
node drive.js
Once your script executes go ahead and adjust your potentiometer. When you twist it, the motors speed should adjust accordingly. Both of your motors should be driving forwards! If yours aren't, revese the wiring of the motor(s) where it hooks to the H-Bridge. Both of your motors should now be driving forward at a speed set by your potentiometer as shown in the video.
Using Your NodeBot
Awesome! You now have your own working NodeBot that you can program wirelessly from your computer. But wait, we have one more addition to your NodeBot before we let you go off into the world with your new found knowledge in JavaScript and electronics.
Do you remember the keyPress module that you used in Experiment 3? Yep, you are probably thinking the same thing! Let's drive this NodeBot with the arrow keys of your computer!
Before we write any code lets install the keypress module into our project directory! Type the following command.
npm install keypress
Now, create a new javascript file called "keyDrive.js" by typing the following command.
touch keyDrive.js
Now, open your new keyDrive.js file and either type out or copy and paste the following script into it.
language:javascript
const five = require('johnny-five');
const keypress = require('keypress');

const board = new five.Board();

const press = keypress();

board.on('ready', ()=>{

   ....

});

console.log('Robot ready to go! Drive it with your arrow keys!');
Make sure that you save your file and the run it by typing the following command.
node keyDrive.js
Once your script executes and you see the console print out the following
Robot ready to go! Drive it with your arrow keys!
Press the UP arrow on your keyboard. Your robot should start moving foward. When you release it, it should stop. The RIGHT and LEFT keys should pivot the robot in those directions and the DOWN key should drive the bot in reverse. Pretty sweet!
Troubleshooting
Robot Spins in a Circle
One of your motors is wired backwards. Find the motor that is going in the opposite direction and flip its wiring to the H-Bridge.
Not Working!
Double check that you have correctly setup your Xbees and they are paired!
Still Nothing!
Make sure the serial connection switch on the Xbee shield is set to UART and not DLINE.
Still No Success
A broken circuit is no fun. Send us an email, and we will get back to you as soon as we can: techsupport@sparkfun.com
With that, you have a robot you can drive around from your computer! Go forth, explore the possibilities and be sure to share your projects with us over social media!