STK-node
 D___Run___
 Experiment 9: Motor
Introduction
Note: If you ARE using the Chrome App you will skip any console commands and run the example code directly in the app
How could you make a motor spin in different directions? With an H-Bridge! In this experiment you will use the H-Bridge to control the motor's direction and speed.
Parts Needed
You will need the following parts:
- 1x Breadboard
- 1x SparkFun RedBoard
- 1x SN754410 H-Bridge IC
- 1x 48:1 Geared Motor
- 12x Jumper Wires
Didn't Get the Tinker Kit?
If you are conducting this experiment and didn't get the Tinker Kit, we suggest using these parts:


Introducing the H-Bridge
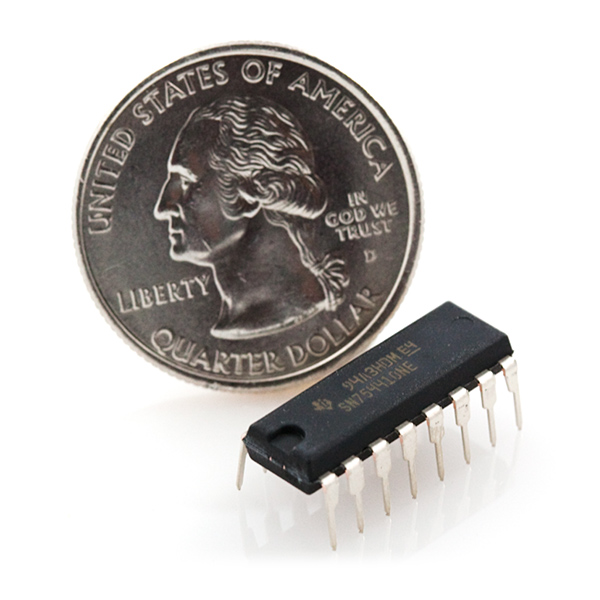
The SN754410 is an Integrated Circuit (IC), called an H-Bridge, that makes controlling motors easier. An H-Bridge allows you to control both the direction and the amount of an electrical current being supplied to a motor. You can think of it as a smart valve that allows you to change the direction of the current passing through the motor.
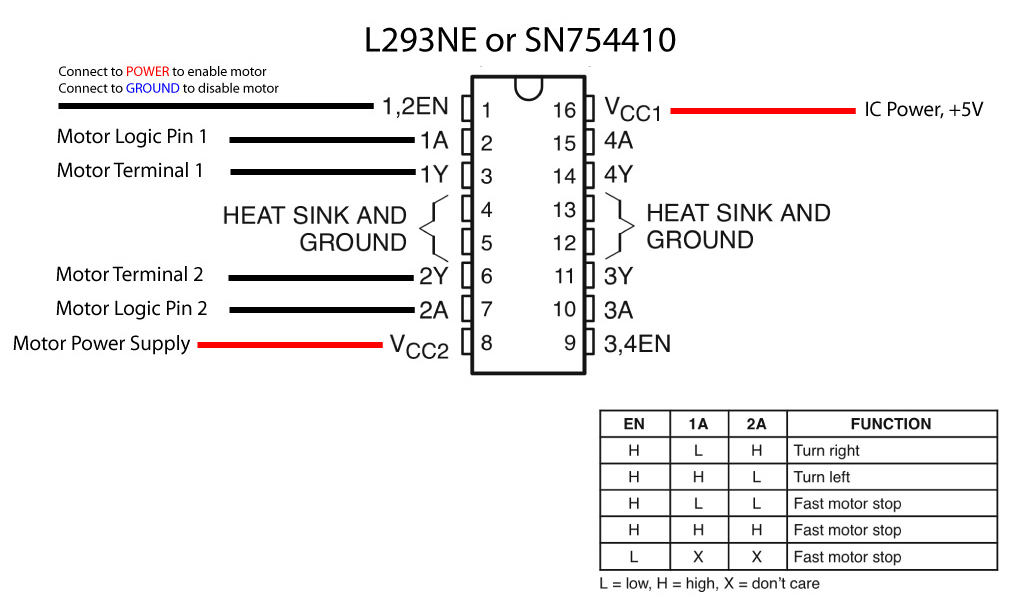
To switch the direction of the current, you use two pins to toggle pins on the board either HIGH or LOW. If the two direction pins are both HIGH or LOW at the same time, that causes the board to brake the motors. If one pin is HIGH and the other is LOW, the motor spins in one direction. If you flip-flop the states, the motor spins in the opposite direction. The IC is also powered separately with 5V supplied to pin 16 on the IC, and up to 36V for the motor voltage on pin 8 of the IC.
You can control up to two motors with a single IC. You can use this diagram as a reference for pin numbers in conjunction with the table below.
Hookup Table
| 1 | PWM signal for controlling the speed of motor A |
| 2 | Direction pin 1 for motor A |
| 3 | Motor A connection 1 |
| 4 | Ground / Heat Sink |
| 5 | Ground / Heat Sink |
| 6 | Motor A connection 2 |
| 7 | Direction pin 2 for motor A |
| 8 | Motor supply voltage |
| 9 | PWM signal for controlling the speed of motor B |
| 10 | Direction pin 1 for motor B |
| 11 | Motor B connection 1 |
| 12 | Ground / Heat Sink |
| 13 | Ground / Heat Sink |
| 14 | Motor B connection 2 |
| 15 | Direction pin 2 for motor B |
| 16 | Chip voltage (5V) |
Hardware Hookup
Ready to start hooking everything up? Check out the wiring diagram below to see how everything is connected.
| Polarized Components | Pay special attention to the component’s markings indicating how to place it on the breadboard. Polarized components can only be connected to a circuit in one direction. |
Wiring Diagram for the Experiment

Write your Script
Remember to Setup Your Project Directory!
From your `SIK` directory make sure that create a new project directory for this experiment and create an empty project by typing in the following commands while in your `SIK` directory.
mkdir exp_09;cd exp_09;
npm init -y;
npm install johnny-five
Once done you will have created a project directory, moved into it, created an npm project and installed Johnny-Five. Wahoo!
Create a new file called "motor.js" from the command line using the following command.
touch motor.js
Now, use a text editor to open your motor.js file and type out or copy and paste the following code into it.
language:javascript
const five = require('johnny-five');

const board = new five.Board();

board.on('ready', ()=>{
   const motor = new five.Motor({
      pins:{
         pwm: 6,
         dir: 5,
         cdir:4,
         },
      invert: false
   });

   motor.forward(255);

   motor.on('forward', ()=>{
      console.log('motor driving forward');
      board.wait(2000, ()=>{
         motor.brake();
      });
   });

   motor.on('brake', ()=>{
      console.log('motor braked');
      board.wait(2000, ()=>{
         motor.forward();
      });
});
Make sure you save your file and then run it from the console by typing the following command.
node motor.js
Code to Note
language:javascript
const motor = new five.Motor({
      pins:{
         pwm: 6,
         dir: 5,
         cdir:4,
         },
      invert: false
   });
When you create a motor component class object with this specific H-Bridge you have to specify three different pins: PWM, or the speed pin and then two directions pins. In this case 6,5 and 4 respectively. Notice that the pins parameter is an object by itself. There is also an option to invert your logic with an invert parameter. We set this to false.
language:javascript
 motor.forward(255);
Once you have created the motor object you can then use the direction methods that are connected to it. In this case we used the forward() method. We pass the method an 8 bit (0 - 255) speed value.
language:javascript
motor.on('forward', ()=>{
      console.log('motor driving forward');
      board.wait(2000, ()=>{
         motor.brake();
      });
   });
The direction methods have event emitters connected to them and so there is also event listeners. In this case the forward event listener is triggered when the forward() method is called. In this example we log a message and then after 2 seconds we call the motor.brake() method.
language:javascript
motor.on('brake', ()=>{
      console.log('motor braked');
      board.wait(2000,()=>{
      board.forward(255);
      });
   });
The brake event listener is similar to the forward event listener. This time we then call the forward() method again which will put this into an event based loop of driving forward and braking every 2 seconds.
What You Should See
When you start your script the motor will spin in one direction at full speed for two seconds (2000 milliseconds) and then stop. Your console will also log motor driving forward and motor braked respectively over and over again.
language:console
motor driving forward
motor braked
motor drive forward
motor braked
...
Troubleshooting
Motor Not Spinning
This is your first encounter with an IC! Make sure that the chip is seated into the breadboard snuggly and none of the pins aren't bent underneath the chip
Still nothing...
There are a lot of pins and wires in play! Double check your circuit and that the pins you specify in your code are the ones that you have wired up!
Motors directions are backwards!
Forward and reverse are arbitrary directions in code! If your motor is going in the opposite direction of your "forward", swap the motor wires where they connect to the breadboard.
Still No Success
A broken circuit is no fun. Send us an email, and we will get back to you as soon as we can: techsupport@sparkfun.com
Beyond forward and reverse
motor.fwd() is an alias for the forward() method
motor.rev() is an alias for the reverse() method
motor.stop() is a coasting stop, doen't hard stop the motor
motor.start() is used to restart the motor in its current direction.
motor.release() is similar to start() but used after the brake() method, releasing the brake!
Exploring Node.js
Motors are great! They are even better when you can automate what they do, especially from a user interface when you can just select an option and not have to do any more programming. Its a great way to be able to test things like motors and projects that have similar circuits. Sometimes it seems a little daunting to build those tools, but command line tools like Inquirer make it easier to build a menu based interface for your project!
Inquirer
A collection of common interactive command line user interfaces.

Inquirer is a module that allows you to build simple, command line based menus for your Node.js apps. In this case we will use it to build menu for different motor functions. The motor function options that we want are as follows:
- forward (full speed)
- reverse (full speed)
- on/off "blink" (forward)
- ramp up (acceleration)
- off
OK, let's get on this! Start by installing the inquirer module with the following command.
npm install inquirer
Testing Inquirer
Next, we will want to give Inquirer a test run. Create a new javascript file called "inqTest.js" using the following command.
touch inqTest.js
Now open your inqTest.js file in your text editor and copy and paste or type out the following code into the file.
language:javascript
var inquirer = require('inquirer');

inq();

function inq() {
  inquirer.prompt([
    {
     type: 'list',
     name: 'macro',
     message: 'What do you want your motor to do?',
     choices: [
       'Forward (full speed)',
       'Forward (half speed)',
       'Reverse (full speed)',
       'Reverse (half speed)',
       'On/Off ("Blink")',
       'Ramp Up',
       'Off'
       ]
    }
  ]).then(function (answers) {
      switch(answers.macro){
        case 'Forward (full speed)':
          console.log('Forward (full speed)');
          break;
        case 'Forward (half speed)':
           console.log('Forward (half speed)');
           break;

        case 'Reverse (full speed)':
           console.log('Reverse (full speed)');
           break;

        case 'Reverse (half speed)':
           console.log('Reverse (half speed)');
           break;

        case 'On/Off ("Blink")':
           console.log('On/Off ("Blink")');
           break;

        case 'Ramp Up':
           console.log('Ramp Up');
           break;

        case 'Off':
          console.log('Off');
          break;

        default:
          console.log('default');
          break;
      }
     inq();
   });
 }
Make sure you save this file and then execute it using the following command.
node inqTest.js
This should launch your app in the command line with a simple menu that looks like the following.
language:console
? What do you want your motor to do? (Use arrow keys)
❯ Forward (full speed)
  Forward (half speed)
  Reverse (full speed)
  Reverse (half speed)
  On/Off ("Blink")
  Ramp Up
  Off
Now, this shouldn't actually control your motors yet. When you move the cursor up and down with your arrow key and make a selection by pressing the Enter key. The console should log your selection and then relaunch the menu. Awesome! Let's take a second and take a look at how this works because there are some things that are new to us.
Code to Note
language:javascript
inq();

function inq() {
   //define inq()
}
First of all we call a function called inq(), but then define that function below. This is called hoisting, meaning that you can define the function anywhere in your script and then use it above it.
language:javascript
inquirer.prompt([
    {
     type: 'list',
     name: 'macro',
     message: 'What do you want your motor to do?',
     choices: [
       'Forward (full speed)',
       'Forward (half speed)',
       'Reverse (full speed)',
       'Reverse (half speed)',
       'On/Off ("Blink")',
       'Ramp Up',
       'Off'
       ]
    }
  ])
The first part of our inq() function is the inquirer.prompt(). We define a few parameters. This is the type of the prompt, in this case a list. We give it a name; macro. and then a prompt message. This message will be shown at the top of our menu. Finally we pass our choices as an array of strings. Fewww...Done!
language:javascript
then(function (answers) {
      //do something if Promise returns a success!
      }
   });
This is new to us! This .then() concept is called promise based programming. Where you have what is called a Promise where you have an executor function that is passed two other functions. Those functions are the resolve and reject functions. In a simple way if the executor function resolves the promise, it runs the resolve function, if it is rejected by the promise then it runs the reject. There is a whole lot to the concept of promises, you can find out more here. For now, we have a single resolve function which includes a long Switch Case of our menu objects.
language:javascript
switch(answers.macro){
        case 'Forward (full speed)':
          console.log('Forward (full speed)');
          break;
        case 'Forward (half speed)':
           console.log('Forward (half speed)');
           break;

        case 'Reverse (full speed)':
           console.log('Reverse (full speed)');
           break;

        case 'Reverse (half speed)':
           console.log('Reverse (half speed)');
           break;

        case 'On/Off ("Blink")':
           console.log('On/Off ("Blink")');
           break;

        case 'Ramp Up':
           console.log('Ramp Up');
           break;

        case 'Off':
          console.log('Off');
          break;

        default:
          console.log('default');
          break;
      }
The Switch case is similar to an if() statement, but it instead of a boolean logic statement you pass it a variable and a number of cases that variable can match. When the variable match a case, that specific group of code is ran. For example if answers.macro matches Off the Switch case runs the code under that case. Notice that each case: is closed with a break; command which returns the function outside of the Switch case.
Adding Motor Functionality
OK, we have the major body of code figured out, we just now have to add the motor functionality to this code using Johnny-Five. Create a new javascript file called "final.js" by running the following command.
touch final.js
Now open your final.js file in your text editor and type or copy and paste the following script.
language:javascript
var inquirer = require('inquirer');
var five = require('johnny-five');

var board = new five.Board();

board.on('ready', ()=>{
  var motor = new five.Motor({
    pins:{
      pwm: 9,
      dir: 10,
      cdir: 11
     }
  });

  inq(motor);
});

function inq(motor) {
  inquirer.prompt([
    {
      type: 'list',
      name: 'macro',
      message: 'What do you want your motor to do?',
      choices: [
        'Forward (full speed)',
        'Forward (half speed)',
        'Reverse (full speed)',
        'Reverse (half speed)',
        'On/Off ("Blink")',
        'Ramp Up',
        'Off'
      ]
    }
  ]).then(function (answers) {
      console.log(answers.macro);
      switch(answers.macro){
        case 'Forward (full speed)':
          motor.forward(255);
          break;

        case 'Forward (half speed)':
          motor.forward(128);
          break;

        case 'Reverse (full speed)':
          motor.reverse(255);
          break;

        case 'Reverse (half speed)':
          motor.reverse(128)
          break;

        case 'On/Off ("Blink")':
          board.loop(2000,()={
            board.wait(1000,()=>{
              motor.forward(255);
            board.wait(1000,()=>{
              motor.brake();
            });
          });
          break;

        case 'Ramp Up':
          for(int i = 0; i <=255; i++){
            motor.forward(i);
            board.wait(100);
          }
          break;

        case 'Off':
          motor.brake();
          break;

        default:
          motor.stop();
          break;
       }
      inq();
    });
});
Make sure that you save your file and then execute it by running the following command.
node final.js
Now, the same menu will launch in your console but when you make a selection it will actually control your motor. Try it out! Then when the menu relaunches you can make a new selection. You now have a pretty cool command line tool to control a motor!