STK-node
 D___Run___
 Experiment 1: Led
Introduction
Note: If you ARE using the Chrome App you will skip any console commands and run the example code directly in the app
LEDs are small, powerful lights that are used in many different applications. To start off, we will work on blinking an LED, the "Hello, World!" of microcontrollers. That's right -- it's as simple as turning a light on and off. It might not seem like much, but establishing this important baseline will give you a solid foundation as we work toward more complex experiments.
Parts Needed
You will need the following parts:
- 1x Breadboard
- 1x SparkFun RedBoard
- 1x LED
- 1x 330Ω Resistor
- 3x Jumper Wires
Didn't Get the Tinker Kit?
If you are conducting this experiment and didn't get the Tinker Kit, we suggest using these parts:


Resistor 330 Ohm 1/6 Watt PTH - 20 pack
COM-11507
Suggested Reading
Before continuing with this experiment, we recommend you be familiar with the concepts in the following tutorial:
- Light-Emitting Diodes -- Learn more about LEDs!
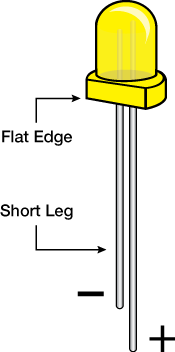
Introducing the LED
A Light-Emitting Diode (LED) will only let current through it in one direction. Think of an LED as a one-way street. When current flows through the LED, it lights up! When you are looking at the LED, you will notice that its legs are different lengths. The long leg, the "anode," is where current enters the LED. This pin should always be connected to the current source. The shorter leg, the "cathode," is the current’s exit. The short leg should always be connected to a pathway to ground.
LEDs are finicky when it comes to how much current you apply to them. Too much current can lead to a burnt-out LED. To restrict the amount of current that passes through the LED, we use a resistor in line with the power source and the LED's long leg; this is called a current-limiting resistor. With the RedBoard, you should use a 330 Ohm resistor. We have included a baggy of them in the kit just for this reason!
Hardware Hookup
Ready to start hooking everything up? Check out the wiring diagram and hookup table below to see how everything is connected.
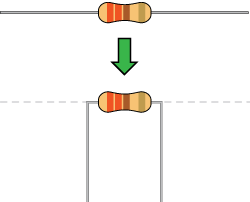
| Polarized Components | Pay special attention to the component’s markings indicating how to place it on the breadboard. Polarized components can only be connected to a circuit in one direction. |
**Please note: Pay close attention to the LED. The negative side of the LED is the short leg, marked with a flat edge. **
Components like resistors need to have their legs bent into 90° angles in order to correctly fit the breadboard sockets. You can also cut the legs shorter to make them easier to work with on the breadboard.
Wiring Diagram for the Experiment

Writing Your First Script
Now that your circuit is built, let's dive into the software side of things!
First off, lets create a project directory for this experiment inside of your sik directory that you created in the software setup section. Once you are in the sik directory create a new project directory, initiate an npm project and install Johhny-Five by typing the following commands.
mkdir exp_01;
cd exp_01;
npm init -y;
npm install johnny-five
With that you can now create a JavaScript file by typing the following command.
touch blink.js
Now open your blink.js file in your text editor and type out or copy and paste the following code.
language:javascript
const five = require('johnny-five');

const board = new five.Board();

board.on('ready', ()=>{
   const led = new five.Led(13);

   led.blink(500);
});
Once you have everything there, make sure you save your file. Run this script from the command line by typing the following command.
node blink.js
What You Should See
You should see your LED blink on and off. If it doesn't, make sure you have assembled the circuit correctly and verified and uploaded the code to your board, or see the Troubleshooting section.
Your console should also output a bunch of information about the board connecting, etc. It should look similar to this!
language:console
1475709038686 Device(s) /dev/cu.usbserial-DN01DHUL
1475709038699 Connected /dev/cu.usbserial-DN01DHUL
1475709042013 Repl Initialized
>>
Code to Note
language:javascript
const five = require('johnny-five');
Node.js is super modular! Which is a good thing, you only add the functionality that you really need. You add functionality by installing modules (as you did earlier) and then requiring them in your script. This is how we use the require() function to add Johnny-Five to our script as a five object.
language:javascript
const board = new five.Board()`
When you look down at your desk, you have a bunch of parts. One of them is a board. The great thing about programming hardware in JavaScript is that almost every piece of hardware you use is defined as an object. We define our "board" as a new five.Board(). Whenever you define an object in Johnny-Five for the first time it will be a new object; in this case, a Board object.
language:javascript
board.on('ready', ()=>{
   //do stuff
});
We have defined our board and now we have its first method. This method is special because it is called an "event listener". An event listener lies in wait listening for an event to happen. In this case it is they "ready" event. The "ready" event happens once the Firmata firmware on the board is finished setting up and is "ready" to accept commands. An event listener has what is called a callback function. A callback is a function that is triggered when the function is complete. In this case, with an event listener, when it receives a message.
language:javascript
const led = new five.Led(13);
Again, if you look down at your circuit, you are using an LED. There is an object for that. Inside of our board event listener we create a new Led object and pass it the pin number we are using, pin 13 in this case.
language:javascript
led.blink(500);
We can now use the led object to control the LED. For this example we used the blink() method and passed it the blink interval in milliseconds (500).
Troubleshooting
Error Return From Node.js
Make sure that you aren't missing any semicolons, commas or parenthesis. spelling and syntax matters in javascript!
Connection Timeout
Make sure that you have installed Firmata correctly on your RedBoard. Try using Interchange to go through the installation process one more time.
Led Not Blinking
Make sure that you built the circuit correctly! The LED is polarized and only works in one direction. Also, check your wiring on the breadboard, it is easy miss a row of pins!
Still No Success
A broken circuit is no fun. Send us an email, and we will get back to you as soon as we can: techsupport@sparkfun.com
Beyond Blink
The Led class has so much more to offer than just the blink() method. Here are a couple of other methods that are available to you to use with your Led object. We have included a few code snippets to play around with before moving on to Experiment 2.
On and Off
If you are looking to just turn your LED on or off there are methods for that and they make it super easy!
Here is an example of using the on() and off() methods to turn the LED on for 5 seconds when the board is ready and then off.
From your console create a new file called on_off.js by typing the following command.
touch on_off.js
Now open your on_off.js file with your text editor and type out or copy and paste the following code.
language:javascript
const five = require('johnny-five');

const board = new five.Board();

board.on('ready', ()=>{
   const led = new five.Led(13);

   led.on();
   board.wait(5000, ()=>{
      led.off();
   });
});
Make sure you save the file and then run the code with the following command.
node on_off.js
Your LED should turn on for 5 seconds and then turn off.
Notice that we also used an interesting method from the Board class... wait(). The wait() method allows us to stop what is going on for a given amount of time, and then when that time is up call a callback. A callback is a function that is called by certain methods when they are finished. The callback is one of the core pieces of asynchronous code.
Toggle
Toggle is pretty much what it states. It takes the state of the LED (on or off) and flips it to the other state.
From your console create a new file called toggle.js by typing the following command.
touch toggle.js
Now open your toggle.js file with your text editor and type out or copy and paste the following code.
language:javascript
const five = require('johnny-five');

const board = new five.Board();

board.on('ready', ()=>{
   const led = new five.Led(13);

   led.on();
   board.loop(1000, ()=>{
      led.toggle();
   });
});
Make sure you save the file and then run the code with the following command.
node toggle.js
Your LED should be blinking once per second.
Again, we use another Board method to control the timing of things here. This method is called loop(). The loop() method accepts two arguments. The first is the timing of the loop in milliseconds. In our example code we have it set to 1000ms (1 second), so it will repeat once per second. The second argument is a callback. Like in the previous section a callback is a function that is called when that function is complete. In this case that function only has a single line of code and that is the led.toggle();. So, every second the LED state is toggled and the LED should blink once per second.
Exploring Node.js
For every experiment in this guide this section will cover how you can bring in other modules both core modules from Node.js itself or other 3rd party modules to do cool things from posting data to the Internet, creating your own console menu system or creating files on your own computer. We will tie these newly found modules to the hardware you learn about to build interactive projects that will create a toolbox for you to explore the Internet of Things.