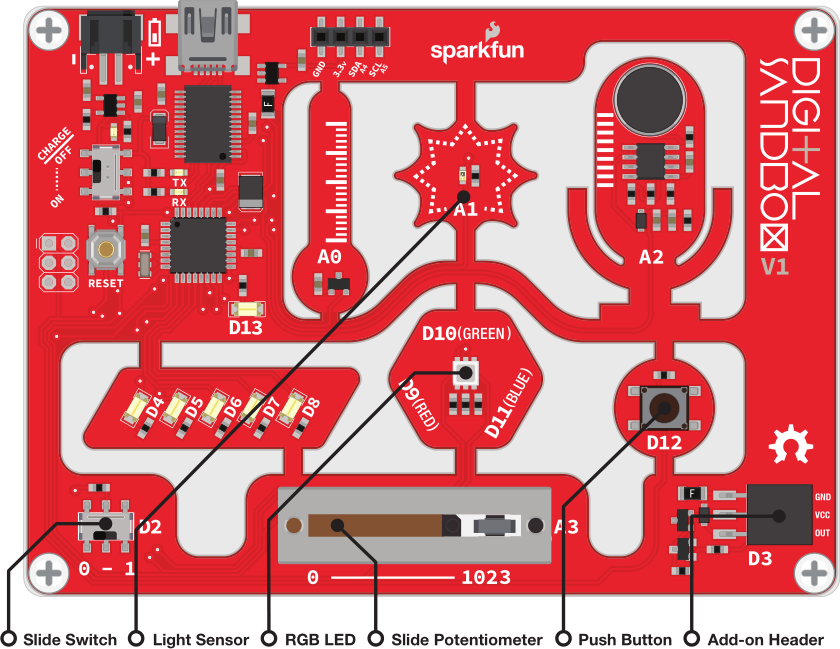
Digital Sandbox Arduino Companion
 jimblom
14. Opto-Theremin (Addon)
In this experiment we'll attach a speaker to the Sandbox, and turn it into a musical instrument! By using the light sensor to control our speaker's pitch, we can create a light-controlled theremin - a non-contact, electronic musical instrument.
Note: This experiment requires the Digital Sandbox Add-On Kit, purchased separately.
Background Information
By precisely modulating a pin, the Digital Sandbox can create electronic waves which, when routed through a loudspeaker, can produce a musical tone. We can program the Sandbox to control two characteristics of musical tone: pitch and duration.
A tone's pitch is what we perceive when we think of a note as being very high (screams, forks scratching plates, etc.) versus very low (like earth-rumbling bass). The pitch of a tone is very closely related to the frequency played through a speaker. If we toggle a pin from HIGH-to-LOW then LOW-to-HIGH 440 times per second, for example, it produces a 440 Hz (hertz) frequency - a "middle A" pitch. Humans can hear frequencies ranging from 20 (low-pitch, bass) to 20,000 Hz (high-pitch, "ow, my ears").
We can also program the duration of a tone - the length of time a pitch is played. In our program we'll use the delay function to set the duration. Playing a tone with the Sandbox is very easy. Just give it a pitch and it'll start toggling the output pin for you. Much like analog output, you can set it and forget it; the tone won't stop playing until you tell it to.
Active Parts
Code Components
This experiment introduces two functions related to sound-making, and another universally handy variable-altering function.
Playing (and Stopping) Tones
The tone function can be used to generate a sound wave and play it using an attached speaker or buzzer.
There are two parameters required to play a tone: a pin and a pitch. The pin should be set to whichever Arduino pin you have a buzzer connected to (don't forget to set it as an OUTPUT). The pitch should be set to the frequency of the tone you want to play.
Want to play an A440 out of pin 3? Here's the code:
language:c
tone(3, 440);   // Play a 440Hz wave on pin 3
As you'll quickly discover, the Sandbox isn't the most musical device out there. The tones it creates can be just a little-bit grating. If you ever need to halt a pin from playing a tone, use the noTone() function. You'll just need to specify which pin you want to noTone(), like this:
language:c
noTone(3);  // Stop playing "music" on pin 3
Map: map([value], [fromLow], [fromHigh], [toLow], [toHigh])
Arduino comes with all sorts of handy functions for manipulating variables, one of which is the map function. map translates a value from one range of values to another.
In our experiment, we want to map the 0-1023 input value of the light sensor, and map it down to a scales-worth (440-880) of tones for the speaker. Here's how we'll do it:
language:c
int lightSensorValue = analogRead(A1);
int frequency = map(lightSensorValue, 0, 1023, 440, 880);
That maps our frequency from the 0-1023 range to a proportional value in the 440-880 range.
Sketch and Experiment
Here is the 'Sandbox_14_OptoTheremin.ino` sketch for this experiment. Read through the comments and upload away!
language:c
    // Sandbox 14: Opto-Theremin (Add-on)

/* In this experiment we’ll attach a speaker to the Sandbox, and turn it into a
   musical instrument! By using the light sensor to control our speaker’s pitch,
   we can create a light-controlled theremin - a non-contact, electronic musical
   instrument.

   By precisely modulating a pin, the Digital Sandbox can create electronic
   waves which, when routed through a loudspeaker, can produce a musical tone.
   We can program the Sandbox to control two characteristics of musical tone:
   pitch and duration.

   This experiment introduces the tone() function, which can be used to play a
   specific tone out of a speaker attached to a pin.

   You'll also quickly discover the noTone() function, which you'll want to call
   before your ears start bleeding.
*/


// Let's create global variables to reference the pins of our in's and out's:
const int speakerPin = 3;   // The speaker is connected to 3
const int switchPin = 2;    // switch is connected to pin 2
const int sliderPin = A3;   // slider pot is connected to A3
const int lightPin = A1;    // light sensor is connected to A1
const int redPin = 9;       // Red LED is connected to pin 9
const int bluePin = 10;     // Blue LED is connected to pin 10
const int greenPin = 11;    // Green LED is connected to pin 11

void setup()
{
    // Set up our sensors (switch, slider, light) as INPUTs:
    pinMode(lightPin, INPUT);
    pinMode(switchPin, INPUT);
    pinMode(sliderPin, INPUT);

    // Set up our speaker and LEDs as OUTPUTs:
    pinMode(speakerPin, OUTPUT);
    pinMode(redPin, OUTPUT);
    pinMode(greenPin, OUTPUT);
    pinMode(bluePin, OUTPUT);
}

void loop()
{
    if (digitalRead(switchPin)) // If the switch is in the "1" position:
    {
        digitalWrite(redPin, HIGH);     // Turn on the red LED
        digitalWrite(bluePin, HIGH);    // Turn on the blue LED
        digitalWrite(greenPin, HIGH);   // Turn on the green LED

        int light = analogRead(lightPin);   // Read in the light sensor
        // Convert the light sensor reading to a pitch frequency we can hear.
        // We can use the map function to convert a value from one range of
        // values to another, proportionally. This example maps light from
        // 0-60 to a proportional value between 440 and 880:
        int pitch = map(light, 0, 60, 440, 880);

        // The tone function plays a pitch on a pin connected to a speaker.
        // In this case, we play the pitch we just calculated on the speakerPin
        // -defined pin.
        tone(speakerPin, pitch);
        // Once we call tone, that pitch will play until commanded to stop, or
        // a new pitch is defined. Let's delay for a short time, then run back
        // through and play another pitch.
        delay(5 + analogRead(sliderPin));
    }
    else    // Otherwise the switch is in the "0" poisition.
    {
        // noTone stops all sound coming out of the defined pin.
        noTone(speakerPin);         // Silence!
        digitalWrite(redPin, LOW);  // Turn red LED off
        digitalWrite(bluePin, LOW); // Turn blue LED off
        digitalWrite(greenPin, LOW);// Turn green LED off
    }
}
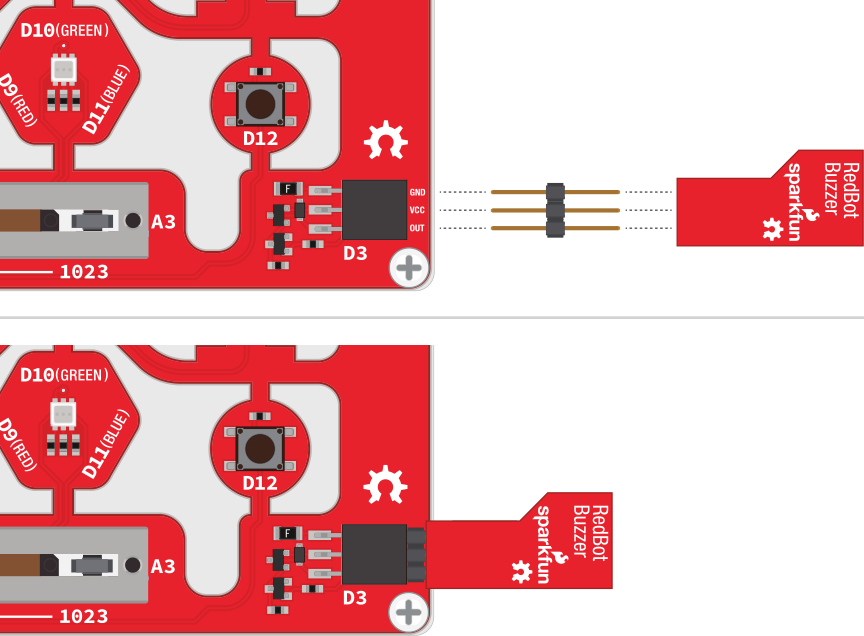
Then you'll need to attach the speaker to the expansion connector. Before you can do that, you will need to break off one group of three pins from the male breakaway headers. Now, you can connector the buzzer, with the top side facing down, to the expansion connector as shown in this image:
As fun as the opto-thermin may be, the sound is considered grating by some, so the code implements a simple ON/OFF function. Slide the switch over to the "1" position to turn the opto-theremin on.
Once the theremin is on, the speaker should start making noises. Try covering the light sensor; does the pitch change? We've turned the RGB LED white, so you can try to corral the light from that to control the light sensor.
You can adjust the duration of the tone by sliding the potentiometer. Slide the pot all the way to zero to get a really fast "zapper" sound, or slide to the right to create a soothing, slow sound.
Your Turn!
- Try adding a "rest" function to your opto-theremin. Use the button to intermittently cut off the sound output.
- Instead of using the Sandbox as a musical instrument, can you program it to play a written piece of music? Using a series of tones and delays, try reproducing the chorus of your favorite song!
- Give yourself a hearing test! What's the highest frequency you can hear? Can you hear tones others can't? Can your pet hear pitches that you can't?