Digital Sandbox Arduino Companion
 jimblom
0. Setup and Loop
We'll start off as basic as possible. This experiment introduces the Arduino bare bones -- the least amount of code required to create any Arduino sketch. Every Arduino sketch is different, but they all include these few lines of code. Time to setup and loop!
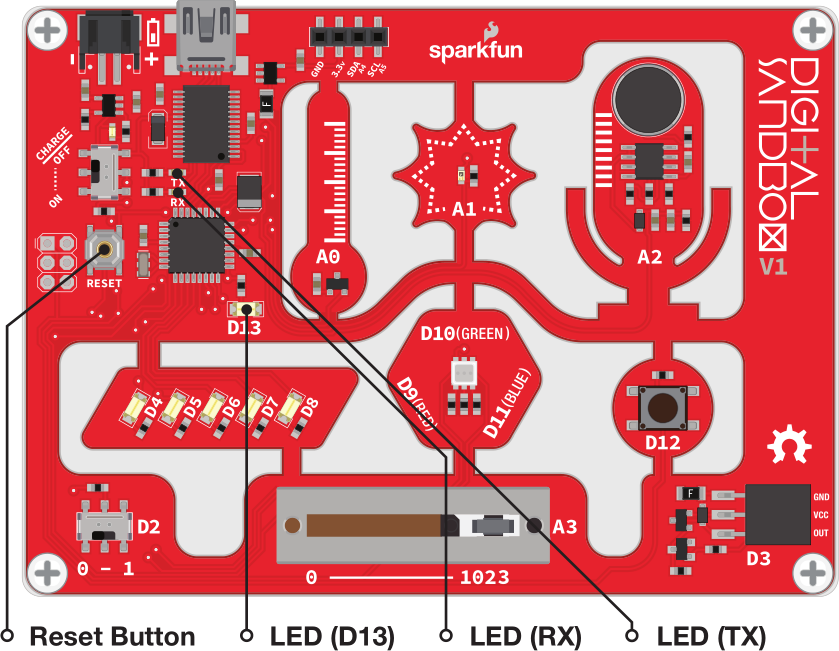
Active Parts
Code Components
In each experiment we'll introduce one or two new Arduino-language concepts, and provide a brief overview of how and why we use them. This time, we're introducing setup(), loop(), comments, and some syntax.
Setup: void setup() { }
This is a declaration for a function called "setup". This exact line is required in every Arduino sketch ever.
Any code that lives inside setup()'s curly brackets ({ and }) runs once at the very beginning of your program and then never again -- at least not until you reset the Arduino, or upload new code.
The setup() function is useful for ... setting up your Arduino for the rest of the program. You'll discover it's power in future experiments. Learn more about setup() in Arduino's reference guide.
Loop: void loop() { }
Like the setup line before it, this is another required Arduino-sketch function. While the setup() function sets your Arduino up, the loop() function...loops!
This is where the bulk of your Arduino sketch is executed. The program starts directly after the opening curly bracket (}), runs until it sees the closing curly bracket (}), and jumps back up to the first line in loop() and starts all over.
The loop() function will run over-and-over-and-over until the Arduino is reset.
You can learn more about loop in Arduino's reference guide.
Comments
You'll get used to these -- and tired of reading them -- by the time you're done experimenting. Comments are lines or blocks of text in your code that are there solely for you or anyone reading your code. Comments have no effect on the operation of your Arduino sketch, but they can be immensely helpful in deciphering what you or someone else was thinking when that line of code was written.
Comments come in two flavors: single-line and multi-line. A single-line comment is any line in your code preceded by two forward slashes (//). For example:
language:c
// This is a single-line comment.
code_goes_here();
A multi-line comment can be used to comment out one or more lines. Multi-line comments are initialized with a slash-asterisk (/*) and they're completed with an asterisk-slash (*/). For example:
language:c
/* This
        is
            a
                multi-line
                    comment */
code_goes_here();
Comments have no effect on your code's operation -- they're completely ignored by the Arduino itself -- but they are very useful to you and anyone else reading your code. Always comment your cod!
Syntax: Semicolons (;), Parenthesis (( )), Curly Brackets ({ }), Oh My.
The syntax of a programming language is analogous to the grammar rules that define our sentence structure. Just as every sentence you write requires a punctuation mark (., ?, !), (almost) every line of code your write in Arduino must end with a semicolon (;). We'll see those soon, don't worry!
More apparent in this example is the parenthesis and curly brackets. Whenever you open a parenthesis or bracket (( or {) you have to close it as well () and }).
You'll discover where parenthesis and brackets are required in your code as you gain more experience. Brackets can be used to contain the entirety of loops, functions, and conditional statements. Parenthesis can be used to define a conditional test, function parameter, or mathematical order of operations. That's probably all gobeldy-gook right now, but take comfort in knowing that you'll understand what all of that means by the time you've explored all of these experiments.
One last thing you'll have to get used to is case-sensitivity. Everything in Arduino is case sensitive: function, variable, library names, you name it. If the first letter is capitalized in the example code, make sure you capitalize it in your code! If you accidentally capitalize something the program editor will let you know with an error.
Fortunately, those errors are usually pretty easy to trace, just look at the line it's pointing you to.
The Sketch and Experiment
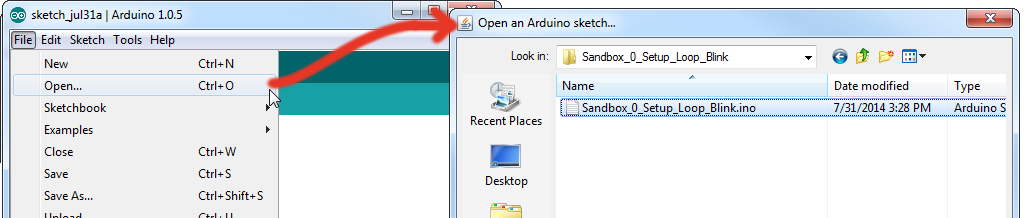
Here's the sketch for this experiment. It's about as simple as it gets, and introduces some of the most fundamental components of any Arduino sketch. You can copy the code below into your Arduino IDE, or alternatively, open the Sandbox_00_Setup_Loop.ino sketch from the ZIP file you downloaded previously.
language:c
    // Sandbox 00: Setup and Loop

/* This example serves as an introduction to the Digital Sandbox, Arduino code,
   and physical computing.

   This experiment introduces setup(), loop(), and some basic syntax.

   Oh, by the way, this is a comment (as is the very top line of this sketch).
   Any text that lives between a SLASH-ASTERISK and a ASTERISK-SLASH is a
   multi-line comment. Comments are useful bits of text that are completely
   ignored by the Arduino. They help you, or others, read your code, but they
   have no effect on what the code does. There are no syntax rules or even
   spell-cheking in comments.

   This is a multi-line comment -- anything within the slashes and asterisks
   will be commented out.
*/

// And this is a single-line comment. Any line preceded with TWO FORWARD SLASHES
// is commented out.


/* void setup() is required in every Arduino sketch. Code within the { and } of
   setup runs ONCE and ONLY ONCE at the very beginning of your program. This
   function is useful for one-time "setup" lines of code that prepare your
   Arduino to run the rest of its program.
*/
void setup()    // Don't forget the ( and ) directly after the word setup.
{   // As you'll discover throughout your programming experience every {...


// (code would go here, if we were so inclined.)


}   // ...requires a mating }.


/* void loop() is also REQUIRED in every program. It contains the bulk of your
   Arduino program.

*/
void loop() // Don't forget the parenthesis -- and the "void" before.
{
    // 1: The loop would start here...
    // 2: Then run this line of code...
    // 3: Then this one...
    // ...
    // ...
    // End of loop: Then this one, then jump back up to the first line of loop.
}
Copy the code above and paste it into your Arduino IDE. Alternatively, open the Sandbox_0_Setup_Loop_Blink.ino that you downloaded in the ZIP previously.
Then, select your Serial Port and Board, and click Upload (the right-facing arrow up top).
It turns out, this code doesn't do very much. After uploading it to your Sandbox, you won't actually see anything happen. That's OK, there's still a lot to learn!