Digital Sandbox Arduino Companion
 jimblom
11. Automatic Night Light
We now have all the programming tools we need to make some totally awesome, interactive projects. Let's incorporate the light sensor - another analog input component - to create an automatic night light that turns on when it's dark.
Background Information
You may not see them, but light sensors are incorporated into all sorts of modern electronic devices. There are light sensors in smartphones, which measure how bright your environment is and adjust the screen brightness automatically. There are light sensors in smoke detectors that detect particles in the air. Photogates use a light sensor to determine when an object passes a certain point -- critical for those photo finishes!
The light sensor on the Digital Sandbox is called a photo-transistor. It produces an analog voltage relative to the amount of light it sees. The lower the analog value, the darker the environment. If you cover the sensor completely, you might get the output all the way down to zero. Shine a flashlight on it and you might get a maximized reading of 1023.
Active Parts
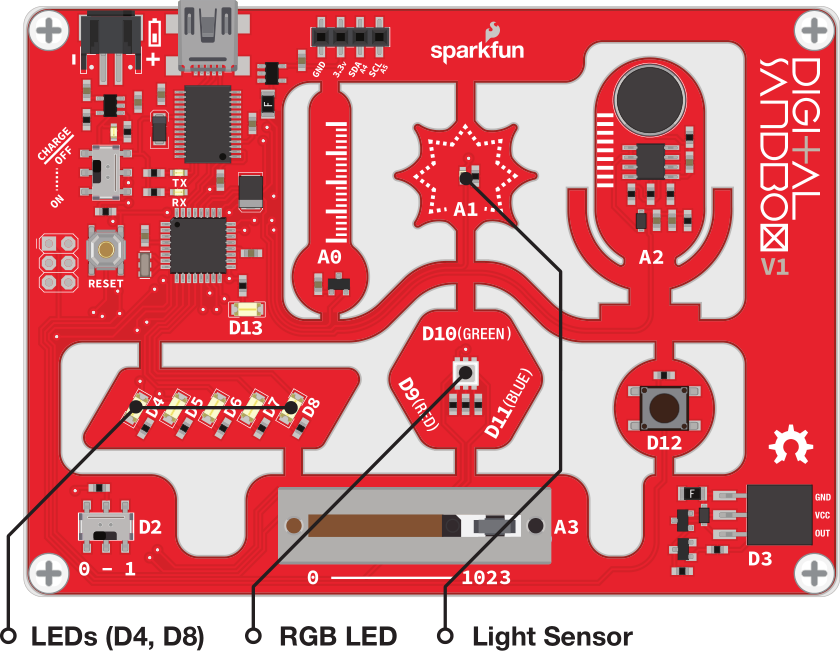
Code Components
Nothing too major to introduce this time, but there is a new variable type!
Constant Variables & Initializing a Variable
The const keyword isn't really a variable type. It's a add-on to a variable type, which modifies how that variable works. const is short for constant. When you stick it in front of a variable declaration that variable becomes read-only.
It's good practice to assign const to any variable you never want to change. In our example, we have a constant darkness threshold that will never change, but may need to be adjusted between code uploads.
When you declare a constant variable, you're forced to assign it a variable right then-and-there. That means after the variable declaration, you have to add = something;. For example, here's how we create a const int variable and assign it the value 0:
language:c
const int example_variable = 0; // Create a constant variable, with the value 0
You can initialize any variable, not just constants. Do it when you can. It can save you a line of code, or sometimes your sanity!
Sketch and Experiment
Here's our Sandbox_11_Automatic_NightLight.ino sketch. Check through the comments, then go ahead and upload it.
language:c
    // Sandbox 11: Automatic Night Light

/* We now have all the programming tools we need to make some totally awesome,
   interactive projects. Let’s incorporate the light sensor - another analog
   input component - to create an automatic night light that turns on when it’s
   dark.

   This experiment continues on with the analogRead() function. This time we're
   going to do something with the analog value! When the output from the light
   sensor gets too low, we'll automatically turn on some LEDs.

   If your light sensor isn't triggering correctly, check the output of the
   Serial Monitor to see if there's a better value for the dark variable than
   we've set.
*/

// A const variable is a variable that can't be changed once it's declared.
// The dark variable determines when we turn the LEDs on or off. If the light
// sensor reading is less then or equal to dark, turn the LEDs on. If it's
// greater than, then turn the LEDs off.
const int dark = 10;

void setup()
{
    // Set A1 as an INPUT
    pinMode(A1, INPUT);

    // Set our LED pins (4 and 8) as outputs:
    pinMode(4, OUTPUT);
    pinMode(8, OUTPUT);

    // Initialize Serial, set the baud rate to 9600 bps.
    Serial.begin(9600);
}

void loop()
{
    // Create a variable, and store the light sensor reading into it:
    int lightValue = analogRead(A1);

    // Print the reading from the light sensor:
    Serial.println(lightValue);

    // Compare the light sensor value to our dark constant variable.
    if (lightValue <= dark) // If the light sensor reading is less then "dark"
    {
        digitalWrite(4, HIGH);  // Turn on LED 4
        digitalWrite(8, HIGH);  // Turn on LED 8
    }
    else                    // Otherwise, if "lightValue" is greater than "dark"
    {
        digitalWrite(4, LOW);   // Turn LED 4 off
        digitalWrite(8, LOW);   // Turn LED 8 off
    }

    delay(100); // Delay for serial monitor visibility.
}
After uploading the sketch, try to cover the light sensor. Do the LEDs turn on? Do they turn back off once you uncover the sensor?
If the LEDs don't turn on as expected, check to see what value the photocell is reading by opening the Serial Monitor.
By default, we set the dark variable to 10. If the photocell is at or below that, the LEDs turn on, otherwise they'll stay off. Does that value need to go higher or lower for your night light to switch?
Your Turn!
- If the brightness is right on the border of on/off, the LEDs can blink unpleasantly. Try adding another if statement to catch if the light sensor is right in the middle range; from there you can dim the LEDs based on what the sensor reads.
- Try incorporating the RGB LED into this project. If it’s super-bright, make it light up yellow. Kind of dim? Green. Totally dark? Blue.