AzureWave Thing Plus (AW-CU488) Hookup Guide
 QCPete,
  bboyho
 Example 2: Scanning WiFi Networks
Required Materials
To follow along with this part of the tutorial, you will need one AzureWave Thing Plus board and USB C cable.


Hardware Hookup
The connection is the same as explained earlier in the tutorial. Connect the USB cable to the AzureWave Thing Plus (AW-CU488). Of course, you will need a wireless router capable of 2.4GHz and 5GHz.

Example Code
Let's upload the sketch to scan local WiFi networks in your area. From the menu, select the following: File > Examples > Examples for AW_CU488 Thing Plus (RTL8721DM) | WiFi > ScanNetworks.
Or you can copy and paste the following code in the Arduino IDE. Select the correct board definition from the menu (in this case, Tools > Boards > AW-CU488 Thing Plus (RTL8721DM)). Then select the correct COM port that the board enumerated to (in this case, it was COM21). Hit upload button.
language:c
/*

 This example  prints the Wifi shield's MAC address, and
 scans for available Wifi networks using the Wifi shield.
 Every ten seconds, it scans again. It doesn't actually
 connect to any network, so no encryption scheme is specified.

 Circuit:
 * WiFi shield attached

 created 13 July 2010
 by dlf (Metodo2 srl)
 modified 21 Junn 2012
 by Tom Igoe and Jaymes Dec
 */


#include <WiFi.h>

void setup() {
    //Initialize serial and wait for port to open:
    Serial.begin(115200);
    while (!Serial) {
        ; // wait for serial port to connect. Needed for native USB port only
    }

    // check for the presence of the shield:
    if (WiFi.status() == WL_NO_SHIELD) {
        Serial.println("WiFi shield not present");
        // don't continue:
        while (true);
    }

    // Print WiFi MAC address:
    printMacAddress();
}

void loop() {
    // scan for existing networks:
    Serial.println("Scanning available networks...");
    listNetworks();
    delay(10000);
}

void printMacAddress() {
    // the MAC address of your Wifi shield
    byte mac[6];

    // print your MAC address:
    WiFi.macAddress(mac);
    Serial.print("MAC: ");
    Serial.print(mac[0], HEX);
    Serial.print(":");
    Serial.print(mac[1], HEX);
    Serial.print(":");
    Serial.print(mac[2], HEX);
    Serial.print(":");
    Serial.print(mac[3], HEX);
    Serial.print(":");
    Serial.print(mac[4], HEX);
    Serial.print(":");
    Serial.println(mac[5], HEX);
}

void listNetworks() {
    // scan for nearby networks:
    Serial.println("** Scan Networks **");
    int numSsid = WiFi.scanNetworks();
    if (numSsid == -1) {
        Serial.println("Couldn't get a wifi connection");
        while (true);
    }

    // print the list of networks seen:
    Serial.print("number of available networks:");
    Serial.println(numSsid);

    // print the network number and name for each network found:
    for (int thisNet = 0; thisNet < numSsid; thisNet++) {
        Serial.print(thisNet);
        Serial.print(") ");
        Serial.print(WiFi.SSID(thisNet));
        Serial.print("\tSignal: ");
        Serial.print(WiFi.RSSI(thisNet));
        Serial.print(" dBm");
        Serial.print("\tEncryptionRaw: ");
        printEncryptionTypeEx(WiFi.encryptionTypeEx(thisNet));
        Serial.print("\tEncryption: ");
        printEncryptionType(WiFi.encryptionType(thisNet));
    }
}

void printEncryptionTypeEx(uint32_t thisType) {
    /*  Arduino wifi api use encryption type to mapping to security type.
    *  This function demonstrate how to get more richful information of security type.
    */
    switch (thisType) {
        case SECURITY_OPEN:
            Serial.print("Open");
            break;
        case SECURITY_WEP_PSK:
            Serial.print("WEP");
            break;
        case SECURITY_WPA_TKIP_PSK:
            Serial.print("WPA TKIP");
            break;
        case SECURITY_WPA_AES_PSK:
            Serial.print("WPA AES");
            break;
        case SECURITY_WPA2_AES_PSK:
            Serial.print("WPA2 AES");
            break;
        case SECURITY_WPA2_TKIP_PSK:
            Serial.print("WPA2 TKIP");
            break;
        case SECURITY_WPA2_MIXED_PSK:
            Serial.print("WPA2 Mixed");
            break;
        case SECURITY_WPA_WPA2_MIXED:
            Serial.print("WPA/WPA2 AES");
            break;
    }
}

void printEncryptionType(int thisType) {
    // read the encryption type and print out the name:
    switch (thisType) {
        case ENC_TYPE_WEP:
            Serial.println("WEP");
            break;
        case ENC_TYPE_TKIP:
            Serial.println("WPA");
            break;
        case ENC_TYPE_CCMP:
            Serial.println("WPA2");
            break;
        case ENC_TYPE_NONE:
            Serial.println("None");
            break;
        case ENC_TYPE_AUTO:
            Serial.println("Auto");
            break;
    }
}
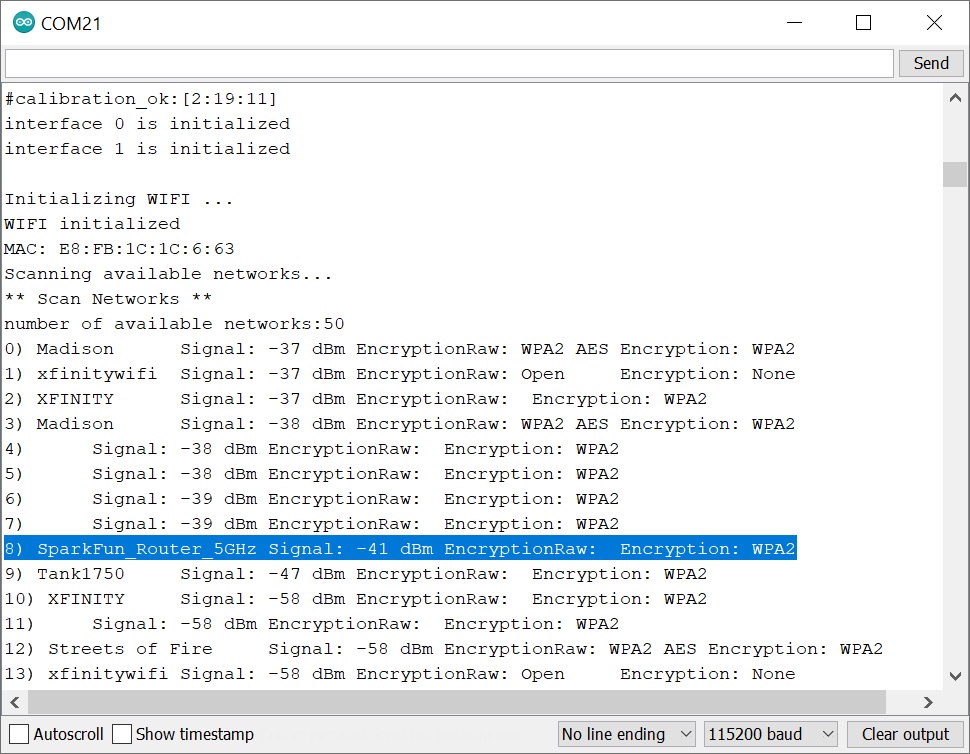
Open you Arduino Serial Monitor at 115200. The AzureWave Thing Plus (AW-CU488) will begin scanning your area. Take note of the encryption type of the WiFi network that you are connecting to. In this case, I had set my home WiFI Router's 5GHz network name to "SparkFun_Router_5GHz" and it was using a WPA2 encryption (as highlighted in the Arduino Serial Monitor).