SparkFun Qwiic Micro (SAMD21E) Hookup Guide
 M-Short,
  Elias The Sparkiest,
  bboyho
Example 2: Serial Ports
One of the SAMD21's most exciting features is SERCOM -- its multiple, configurable serial ports. The Arduino IDE equips the SAMD21 with a hardware serial port, by default, plus a "USB serial port" for communicating between the serial monitor.
Each of these serial ports has a unique Serial object which you'll refer to in code:
| Serial Object | Serial Port | RX Pin | TX Pin |
|---|---|---|---|
SerialUSB | USB Serial (Serial Monitor) | ||
Serial | Hardware Serial Port | D16 | D17 |
There are a couple critical things to notice here. First of all, if you're trying to use the Serial Monitor to debug, you'll need to use SerialUSB.begin(<baud>) and SerialUSB.print(). (Thankfully find/replace exists for adjusting example code.) You can also add #define Serial SerialUSB to the beginning of a sketch. This will tell the IDE to replace "Serial" with "SerialUSB" everywhere it sees it before it compiles.
Here's a quick example demonstrating the differences between Serial Monitor and Serial. It is designed to route data from Serial to the Serial Monitor, and vice-versa.
language:c
void setup()
{
  SerialUSB.begin(9600); // Initialize Serial Monitor USB
  Serial.begin(9600); // Initialize hardware serial port, pins 17/16

  while (!SerialUSB) ; // Wait for Serial monitor to open

  // Send a welcome message to the serial monitor:
  SerialUSB.println("Send character(s) to relay it over Serial");
}

void loop()
{
  if (SerialUSB.available()) // If data is sent to the monitor
  {
    String toSend = ""; // Create a new string
    while (SerialUSB.available()) // While data is available
    {
      // Read from SerialUSB and add to the string:
      toSend += (char)SerialUSB.read();
    }
    // Print a message stating what we're sending:
    SerialUSB.println("Sending " + toSend + " to Serial");

    // Send the assembled string out over the hardware
    // Serial port (TX pin 1).
    Serial.print(toSend);
  }

  if (Serial.available()) // If data is sent from device
  {
    String toSend = ""; // Create a new string
    while (Serial.available()) // While data is available
    {
      // Read from hardware port and add to the string:
      toSend += (char)Serial.read();
    }
    // Print a message stating what we've received:
    SerialUSB.println("Received " + toSend + " from Serial");
  }
}
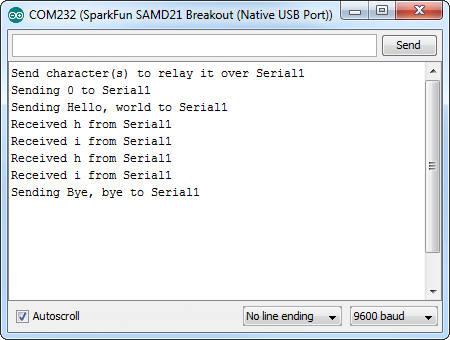
Then try typing something into the serial monitor. Even with nothing connected to the hardware serial port, you should see what you typed echoed back at you. It should look similar to the image below similar to the SAMD21 breakout.
You can further test this sketch out by connecting an 3.3V FTDI Basic or any other serial device to the SAMD21's pins 17 (RX) and 16 (TX). You'll need IC hooks for a quick temporary connection. Otherwise, you'll need to solder pins or wires to the board. By opening up a serial terminal, any data sent from the FTDI should end up in your Arduino Serial Monitor, and data sent to your Arduino Serial Monitor will route over to the FTDI. Here's a table that shows what pins to connect together.
| Qwiic Micro Pins | 3.3V FTDI (or any USB-to-Serial Converter) Pins |
|---|---|
| D16/TX | TXO |
| D17/RX | RXI |
| GND | GND |