SparkFun Inventor's Kit for MicroView
 Joel_E_B
Programming the MicroView
The following section will cover all the of the instructions to install the MicroView library and get started using the MicroView with the Arduino IDE.
In order to get your MicroView up and running, there a few easy steps you will need to follow:
- Download the FTDI Drivers
- Install Arduino software and MicroView Library
- Select the right board
- Run your first sketch
Driver Installation
If have never used an Arduino or Arduino compatible device on your computer before, you'll likely need to install the drivers for the FTDI chip located on the MicroView USB Programmer board. If you have never installed an FTDI Driver before, please visit our FTDI Driver Installation tutorial. Once successfully installed, your MicroView should show up as a valid COM Port in the Arduino IDE under Tools -> Ports.
On a Mac or Linux machine, it will appear as /dev/cu.usbmodemXXXXXX or as /dev/cu.usbserialXXXXXX, where the X’s are some specific characters and numbers.
On Windows, it will appear as COMXX, where the X’s are a specific number.
Once you have finished the FTDI driver installation, you will need to prepare your MicroView to be inserted into the computer’s USB port.
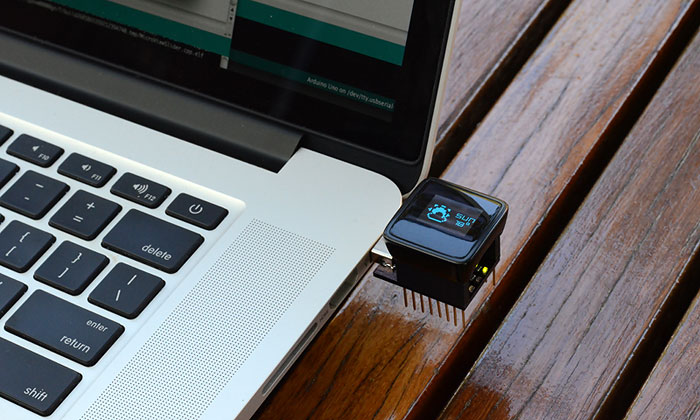
If you're using the USB Programmer, insert the MicroView into the USB Programmer now. Be sure to align Pin 1 of the MicroView with Pin 1 of the USB Programmer. Once you have inserted the MicroView into the USB Programmer, you can now insert the USB Programmer into the USB port of the computer as pictured below. If your computer does not have a right-sided USB port, please use a USB Cable Extension to extend the USB port to the front so that you can easily work with the MicroView.
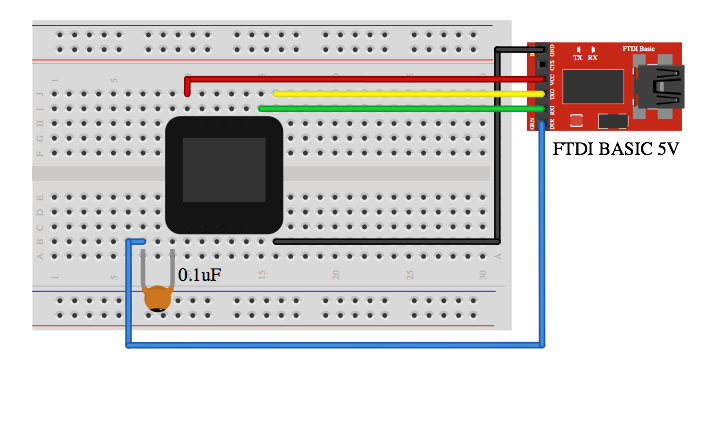
As an alternative to the USB Programmer, you can use a 5V FTDI Basic Breakout or 5V FTDI Cable instead. Connect the FTDI Basic Breakout board as below, and you are ready to go.
Install Arduino IDE and the MicroView Library
If you have not installed the Arduino IDE already, now is the time to do so. Visit our Installing the Arduino IDE tutorial for detailed instructions.
Download the library using the Arduino Library Manager (found in all version of the Arduino IDE from v1.6.4 and on).
Click Sketch -> Include Library -> Manger Libraries to open the Library Manger. Once open, type 'microview' in the search field. Install the SparkFun MicroView library by clicking on the library then clicking the install button. Once installed, there should be a blue 'installed' indicator next to the library.

You should now be able to find all the MicroView examples in your Arduino IDE skecthbook.

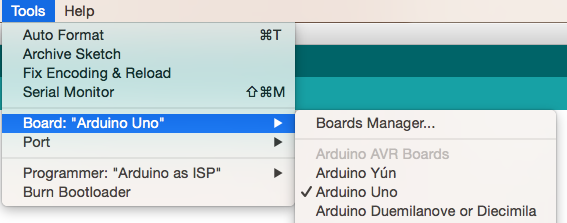
Board Selection
Once the Arduino IDE is up and running, you'll need to select the correct Board. Luckily, the MicroView is supported as an Arduino Uno variant, meaning no extra .brd files need to be installed to use the MicroView. Select Arduino Uno under Tools -> Boards.
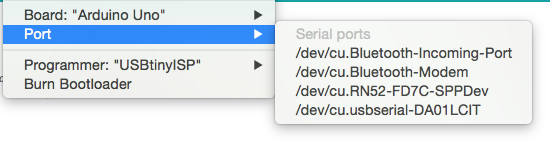
In the Arduino IDE under Tools -> Ports, select the correct COM port. This is the port that was found in the Driver Installation section.
For advance user that like to see MicroView as a board by itself in the IDE, add the following board definition to the boards.txt file. Depending on your setup, the boards.txt file usually located at arduino-version\hardware\arduino folder. Replace arduino-version with the right folder name for your Arduino version installed in your computer.
uview.upload.tool=avrdude
uview.bootloader.tool=avrdude
uview.name=MicroView
uview.upload.protocol=arduino
uview.upload.maximum_size=32256
uview.upload.speed=115200
uview.bootloader.low_fuses=0xff
uview.bootloader.high_fuses=0xde
uview.bootloader.extended_fuses=0x05
uview.bootloader.path=optiboot
uview.bootloader.file=optiboot_atmega328.hex
uview.bootloader.unlock_bits=0x3F
uview.bootloader.lock_bits=0x0F
uview.build.mcu=atmega328p
uview.build.f_cpu=16000000L
uview.build.core=arduino
uview.build.variant=standard
With the drivers and library installed and the correct settings in selected in the Arduino IDE, it's time to run our first program on the MicroView. The Hello World sketch in the next section will be the first code we upload to the MicroView.