SparkFun Inventor's Kit for MicroView
Experiment 8: Piezo Buzzer
Introduction
In this circuit, we'll again bridge the gap between the digital world and the analog world. We'll be using a Piezo buzzer that makes a small "click" when you apply voltage to it (try it!). By itself that isn't terribly exciting, but if you turn the voltage on and off hundreds of times a second, the buzzer will produce a tone. And if you string a bunch of tones together, you've got music! This circuit and sketch will play a classic tune. We'll never let you down!
Parts Needed
You will need the following parts:
- 1x Piezo Buzzer
- 2x Jumper Wires
Breadboard Setup
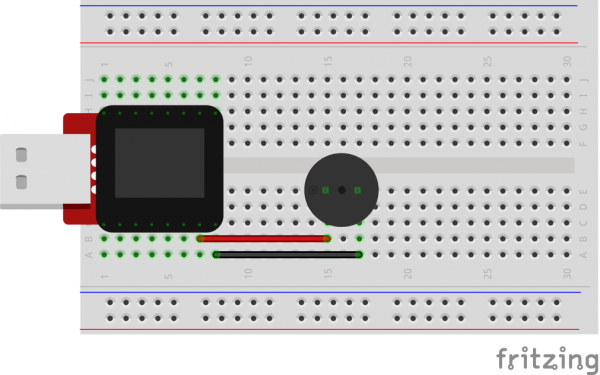
Hook up your circuit as pictured below:
MicroView Arduino Code
language:c
#include <MicroView.h>
// adapted from SparkFun Inventor Kit https://www.sparkfun.com/products/12001
// Please download the original source code for detail comment of the source code
// http://cdn.sparkfun.com/datasheets/Kits/SIK%20Guide%20Code.zip

const int buzzerPin = A0;
const int songLength = 18;
char notes[] = "cdfda ag cdfdg gf "; // a space represents a rest
int beats[] = {1,1,1,1,1,1,4,4,2,1,1,1,1,1,1,4,4,2};

int tempo = 150;

void setup()
{
    uView.begin();
    uView.clear(PAGE);
    pinMode(buzzerPin, OUTPUT);
}

void loop()
{
    int i, duration;

    for (i = 0; i < songLength; i++) // step through the song arrays
    {
        duration = beats[i] * tempo;  // length of note/rest in ms

        if (notes[i] == ' ')          // is this a rest?
        {
            uView.print(" ");
            uView.display();
            delay(duration);            // then pause for a moment
        }
        else                          // otherwise, play the note
        {
            uView.print(notes[i]);
            uView.display();
            tone(buzzerPin, frequency(notes[i]), duration);
            delay(duration);            // wait for tone to finish
        }
        delay(tempo/10);              // brief pause between notes
    }

    // We only want to play the song once, so we'll pause forever:
    while(true){}
    // If you'd like your song to play over and over,
    // remove the above statement
}


int frequency(char note)
{
    // This function takes a note character (a-g), and returns the
    // corresponding frequency in Hz for the tone() function.

    int i;
    const int numNotes = 8;  // number of notes we're storing

    // The following arrays hold the note characters and their
    // corresponding frequencies. The last "C" note is uppercase
    // to separate it from the first lowercase "c". If you want to
    // add more notes, you'll need to use unique characters.

    // For the "char" (character) type, we put single characters
    // in single quotes.

    char names[] = { 'c', 'd', 'e', 'f', 'g', 'a', 'b', 'C' };
    int frequencies[] = {262, 294, 330, 349, 392, 440, 494, 523};

    // Now we'll search through the letters in the array, and if
    // we find it, we'll return the frequency for that note.

    for (i = 0; i < numNotes; i++)  // Step through the notes
    {
        if (names[i] == note)         // Is this the one?
        {
            return(frequencies[i]);     // Yes! Return the frequency
        }
    }
    return(0);  // We looked through everything and didn't find it,
    // but we still need to return a value, so return 0.
}
What You Should See
You should see - well, nothing; but you should be able to hear a song. If it isn't working, make sure you have assembled the circuit correctly and verified and uploaded the code to your MicroView or see the troubleshooting tips below.
Code to Note
Up until now we've been working solely with numerical data, but the Arduino can also work with text. Characters (single, printable, letters, numbers and other symbols) have their own type, called "char". When you have an array of characters, it can be defined between double-quotes (also called a "string"), OR as a list of single-quoted characters.
char notes[] = "cdfda ag cdfdg gf ";
char names[] = {'c','d','e','f','g','a','b','C'};
One of Arduino's many useful built-in commands is the tone() function. This function drives an output pin at a certain frequency, making it perfect for driving buzzers and speakers. If you give it a duration (in milliseconds), it will play the tone then stop. If you don't give it a duration, it will keep playing the tone forever (but you can stop it with another function, noTone() ).
tone(pin, frequency, duration);
Troubleshooting
No Sound
Given the size and shape of the piezo element it is easy to miss the right holes on the breadboard. Try double checking its placement.
Can't Think While the Melody is Playing
Just pull up the piezo element whilst you think, upload your program then plug it back in.
Still No Success?
A broken circuit is no fun, send us an e-mail and we will get back to you as soon as we can: TechSupport@sparkfun.com
