SparkFun Inventor's Kit for MicroView
 Joel_E_B
Experiment 2: Reading a Potentiometer
In this circuit, you’ll work with a potentiometer. A potentiometer is also known as a variable resistor. When it’s connected with 5 volts across its two outer pins, the middle pin outputs a voltage between 0 and 5, depending on the position of the knob on the potentiometer. A potentiometer is a perfect demonstration of a variable voltage divider circuit. The voltage is divided proportionate to the resistance between the middle pin and the ground pin. In this circuit, you’ll learn how to use a potentiometer and display its value on the MicroView.
Parts Needed
You will need the following parts:
- 1x Potentiometer
- 3x Jumper Wire
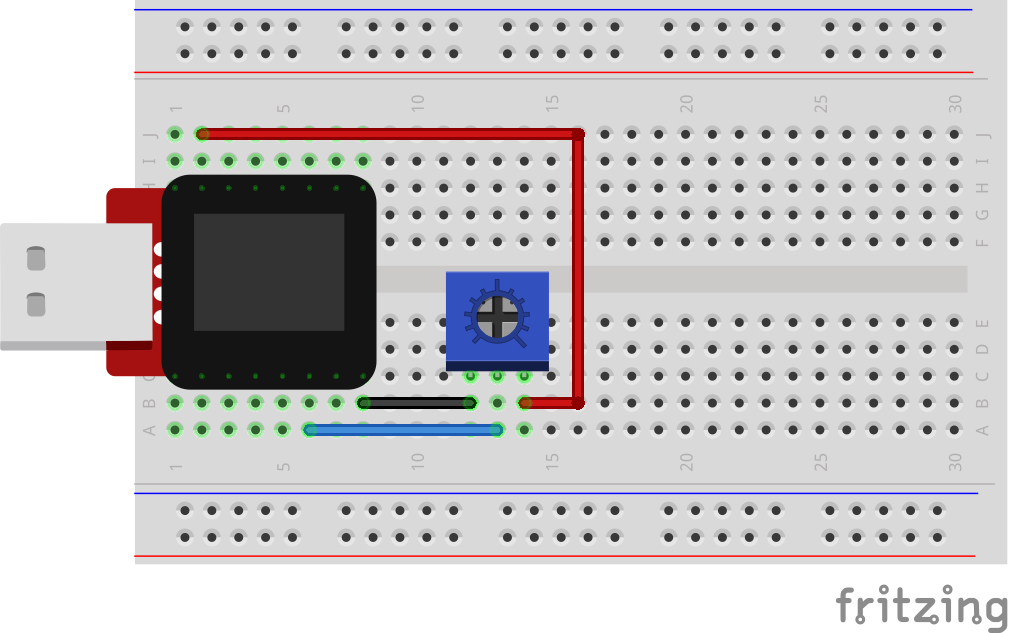
Breadboard Setup
Hook up your circuit as pictured below:
MicroView Arduino Code
Upload the following code to your MicroView:
language:c
#include <MicroView.h>          // include MicroView library

MicroViewWidget *widget;        // create widget pointer
MicroViewWidget *widget2;       // create widget pointer

int sensorPin = A1;    // select the input pin for the potentiometer
int sensorValue = 0;  // variable to store the value coming from the sensor

void setup()
{
    digitalWrite(sensorPin, HIGH);      // Internal Pull-up
    pinMode(sensorPin, INPUT);          // make pin as INPUT
    uView.begin();                      // start MicroView
    uView.clear(PAGE);                  // clear page
    widget = new MicroViewSlider(0, 0, 0, 1024);    // make widget as Slider
    widget2 = new MicroViewSlider(0, 20, 0, 1024, WIDGETSTYLE1);    // make widget as Silder STYLE1
    uView.display();                    // display the content in the screen buffer
}

void loop()
{
    sensorValue = analogRead(sensorPin);    // read sensorPin
    widget->setValue(sensorValue);          // set value of sensorPin to widget
    widget2->setValue(sensorValue);         // set value of sensorPin to widget
    uView.display();                        // display the content in the screen buffer
}
What You Should See
By turning the potentiometer's knob you should see on your MicroView's display two different styles of widget reflect the reading of the potentiometer.
Code to Note
A “variable” is a stored value you’ve given a name to. You must introduce, or "declare" variables before you use them; here we're declaring a variable called sensorValue, of type "int" (integer). Don't forget that variable names are case-sensitive!
int sensorValue;
We use the analogRead() function to read the value on an analog pin. analogRead() takes one parameter, the analog pin you want to use ("sensorPin"), and returns a number ("sensorValue") between 0 (0 volts) and 1023 (5 volts).
sensorValue = analogRead(sensorPin);
Troubleshooting
LED Not Lighting Up?
LEDs will only work in one direction. Try taking it out and turning it around 180 degrees (no need to worry, installing it backward does no permanent harm).
Still No Success?
A broken circuit is no fun, send us an e-mail and we will get back to you as soon as we can: TechSupport@sparkfun.com