SparkFun Inventor's Kit for MicroView
 Joel_E_B
Experiment 4: Push Buttons
In this circuit, we’ll be looking at one of the most common and simple inputs – a push button. The way a push button works with this MicroView tutorial is that when the button is pushed, the contacts in the button connects to the ground, MicroView reads this and reacts accordingly.
Parts Needed
You will need the following parts:
- 1x Push Button
- 2x Jumper Wire
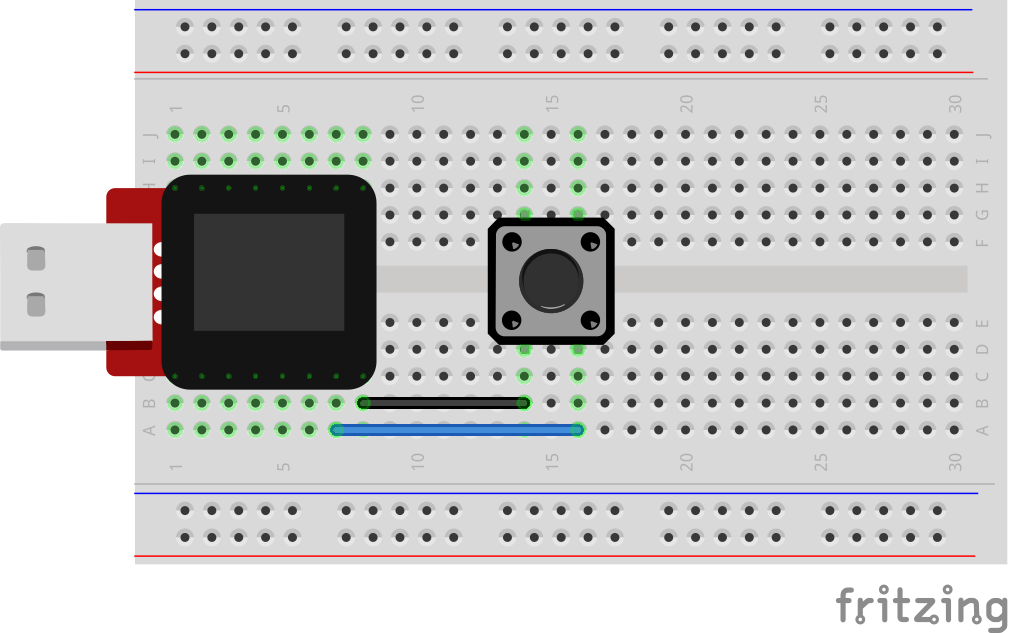
Breadboard Setup
Hook up your circuit as pictured below:
MicroView Arduino Code
language:c
#include <MicroView.h>      // include MicroView library

int buttonPin = A0;         // push button pin
int buttonState = 0;        // variable to store the pushbutton status

void setup() {
    uView.begin();          // start MicroView
    uView.clear(PAGE);      // clear page

    pinMode(buttonPin, INPUT);      // initialize the pushbutton pin as an input
    digitalWrite(buttonPin,HIGH);   // set Internal pull-up
}

void loop() {
    buttonState = digitalRead(buttonPin);   // read the state of the pushbutton value

    // check if the pushbutton is pressed.
    // if it is not pressed, the buttonState is HIGH:
    if (buttonState == HIGH) {
        uView.setCursor(0,0);       // set cursor at 0,0
        uView.print("OFF");         // print OFF
        uView.display();
    }
    else {
        uView.setCursor(0,0);
        uView.print("ON ");
        uView.display();
  }
}
What You Should See
You should see your MicroView print "ON" if you push the button, and "OFF" if you let go. (See the code to find out why!) If it isn't working, make sure you have assembled the circuit correctly and verified and uploaded the code to your MicroView or see the troubleshooting tips below.
Code to Note
The digital pins can be used as inputs as well as outputs. Before you do either, you need to tell the MicroView which direction you're going.
pinMode(buttonPin, INPUT);
To read a digital input, you use the digitalRead() function. It will return HIGH if there's 5V present at the pin, or LOW if there's 0V present at the pin.
buttonState = digitalRead(buttonPin);
Because we've connected the button to GND, it will read LOW when it's being pressed. Here we're using the "equivalence" operator ("==") to see if the button is being pressed.
if (buttonState == LOW)
Troubleshooting
Light Not Turning On
The pushbutton is square, and because of this it is easy to put it in the wrong way. Rotate the button by 90 degrees and see if it starts working.
Underwhelmed
No worries, these circuits are all super stripped down to make playing with the components easy, but once you throw them together the sky is the limit.
Still No Success?
A broken circuit is no fun, send us an e-mail and we will get back to you as soon as we can: TechSupport@sparkfun.com
Getting Logical
One of the things that makes the MicroView so useful is that it can make complex decisions based on the input it's getting. For example, you could make a thermostat that turns on a heater if it gets too cold, a fan if it gets too hot, waters your plants if they get too dry, etc.
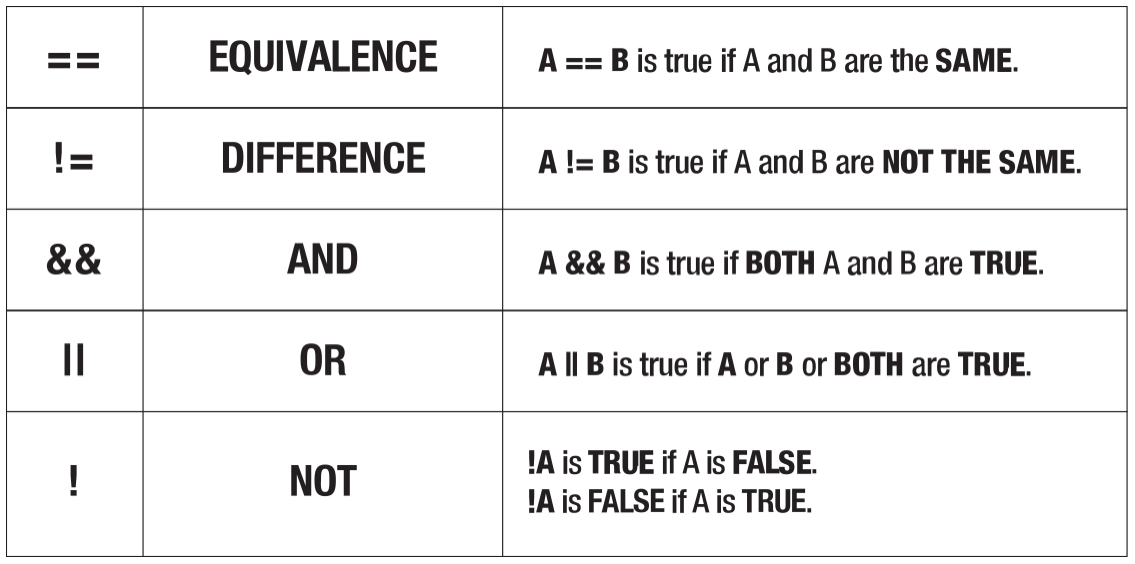
You can combine these functions to build complex if() statements.
if ((mode == heat) && ((temperature < threshold) || (override == true))) {
    digitalWrite(HEATER, HIGH);
}
...will turn on a heater if you're in heating mode AND the temperature is low, OR if you turn on a manual override. Using these logic operators, you can program your MicroView to make intelligent decisions and take control of the world around it! To learn more about logic, check out our tutorial on digital logic.
To learn more about the different types of buttons and switches you can use in your projects, visit the Switch Basics tutorial.