Galileo Getting Started Guide
This Tutorial is Retired!
This tutorial covers concepts or technologies that are no longer current. It's still here for you to read and enjoy, but may not be as useful as our newest tutorials.
 jimblom
 Introduction
The Galileo is Intel's toe-dip into the Arduino waters. It features their Quark SoC X1000 processor -- a relatively new, x86-based, low-power embedded system-on-a-chip. The 32-bit processor can run at up to 400MHz, and it has 512 KB SRAM built-in. The Galileo board supports the Quark with a wide range of external peripherals.
As far as memory goes, the Galileo has a lot of it. There's 8MB Flash (to store firmware), an 11KB EEPROM (non-volatile memory), and a µSD socket (which supports up to 32GB µSD cards). In addition to the memory, there are all sorts of peripherals: 10/100Mb Ethernet, USB 2.0 host and device ports, an RS-232 port, and a mini PCI Express (mPCIE) socket. Plus it has that same, familiar Arduino pinout we all love/hate. The Arduino pins -- including six analog inputs, SPI, I2C, UART, and PWM outputs -- are all exactly where an experienced Arduino user would expect them to be.
What the Galileo tries to do is meld the ease of Arduino's hardware manipulation with the power of a fully operational Linux operating system. Most sketches written for Arduino Unos, Leonardos, and other boards can be ported directly over to the Galileo. You still have access to popular Arduino libraries like SD, Ethernet, WiFi, EEPROM, SPI, and Wire, but you can also access the Linux side of the board with system() calls. The Linux half of the board supports stuff like Python, Node.js, SSH, Telnet, and all sorts of other, fun Linux stuff.
Covered In This Tutorial
This tutorial will provide a rundown of every step required to get your Galileo up and running. From sitting there, blinky-less on your desk, to running an Arduino sketch and interacting with a Linux terminal. In all, we'll cover:
- Board Overview -- An overview of the components and connectors on the Galileo.
- Software Download/Setup -- How to download and install the Arduino software specifically written for Galileo.
- Driver Installation -- Installing the Galileo drivers on Windows, Mac, and Linux.
- Updating Firmware -- How to update the low-level firmware on the Galileo, using the Arduino IDE.
- Uploading Blink -- How to upload your first Arduino sketch to the Galileo.
- Using the Terminal -- How to use the terminal, and interact with the Galileo's Linux half.
- Installing the "Bigger" Linux Image -- Why you'd want to use the "bigger" Linux image, and how to install it.
Required Materials
- Galileo Board -- The star of the show! The Galileo product should include both a 5V/3A power supply and a micro-B USB cable.
- µSD card -- This is required if you want to use the bigger Linux image. The card should be bigger than 1GB and no larger than 32GB.
Suggested Reading
Before delving into this tutorial, there are a few concepts you should be familiar with, including:
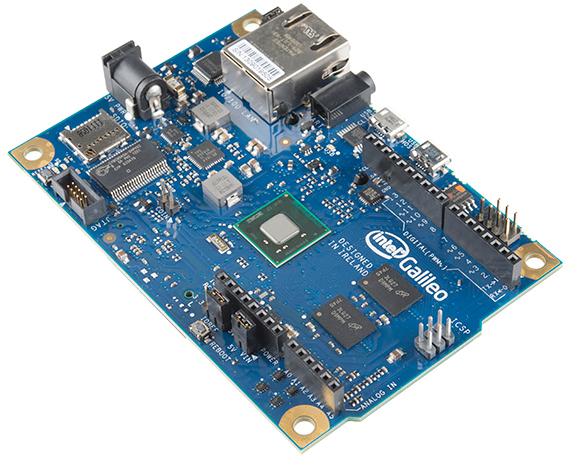
Board Overview
Here's an overview of the connectors and parts surrounding the Quark processor to form the Galileo board:
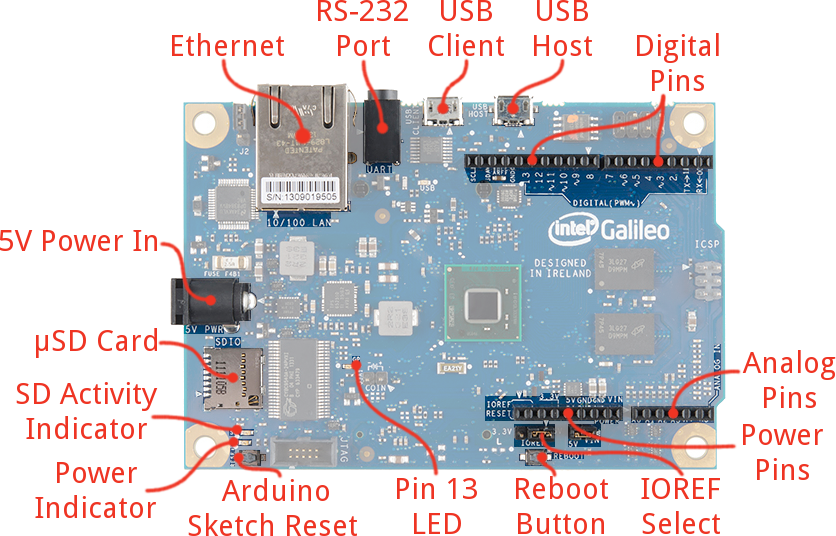
The top side of the Galileo is where the vast majority of the action is, including:
- Ethernet -- Connects the Galileo up to any 10/100 Mb/s LAN.
- RS-232 Port -- In a weird, 3.5mm "stereo" jack form factor. The sleeve is ground, ring is TX, and tip is RX. With the proper cables, this can be used to access the Linux terminal.
- USB Client -- Connect this to your computer to program the Galileo with Arduino.
- USB 2.0 Host -- This supports an interface with USB devices like keyboards, mass storage, etc. With a USB hub, up to 128 devices can be connected to this port.
- Standard Arduino connectors:
- 8-pin power header (3.3V, 5V, GND, Reset, etc.)
- 6-pin analog input header (A0-A6)
- 8-pin digital I/O header (D0-D7), which includes UART on pins 0/1, PWM on pins 3, 5, and 6
- 10-pin digital I/O header (D8-SCL), which includes I2C pins and PWM on pins 9, 10, and 11.
- 2x3-pin ICSP header breaks out SPI pins.
- Reboot Button -- Pressing this button will reboot the entire Galileo -- Linux included. Boot time is about 30 seconds, so don't press this accidentally!
- Pin 13 LED -- As with most Arduinos, the Galileo ties a small, on-board LED to pin 13. Great for the Blink sketch!
- Arduino Reset Button -- This will restart solely the Arduino sketch running on the Galileo. This button acts much more like the reset button you may be used to.
- µSD Card -- The Galileo supports up to 32GB SD cards. You'll have to use this socket if you hope to boot the Galileo off the "bigger" Linux image.
- 5V Power In -- This is a center-positive, 2.1mm barrel jack for a clean, regulated 5V supply. The power supply should be included with your Galileo.
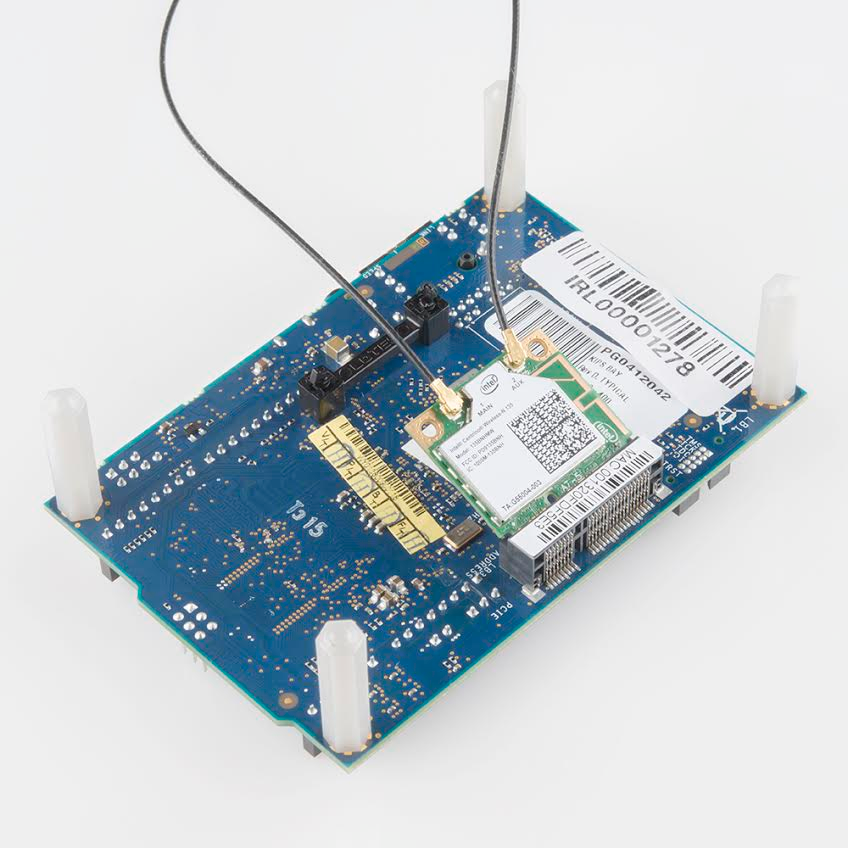
Flip the Galileo over to find the one highlight on the bottom side of the board: the mini PCIe (Peripheral Component Interconnect Express) socket. This socket is most useful for attaching WiFi cards to give your Galileo easy, wireless network access.
Powering the Galileo
The Galileo can (supposedly) be powered via USB (on the Client port), but Intel recommends against that. Instead, the board should be powered through the barrel jack, using a regulated 5V DC power supply.
The Galileo includes a "universal" wall adapter, which should work for just about anyone. If you're using your own supply, make sure it can supply up to 3A. And remember that 5V is the max and min on that supply input. Don't throw a 9V or 12V wall adapter on there and expect the magic smoke to stay inside.
The Intel(R) Quark SoC X1000
The heart of the Galileo is the stylish Quark SoC X1000 processor. This is a 32-bit processor built on the x86 architecture. The Quark X1000 features:
- Up to 400MHz clock speed
- 16KB L1 Cache
- 512KB SRAM
- Single core, single thread
- Integrated SDIO, UART, SPI, USB, I2C, Ethernet, RTC
The Quark X1000's focus is embedded computing -- wearable devices, Internet of Things, autonomous vehicles, or all sorts of other applications. It's intended to be a low-power, x86-based option for that variety of projects.
Architecture: x86 vs ARM
The Quark X1000 is an x86, which makes it unique in today's single-board computer market. Most popular SBCs -- including the Raspberry Pi, Beaglebone Black, and pCDuino -- are all driven by ARM-based processors. x86 processors are usually used in desktop computers, running Windows or OS X, because they're faster and more powerful. ARM processors, on the other hand, are more often used in portable electronics because they're more power-efficient.
ARM and x86 differ at fundamentally philosophical level: the size of their instruction set. ARM is a RISC (Reduced Instruction Set Computing, a smaller, simpler instruction set) architecture and x86 processors are CISC (Complex Instruction Set Computing, a more complex, and powerful set). Something that takes an x86 one clock cycle, might take an ARM processor three. A large instruction set requires more hardware, which requires more power to run.
Intel's Atom and Quark products try to combat the high power consumption. They're directed at the mobile market. But they're still x86 architectures, and they'll still consume more power.
Software Download/Setup
On this, and the next few pages, we'll overview the steps that you'll need to follow in order to upload Arduino code to the Galileo. As usual, it all starts with downloading software. Unfortunately, the Galileo won't work with the standard Arduino IDE (integrated development environment), so we'll have to download and install a specialized version.
Download the Arduino IDE for Galileo
The Arduino Galileo is so wildly different from any other Arduino platform -- it's x86-based, and most commands are sent via the Linux terminal. As such, an entirely re-purposed version of the software is required to upload an Arduino sketch to the board. Click the link below to download the Galileo-ized Arduino IDE:
Download Arduino for Galileo
Make sure you grab the option that matches your operating system -- there are versions available for Windows, Mac OS X, and Linux (32 or 64-bit).
The download is about 100MB, and comes as an archived (zip or tgz) file. The next step, "installing", amounts to unzipping the folder properly.
Install the Arduino IDE for Galileo
Both Mac and Windows versions of the IDE software are delivered in a ZIP format. You'll need to unzip that archive in order to use the software, but be careful where and how you unzip it!
Windows Install
Windows users should unzip the file to the top directory of your drive (e.g. C:/). You can leave the unzipped directory as named (arduino-1.5.3), or rename it to something descriptive, just make sure there are no spaces in the name of the directory.
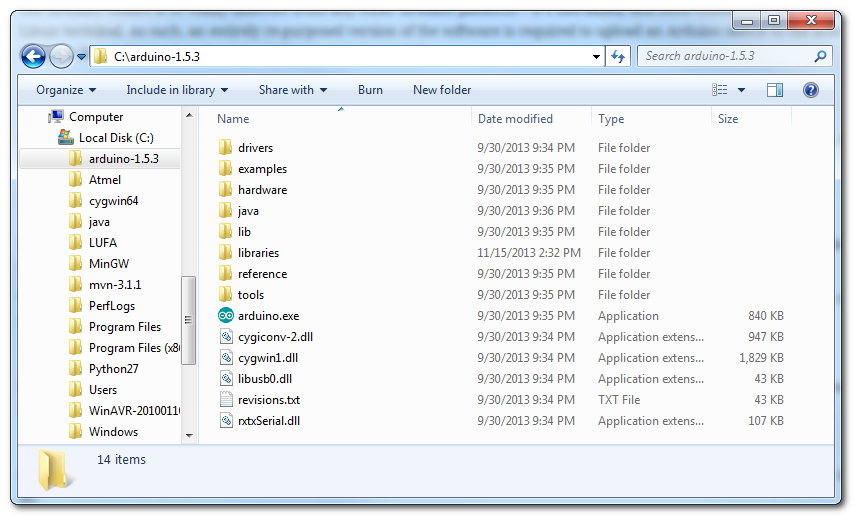
Double-click, or run Arduino.exe to open up the Arduino IDE for Galileo.
Mac OS X Install
Mac users should unzip application and move it into your Applications folder. You can rename the application (to differentiate it from any other Arduino installs), but make sure there are no spaces in the name.
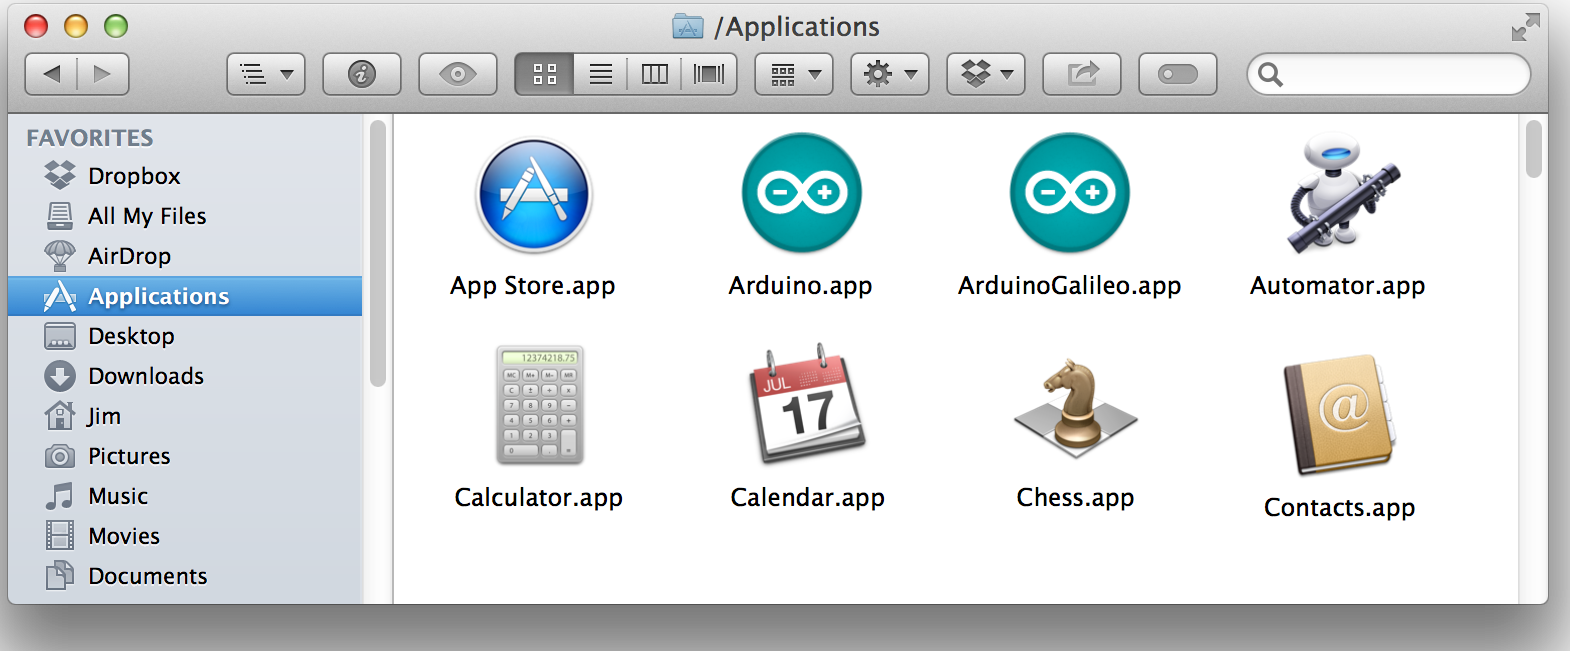
Double-click your newly downloaded Arduino application to run the IDE.
Linux Install
Linux users need to use the tar tool to extract the tar.gz file. A command like tar -zxvf arduino-1.5.3-linux32.tar.gz should do.
It's also necessary to disable the modem manager on most Linux distributions, to enable uploading to the board. This will vary by distro, but something like sudo apt-get remove modemmanager will work.
Once installed, run the arduino file in the extracted directory. From a terminal, you can enter ./arduino to run it.
Driver Installation
Once you've downloaded and installed the software, the next step is to connect the board and install drivers. This process differs on each operation system, follow the directions below that pertain to your OS:
Windows Driver Install
- Connect a 5V power supply to the Galileo. (The USB port alone cannot supply enough power to run the Galileo.)
- Connect a micro-B USB cable from the Galileo's USB Client port to an available USB socket on your computer.
- Upon connecting the board, Windows will automatically attempt to install the driver and, unsurprisingly, it will fail. We'll have to manually install the driver.
- Open up the Device Manager. (Either Start > Run > devmgmt.msc, or go to the Control Panel, select System and click Device Manager.)
- Locate the Gadget Serial v2.4 device, under the Other devices tree. Right-click that and select Update Driver Software...
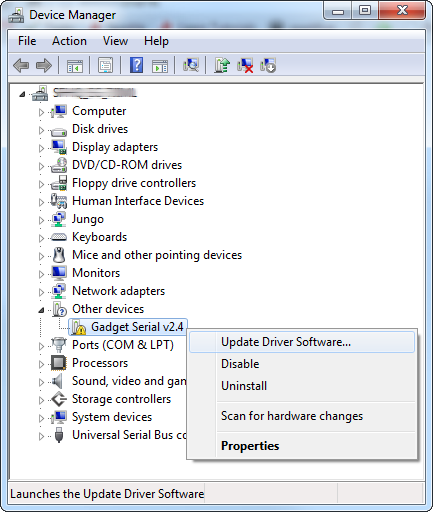
- On the first window that pops up, click Browse my computer for driver software. And on the next page select Browse... and navigate to the
hardware\arduino\x86\toolsfolder within your Arduino Galileo software installation. Then click Next.
- Click Install on the next Windows Security window that pops up. And, after a number of loading-bar-scrolls, the installation should complete and you should be greeted with a Windows has successfully updated your driver software window.
- Look back at the Device Manager, under the Ports tree now. There should be an entry for Galileo (COM #). Remember which COM # your Galileo is assigned, it'll be important for Arduino sketch uploading and the next step, updating firmware.
Mac OS X Driver Install
Mac has built-in driver support for the Galileo, so this setup should be easy. Follow the steps below to install the board on your machine:
- Begin by connecting 5V power to the Galileo.
- Then connect a micro-B USB cable from the USB Client port on the Galileo to an available USB socket on your computer.
- Wait a few seconds while the Galileo boots up. To verify the Galileo has enumerated properly, open the System Information window (Hold Option > Click the Apple menu in the top left > Click System Information), and check under the USB tab for a Gadget Serial v2.4 entry.
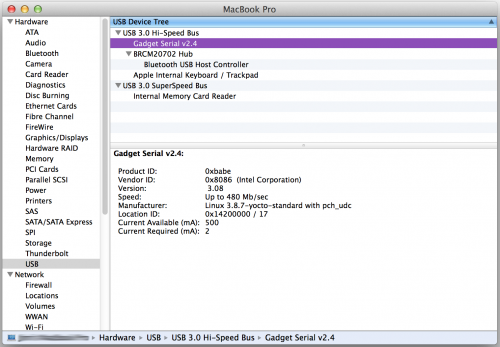
- You can also check under the Network tab to find the Device Name of your Galileo. It should be something like usbmodemXXXX. Keep that name in mind as we go to the next step, updating firmware.

Linux Driver Install
Like Mac, drivers are not necessary to use the Galileo with Linux. Follow the steps below to install the board:
- Connect 5V power to the Galileo (before connecting USB).
- Connect a micro-B USB cable from the USB Client port on the Galileo to an available socket on your computer.
- Open a terminal and type
ls /dev/ttyACM* - Take note of the port number that the Galileo is assigned to, you'll need that when you upload code to the board.
Updating Firmware
Updating the Galileo firmware is a good first step to take after driver installation. It helps to prove that your software and drivers are set up correctly, and it prepares your Galileo board with the most up-to-date firmware available. Follow the steps below to update your Galileo board's firmware.
Step 1: Reboot the Galileo (No SD Cards!)
To reboot the Galileo, first unplug the USB cable. Then unplug the 5V adapter from the board. If there is an SD card in the Galileo, remove it before powering the board back up.
To power the board back up, make sure you plug the 5V cable in first, then plug in a USB cable into the USB Client port.
Step 2: Set Up the Arduino Galileo IDE
Open up the Galileo-specific Arduino software you downloaded earlier. Mac users can double-click the application file, Windows users should run the Arduino.exe file at the top level of the unzipped folder.
Serial Port Selection
Double-check that the title of the Window has Arduino 1.5.3 at the top. Then the first step is to select the serial port. Go to the Tools menu, then hover over Serial Port. On a Windows machine, select the COM port you saw earlier in the Device Manager. On a Mac machine, select the /dev/cu.usbmodemXXXX (make sure it's the cu option) that matched what you found in the System Information panel.

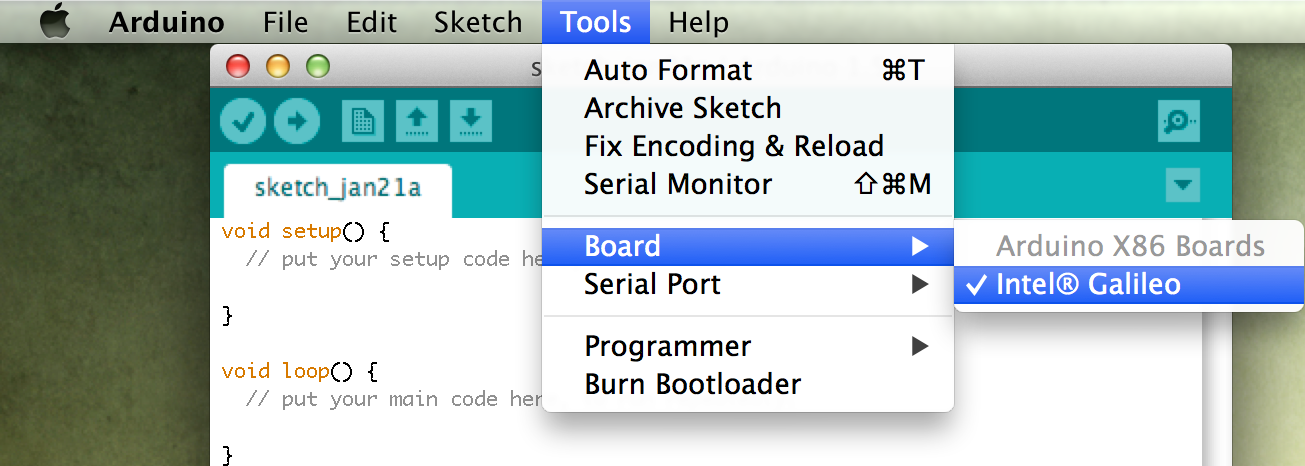
Board Selection
Under the Tools > Board menu, make sure Intel (R) Galileo is selected. (Not that you have any other choice.)
Step 3: Firmware Update
Last, but not least, to update the board firmware go to Help > Firmware Update. Then click Yes to proceed.
The software will attempt to communicate with your board, and read the current version of the firmware. On the next window that pops up, select Yes to acknowledge that you'd like to upgrade the firmware, and the process will begin.
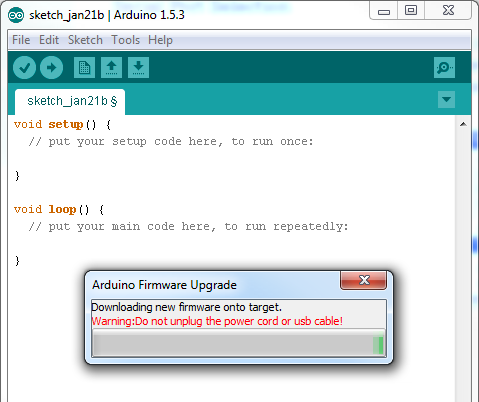
While the progress bar zooms across your screen, make sure you don't unplug either power or USB from the Galileo. As the pop-up says, the update procedure will take about five minutes. A Target Firmware Upgraded Successfully pop-up will appear after the update completes.
Uploading Blink
As always, the first program to be uploaded to a board is the "Hello, world" of microcontrollers - Blink.
To open the Blink example, go to the File > Examples > 01.Basics > Blink.
language:c
/*
  Blink
  Turns on an LED on for one second, then off for one second, repeatedly.

  This example code is in the public domain.
 */

// Pin 13 has an LED connected on most Arduino boards.
// give it a name:
int led = 13;

// the setup routine runs once when you press reset:
void setup() {
  // initialize the digital pin as an output.
  pinMode(led, OUTPUT);
}

// the loop routine runs over and over again forever:
void loop() {
  digitalWrite(led, HIGH);   // turn the LED on (HIGH is the voltage level)
  delay(1000);               // wait for a second
  digitalWrite(led, LOW);    // turn the LED off by making the voltage LOW
  delay(1000);               // wait for a second
}
Make sure the Serial Port and Board selections are still correct (check the Updating Firmware page for help). Then click the Upload button.
After the upload completes, you should see a tiny, green LED blinking on and off every second. This LED is connected to pin 13 of the Galileo.
Troubleshooting
If you're having any trouble uploading code, or even updating the firmware, here are a few of the hiccups we encountered, and how we fixed them.
In general, if you're having any trouble, try rebooting your Galileo (unplug everything, wait a few seconds, plug back in, wait for the boot-up to complete) to see if it fixes it. If that doesn't work, try rebooting your computer. Sometimes the magic reboot fixes everything.
Improper File Name (Mac)
On Mac, if you get an error like this:
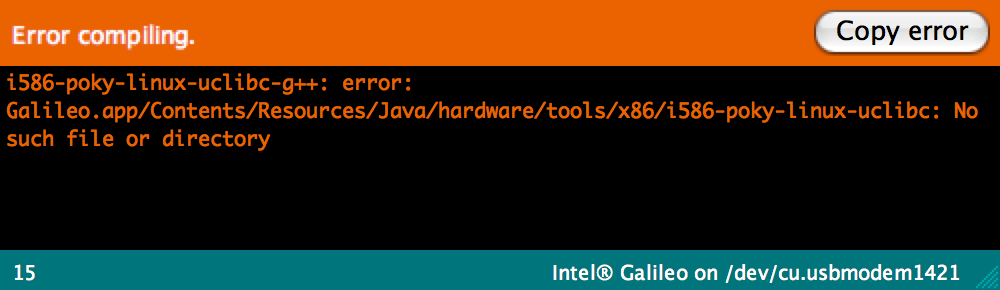
i586-poky-linux-uclibc-g++: error: Galileo.app/Contents/Resources/Java/hardware/tools/x86/i586-poky-linux-uclibc: No such file or directory There may be a problem with the name of your application. Make sure there are no spaces! For example, if your application is named "Arduino Galileo", rename it to "ArduinoGalileo".
Bad COM Port (Windows)
On Windows, if your upload hangs, eventually producing this error:
line 34: /dev/ttyS78: Read-only file system Your COM port number may just be too high. You can reassign the COM port by going to the Device Manager, then right-click on your Galileo device and select Properties. Next, go to the Port Settings tab and click Advanced.... In this window, click the COM Port Number drop-down, and assign the Galileo to a COM port that's less than 10.
After you've done that, reboot your computer and try uploading again.
Any other trouble uploading? Contact our tech support team or leave a comment in the discussion thread here, and we'll be happy to help!
Using the Terminal
What makes the Galileo truly unique is the fact that it has Linux running under the hood. You can interact with the Linux OS through the terminal, executing simple commands through a command-line interface. In comparison to uploading Arduino sketches, interacting with the Linux command line is a much more advanced skill, but this is as good a place as any to start learning.
There are two different ways to connect to the Linux terminal: over the 3.5mm stereo jack RS-232 port or over USB. The former requires a special cable (or two), and the latter requires you to upload a special Arduino sketch. We'll cover both on this page, there are pros and cons to each approach.
Both of these methods require that you have a terminal emulator installed on your computer. Check out our Serial Terminal Basics tutorial for our recommendations.
RS-232 Terminal
This method is safer, and easier, but it does require that you have some extra cables. The terminal interface on the Galileo is a 3.5mm stereo jack, like what you might plug headphones into. The three contacts on this connector break out ground, RX and TX. A specialized 3.5mm to DB9 RS-232 cable can help move the interface to a more common connector, and (assuming your computer doesn't have an archaic serial port) you may need a RS-232 to USB cable on top of that to interface the board with your computer.
Once the board is connected to your computer, open up a serial terminal program (like Tera Term for Windows or Cool Term for Mac). Set the serial port number, and change the baud rate to 115200 bps.
Check out the section below if you're not sure what to do with Linux.
Custom Arduino Sketch
If you don't have the weird 3.5mm RS-232 interface cables, never fear! You can upload an Arduino sketch to access the Linux terminal.
One warning here: this sketch does mess with some of the basic workings of the Galileo. You won't be able to upload another Arduino sketch unless you reset the board or run the few lines at the end of this section.
Copy the code below into your Arduino IDE. Then upload just as you did the Blink sketch. This is a slightly modified version of the code found in Intel's example code samples.
language:c
void setup()
{
  system("cp /etc/inittab /etc/inittab.bak");  // Back up inittab
  // Replace all "S:2345" with "S0:2345"'s (switching serial ports):
  system("sed -i 's/S:2345/S0:2345/g' /etc/inittab");
  // Replace all "ttyS1" with "ttyGS0"'s (switching serial ports):
  system("sed -i 's/ttyS1/ttyGS0/g' /etc/inittab");
  // Replace all "grst" with "#grst"'s to comment that line out:
  system("sed -i 's/grst/#grst/g' /etc/inittab");
  // Replace all "clld" with "#clld"'s to comment that line out:
  system("sed -i 's/clld/#clld/g' /etc/inittab");
  system("kill -SIGHUP 1");
}
void loop()
{

}
Once that's uploaded, you'll need to open up a separate serial terminal program (not the Serial Monitor). Set the serial port to the same as your Galileo, and set the baud rate to 115200. See the below section for help using Linux.
Once you're done using this version of the serial terminal, send this trio of commands to revert back to "Arduino mode":
language:c
rm /sketch/sketch.elf
cp /etc/inittab.bak /etc/inittab
kill -SIGHUP 1
Those will remove your terminal "Arduino sketch", revert back to the old init procedure, and reboot the init process. Your Galileo will revert back to the way it was, and you can upload an Arduino sketch once again.
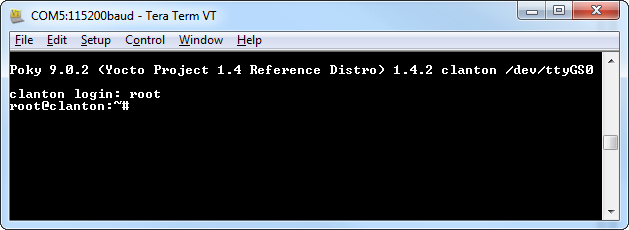
Using the Linux Terminal
When you first open your Linux terminal, press enter. You'll the be prompted to log in, use the user name root (no password, by default). Welcome to the shell!
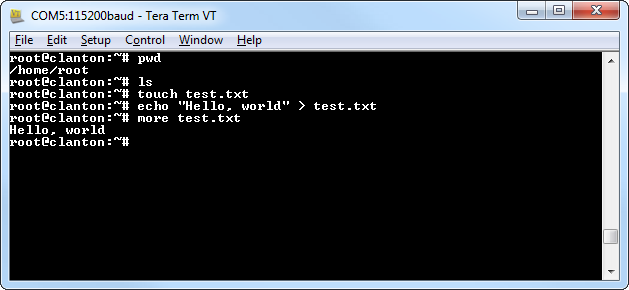
From here, the you can perform a variety of basic Linux commands. You can list directory contents with ls. Navigate directories with cd. Make directories with mkdir or create files with touch. There are, of course, more advanced Linux utilities to discover as well.
There are a wide range of Linux commands made available to the Galileo. For help discovering them check out these resources.
If you're feeling handicapped by some of the Linux commands that may be missing, check over to the next page, where we'll install the "bigger" Linux image. The bigger Linux image boots the Galileo off an SD card, and provides access to useful tools like SSH, Python, node.js, and OpenCV.
"Bigger" Linux Image
With the on-board flash memory, the Galileo has a limited amount of space to store its Linux kernel. As such, the default Linux image is a bit gimped in terms of extra features. But with an SD card, we can boot the Galileo off a bigger Linux image, which provides access to the following:
- WiFi drivers -- The Galileo supports all Intel-chipset WiFi cards with these drivers. Plug them in, and they should be recognized immediately.
- Python -- Python is our favorite when it comes to scripting languages. With Python you can easily post to Twitter, check for unread emails, and perform all sorts of other nifty tricks.
- Node.js -- Node.js is a popular JavaScript-based scripting language. A good alternative to Python, if you're more comfortable with JS.
- SSH -- Secure Shell (SSH) is an incredibly useful network tool that allows you to log into and control a device remotely. With SSH running on your network-connected Galileo, you can skip both of the terminal methods described on the last page, and remotely control the board from any device on the network.
- openCV -- OpenCV is an open-source computer vision application. You can plug a USB webcam into the Galileo's USB host port, and use OpenCV to track and recognize objects.
- ALSA -- Advanced Linux Sound Architectures (ALSA) can equip your Galileo (and an attached sound card) with the ability to play and record MIDI files.
- V4L2 -- Video4Linux2 is a video record and play utility for Linux. You'll need a USB webcam attached to your Galileo to make use of this.
Installing the Bigger Image
To boot the Galileo off the bigger Linux image, you'll need an SD card that is at least 1GB (and less than 32GB). You'll also need to download the bigger image from Intel's Drivers page (find the most current file there). The file is about 37 MB.
The download comes as a 7z file, which means you may need extra software to extract it. Windows and Linux users can use 7Zip, Mac users can use The Unarchiver.
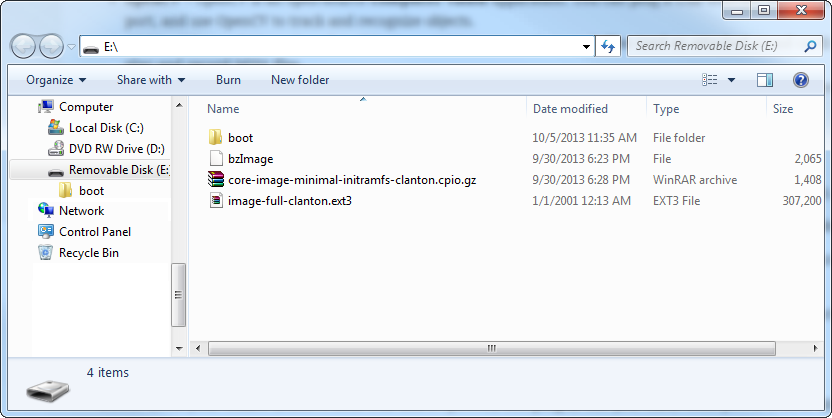
Extract the contents of the 7z file to the top level of your SD card. Once unzipped, this is what your SD directory structure should look like.
Power down your Galileo (remove both USB and 5V power), and plug in the µSD card. Then power it back up.
The first boot may take a little longer than average. You can use the terminal to verify that the bigger image is working. Try running Python, for example:
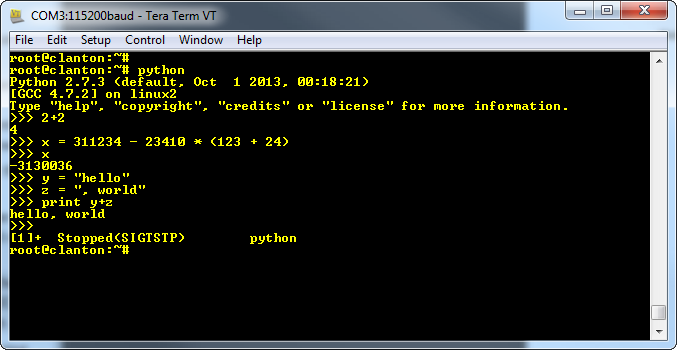
Python and the other utilities enabled by the bigger image allow the Galileo to do some really neat stuff. There are all sorts of applications where Python fits right in. Check out our unread email checker as an example.
Resources and Going Further
If you've gotten this far, you should be prepared enough to start designing your own Arduino/Intel(R) Galileo project. If you need a bit more, here are some of the resources we've found handy in experimenting with the board:
- Galileo Community Forum
- Intel's Galileo Getting Started Guide
- Galileo Software Downloads
- Nifty Galileo Arduino Examples
- Galileo Schematics
- Galileo Board Design Files
Going Further
If you're looking for a little project inspiration, or just need more tutorials to devour, here are some related tutorials we'd suggest checking out:
- Galileo Experiment Guide -- This guide offers 16 different experiments to get you started with the Galileo, much like our popular SparkFun Inventors Kit.
- Galileo Unread Email Checker -- A simple Galileo-based project which uses an OpenSegment Shield to show how many unread emails you have.
- Raspberry Pi Twitter Monitor -- This is a project that could easily be ported over to the Galileo -- a Python-running, Twitter-reading, LED blinker.
- Getting Started with Raspberry Pi: Setting Up Raspbian -- If you want to continue on your Getting Started Guide bender, check out this tutorial on getting the Raspberry Pi running the most popular distro out there.
- pcDuino Crowdsource Kiosk -- How to make a crowdsource kiosk with the pcDuino, another popular single-board computer alternative.