pcDuino Crowdsource Kiosk
 Nick Poole
"Will Work 4 Candy"

When I was tasked with building a project that showcases the pcDuino development board, I was stumped at first. This little board is so capable that it's kind of like being asked to do a demonstration on how you'd use a desktop PC. I knew the feature that would set the pcDuino apart is the ease with which it will interface with hardware, and I also wanted to incorporate some kind of software interface. I thought it would be best to build a vending machine. But paying in money is boring, what if I could get people to pay in work?
Thus the pcDuino Crowdsource Kiosk was born. Simply step up to the machine, complete a few pop-up forms, and you'll be rewarded with a bite of chocolaty goodness! There are a few main components to this build so I'll walk you through each piece. The best thing about the Crowdsource Kiosk is that you can program it for any task that needs to be done, and as long as you have enough chocolate (and enough chocolate addicts), you're bound to get results!
Suggested Reading
Before diving into this project tutorial, you may want to familiarize yourself with the concepts below if you aren't already.
The Chocolate Dispenser
I started in on this project by designing a gravity fed hopper that can dispense Hershey's Minis one at a time. I chose Hershey's Mini bars because they're small and relatively uniform in size.
Whenever I'm designing a piece of hardware, I start by playing around in SketchUp. Here are the drawings I made:
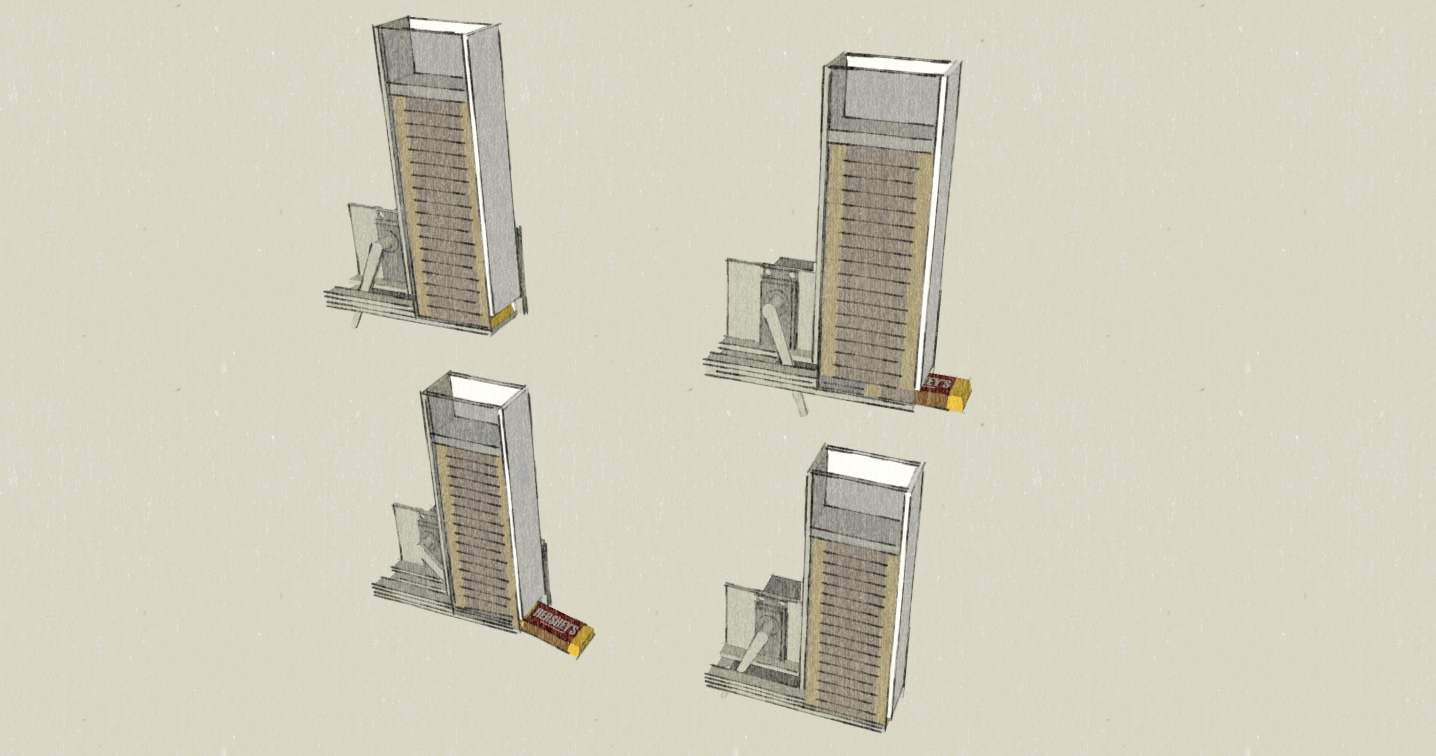
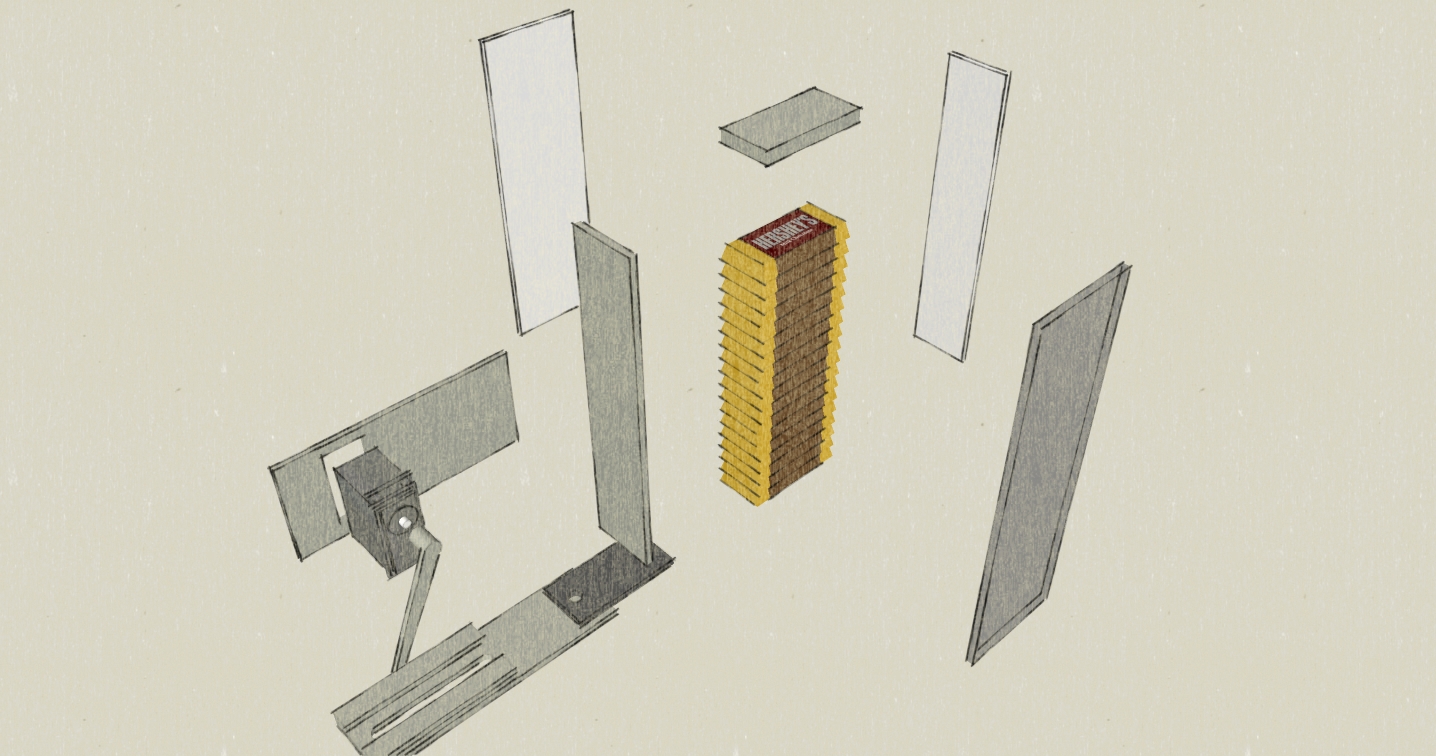
A servo driven solution seemed to be the most robust approach. My design incorporates a card-shaped pusher moving inside a channel to eject the bottom chocolate bar on the stack. As the servo sweeps counter-clockwise, the push-card slides a chocolate bar through an opening in the front of the hopper. When the servo sweeps clockwise, the card returns to its home position behind the hopper, and the stack of chocolate is allowed to fall in the hopper, thus resetting the mechanism.
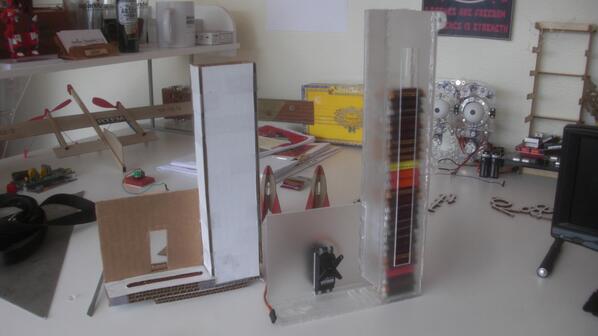
It seems straight-forward enough, but before I invested any material in it, I built a prototype out of cardboard. There were some hiccups in translating from cardboard to a more rigid material (in this case: acrylic) but it worked great! Here's a picture of my cardboard prototype and my final acrylic components side-by-side:
The servo based mechanism ended up being extremely reliable. Unfortunately, because of operating system restrictions, the same cannot be said of the pcDuino servo library. To remedy this situation, I decided to take the burden of pulsing the servo off of the pcDuino and incorporated a SparkFun RedBoard into my dispenser. The code on the RedBoard is really simple: As soon as a particular pin was pulled low, it would sweep the servo one direction, delay a few milliseconds, and return the servo to its start position. All the pcDuino needs to do now is pull that RedBoard pin low to dispense chocolate!
Before we jump into the pcDuino side of things, let's talk about how this whole thing will be enclosed...
The Kiosk
I took my inspiration for the enclosure from things like airport information kiosks. Modern information kiosks are essentially just free-standing computers with all of the important bits hidden. Using the pcDuino as my computer gave me a lot of freedom in designing this thing, since it's small enough to be easily concealed. For the monitor, I chose our 7" LCD Monitor since it connects easily to the pcDuino and is also very lightweight.
I opted for MDF as my material, both because it's inexpensive and because it presents a smooth surface for finishing. I picked up a 4x8' sheet of MDF at the local hardware store and dragged it back to the shop. I just needed an upright panel in which to mount the monitor, a shelf for a keyboard and a base that was sturdy enough to keep it from tipping over. I went for the simplest possible shape, an upside-down "T" with some braces to keep it rigid.
Everything was assembled with screws and woodglue. A steel angle was used to hang the keyboard shelf and give it some reinforcement. Acrylic bezels were cut for the monitor and chocolate dispenser. I disassembled the monitor and pulled the LCD screen out so that I could mount it flush to the front of the kiosk.
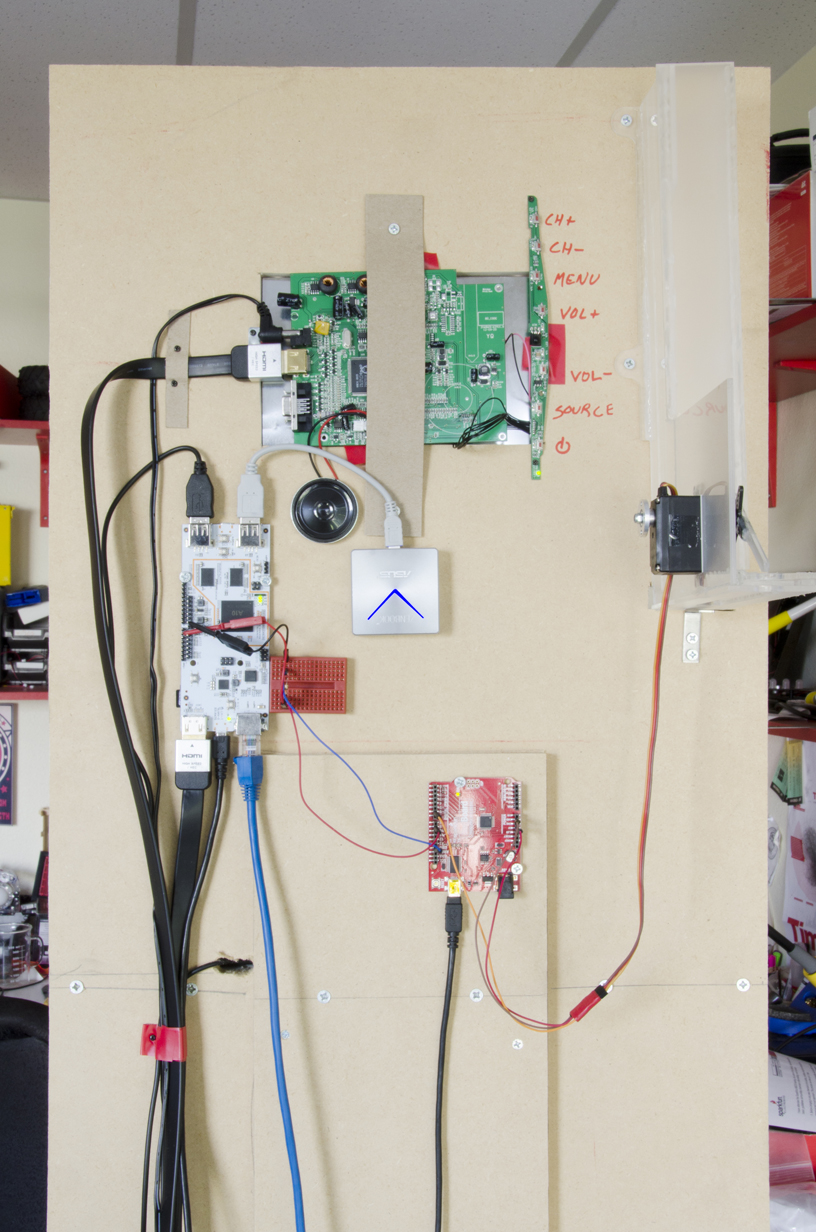
Once everything was mounted along the back of the board, it needed to be powered. Since I didn't want to take up every outlet in the room, I went ahead and threw in a power strip. After all, the Redboard, the pcDuino, and the LCD monitor all have separate plugs.
Since it was going to live in the (semi)controlled environment of the office, I decided the kiosk didn't need a protective cover on the back to prevent tampering. I did, however, use some handy foam double-stick tape to attach the keyboard in place.
Finally, everything got a coat of white paint and a SparkFun stencil. MDF does not like to take paint, it soaks it right up, so it would probably make more sense to laminate it with something like a vinyl wrap. Ain't nobody got time for that, so I just kept throwing paint at it.
The Interface: Learning Python
After completing the hardware portion of the build, I went on to tackle the software portion. The GUI for the kiosk would need to meet a few basic criteria:
- Easy to Navigate
- Capable of Saving a Form to a File
- Difficult to Exit
- Difficult to Hack (Form Injection Attacks, etc.)
- Cross-Platform (So I can develop on my Windows machine)
I needed a language or tool that would make this GUI (relatively) painless to assemble. I haven't done any not-Arduino programming since... um... BASIC? So it's about time I learned a new language, and I knew just the one I needed: Python.
Why Python? Because Python can do anything. Well, okay, not anything but it is a very nice language for 'banging out' a quick app. There's also a huge collection of libraries available to hook Python into all kinds of things. Not to mention it's cross-platform so I could do all of the development on my Windows machine and load that same script on the pcDuino with no problems.
Sometimes the best way to learn a new programming language is to just jump into your project with both feet. Find some libraries that you think you'll need, open all of the example code, and start taking it apart. If you read a script start to finish, using Google to look up anything you don't understand, you'll have a working understanding of the syntax and methods by the end. From there it's just the same old grind: write, run, get error, debug. Although if you're just moving to Python from C it's more like: write, run, 'really, that worked, huh?'
I started by grabbing easyGUI, an aptly named library for Python that plugs into TkInter (a python binding to the Tk GUI kit) and makes it super easy to display and navigate simple forms. You can do everything I did without easyGUI, but it won't be as easy... GUI...(Where am I?)
It's also very easy to control the pcDuino GPIO from Python. Essentially you're just opening a file and changing a value, it really is that easy. I copy/pasted some code from an example, which puts some definitions at the top of the script allowing you to use HIGH, LOW, INPUT, OUTPUT, etc without having to remember what value represents each.
I'll go ahead and post my code below in chunks (not necessarily in written order but in functional order) then try to explain each bit for the benefit of anyone who isn't familiar with Python. I should warn anyone who is familiar that I usually code in C so my Python isn't very... Pythonic? It does work, though.
Okay, so we have to do a little bit of setup first:
language:python
import easygui as eg
import time, os

# patch rootWindowPosition
eg.rootWindowPosition = "+180+20"
Well that shouldn't be too scary for the Arduino programmers. Just importing a few libraries, the same way you'd use "include". I've already explained the easyGUI library, but the time library just gives me the ability to put delays in the code.
The ugly bit there about a patch is something I stole from a piece of example code to set the window position of my GUI. I was having trouble with my window manager just plopping it down wherever it wanted to, whether everything was on screen or not. The # denotes the start of a comment in Python, by the way.
The next thing to do is to ready the GPIO!
language:python
GPIO_MODE_PATH= os.path.normpath('/sys/devices/virtual/misc/gpio/mode/')
GPIO_PIN_PATH=os.path.normpath('/sys/devices/virtual/misc/gpio/pin/')
GPIO_FILENAME="gpio"

pinMode = []
pinData = []

HIGH = "1"
LOW =  "0"
INPUT = "0"
OUTPUT = "1"
INPUT_PU = "8"

for i in range(0,18):
    pinMode.append(os.path.join(GPIO_MODE_PATH, 'gpio'+str(i)))
    pinData.append(os.path.join(GPIO_PIN_PATH, 'gpio'+str(i)))

for pin in pinMode:
    file = open(pin, 'r+')  ## open the file in r/w mode
    file.write(OUTPUT)      ## set the mode of the pin
    file.close()            ## IMPORTANT- must close file to make changes!

for pin in pinData:
    file = open(pin, 'r+')
    file.write(LOW)
    file.close()
All of that was also stolen from an example script. It basically tells Python where the GPIO control pin files are kept on the pcDuino. Then it defines terms like HIGH and INPUT, and then it uses a series of "for" loops to set the GPIO pins to a known state.
If you're an Arduino programmer then you've probably noticed something crazy by now: there aren't any semicolons! Or curly brackets! Has the world gone mad?? Well, yes, but not for lack of punctuation. Python is dictated by indentation. Code blocks are separated by the level of their indentation.
Okay, we're all done with setup. Let's get something on screen:
language:python
while(1):

    mainTurk()

def mainTurk():
    x = str(eg.buttonbox("", title="Chocolate Turk", image="screen1.jpg", choices = ["Gimme Candy!", "Why?"]))

    if x == "Why?":
        msg = "Chocolate Turk is a Mechanical Turk problem-solver that rewards people with chocolate! \n \n It was built using the pcDuino as a demonstration of the device's capabilities. The control software and interface were programmed in Python with help from the EasyGUI and PIL libraries. \n \n A tutorial on how this project was completed will be made available on the SparkFun Learn site. \n \n Why not give MarComm a hand in advertising? There's chocolate in it for you ;) \n \n Imagined and Executed by: Nick P. \n \n"
        title = "About Chocolate Turk"
    choices = ["Return","Kill Program"]
        killer = eg.buttonbox(msg, title, choices=choices)

        if killer == "Kill Program":
        sys.exit()
    else:
        pass
    else:
        chocoturk()
"Whoa, whoa, whoa... what?" I know, if you're an Arduino programmer, this can look like a mess at first. No worries, we'll step through it. First of all, I start while(1) loop so the kiosk program will keep running over and over. The next line is a call to eg.buttonbox (if you'll remember we imported easyGUI as "eg") which is a method in easyGUI which creates a dialog box with some buttons. This is one line of condensed code, so it's a little strange looking, but one thing that will help you figure out what's going on is this: x will hold the value of the button that is pressed. If you're wondering where x came from, it didn't! We just made it up! That's right, in Python you don't have to declare a variable, you can just start using it and Python will figure out what you want to do with it.
Sequentially, what's happening is that I'm filling x with the string version of the value of the function call "eg.buttonbox". That function takes a few arguments: the title of the window, the name of the image I want to display, and the choices that I want available. When this string executes, a window called "Chocolate Turk" pops up with an image retrieved from screen1.jpg and two buttons labeled "Gimme Candy!" and "Why?". After one of the buttons is clicked, the function returns that choice to the str(), which "stringifies" it and stuffs it into x.
The next step is to test x. If x is equal to "Why?" (In other words, if the "Why?" button is pressed) then I pop up a screen explaining the project. Just to give you an expanded example I neglected to write this all on one line. You can see that I actually stuffed each variable before making the call to eg.buttonbox. I called the return variable "killer" because it's the only place in the program to kill it. Clicking the "x" on the window won't even do it, because I didn't write anything to handle that. This is a good thing, I didn't want people exiting the GUI on my kiosk.
The else statements afterward just handle what happens if you press "Gimme Candy!" which is, of course, it dumps into the next function, which looks like this:
language:python
def chocoturk():
    msg     = "Pick a product that you feel pretty familiar with:"
    title   = "Pick a card"
    choices = ["pcDuino", "IOIO-OTG", "SparkFun Inventors Kit for Arduino with Retail Case", "Makey Makey - Standard Kit", "LilyPad Arduino Simple Board", "Raspberry Pi - Model B", "9 Degrees of Freedom - Razor IMU", "RedBoard - Programmed with Arduino", "XBee Explorer USB", "EasyDriver Stepper Motor Driver"]
    choic   = eg.choicebox(msg, title, choices)

    if choic == None:
        return

    image   = "%s.jpg" % choic
    msg     = "Wanna write an ad for the %s?" % choic
    choices = ["Let's Do it!","Wait, go back!"]
    reply   = eg.buttonbox(msg,image=image,choices=choices)

    if reply == "Wait, go back!":
        return
    else:
    val=["","","",""]
        composer(choic, val)

    return
The first thing that I need the user to do is to pick one of our best-selling products, so I line them all up in what easyGUI calls a choicebox. I get a chance to be a little clever after the user picks a product. I saved a picture of each product using the name of the product as the filename. So when I went to retrieve the picture for the next window, I just popped ".jpg" onto the end of the answer from choicebox into the image argument for buttonbox.
I also gave the user a chance to change their mind if they wanted by returning out of the function. If they confirm that they want to continue then I drop into the next function, the composer function.
language:python
def composer(product, retainVal):
    msg         = "Write the AdWords copy for the %s \n \n Formatting: \n \n -Headline \n Limited to 25 characters. Links to the product page. \n \n -Description \n You get 2 lines of 35 characters each to describe a SparkFun product to a targeted shopper using Google search \n \n -Keywords: \n What 5 search terms or phrases when typed into Google, should return your ad? (comma-separated) \n \n" % product
    title       = "AdWords Composer"
    fieldNames  = ["Headline","Description Line 1","Description Line 2","Keywords"]
    fieldValues = [retainVal[0], retainVal[1], retainVal[2], retainVal[3]]
    fieldValues = eg.multenterbox(msg, title, fieldNames, fieldValues)

    if fieldValues == None:
        return

    if len(fieldValues[0]) > 25:
        eg.msgbox("You've got too many characters in your Headline. Pare it down.")
        composer(product, fieldValues)
    if len(fieldValues[1]) > 35:
        eg.msgbox("You've got too many characters in your Description (Line 1). Pare it down.")
        composer(product, fieldValues)
    if len(fieldValues[2]) > 35:
        eg.msgbox("You've got too many characters in your Description (Line 2). Pare it down.")
        composer(product, fieldValues)

    composereview(fieldValues, product)

    return
The composer function is pretty straight-forward. I just need the user to enter some text, this is the task that they're being rewarded for. If you hadn't figured it out by now, it's spelled out in the msg argument: We were trying to get people from outside our marketing department to write ad copy. Since these were theoretically going to appear as AdWords ads, they needed to conform to a certain format. I added some if statements that check the character length of each field before rewarding the user. If there were too many characters in a field, I'd let the user know which one and return them to the form. Finally, if they succeeded in filling out the form I gave them a chance to review what they had written beside a picture of the product:
language:python
def composereview(adcopy, prod):
    image   = "%s.jpg" % prod
    msg     = "Here's what you wrote about the %s: \n \n %s \n %s \n %s \n \n With the keywords: \n \n %s" % (prod, adcopy[0], adcopy[1], adcopy[2], adcopy[3])
    choices = ["Gimme Chocolate NAO!","Let me try again..."]
    reply   = eg.buttonbox(msg,image=image,choices=choices)

    if reply == "Let me try again...":
        composer(prod, adcopy)
    else:
        f = open('AdWordsDump.txt', 'a')
        f.write(prod)
        f.write('\n')
        f.write(adcopy[0])
        f.write('\n')
        f.write(adcopy[1])
        f.write('\n')
        f.write(adcopy[2])
        f.write('\n')
        f.write(adcopy[3])
        f.write('\n')
        f.write('\n')
        f.close()
        givethemthechocolate()
The "compose review" is a simple form that I populate with the answers passed from the composer and a picture of the product using the same name trick as in the product selection window. If the user decides that they like what they've written, I save it into a big .txt file where I store all of the info collected from the kiosk. Oh yeah, and I dump them into the final function:
language:python
def givethemthechocolate():

    file = open(pinData[6], 'r+')
    file.write(HIGH)
    time.sleep(1)
    file = open(pinData[6], 'r+')
    file.write(LOW)
    file.close()
    image   = "thanks.jpg"
    msg     = ""
    choices = ["Finish"]
    eg.buttonbox(msg,image=image,choices=choices)

    mainTurk()
In this function, I simply send the candy dispenser a HIGH pulse, handing over that sweet, sweet candy. I also show the user a thank you image and return to the homescreen.
Field Testing
The kiosk was strategically placed in a high traffic area of the building: The break room. With any luck, some portion of the people who dropped in for a frosty evening beverage would also be in the mood for a chocolate treat. I found an open outlet and placed the kiosk against a wall, started up my Python script and then walked away.
I decided that a quiet launch was the way to go, just let people discover it. That turned out to be perfect because just enough people messed with it for me to discover what needed to be tweaked. First of all, the screensaver was kicking in after 5 minutes and making people think it was turned off. After correcting that issue, I started noticing that the screen would be left at the composer form. They were so close to candy, what happened? I asked around and it turned out that one of two things was happening: Either they were entering too many characters into the form, getting an error message and returning to the composer to find their work erased OR they were actually making it to the candy screen, getting their candy and being inexplicably dumped back into the composer.
It took some fiddling to figure out what was going on and, to be honest, I'm not sure I have it entirely figured out. It's amazing how far off the beaten path people can get when they don't have the same top-down view of the program flow as you do. There are failure modes that you could never come up with yourself hiding just off that path. Often, the best way to test something is to just let people play with it.
I made a few software tweaks and then set it loose again. This time, things seemed to be going well, so I sent out a group e-mail informing people that the kiosk was just waiting to hand out delicious prizes in exchange for short work. I did end up getting some ad copy out of this exercise, but I also got a lot of junk and even the evidence of some clever exploit attempts...
Results
When the kiosk had sat for some two weeks in the break room I decided to call an end to the experiment and wheel the machine back to my office to unload the text file and have a look. It turns out that not everyone is cut out for the advertising business... I've collected a few of the more interesting responses here, in AdWords format, for your enjoyment:
First up, we have an impatient volunteer who seems to be fixated on the chocolate reward, rendering him/her incapable of actually finishing the ad:
>
Raspberry Pi - Model B
>
Raspberry Pi is da bomb
>
GIMME CANDY
>
I can has candy?
>
www.sparkfun.com/fakead
The next ad starts off fairly well-, if strangely-, written. It takes an interesting turn around line 3, however, when its Wonder Twin powers activate: shape of a poorly translated Chinese advertisement:
pcDuino
pcDuino runs Linux!
It's got brains AND beauty!
Linux for your pleasant life!
www.sparkfun.com/fakead
Here we have another ad that took off in the right direction and then went south, as it were:
pcDuino
Linux and Android Capable Single board computer
groin grabbingly good
www.sparkfun.com/fakead
This next ad is especially strange because the author seems to take this as an opportunity to poke fun at me. The puzzling part? This never happened, I have literally no idea where this story (of dubious possibility) even came from:
>
RedBoard - Programmed with Arduino
>
Nick P is a chucklehead!
>
He locked himself in his own car.
>
It was pretty funny.
>
www.sparkfun.com/fakead
I have to admit, I kind of like where this one went. Of all of the entries that I collected from the machine, this would be the one I'm most likely to run. There's something methodically comforting about the progression from one to two and eventually three exclamation points in the final line. That said, you're not likely to run into this ad in the wild:
>
SparkFun Inventors Kit for Arduino with Retail Case
>
Program your evil empire now
>
BUILD! PROGRAM!! CONTROL!!!
>
www.sparkfun.com/fakead
Finally, our very own Chris Taylor (or should I call him Bobby Tables?) decided to toss some SQL at my input form. Luckily, my program was literally too low tech to even care. There was no SQL database to play with, just an innocent txt file soaking up whatever bits came in from the form:
>
pcDuino
>
SELECT * FROM "name"
>
SELECT * FROM ""
>
SELECT * FROM "date"
>
SELECT * FROM *
So... it turns out that you can get people to technically do work for candy. Unfortunately there's really no way to control the quality of the feedback that you'll get. So what happens to the kiosk now? Will it sit in my office collecting dust? Of course it won't! Maybe I'll figure out a way for it to dispense other treats and send it back out into the breakroom to collect dirty jokes. Or maybe I'll turn it into a green information kiosk to display sustainability data. Whatever happens, I've learned a few things this time around that should help me keep it operational. And hopefully you've learned a few things that will help you exploit your friends' love of candy.