Galileo Getting Started Guide
This Tutorial is Retired!
This tutorial covers concepts or technologies that are no longer current. It's still here for you to read and enjoy, but may not be as useful as our newest tutorials.
"Bigger" Linux Image
With the on-board flash memory, the Galileo has a limited amount of space to store its Linux kernel. As such, the default Linux image is a bit gimped in terms of extra features. But with an SD card, we can boot the Galileo off a bigger Linux image, which provides access to the following:
- WiFi drivers -- The Galileo supports all Intel-chipset WiFi cards with these drivers. Plug them in, and they should be recognized immediately.
- Python -- Python is our favorite when it comes to scripting languages. With Python you can easily post to Twitter, check for unread emails, and perform all sorts of other nifty tricks.
- Node.js -- Node.js is a popular JavaScript-based scripting language. A good alternative to Python, if you're more comfortable with JS.
- SSH -- Secure Shell (SSH) is an incredibly useful network tool that allows you to log into and control a device remotely. With SSH running on your network-connected Galileo, you can skip both of the terminal methods described on the last page, and remotely control the board from any device on the network.
- openCV -- OpenCV is an open-source computer vision application. You can plug a USB webcam into the Galileo's USB host port, and use OpenCV to track and recognize objects.
- ALSA -- Advanced Linux Sound Architectures (ALSA) can equip your Galileo (and an attached sound card) with the ability to play and record MIDI files.
- V4L2 -- Video4Linux2 is a video record and play utility for Linux. You'll need a USB webcam attached to your Galileo to make use of this.
Installing the Bigger Image
To boot the Galileo off the bigger Linux image, you'll need an SD card that is at least 1GB (and less than 32GB). You'll also need to download the bigger image from Intel's Drivers page (find the most current file there). The file is about 37 MB.
The download comes as a 7z file, which means you may need extra software to extract it. Windows and Linux users can use 7Zip, Mac users can use The Unarchiver.
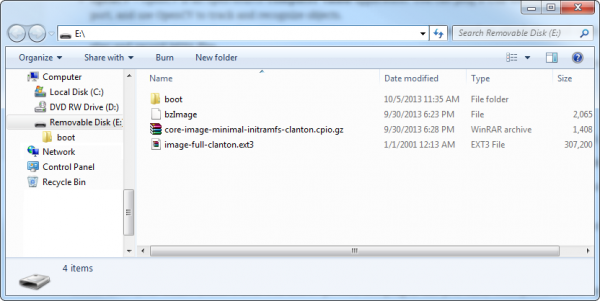
Extract the contents of the 7z file to the top level of your SD card. Once unzipped, this is what your SD directory structure should look like.
Power down your Galileo (remove both USB and 5V power), and plug in the µSD card. Then power it back up.
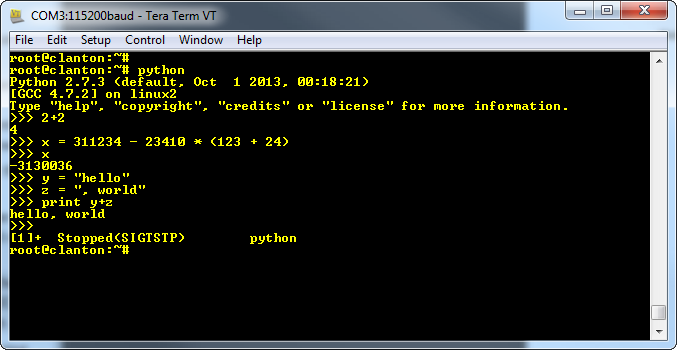
The first boot may take a little longer than average. You can use the terminal to verify that the bigger image is working. Try running Python, for example:
Python and the other utilities enabled by the bigger image allow the Galileo to do some really neat stuff. There are all sorts of applications where Python fits right in. Check out our unread email checker as an example.

