Galileo Getting Started Guide
This Tutorial is Retired!
This tutorial covers concepts or technologies that are no longer current. It's still here for you to read and enjoy, but may not be as useful as our newest tutorials.
 jimblom
Introduction
The Galileo is Intel's toe-dip into the Arduino waters. It features their Quark SoC X1000 processor -- a relatively new, x86-based, low-power embedded system-on-a-chip. The 32-bit processor can run at up to 400MHz, and it has 512 KB SRAM built-in. The Galileo board supports the Quark with a wide range of external peripherals.
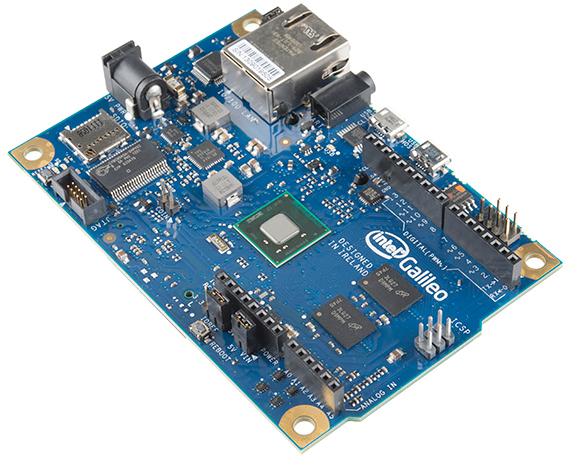
As far as memory goes, the Galileo has a lot of it. There's 8MB Flash (to store firmware), an 11KB EEPROM (non-volatile memory), and a µSD socket (which supports up to 32GB µSD cards). In addition to the memory, there are all sorts of peripherals: 10/100Mb Ethernet, USB 2.0 host and device ports, an RS-232 port, and a mini PCI Express (mPCIE) socket. Plus it has that same, familiar Arduino pinout we all love/hate. The Arduino pins -- including six analog inputs, SPI, I2C, UART, and PWM outputs -- are all exactly where an experienced Arduino user would expect them to be.
What the Galileo tries to do is meld the ease of Arduino's hardware manipulation with the power of a fully operational Linux operating system. Most sketches written for Arduino Unos, Leonardos, and other boards can be ported directly over to the Galileo. You still have access to popular Arduino libraries like SD, Ethernet, WiFi, EEPROM, SPI, and Wire, but you can also access the Linux side of the board with system() calls. The Linux half of the board supports stuff like Python, Node.js, SSH, Telnet, and all sorts of other, fun Linux stuff.
Covered In This Tutorial
This tutorial will provide a rundown of every step required to get your Galileo up and running. From sitting there, blinky-less on your desk, to running an Arduino sketch and interacting with a Linux terminal. In all, we'll cover:
- Board Overview -- An overview of the components and connectors on the Galileo.
- Software Download/Setup -- How to download and install the Arduino software specifically written for Galileo.
- Driver Installation -- Installing the Galileo drivers on Windows, Mac, and Linux.
- Updating Firmware -- How to update the low-level firmware on the Galileo, using the Arduino IDE.
- Uploading Blink -- How to upload your first Arduino sketch to the Galileo.
- Using the Terminal -- How to use the terminal, and interact with the Galileo's Linux half.
- Installing the "Bigger" Linux Image -- Why you'd want to use the "bigger" Linux image, and how to install it.
Required Materials
- Galileo Board -- The star of the show! The Galileo product should include both a 5V/3A power supply and a micro-B USB cable.
- µSD card -- This is required if you want to use the bigger Linux image. The card should be bigger than 1GB and no larger than 32GB.
Suggested Reading
Before delving into this tutorial, there are a few concepts you should be familiar with, including:
- What is an Arduino?
- Serial Terminal Basics
- Voltage, Current, Resistance, and Ohm's Law
- What is a Circuit?