Galileo Getting Started Guide
This Tutorial is Retired!
This tutorial covers concepts or technologies that are no longer current. It's still here for you to read and enjoy, but may not be as useful as our newest tutorials.
 jimblom
Board Overview
Here's an overview of the connectors and parts surrounding the Quark processor to form the Galileo board:
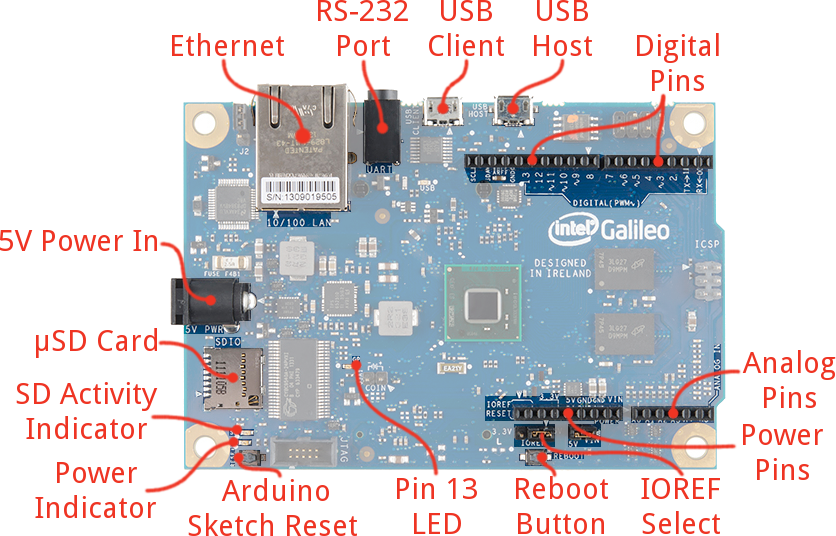
The top side of the Galileo is where the vast majority of the action is, including:
- Ethernet -- Connects the Galileo up to any 10/100 Mb/s LAN.
- RS-232 Port -- In a weird, 3.5mm "stereo" jack form factor. The sleeve is ground, ring is TX, and tip is RX. With the proper cables, this can be used to access the Linux terminal.
- USB Client -- Connect this to your computer to program the Galileo with Arduino.
- USB 2.0 Host -- This supports an interface with USB devices like keyboards, mass storage, etc. With a USB hub, up to 128 devices can be connected to this port.
- Standard Arduino connectors:
- 8-pin power header (3.3V, 5V, GND, Reset, etc.)
- 6-pin analog input header (A0-A6)
- 8-pin digital I/O header (D0-D7), which includes UART on pins 0/1, PWM on pins 3, 5, and 6
- 10-pin digital I/O header (D8-SCL), which includes I2C pins and PWM on pins 9, 10, and 11.
- 2x3-pin ICSP header breaks out SPI pins.
- Reboot Button -- Pressing this button will reboot the entire Galileo -- Linux included. Boot time is about 30 seconds, so don't press this accidentally!
- Pin 13 LED -- As with most Arduinos, the Galileo ties a small, on-board LED to pin 13. Great for the Blink sketch!
- Arduino Reset Button -- This will restart solely the Arduino sketch running on the Galileo. This button acts much more like the reset button you may be used to.
- µSD Card -- The Galileo supports up to 32GB SD cards. You'll have to use this socket if you hope to boot the Galileo off the "bigger" Linux image.
- 5V Power In -- This is a center-positive, 2.1mm barrel jack for a clean, regulated 5V supply. The power supply should be included with your Galileo.
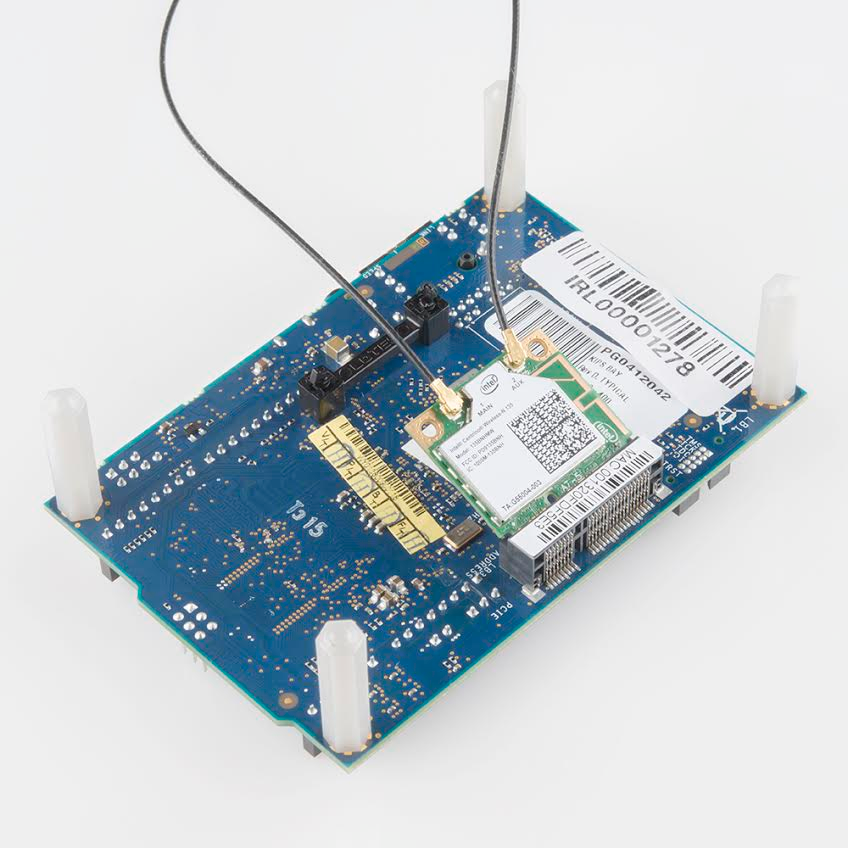
Flip the Galileo over to find the one highlight on the bottom side of the board: the mini PCIe (Peripheral Component Interconnect Express) socket. This socket is most useful for attaching WiFi cards to give your Galileo easy, wireless network access.
Powering the Galileo
The Galileo can (supposedly) be powered via USB (on the Client port), but Intel recommends against that. Instead, the board should be powered through the barrel jack, using a regulated 5V DC power supply.
The Galileo includes a "universal" wall adapter, which should work for just about anyone. If you're using your own supply, make sure it can supply up to 3A. And remember that 5V is the max and min on that supply input. Don't throw a 9V or 12V wall adapter on there and expect the magic smoke to stay inside.
The Intel(R) Quark SoC X1000
The heart of the Galileo is the stylish Quark SoC X1000 processor. This is a 32-bit processor built on the x86 architecture. The Quark X1000 features:
- Up to 400MHz clock speed
- 16KB L1 Cache
- 512KB SRAM
- Single core, single thread
- Integrated SDIO, UART, SPI, USB, I2C, Ethernet, RTC
The Quark X1000's focus is embedded computing -- wearable devices, Internet of Things, autonomous vehicles, or all sorts of other applications. It's intended to be a low-power, x86-based option for that variety of projects.
Architecture: x86 vs ARM
The Quark X1000 is an x86, which makes it unique in today's single-board computer market. Most popular SBCs -- including the Raspberry Pi, Beaglebone Black, and pCDuino -- are all driven by ARM-based processors. x86 processors are usually used in desktop computers, running Windows or OS X, because they're faster and more powerful. ARM processors, on the other hand, are more often used in portable electronics because they're more power-efficient.
ARM and x86 differ at fundamentally philosophical level: the size of their instruction set. ARM is a RISC (Reduced Instruction Set Computing, a smaller, simpler instruction set) architecture and x86 processors are CISC (Complex Instruction Set Computing, a more complex, and powerful set). Something that takes an x86 one clock cycle, might take an ARM processor three. A large instruction set requires more hardware, which requires more power to run.
Intel's Atom and Quark products try to combat the high power consumption. They're directed at the mobile market. But they're still x86 architectures, and they'll still consume more power.