Galileo Getting Started Guide
This Tutorial is Retired!
This tutorial covers concepts or technologies that are no longer current. It's still here for you to read and enjoy, but may not be as useful as our newest tutorials.
Contributors:
 jimblom
jimblom Driver Installation
Once you've downloaded and installed the software, the next step is to connect the board and install drivers. This process differs on each operation system, follow the directions below that pertain to your OS:
Windows Driver Install
- Connect a 5V power supply to the Galileo. (The USB port alone cannot supply enough power to run the Galileo.)
- Connect a micro-B USB cable from the Galileo's USB Client port to an available USB socket on your computer.
- Upon connecting the board, Windows will automatically attempt to install the driver and, unsurprisingly, it will fail. We'll have to manually install the driver.
- Open up the Device Manager. (Either Start > Run > devmgmt.msc, or go to the Control Panel, select System and click Device Manager.)
- Locate the Gadget Serial v2.4 device, under the Other devices tree. Right-click that and select Update Driver Software...
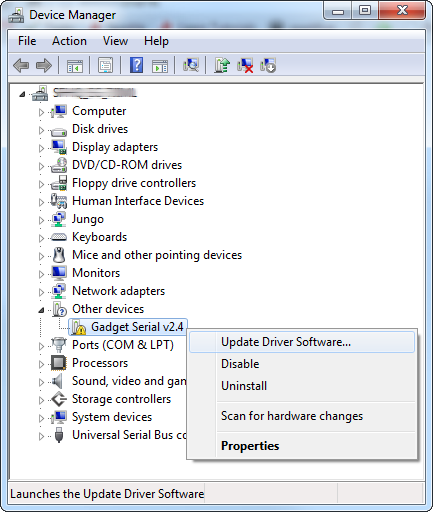
- On the first window that pops up, click Browse my computer for driver software. And on the next page select Browse... and navigate to the
hardware\arduino\x86\toolsfolder within your Arduino Galileo software installation. Then click Next.
- Click Install on the next Windows Security window that pops up. And, after a number of loading-bar-scrolls, the installation should complete and you should be greeted with a Windows has successfully updated your driver software window.
- Look back at the Device Manager, under the Ports tree now. There should be an entry for Galileo (COM #). Remember which COM # your Galileo is assigned, it'll be important for Arduino sketch uploading and the next step, updating firmware.
Mac OS X Driver Install
Mac has built-in driver support for the Galileo, so this setup should be easy. Follow the steps below to install the board on your machine:
- Begin by connecting 5V power to the Galileo.
- Then connect a micro-B USB cable from the USB Client port on the Galileo to an available USB socket on your computer.
- Wait a few seconds while the Galileo boots up. To verify the Galileo has enumerated properly, open the System Information window (Hold Option > Click the Apple menu in the top left > Click System Information), and check under the USB tab for a Gadget Serial v2.4 entry.
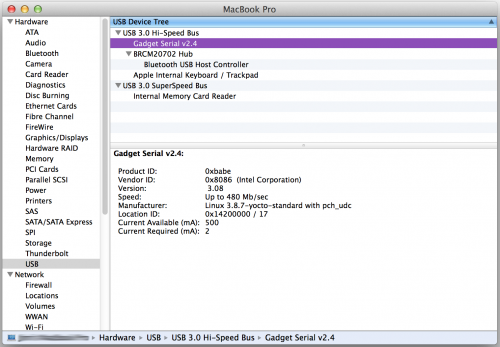
- You can also check under the Network tab to find the Device Name of your Galileo. It should be something like usbmodemXXXX. Keep that name in mind as we go to the next step, updating firmware.

Linux Driver Install
Like Mac, drivers are not necessary to use the Galileo with Linux. Follow the steps below to install the board:
- Connect 5V power to the Galileo (before connecting USB).
- Connect a micro-B USB cable from the USB Client port on the Galileo to an available socket on your computer.
- Open a terminal and type
ls /dev/ttyACM* - Take note of the port number that the Galileo is assigned to, you'll need that when you upload code to the board.