SparkFun Arduino UNO R4 WiFi Qwiic Kit Hookup Guide
Example 4: Qwiic Ambient Light Sensor (VEML6030)
Library Installation
The Qwiic Ambient Light Sensor (VEML6030) library will give you the full functionality of the sensor and provides example code to get the most our of your project. You can obtain these libraries through the Arduino Library Manager by searching SparkFun Ambient Light Sensor. The second option is to download the ZIP file below from its GitHub repository to manually install.
Hardware Hookup
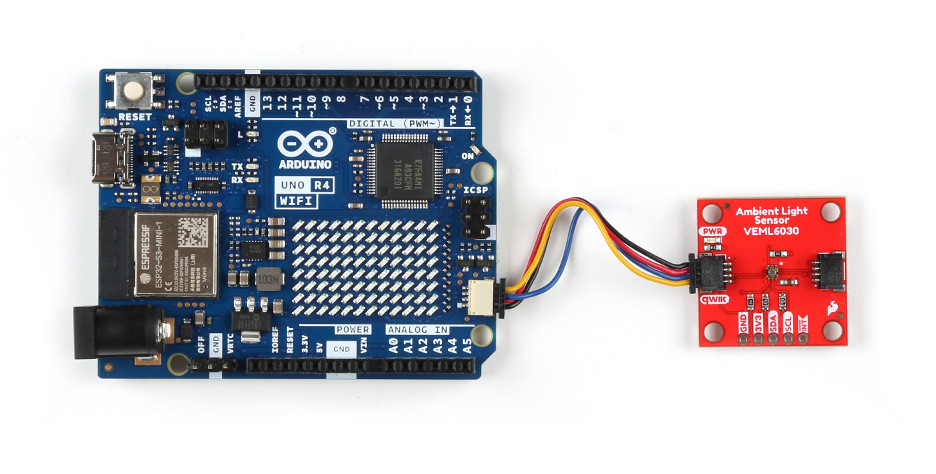
Plug one end of the Qwiic connector into the Qwiic port on the breakout board, and the other end into the Qwiic connector on the Arduino Uno R4 WiFi board like so:
Software Example
In this example, we'll get you comfortable with gathering ambient light and setting two vital properties of the sensor's ability to read light: the gain and the integration time. These two properties determine the resolution (accuracy) of the reading and the available ranges of light that you can read! For example, a gain of 1/8 and 800ms integration time cannot read anything above 3775 Lux. This means you'll max out your sensor outdoors but would be a proper setting for dim rooms due to it's higher resolution.
language:c
/*
This example code will walk you through how to read ambient light values.
Chances are good that you'll use this sensor in various environments so it'll
also walk you through setting the gain and integration time that allow for
different ranges of lux values. For example using the default gain of 100ms
gives you a maximum reading of 30,199 Lux. This is great for daylight
readings but not DIRECT sun. Higher integration times mean higher
resoultions but lower lux values and vice versa: the lowest integration time
and lowest gain should be used for mid day direct light. Check our hookup
guide for more information.
SparkFun Electronics
Author: Elias Santistevan
Date: July 2019
License: This code is public domain but if you use this and we meet someday, get me a beer!
Feel like supporting our work? Buy a board from Sparkfun!
https://www.sparkfun.com/products/15436
*/
#include <Wire.h>
#include "SparkFun_VEML6030_Ambient_Light_Sensor.h"
#define AL_ADDR 0x48
SparkFun_Ambient_Light light(AL_ADDR);
// Possible values: .125, .25, 1, 2
// Both .125 and .25 should be used in most cases except darker rooms.
// A gain of 2 should only be used if the sensor will be covered by a dark
// glass.
float gain = .125;
// Possible integration times in milliseconds: 800, 400, 200, 100, 50, 25
// Higher times give higher resolutions and should be used in darker light.
int timeLength = 100;
long luxVal = 0;
void setup(){
Wire1.begin();
Serial.begin(115200);
if(light.begin(Wire1))
Serial.println("Ready to sense some light!");
else
Serial.println("Could not communicate with the sensor!");
// Again the gain and integration times determine the resolution of the lux
// value, and give different ranges of possible light readings. Check out
// hoookup guide for more info.
light.setGain(gain);
light.setIntegTime(timeLength);
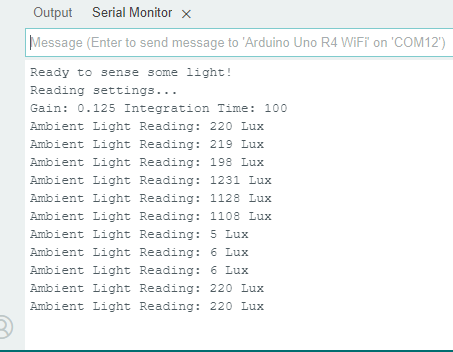
Serial.println("Reading settings...");
Serial.print("Gain: ");
float gainVal = light.readGain();
Serial.print(gainVal, 3);
Serial.print(" Integration Time: ");
int timeVal = light.readIntegTime();
Serial.println(timeVal);
}
void loop(){
luxVal = light.readLight();
Serial.print("Ambient Light Reading: ");
Serial.print(luxVal);
Serial.println(" Lux");
delay(1000);
}
Make sure you have the correct board and port selected, and upload the code. Open a Serial Monitor and you should see something like the below: