SIK Experiment Guide for Arduino - V3.2
This Tutorial is Retired!
This tutorial covers concepts or technologies that are no longer current. It's still here for you to read and enjoy, but may not be as useful as our newest tutorials.
View the updated tutorial: SIK Experiment Guide for Arduino - V3.3
 HelloTechie
Introduction: SIK RedBoard & Sparkfun Mini Inventor's Kit
The SparkFun Inventor's Guide is your map for navigating the waters of beginning embedded electronics. This guide contains all the information you will need to explore the 16 circuits of the SparkFun Inventor's Kit for Arduino V3.2. At the center of this guide is one core philosophy - that anyone can (and should) play around with electronics. When you're done with this guide, you'll have the know-how to start creating your own projects and experiments. Now enough talking - let's get inventing!
This guide is also available as a downloadable PDF, if you prefer. Click here for the download.
**For Starter Kit for RedBoard - Programmed with Arduino users: ** For those who have Starter Kit for RedBoard - Programmed with Arduino, you are able to follow through experiments 1, 2, 3, 6, 7, 9, 10, and 11.
SparkFun Inventor's Kit - V3.2
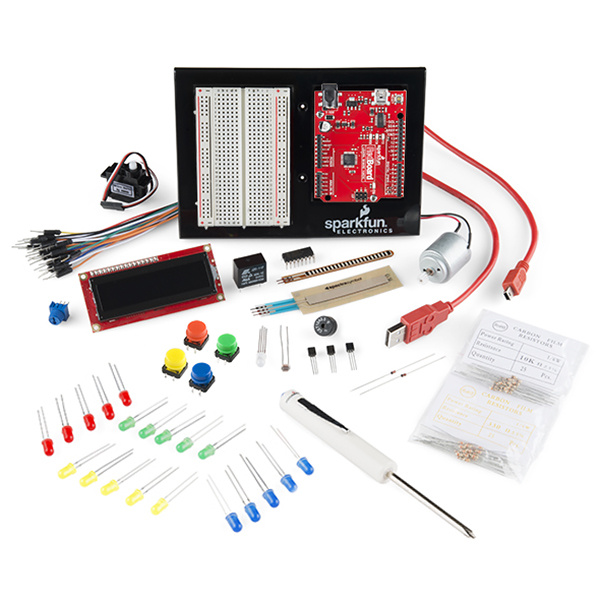
SparkFun Inventor's Kit - V3.2
KIT-12060Here is all the parts in the SparkFun Inventor's Kit for Arduino:
- SparkFun RedBoard - Programmed with Arduino - The SparkFun RedBoard, fully assembled and tested
- Arduino and Breadboard Holder - A nice holder for your RedBoard and breadboard
- SparkFun Inventor’s Kit Guidebook - A printed manual that you follow along through all the experiments
- Breadboard - Excellent for making circuits and connections off the Arduino.
- Carrying Case - Take your kit anywhere with ease
- SparkFun Mini Screwdriver - To help you screw on your RedBoard to the holder
- 16x2 White on Black LCD (with headers) - This is a basic 16 character by 2 line display with a snazzy black background with white characters.
- 74HC595 Shift Register- Simple shift register IC. Clock in data and latch it to free up IO pins on your RedBoard.
- 2N2222 Transistors - This little transistor can help in your project by being used to help drive large loads or amplifying or switching applications.
- 1N4148 Diodes - This is a very common signal diode - 1N4148. Use this for signals up to 200mA of current.
- DC Motor with Gear - It works well for basic things like making a fan or spinning something pretty fast without much resistance.
- Small Servo - Here is a simple, low-cost, high quality servo for all your mechatronic needs.
- SPDT 5V Relay - This is a high quality Single Pole - Double Throw (SPDT) sealed relay. Use it to switch high voltage, and/or high current devices. This relay’s coil is rated up to 12V, with a minimum switching voltage of 5V.
- TMP36 Temp Sensor - A sensor for detecting temperature changes.
- Flex sensor - As the sensor is flexed, the resistance across the sensor increases.
- Softpot - By pressing down on various parts of the strip, the resistance linearly changes from 100Ohms to 10,000Ohms allowing you to very accurately calculate the relative position on the strip.
- SparkFun USB Mini-B Cable - This 6' cable provides you with a USB-A connector at the host end and mini-B connector at the device end.
- Male to Male jumper wires - These are high quality wires that allow you to connect the female headers on the Arduino to the components and breadboard.
- Photocell - A sensor to detect ambient light. Perfect for detecting when a drawer is opened or when night-time approaches.
- Tri-Color LED - Because everyone loves a blinky.
- Red, Blue, Yellow, and Green LEDs - Light emitting diodes make great general indicators.
- Red, Blue, Yellow, and Green Tactile Buttons - Go crazy with different colored buttons
- 10K Trimpot - Also known as a variable resistor, this is a device commonly used to control volume, contrast, and makes a great general user control input.
- Piezo Buzzer - Use this to make sounds and play songs
- 330 Ohm Resistors - Great current limiting resistors for LEDs, and strong pull-up resistors.
- 10k Ohm Resistors - These make excellent pull-ups, pull-downs, and current limiters.
SparkFun Mini Inventor's Kit
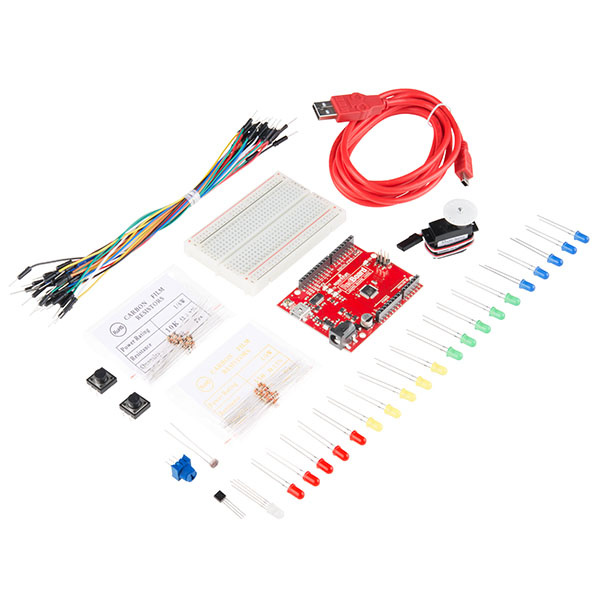
If you’re new to electronics and programming, the SparkFun Mini Inventor's Kit for RedBoard is a great way for beginners to get their foot in the door at half the cost of the SIK. SparkFun Mini Inventor's Kit can be taken straight out of the box to help you make a slew of basic circuits.
Here is all the parts in the SparkFun Mini Inventor's Kit:
- SparkFun RedBoard - The SparkFun RedBoard, fully assembled and tested.
- SparkFun USB Mini-B Cable - This 6' cable provides you with a USB-A connector at the host end and mini-B connector at the device end.
- Breadboard - Excellent for making circuits and connections off the Arduino.
- Male to Male jumper wires - These are high quality wires that allow you to connect the female headers on the Arduino to the components and breadboard.
- Photocell - A sensor to detect ambient light. Perfect for detecting when a drawer is opened or when night-time approaches.
- TMP36 Temp Sensor - A sensor for detecting temperature changes.
- Tri-Color LED - Because everyone loves a blinky. Use this LED to PWM mix any color you need.
- Basic LEDs - Light emitting diodes make great general indicators.
- 10K Trimpot - Also known as a variable resistor, this is a device commonly used to control volume, contrast, and makes a great general user control input.
- 12mm button - Because big buttons are easier to hit.
- Small Servo - Here is a simple, low-cost, high quality servo for all your mechatronic needs.
- 330 Ohm Resistors - Great current limiting resistors for LEDs, and strong pull-up resistors.
- 10k Ohm Resistors - These make excellent pull-ups, pull-downs, and current limiters.
Experiment List
In this SparkFun Inventor's Kit for Arduino guide, you will learn the following:
- **Experiment 1: Blinking an LED**
- **Experiment 2: Reading a Potentiometer**
- **Experiment 3: Driving an RGB LED**
- **Experiment 4: Driving Multiple LEDs**
- **Experiment 5: Push Buttons**
- **Experiment 6: Reading a Photoresistor**
- **Experiment 7: Reading a Temperature Sensor**
- **Experiment 8: Driving a Servo Motor**
- Experiment 9: Using a Flex Sensor
- Experiment 10: Reading a Soft Potentiometer
- Experiment 11: Using a Piezo Buzzer
- Experiment 12: Driving a Motor
- Experiment 13: Using Relays
- Experiment 14: Using a Shift Register
- Experiment 15: Using an LCD
- Experiment 16: Simon Says
What is the RedBoard platform?
The DIY Revolution
We live in a unique time where we have access to resources that allow us to create our own solutions and inventions. The DIY revolution is composed of hobbyists, tinkerers and inventors who would rather craft their own projects than let someone do it for them.
A Computer for the Physical World
The RedBoard in your hand (or on your desk) is your development platform. At its roots, the RedBoard is essentially a small portable computer. It is capable of taking inputs (such as the push of a button or a reading from a light sensor) and interpreting that information to control various outputs (like a blinking LED light or an electric motor).
That's where the term "physical computing" is born - this board is capable of taking the world of electronics and relating it to the physical world in a real and tangible way. Trust us - this will all make more sense soon.
The SparkFun RedBoard is one of a multitude of development boards based on the ATmega328. It has 14 digital input/output pins (6 of which can be PWM outputs), 6 analog inputs, a 16 MHz crystal oscillator, a USB connection, a power jack, an ISP header, and a reset button. Check out our RedBoard Hookup Guide, to get yourself familiar with the RedBoard.
Download the Arduino IDE
In order to get your RedBoard up and running, you'll need to download the newest version of the Arduino software first from www.arduino.cc (it's free and open source!). This software, known as the Arduino IDE, will allow you to program the board to do exactly what you want. It’s like a word processor for writing programs. With an internet-capable computer, open up your favorite browser and go to Arduino download page.
Check out our Installing Arduino IDE tutorial, to see in detail on how to install the Arduino IDE on your computer.
Connect your RedBoard to your Computer
Use the USB cable provided in the SIK kit to connect the RedBoard to one of your computer’s USB inputs.
Install FTDI Drivers
Depending on your computer’s operating system, you will need to follow specific instructions. Please go to How to Install FTDI Drivers, for specific instructions on how to install the FTDI drivers onto your RedBoard.
Getting Started in the Arduino IDE
Now, it's finally time to open up the Arduino software. You'll be presented with a window that looks a little something like this:
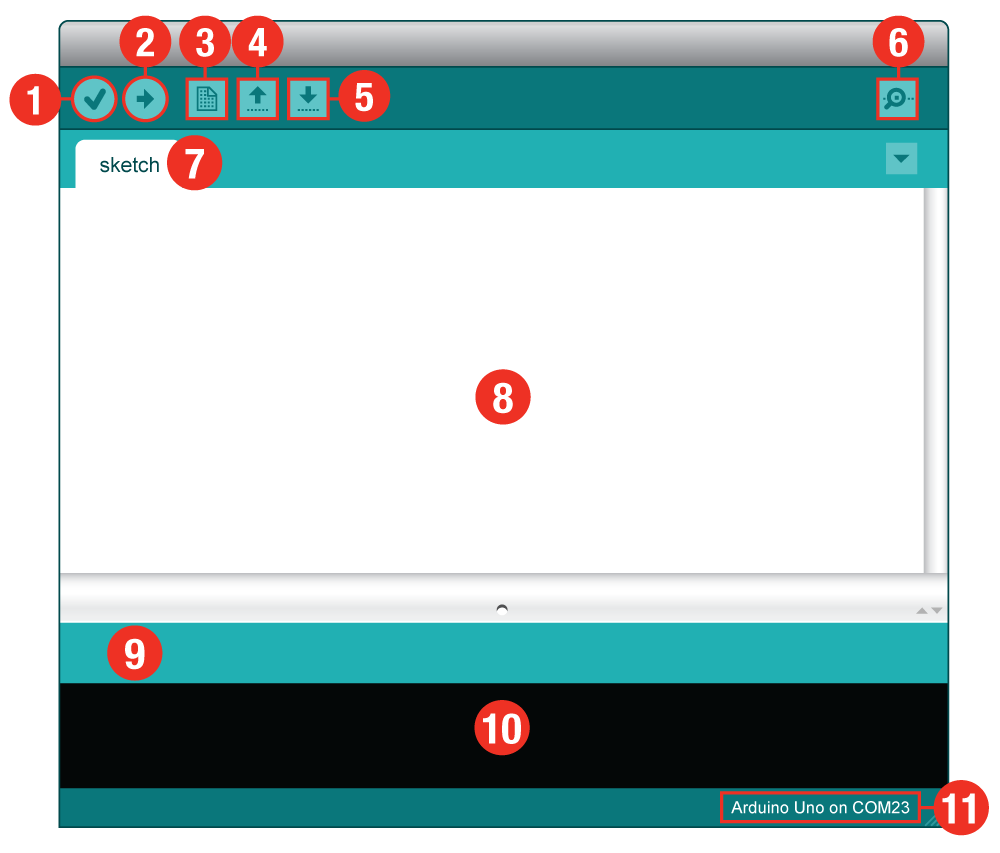
- Verify: Compiles and approves your code. It will catch errors in syntax (like missing semi-colons or parenthesis).
- Upload: Sends your code to the RedBoard. When you click it, you should see the lights on your board blink rapidly.
- New: This buttons opens up a new code window tab.
- Open: This button will let you open up an existing sketch.
- Save: This saves the currently active sketch.
- Serial Monitor: This will open a window that displays any serial information your RedBoard is transmitting. It is very useful for debugging.
- Sketch Name: This shows the name of the sketch you are currently working on.
- Code Area: This is the area where you compose the code for your sketch.
- Message Area: This is where the IDE tells you if there were any errors in your code.
- Text Console: The text console shows complete error messages. When debugging, the text console is very useful.
- Board and Serial Port: Shows you what board and the serial port selections
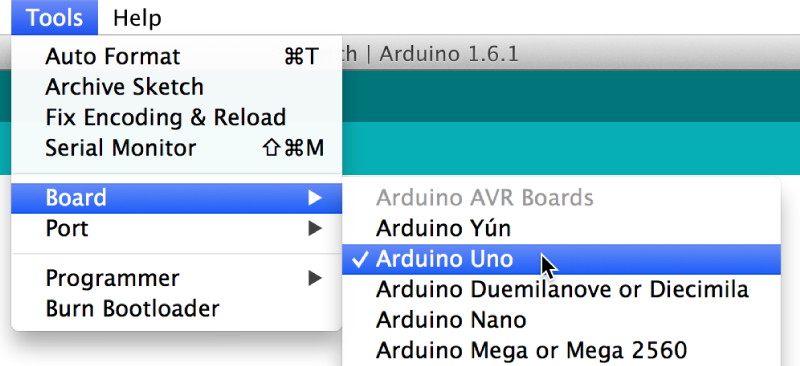
Select your board: Arduino Uno
Before we can start jumping into the experiments, there are a couple adjustments we need to make. This step is required to tell the Arduino IDE which of the many Arduino boards we have. Go up to the Tools menu. Then hover over Board and make sure Arduino Uno is selected.
Please note: Your SparkFun RedBoard and the Arduino UNO are interchangeable but you won’t find the RedBoard listed in the Arduino Software. Select “Arduino Uno” instead.
Select a Serial Port
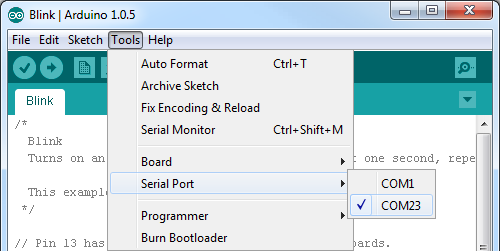
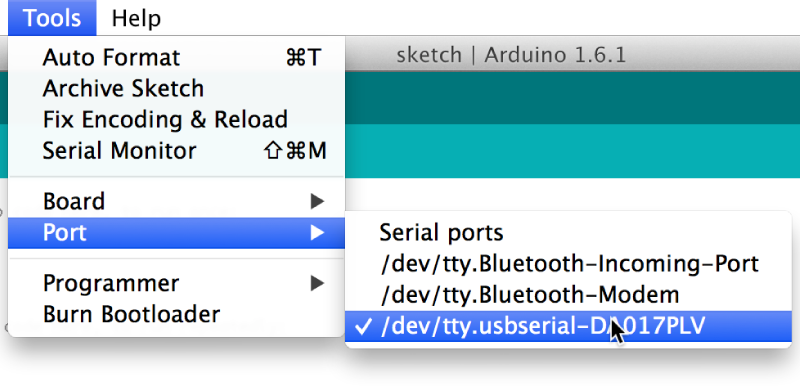
Next up we need to tell the Arduino IDE which of our computer's serial ports the RedBoard is connected to. For this, again go up to Tools, then hover over Port (Serial Port in older Arduino versions) and select your RedBoard's serial port.
Window Users: This is likely to be com3 or higher (COM1 and COM2 are usually reserved for hardware serial ports). To find out, you can disconnect your RedBoard and re-open the menu; the entry that disappears should be the RedBoard. Reconnect the board and select that serial port.
Mac Users: Select the serial device of the RedBoard from the Tools, then hover over Port. (You will be hovering over Serial Port if you have older versions of the Arduino IDE) On the Mac, this should be something with /dev/tty.usbmodem or /dev/tty.usbserial in it.
Linux Users: Please visit the Arduino Learning Linux section, to learn more about Arduino on Linux.
Download Arduino Code
You are so close to to being done with setup! Download the SIK Guide Code. Click the following link to download the code:
SIK Guide Code
Copy “SIK_Guide_Code_32” into “examples” folder in the Arduino folder.
Window Users: Unzip the file “SIK_Guide_Code_32”. It should be located in your browser’s “Downloads” folder. Right click the zipped folder and choose “unzip”. Copy the “SIK Guide Code” folder into Arduino’s folder named “examples”.
Mac Users: Unzip the file “SIK_Guide_Code_32”. It should be located in your browser’s “Downloads” folder. Right click the zipped folder and unzip. Find “Arduino” in your applications folder. Right click (ctrl + click) on “Arduino”. Select “Show Package Contents”. Then, click through folders Contents > Resources > Java > examples. Copy the “SIK Guide Code” folder into Arduino’s folder named “examples”.
Suggested Reading
Before continuing on with this tutorial, we recommend you be somewhat familiar with the concepts in the following tutorial:
- How to Use a Breadboard - First time working with a breadboard? Please check out this tutorial! It will help you understand why the breadboard is a great for prototyping and how to use one.
Open Source!
At SparkFun, our engineers and educators have been improving this kit and coming up with new experiments for a long time now. We would like to give attribution to Oomlout, since we originally started working off the Arduino Kit material many years ago. Both the Oomlut and SparkFun versions are licensed under the Creative Commons Attribution Share-Alike 3.0 Unported License
To view a copy of this license visit: http://creativecommons.org/by-sa/3.0/ Or write: Creative Commons, 171 Second Street, Suite 300, San Francisco, CA 94105, USA.
Time for the fun part!
Continue on to the first experiment and in no time you will be blinking an LED!