SIK Experiment Guide for Arduino - V3.2
This Tutorial is Retired!
This tutorial covers concepts or technologies that are no longer current. It's still here for you to read and enjoy, but may not be as useful as our newest tutorials.
View the updated tutorial: SIK Experiment Guide for Arduino - V3.3
Experiment 7: Reading a Temperature Sensor
Introduction
A temperature sensor is exactly what it sounds like – a sensor used to measure ambient temperature. This particular sensor has three pins – a positive, a ground, and a signal. This is a linear temperature sensor. A change in temperature of one degree centigrade is equal to a change of 10 millivolts at the sensor output.
The TMP36 sensor has a nominal 750 mV at 25°C (about room temperature). In this circuit, you’ll learn how to integrate the temperature sensor with your RedBoard or Arduino Uno R3, and use the Arduino IDE’s serial monitor to display the temperature.
Parts Needed
You will need the following parts:
- 1x Breadboard
- 1x RedBoard or Arduino Uno
- 5x Jumper Wires
- 1x Temperature Sensor
Didn't get the SIK?
If you are following through this experiment and didn't get the SIK, we suggest using these parts:
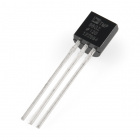
Temperature Sensor - TMP36
SEN-10988You will also need either a RedBoard or Arduino Uno R3.
Hardware Hookup
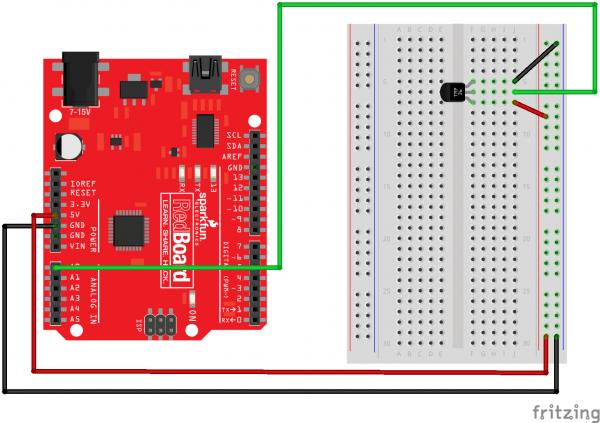
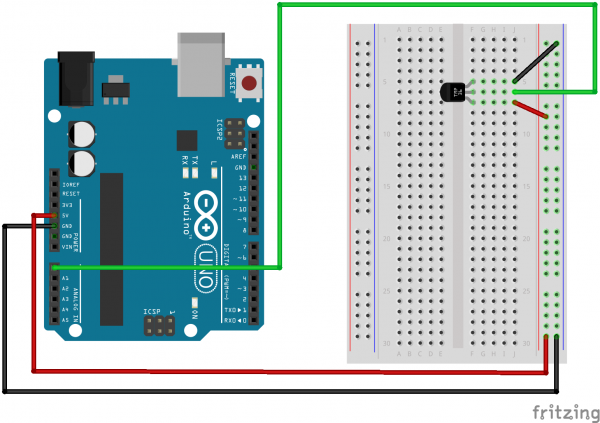
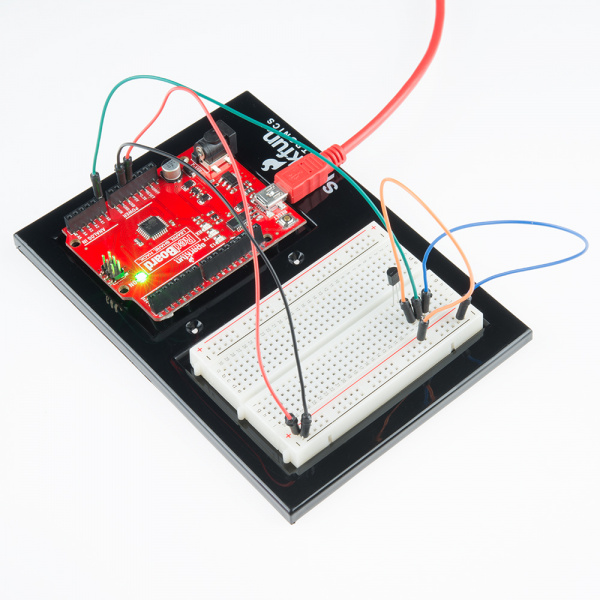
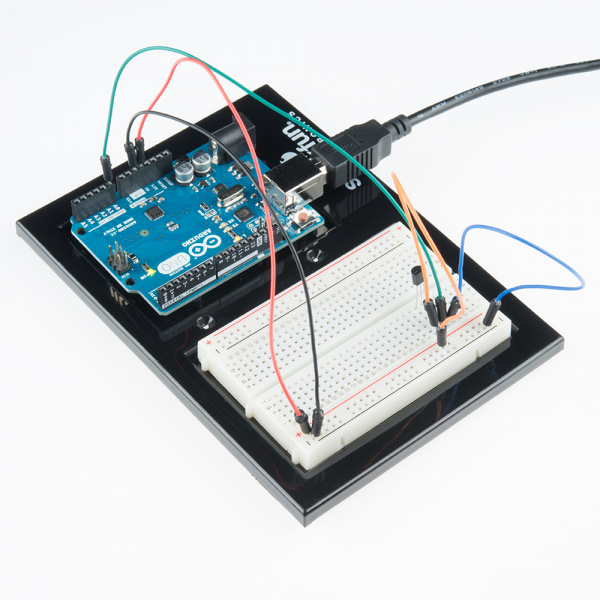
Ready to start hooking everything up? Check out the Fritzing diagram below, to see how everything is connected.
| Polarized Components | Pay special attention to the component’s markings indicating how to place it on the breadboard. Polarized components can only be connected to a circuit in one direction. |
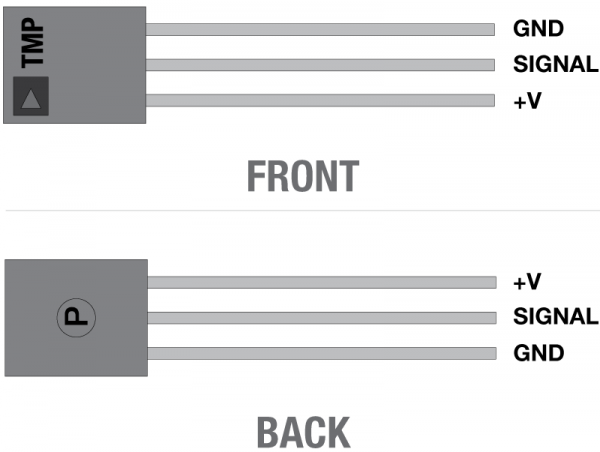
Please note: The temperature sensor can only be connected to a circuit in one direction. See below for the pin outs of the temperature sensor - TMP36
Fritzing Diagram for RedBoard
Fritzing Diagram for Arduino
Open the Sketch
Open Up the Arduino IDE software on your computer. Coding in the Arduino language will control your circuit. Open the code for Circuit 7 by accessing the “SIK Guide Code” you downloaded and placed into your “Examples” folder earlier.
To open the code go to: File > examples > SIK Guide Code > Circuit_07
You can also copy and paste the following code into the Arduino IDE. Hit upload, and see what happens!
language:cpp
/*
SparkFun Inventor's Kit
Example sketch 07

TEMPERATURE SENSOR

  Use the "serial monitor" window to read a temperature sensor.

  The TMP36 is an easy-to-use temperature sensor that outputs
  a voltage that's proportional to the ambient temperature.
  You can use it for all kinds of automation tasks where you'd
  like to know or control the temperature of something.

  More information on the sensor is available in the datasheet:
  http://cdn.sparkfun.com/datasheets/Sensors/Temp/TMP35_36_37.pdf

  Even more exciting, we'll start using the Arduino's serial port
  to send data back to your main computer! Up until now, we've
  been limited to using simple LEDs for output. We'll see that
  the Arduino can also easily output all kinds of text and data.

Hardware connections:

  Be careful when installing the temperature sensor, as it is
  almost identical to the transistors! The one you want has
  a triangle logo and "TMP" in very tiny letters. The
  ones you DON'T want will have "222" on them.

  When looking at the flat side of the temperature sensor
  with the pins down, from left to right the pins are:
  5V, SIGNAL, and GND.

  Connect the 5V pin to 5 Volts (5V).
  Connect the SIGNAL pin to ANALOG pin 0.
  Connect the GND pin to ground (GND).

This sketch was written by SparkFun Electronics,
with lots of help from the Arduino community.
This code is completely free for any use.
Visit http://learn.sparkfun.com/products/2 for SIK information.
Visit http://www.arduino.cc to learn about the Arduino.

Version 2.0 6/2012 MDG
*/

// We'll use analog input 0 to measure the temperature sensor's
// signal pin.

const int temperaturePin = 0;


void setup()
{
  // In this sketch, we'll use the Arduino's serial port
  // to send text back to the main computer. For both sides to
  // communicate properly, they need to be set to the same speed.
  // We use the Serial.begin() function to initialize the port
  // and set the communications speed.

  // The speed is measured in bits per second, also known as
  // "baud rate". 9600 is a very commonly used baud rate,
  // and will transfer about 10 characters per second.

  Serial.begin(9600);
}


void loop()
{
  // Up to now we've only used integer ("int") values in our
  // sketches. Integers are always whole numbers (0, 1, 23, etc.).
  // In this sketch, we'll use floating-point values ("float").
  // Floats can be fractional numbers such as 1.42, 2523.43121, etc.

  // We'll declare three floating-point variables
  // (We can declare multiple variables of the same type on one line:)

  float voltage, degreesC, degreesF;

  // First we'll measure the voltage at the analog pin. Normally
  // we'd use analogRead(), which returns a number from 0 to 1023.
  // Here we've written a function (further down) called
  // getVoltage() that returns the true voltage (0 to 5 Volts)
  // present on an analog input pin.

  voltage = getVoltage(temperaturePin);

  // Now we'll convert the voltage to degrees Celsius.
  // This formula comes from the temperature sensor datasheet:

  degreesC = (voltage - 0.5) * 100.0;

  // While we're at it, let's convert degrees Celsius to Fahrenheit.
  // This is the classic C to F conversion formula:

  degreesF = degreesC * (9.0/5.0) + 32.0;

  // Now we'll use the serial port to print these values
  // to the serial monitor!

  // To open the serial monitor window, upload your code,
  // then click the "magnifying glass" button at the right edge
  // of the Arduino IDE toolbar. The serial monitor window
  // will open.

  // (NOTE: remember we said that the communication speed
  // must be the same on both sides. Ensure that the baud rate
  // control at the bottom of the window is set to 9600. If it
  // isn't, change it to 9600.)

  // Also note that every time you upload a new sketch to the
  // Arduino, the serial monitor window will close. It does this
  // because the serial port is also used to upload code!
  // When the upload is complete, you can re-open the serial
  // monitor window.

  // To send data from the Arduino to the serial monitor window,
  // we use the Serial.print() function. You can print variables
  // or text (within quotes).

  Serial.print("voltage: ");
  Serial.print(voltage);
  Serial.print("  deg C: ");
  Serial.print(degreesC);
  Serial.print("  deg F: ");
  Serial.println(degreesF);

  // These statements will print lines of data like this:
  // "voltage: 0.73 deg C: 22.75 deg F: 72.96"

  // Note that all of the above statements are "print", except
  // for the last one, which is "println". "Print" will output
  // text to the SAME LINE, similar to building a sentence
  // out of words. "Println" will insert a "carriage return"
  // character at the end of whatever it prints, moving down
  // to the NEXT line.

  delay(1000); // repeat once per second (change as you wish!)
}


float getVoltage(int pin)
{
  // This function has one input parameter, the analog pin number
  // to read. You might notice that this function does not have
  // "void" in front of it; this is because it returns a floating-
  // point value, which is the true voltage on that pin (0 to 5V).

  // You can write your own functions that take in parameters
  // and return values. Here's how:

    // To take in parameters, put their type and name in the
    // parenthesis after the function name (see above). You can
    // have multiple parameters, separated with commas.

    // To return a value, put the type BEFORE the function name
    // (see "float", above), and use a return() statement in your code
    // to actually return the value (see below).

    // If you don't need to get any parameters, you can just put
    // "()" after the function name.

    // If you don't need to return a value, just write "void" before
    // the function name.

  // Here's the return statement for this function. We're doing
  // all the math we need to do within this statement:

  return (analogRead(pin) * 0.004882814);

  // This equation converts the 0 to 1023 value that analogRead()
  // returns, into a 0.0 to 5.0 value that is the true voltage
  // being read at that pin.
}

// Other things to try with this code:

//   Turn on an LED if the temperature is above or below a value.

//   Read that threshold value from a potentiometer - now you've
//   created a thermostat!
Code To Note
Serial.begin(9600);
Before using the serial monitor, you must call Serial.begin() to initialize it. 9600 is the "baud rate", or communications speed. When two devices are communicating with each other, both must be set to the same speed.
Serial.print(degreesC);
The Serial.print() command is very smart. It can print out almost anything you can throw at it, including variables of all types, quoted text (AKA "strings"), etc. See http://arduino.cc/en/serial/print for more info.
Serial.println(degreesF);
Serial.print() will print everything on the same line.
Serial.println() will move to the next line. By using both of these commands together, you can create easy-to-read printouts of text and data.
What You Should See
You should be able to read the temperature your temperature sensor is detecting on the serial monitor in the Arduino IDE. If it isn't working, make sure you have assembled the circuit correctly and verified and uploaded the code to your board or see the troubleshooting section.
Example of what you should see in the Arduino IDE’s serial monitor:
voltage: 0.73 deg C: 23.24 deg F: 73.84
voltage: 0.73 deg C: 23.24 deg F: 73.84
voltage: 0.73 deg C: 22.75 deg F: 72.96
voltage: 0.73 deg C: 23.24 deg F: 73.84
voltage: 0.73 deg C: 23.24 deg F: 73.84
voltage: 0.73 deg C: 23.24 deg F: 73.84
voltage: 0.73 deg C: 22.75 deg F: 72.96
voltage: 0.73 deg C: 23.24 deg F: 73.84
voltage: 0.73 deg C: 22.75 deg F: 72.96
voltage: 0.73 deg C: 22.75 deg F: 72.96
voltage: 0.73 deg C: 23.24 deg F: 73.84
voltage: 0.73 deg C: 22.75 deg F: 72.96
voltage: 0.73 deg C: 23.24 deg F: 73.84
Real World Application
Building climate control systems use a temperature sensor to monitor and maintain their settings.
Troubleshooting
Nothing Seems to Happen
This program has no outward indication it is working. To see the results you must open the Arduino IDE's serial monitor (instructions on previous page).
Gibberish is Displayed
This happens because the serial monitor is receiving data at a different speed than expected. To fix this, click the pull-down box that reads "*** baud" and change it to "9600 baud".
Temperature Value is Unchanging
Try pinching the sensor with your fingers to heat it up or pressing a bag of ice against it to cool it down.


