SIK Experiment Guide for Arduino - V3.2
This Tutorial is Retired!
This tutorial covers concepts or technologies that are no longer current. It's still here for you to read and enjoy, but may not be as useful as our newest tutorials.
View the updated tutorial: SIK Experiment Guide for Arduino - V3.3
 HelloTechie
 Experiment 4: Driving Multiple LEDs
Introduction
Now that you've gotten your LED to blink on and off, it's time to up the stakes a little bit – by connecting eight LEDs at once. We'll also give your RedBoard or Arduino R3 a little test by creating various lighting sequences. This circuit is a great setup to start practicing writing your own programs and getting a feel for the way Arduino works.
Along with controlling the LEDs, you’ll learn about a couple programming tricks that keep your code neat and tidy:
for() loops - used when you want to run a piece of code several times
arrays[ ] - used to make managing variables easier by grouping them together
Parts Needed
You will need the following parts:
- 1x Breadboard
- 1x RedBoard or Arduino Uno
- 8x LEDs
- 8x 330Ω Resistors
- 9x Jumper Wires
Didn't get the SIK?
If you are following through this experiment and didn't get the SIK, we suggest using these parts:


Resistor 330 Ohm 1/6 Watt PTH - 20 pack
COM-11507You will also need either a RedBoard or Arduino Uno R3.

Hardware Hookup
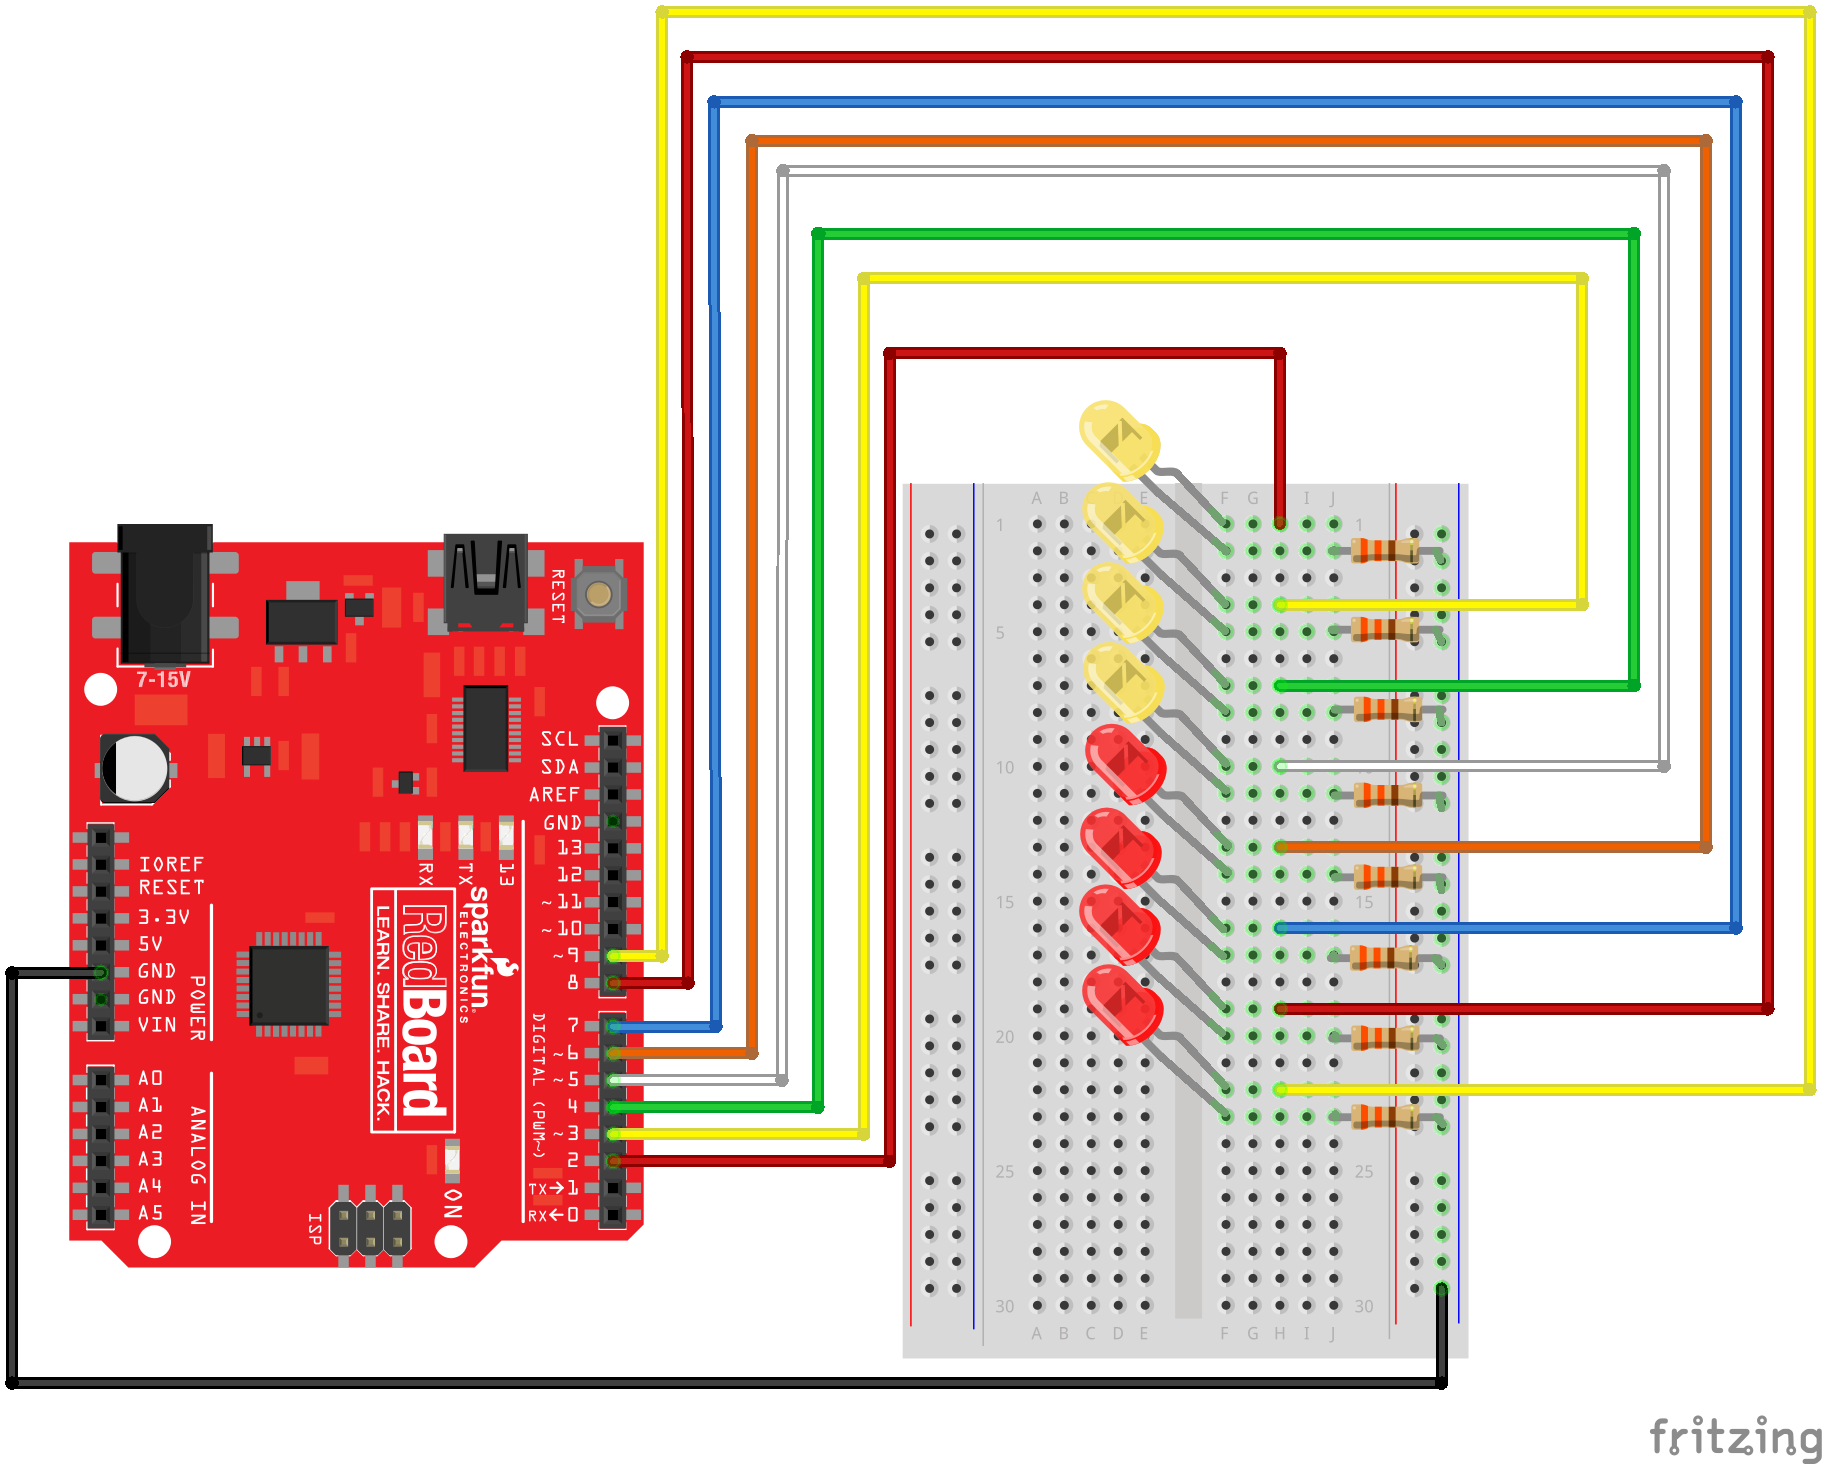
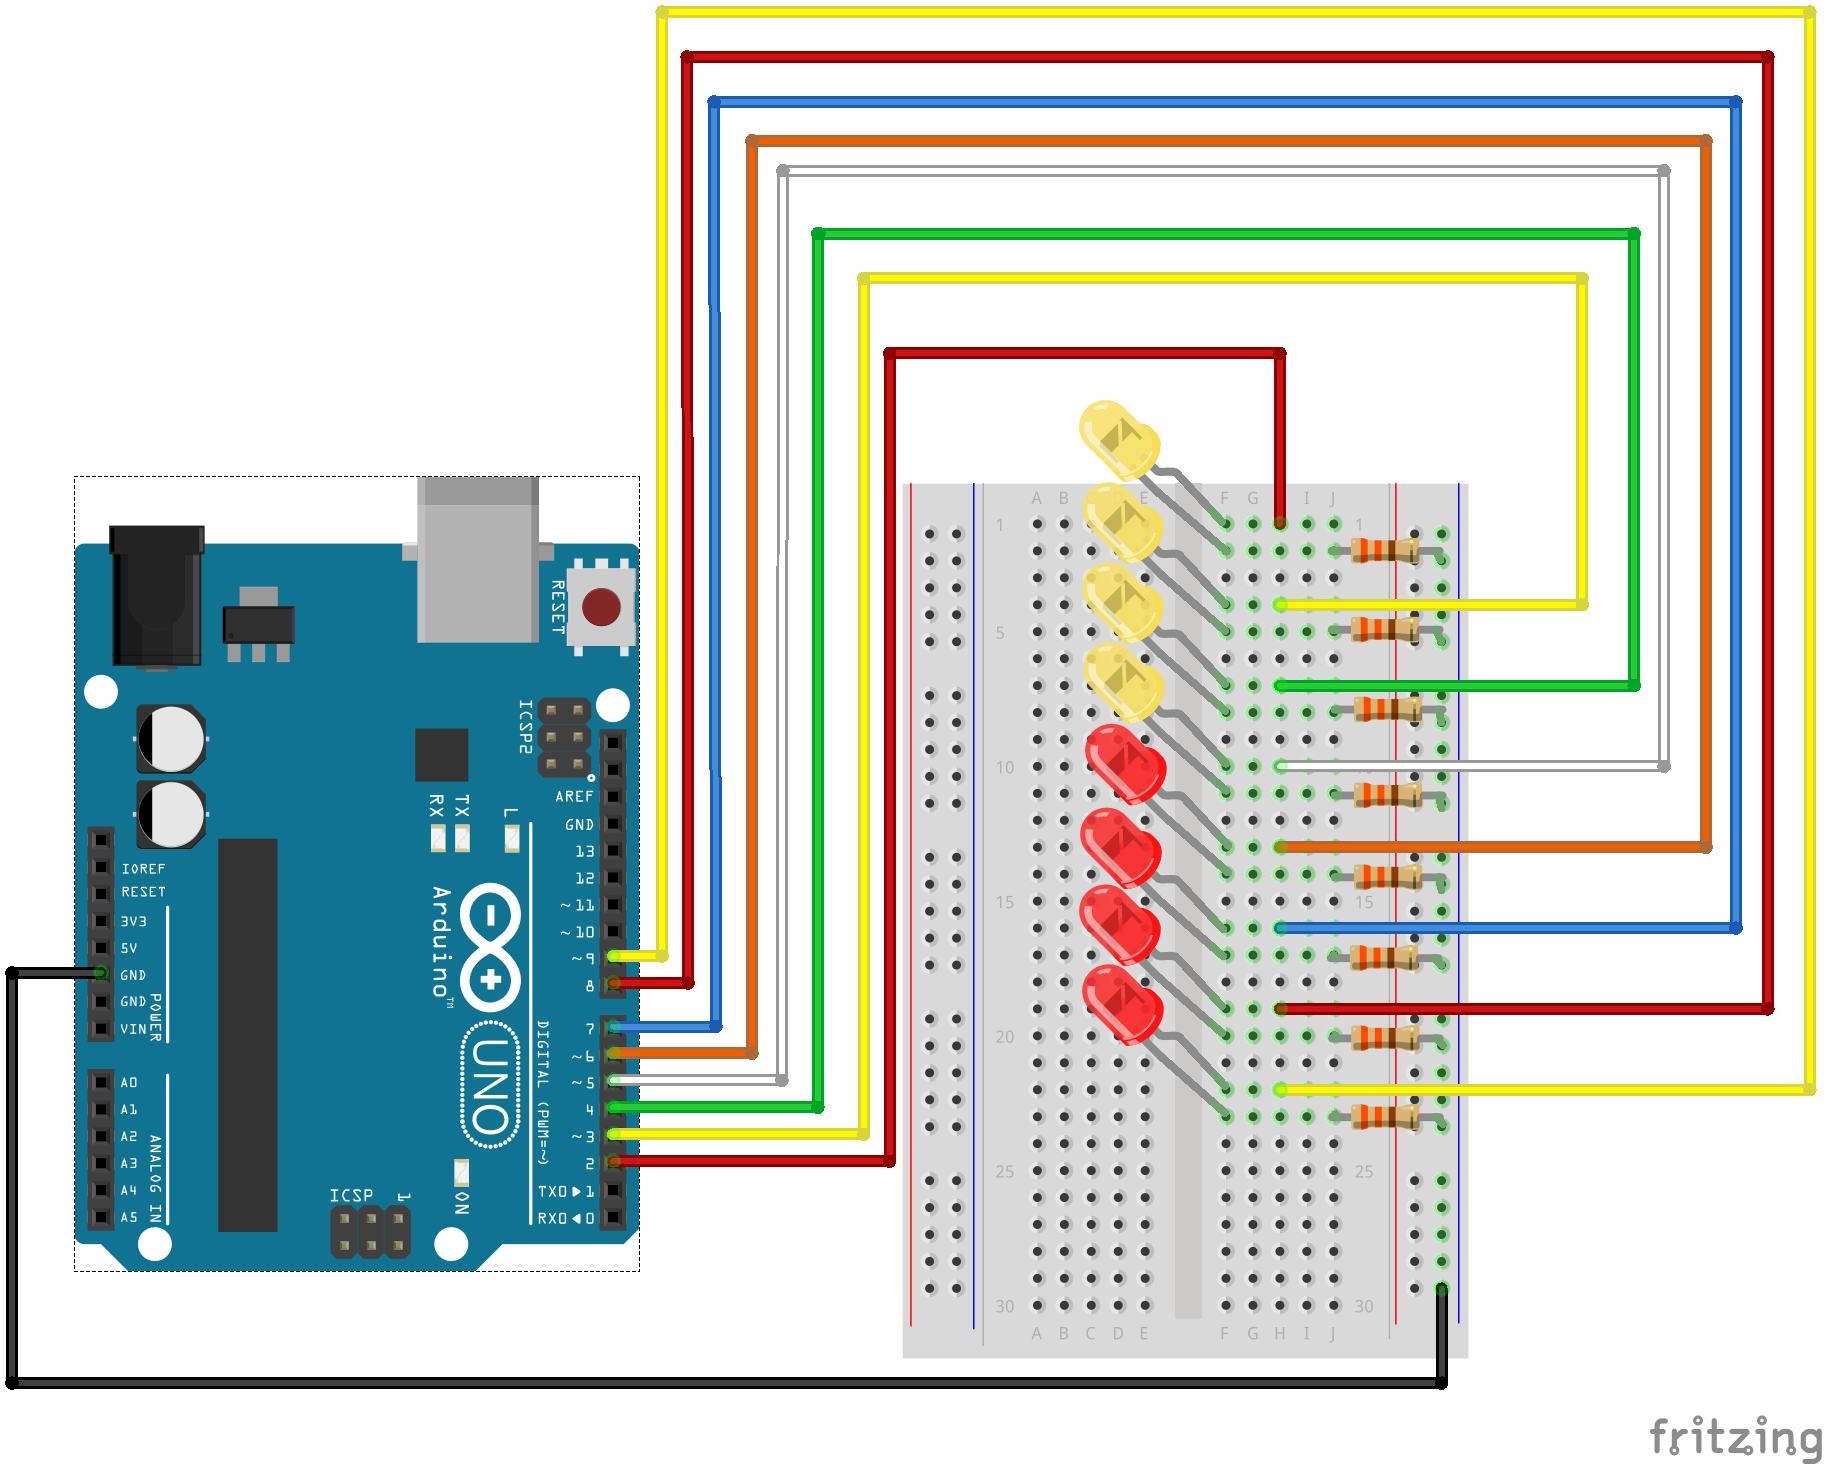
Ready to start hooking everything up? Check out the Fritzing diagram and hookup table below, to see how everything is connected.
| Polarized Components | Pay special attention to the component’s markings indicating how to place it on the breadboard. Polarized components can only be connected to a circuit in one direction. |
Fritzing Diagram for RedBoard
Fritzing Diagram for Arduino
Open the Sketch
Open Up the Arduino IDE software on your computer. Coding in the Arduino language will control your circuit. Open the code for Circuit 4 by accessing the “SIK Guide Code” you downloaded and placed into your “Examples” folder earlier.
To open the code go to: File > examples > SIK Guide Code > Circuit_04
You can also copy and paste the following code into the Arduino IDE. Hit upload, and see what happens!
language:cpp
/*
SparkFun Inventor's Kit
Example sketch 04

MULTIPLE LEDs

  Make eight LEDs dance. Dance LEDs, dance!

Hardware connections:

  You'll need eight LEDs, and eight 330 Ohm resistors
  (orange-orange-brown).

    For each LED, connect the negative side (shorter leg)
    to a 330 Ohm resistor.

    Connect the other side of the resistors to GND.

    Connect the positive side (longer leg) of the LEDs
    to Arduino digital pins 2 through 9.

This sketch was written by SparkFun Electronics,
with lots of help from the Arduino community.
This code is completely free for any use.
Visit http://learn.sparkfun.com/products/2 for SIK information.
Visit http://www.arduino.cc to learn about the Arduino.

Version 2.0 6/2012 MDG
*/


// To keep track of all the LED pins, we'll use an "array".
// An array lets you store a group of variables, and refer to them
// by their position, or "index". Here we're creating an array of
// eight integers, and initializing them to a set of values:

int ledPins[] = {2,3,4,5,6,7,8,9};

// The first element of an array is index 0.
// We've put the value "2" in index 0, "3" in index 1, etc.
// The final index in the above array is 7, which contains
// the value "9".

// We're using the values in this array to specify the pin numbers
// that the eight LEDs are connected to. LED 0 is connected to
// pin 2, LED 1 is connected to pin 3, etc.


void setup()
{
  int index;

  // In this sketch, we'll use "for() loops" to step variables from
  // one value to another, and perform a set of instructions for
  // each step. For() loops are a very handy way to get numbers to
  // count up or down.

  // Every for() loop has three statements separated by
  // semicolons (;):

  //   1. Something to do before starting
  //   2. A test to perform; as long as it's true, keep looping
  //   3. Something to do after each loop (increase a variable)

  // For the for() loop below, these are the three statements:

  //   1. index = 0;    Before starting, make index = 0.
  //   2. index <= 7;   If index is less or equal to 7,
  //                    run the following code.
  //            (When index = 8, continue with the sketch.)
  //   3. index++   Putting "++" after a variable means
  //                    "add one to it".
  //            (You can also use "index = index + 1".)

  // Every time you go through the loop, the statements following
  // the for() (within the brackets) will run.

  // When the test in statement 2 is finally false, the sketch
  // will continue.


  // Here we'll use a for() loop to initialize all the LED pins
  // to outputs. This is much easier than writing eight separate
  // statements to do the same thing.

  // This for() loop will make index = 0, then run the pinMode()
  // statement within the brackets. It will then do the same thing
  // for index = 2, index = 3, etc. all the way to index = 7.

  for(index = 0; index <= 7; index++)
  {
    pinMode(ledPins[index],OUTPUT);
    // ledPins[index] is replaced by the value in the array.
    // For example, ledPins[0] is 2
  }
}


void loop()
{
  // This loop() calls functions that we've written further below.
  // We've disabled some of these by commenting them out (putting
  // "//" in front of them). To try different LED displays, remove
  // the "//" in front of the ones you'd like to run, and add "//"
  // in front of those you don't to comment out (and disable) those
  // lines.

  oneAfterAnotherNoLoop();  // Light up all the LEDs in turn

  //oneAfterAnotherLoop();  // Same as oneAfterAnotherNoLoop,
                            // but with much less typing

  //oneOnAtATime();         // Turn on one LED at a time,
                            // scrolling down the line

  //pingPong();             // Light the LEDs middle to the edges

  //marquee();              // Chase lights like you see on signs

  //randomLED();            // Blink LEDs randomly
}


/*
oneAfterAnotherNoLoop()

This function will light one LED, delay for delayTime, then light
the next LED, and repeat until all the LEDs are on. It will then
turn them off in the reverse order.

This function does NOT use a for() loop. We've done it the hard way
to show you how much easier life can be when you use for() loops.
Take a look at oneAfterAnotherLoop() further down, which does
exactly the same thing with much less typing.
*/

void oneAfterAnotherNoLoop()
{
  int delayTime = 100; // time (milliseconds) to pause between LEDs
                       // make this smaller for faster switching

  // turn all the LEDs on:

  digitalWrite(ledPins[0], HIGH);  //Turns on LED #0 (pin 2)
  delay(delayTime);                //wait delayTime milliseconds
  digitalWrite(ledPins[1], HIGH);  //Turns on LED #1 (pin 3)
  delay(delayTime);                //wait delayTime milliseconds
  digitalWrite(ledPins[2], HIGH);  //Turns on LED #2 (pin 4)
  delay(delayTime);                //wait delayTime milliseconds
  digitalWrite(ledPins[3], HIGH);  //Turns on LED #3 (pin 5)
  delay(delayTime);                //wait delayTime milliseconds
  digitalWrite(ledPins[4], HIGH);  //Turns on LED #4 (pin 6)
  delay(delayTime);                //wait delayTime milliseconds
  digitalWrite(ledPins[5], HIGH);  //Turns on LED #5 (pin 7)
  delay(delayTime);                //wait delayTime milliseconds
  digitalWrite(ledPins[6], HIGH);  //Turns on LED #6 (pin 8)
  delay(delayTime);                //wait delayTime milliseconds
  digitalWrite(ledPins[7], HIGH);  //Turns on LED #7 (pin 9)
  delay(delayTime);                //wait delayTime milliseconds

  // turn all the LEDs off:

  digitalWrite(ledPins[7], LOW);   //Turn off LED #7 (pin 9)
  delay(delayTime);                //wait delayTime milliseconds
  digitalWrite(ledPins[6], LOW);   //Turn off LED #6 (pin 8)
  delay(delayTime);                //wait delayTime milliseconds
  digitalWrite(ledPins[5], LOW);   //Turn off LED #5 (pin 7)
  delay(delayTime);                //wait delayTime milliseconds
  digitalWrite(ledPins[4], LOW);   //Turn off LED #4 (pin 6)
  delay(delayTime);                //wait delayTime milliseconds
  digitalWrite(ledPins[3], LOW);   //Turn off LED #3 (pin 5)
  delay(delayTime);                //wait delayTime milliseconds
  digitalWrite(ledPins[2], LOW);   //Turn off LED #2 (pin 4)
  delay(delayTime);                //wait delayTime milliseconds
  digitalWrite(ledPins[1], LOW);   //Turn off LED #1 (pin 3)
  delay(delayTime);                //wait delayTime milliseconds
  digitalWrite(ledPins[0], LOW);   //Turn off LED #0 (pin 2)
  delay(delayTime);                //wait delayTime milliseconds
}


/*
oneAfterAnotherLoop()

This function does exactly the same thing as oneAfterAnotherNoLoop(),
but it takes advantage of for() loops and the array to do it with
much less typing.
*/

void oneAfterAnotherLoop()
{
  int index;
  int delayTime = 100; // milliseconds to pause between LEDs
                       // make this smaller for faster switching

  // Turn all the LEDs on:

  // This for() loop will step index from 0 to 7
  // (putting "++" after a variable means add one to it)
  // and will then use digitalWrite() to turn that LED on.

  for(index = 0; index <= 7; index++)
  {
    digitalWrite(ledPins[index], HIGH);
    delay(delayTime);
  }

  // Turn all the LEDs off:

  // This for() loop will step index from 7 to 0
  // (putting "--" after a variable means subtract one from it)
  // and will then use digitalWrite() to turn that LED off.

  for(index = 7; index >= 0; index--)
  {
    digitalWrite(ledPins[index], LOW);
    delay(delayTime);
  }
}


/*
oneOnAtATime()

This function will step through the LEDs,
lighting only one at at time.
*/

void oneOnAtATime()
{
  int index;
  int delayTime = 100; // milliseconds to pause between LEDs
                       // make this smaller for faster switching

  // step through the LEDs, from 0 to 7

  for(index = 0; index <= 7; index++)
  {
    digitalWrite(ledPins[index], HIGH);  // turn LED on
    delay(delayTime);                    // pause to slow down
    digitalWrite(ledPins[index], LOW);   // turn LED off
  }
}


/*
pingPong()

This function will step through the LEDs,
lighting one at at time in both directions.
*/

void pingPong()
{
  int index;
  int delayTime = 100; // milliseconds to pause between LEDs
                       // make this smaller for faster switching

  // step through the LEDs, from 0 to 7

  for(index = 0; index <= 7; index++)
  {
    digitalWrite(ledPins[index], HIGH);  // turn LED on
    delay(delayTime);                    // pause to slow down
    digitalWrite(ledPins[index], LOW);   // turn LED off
  }

  // step through the LEDs, from 7 to 0

  for(index = 7; index >= 0; index--)
  {
    digitalWrite(ledPins[index], HIGH);  // turn LED on
    delay(delayTime);                    // pause to slow down
    digitalWrite(ledPins[index], LOW);   // turn LED off
  }
}


/*
marquee()

This function will mimic "chase lights" like those around signs.
*/

void marquee()
{
  int index;
  int delayTime = 200; // milliseconds to pause between LEDs
                       // Make this smaller for faster switching

  // Step through the first four LEDs
  // (We'll light up one in the lower 4 and one in the upper 4)

  for(index = 0; index <= 3; index++) // Step from 0 to 3
  {
    digitalWrite(ledPins[index], HIGH);    // Turn a LED on
    digitalWrite(ledPins[index+4], HIGH);  // Skip four, and turn that LED on
    delay(delayTime);                      // Pause to slow down the sequence
    digitalWrite(ledPins[index], LOW);     // Turn the LED off
    digitalWrite(ledPins[index+4], LOW);   // Skip four, and turn that LED off
  }
}


/*
randomLED()

This function will turn on random LEDs. Can you modify it so it
also lights them for random times?
*/

void randomLED()
{
  int index;
  int delayTime;

  // The random() function will return a semi-random number each
  // time it is called. See http://arduino.cc/en/Reference/Random
  // for tips on how to make random() even more random.

  index = random(8);    // pick a random number between 0 and 7
  delayTime = 100;

  digitalWrite(ledPins[index], HIGH);  // turn LED on
  delay(delayTime);                    // pause to slow down
  digitalWrite(ledPins[index], LOW);   // turn LED off
}
Code To Note
int ledPins[] = {2,3,4,5,6,7,8,9};
When you have to manage a lot of variables, an "array" is a handy way to group them together. Here we're creating an array of integers, called ledPins, with eight elements.
digitalWrite(ledPins[0], HIGH);
You refer to the elements in an array by their position. The first element is at position 0, the second is at position 1, etc. You refer to an element using "ledPins[x]" where x is the position. Here we're making digital pin 2 HIGH, since the array element at position 0 is "2".
index = random(8);
Computers like to do the same things each time they run. But sometimes you want to do things randomly, such as simulating the roll of a dice. The random() function is a great way to do this.
See http://arduino.cc/en/reference/random for more information.
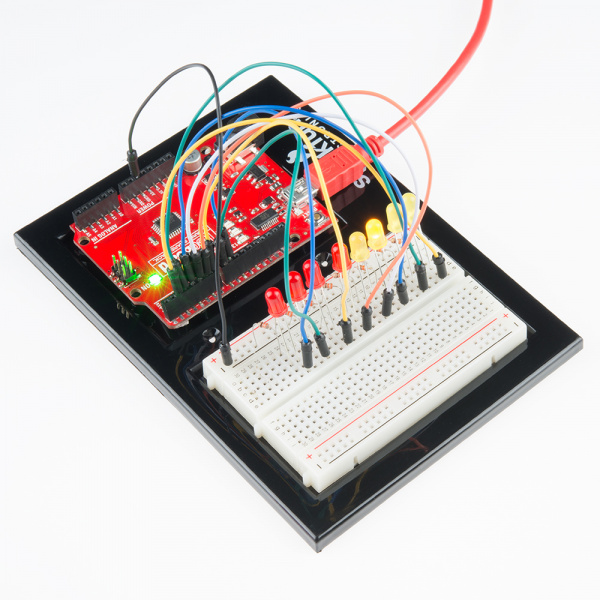
What You Should See
This is similar to circuit number one, but instead of one LED, you should see all the LEDs blink. If they aren't, make sure you have assembled the circuit correctly and verified and uploaded the code to your board, or see the troubleshooting section.

Real World Application
Scrolling marquee displays are generally used to spread short segments of important information. They are built out of many LEDs.
Troubleshooting
Some LEDs Fail to Light
It is easy to insert an LED backwards. Check the LEDs that aren't working and ensure they are in the correct orientation.
Operating out of sequence
With eight wires it's easy to cross a couple. Double check that the first LED is plugged into pin 2 and each pin thereafter.
Starting Fresh
It’s easy to accidentally misplace a wire without noticing. Pulling everything out and starting with a fresh slate is often easier than trying to track down the problem.