LilyPad Development Board Activity Guide
 Gella
Gella 
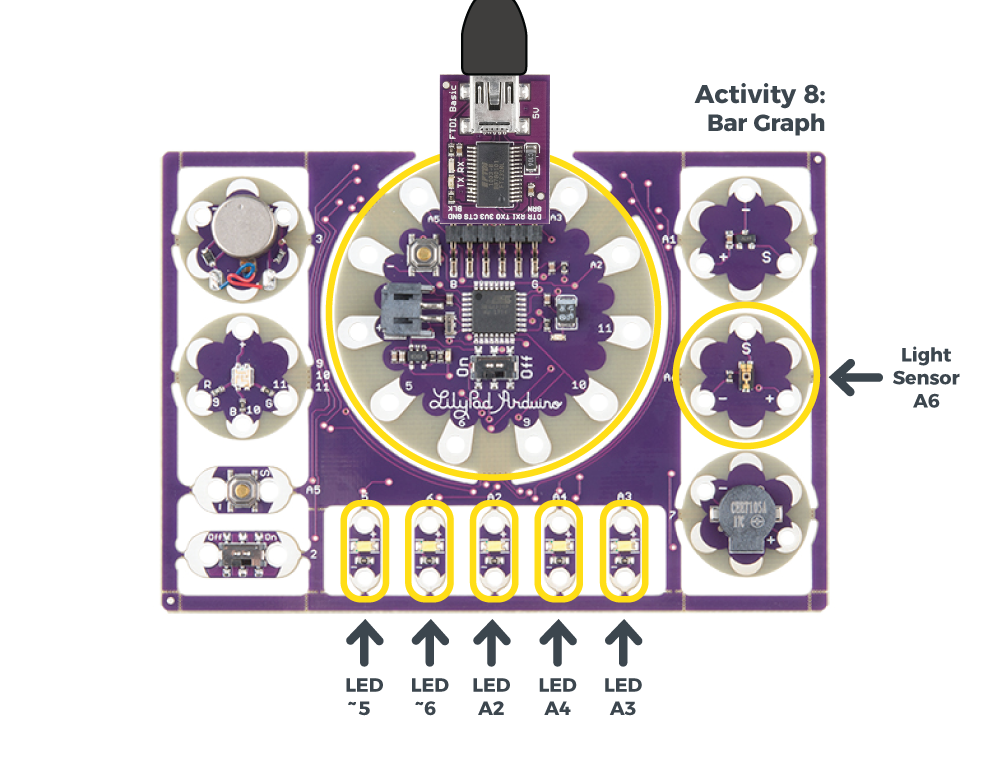
8: LED Bar Graph
The LilyPad Development Board includes five pre-wired white LEDs, because they're in a row they're perfect for creating a LED bar graphs. In this activity, we'll experiment with graphing the readings from the light sensor onto the row of LEDs.
LilyPad Boards Used in This Activity
- LilyPad Arduino Simple
- LilyPad Light Sensor
- LilyPad LEDs
An LED bar graph is a row of LEDs that you can use to display information by lighting up one or more of the LEDs. The LilyPad Development Board has a row of LEDs you can use as a bar graph. LED bar graphs have less resolution than other types of displays, but this can be an advantage if you just need a quick indication if a value is high or low.
New Concepts Introduced in This Activity
Using Arrays
Arrays are a handy way to store many variables in one structure. Here we'll store the pin / sew tab numbers of the white LEDs, making them easier to use as a group.
Creating Custom Functions
So far we've been using Arduino's built-in functions, but you can also create your own. Functions are great for bits of code you want to run repeatedly, or even reuse in other programs.
Anatomy of a Function
So far we've been using Arduino's built-in functions to do everything, but you can write your own functions as well. Functions are a great way to encapsulate a bit of code that you use a lot, or want to re-use in other programs.You've already seen the basic structure of the
setup() and loop() functions. Your own functions will have the same structure. Let's go over the individual pieces:
Return Type
You've probably noticed the word
void at the start of the setup() and loop() functions, and wondered what that means.
Functions can optionally return values, and the return type lets you specify what type of data it will be returning. Some functions, like
setup() and loop() just carry out that task. Since they don't return a value, their return type is void.
Other functions, like
digitalRead() and analogRead() return a value. These functions have int as their return type.
If you want to write a function that returns a value, specify the return type (usually
int) before the name, and include a return statement at the end of the function. Here's an example of a very simple function that always returns 4 when called:
int four(){ return 4;} |
Name
Every function needs a name. It should be unique; not the name of an existing function or variable (you can tell this if the name changes color when you type it in). Ideally the name should be descriptive of what the function does, though of course it's your program and you can name things whatever you wish.
Parameters
You've seen that many functions require parameters. For example,
pinMode() requires a pin number, and whether that pin should be configured as an INPUT or OUTPUT.
If your custom function needs parameters, you can declare them in the parentheses after the function name. These are declared just like variables in our code; with a type (usually
int) and a name. If you need more than one parameter, separate the declarations with commas. Here's an example of a simple function that adds two numbers together and returns the result:
int add(int a, int b){ int c; c = a + b; return c;}Note that when you call a function with parameters, the values are transferred to the function by position, not by name. Let's say you're calling your
add functions from the main loop:
var1 = 100;var2 = 200;var3 = add(var1,var2);When your
add() function runs, the variable a will get the value 100 from var1, and the variable b will get the value 200 from var2. When the function returns, it will transfer the value from c back to var3 (which will be 300).
Scope
Now's a good time to bring up the concept of scope, which governs where variables are visible in your program (spoiler: it depends on where you declare them.)
In all of our activities, we've declared several variables at the very top of the program. Because they are declared "outside" of
setup() and loop(), they've visible within those functions (and any others you create). Because these variables are visible everywhere, they're called global variables.
We can also declare variables inside functions, as we did in the
add() function above. This variable will be usable within the function, but if you try to access it elsewhere, you will get an error ("variable not declared in this scope"). These are called local variables.
Both types of variables have their place. Global variables are useful for pin names and option settings, since they're visible everywhere and easy to change from one place. Local variables are ideal for data that doesn't need to leave a function; they allow you to copy and paste functions to new programs.
Learn more about functions and their use at the Arduino Reference site.
Incrementing Shortcuts
Many times in programming you'll want to add or subtract one from a number, such as in a for() loop. In earlier activities, we did this with the pattern x = x + 1. But there are some handy shortcuts you can use:
| The Long Way | Shortcut |
|---|---|
| x = x + 1 | x++ |
| x = x - 1 | x-- |
| x = x + 5 | x += 5 |
| x = x - 8 | x -= 8 |
| x = x * 2 | x *= 2 |
| x = x / 4 | x /= 4 |
Learn more about compound operators for shorcuts and their use at the Arduino Reference site.
Example Code
To open the code, go to:
File > Examples > LilyPadDevelopmentBoard_ActivityGuide > LPD_08_BarGraph
You can also copy and paste the following code into the Arduino IDE. Hit upload, and see what happens!
language:c
/*
LilyPad Development Board Activity 8: LED Bar Graph
SparkFun Electronics
https://www.sparkfun.com/products/11262

Play with the row of five LEDs on the bottom of the LilyPad Development Board

Follow the tutorial at:
https://learn.sparkfun.com/tutorials/lilypad-development-board-activity-guide/8-led-bar-graph

This code is released under the MIT License (http://opensource.org/licenses/MIT)

******************************************************************************/

// Create a variable for the light sensor input:

int sensorPin = A6;


// To the five LEDs on the LilyPad Development Board easier to use, we'll put those numbers into an array.
// The initial [5] defines the size of the array (five elements).
// We're filling the array with predefined values, but you could do this
// in your code as well.

int bargraphLED[5] = {5,6,A2,A4,A3};

// The array is indexed from 0 to 4; for example bargraphLED[2] = A2

void setup()
{
  int x;

  // Initialize the sensor pin as an input, but without a pullup
  // (Pullups are only used for switch inputs)

  pinMode(sensorPin, INPUT);

  // Initialize the bargraph LED pins as outputs
  // We'll use the matrix we defined above,
  // where the LEDs are indexed from 0 to 4

  for (x = 0; x <= 4; x++)
  {
    pinMode(bargraphLED[x], OUTPUT);
  }

  // Initialize the serial monitor

  Serial.begin(9600);
}

void loop()
{
  int sensorValue;

  // Read the sensor value (will be 0 to 1023):

  sensorValue = analogRead(sensorPin);

  // Print out the sensor reading:

  Serial.print("sensor value: ");
  Serial.println(sensorValue);

  // Display the sensor reading on the bar graph LEDs.
  // This is a new function that we created ourselves (see below).

  barGraph(sensorValue);
}

// Here we're making our own command called barGraph:
// The first "void" means we don't return anything from this command
// The "int value" is what we'll pass to the command (it must be an integer,
// and it will be called "value" in the command.

void barGraph(int value)
{
  // Create a LED bargraph using value as an input.
  // Value should be in the range 0 to 1023.

  int x;

  // Step through the bargraph LEDs,
  // Turn them on or off depending on value.

  // Value will be in the range 0 to 1023.
  // There are 6 LEDs in the bargraph.
  // 1023 divided by 5 is 204, so 204 will be our threshold
  // between each LED

  for (x=0; x <= 4; x++)
  {
    if (value > (x*204) )
    {
      digitalWrite(bargraphLED[x], HIGH);
    }
    else
    {
      digitalWrite(bargraphLED[x], LOW);
    }
  }
}
What You Should See
After the code loads, the row of white LEDs on the LilyPad Development Board will create a bar graphing showing how much light is hitting the light sensor by lighting up more or less of the row. Try covering the sensor with your hand, or aiming a flashlight at it to see a larger or smaller response from the bar graph.
Understanding Your Program
Program Overview
- Set up an array with the white LED pins.
- Configure the pins and serial monitor.
- Read the light level.
- Display it on the bar graph.
- Repeat.
Code to Note
| Code | Description |
|---|---|
int bargraphLED[5] = {5,6,A2,A4,A3}; |
Creating an Array:An array is a convenient way to group a number of variables together. Here we're taking the pin numbers of the white LEDs, and storing them in an array calledbargraphLED.
When you declare an array, one method is to specify how many variables (also called elements) it will contain. This array will contain five variables, which we specify in brackets after the variable name. At the same time that we're declaring the array, we're also filling it in with our LED pin numbers. Later on, if you want to read or write one of those variables, you specify it by position. The positions in this array are numbered 0 through 4. For example, if you want to reference the variable in position 2, you would write bargraphLED[2], which equals A2.
|
for (x = 0; x <= 4; x++){ pinMode(bargraphLED[x], OUTPUT);} |
Using an Array:The nice thing about storing our bar graph LEDs in an array is that we can access the pin numbers by their positions (0 to 4). This makes it easy to createfor() loops that do the same thing to all of them, like using pinMode() to make them all outputs.
|
void barGraph(int value){ int x; for (x=0; x <= 4; x++) { if (value > (x*204) ) { digitalWrite(bargraphLED[x], HIGH); } else { digitalWrite(bargraphLED[x], LOW); } }} |
Creating a Custom Function:In addition to the standard functionssetup() and loop(), you can create your own functions. Here we've created a new function called barGraph(). It's set up much like the setup() and loop() functions, but we've added a parameter called value. The value should be from 0 to 1023, the same range we get from analogRead().
Within the brackets of our function, we step through the positions in our LED array (0 to 4). We then determine whether each LED should be lit up or not. Each LED represents about 204 in the range of 0 to 1023, and if |
barGraph(sensorValue);
|
Using a Custom Function:Now that we've written our custom function, we can use it insidesetup() or loop() just like any other command. As you recall, we wrote barGraph() to take one parameter. Here we're providing it with sensorValue. This value will be transferred to the value variable within the function itself.
|
Coding Challenges
Alter the function of the bar graph so that all of the LEDs are on, and go out as the value increases.
Alter the value of the bar graph so that it fills in from the right rather than from the left. Hint: Can you do this by declaring the array differently?