LilyPad Development Board Activity Guide
 Gella
Gella 
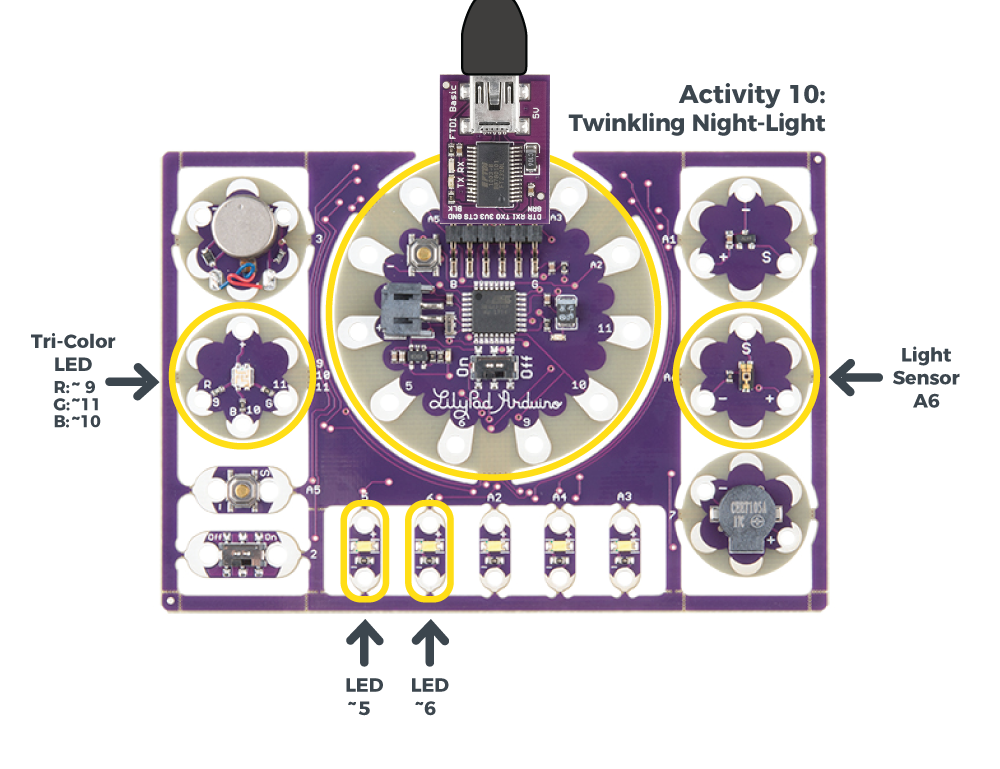
10: Twinkling Night-Light Project
In this activity, we'll pull together elements from earlier activities to create an entire project: a night-light that randomly twinkles LEDs when it gets dark. You could use this as the starting point for a project based around twinkling stars, fireflies, lightning clouds or something else entirely.
LilyPad Boards Used in This Activity
- LilyPad Arduino Simple
- LilyPad Tri-Color LED
- LilyPad Light Sensor
- LilyPad LEDs
New Concepts Introduced in This Activity
Random
Computers are generally very predictable. Usually this is exactly what we want, but sometimes, especially when creating artistic projects, we want a bit of randomness to make things more surprising and natural. In this activity, we'll introduce the random() command, which will help you do exactly that.
The random() function is a fun command that will return a random number. You can use it to randomize which LEDs are lit, how long to pause, what tone to play, etc. The random() function takes one parameter, the number of possibilites to choose from. For example, if you wanted to simulate a six-sided die, you would call random(6). The function will then return a number between 0 and 5.
The numbers returned by
random() aren't entirely random. Every time your program runs, it will repeat the same "random" sequence. This is good enough for many art projects, but if you want a truly random sequence each time your program runs, you can use the randomSeed() command. See Arduino's Reference site for more information on how to use random() in your code.
Setting a Threshold
To determine when it's dark enough to begin twinkling, we'll define a threshold value. If the ambient light level is below that value, we'll begin twinkling. To help you fine-tune this value, we also use the serial monitor to print out the current light level.
Example Code
To open the code, go to:
File > Examples > LilyPadDevelopmentBoard_ActivityGuide > LPD_10_NightLight
You can also copy and paste the following code into the Arduino IDE. Hit upload, and see what happens!
language:c
/*
LilyPad Development Board Activity 10: Twinkling Night-Light
SparkFun Electronics
https://www.sparkfun.com/products/11262

Create a twinkling night-light that turns on when it gets dark.

Follow the tutorial at:
https://learn.sparkfun.com/tutorials/lilypad-development-board-activity-guide/10-twinkling-night-light-project

This code is released under the MIT License (http://opensource.org/licenses/MIT)

******************************************************************************/

// Create variables for the pins we'll be using:

int lightSensor = A6;

// Array of all the LEDs we'll be twinkling. You can set these to the sewtabs
// you'll be using in your project. Remember to only choose outputs that
// have the "~" symbol that are compatible with analogWrite.

int numLEDs = 2;
int LED[2] = {5,6};

int blueLED = 10;

// Threshold for light level (when it's darker than this, twinkle LEDs)

int threshold = 50;

void setup()
{
  int x;

  // Initialize the pins we'll be using

  pinMode(lightSensor, INPUT);

  for (x = 0; x < numLEDs; x++)
  {
    pinMode(LED[x],OUTPUT);
  }

  pinMode(blueLED,OUTPUT);

  // Initialize the serial monitor

  Serial.begin(9600);
}

void loop()
{
  int x,lightLevel,brightness;

  // Read the sensor value (will be 0 to 255):

  lightLevel = analogRead(lightSensor);

  // Print out the sensor reading:

  Serial.print("light level: ");
  Serial.print(lightLevel);
  Serial.print(" threshold: ");
  Serial.print(threshold);
  Serial.print(" twinkle: ");

  // If the light level is below the threshold, twinkle LEDs:

  if (lightLevel < threshold)
  {
    Serial.println("ON");
    digitalWrite(blueLED,LOW); //Note that this is reversed than other LEDS because the tri-color LED is common anode.

    // Pick a random LED:

    x = random(numLEDs);

    // Quickly ramp up the brightness of the LED from off to on:

    for (brightness = 0; brightness <= 255; brightness++)
    {
      analogWrite(LED[x],brightness);
      delay(1);
    }

    // Quickly ramp down the brightness of the LED from on to off:

    for (brightness = 255; brightness >= 0; brightness--)
    {
      analogWrite(LED[x],brightness);
      delay(1);
    }

    // Wait a random amount of time (up to 2 seconds)

    delay(random(2000));
  }
  else
  {
    Serial.println("off");
    digitalWrite(blueLED,HIGH); //Note that this is reversed than other LEDS because the tri-color LED is common anode.
  }
}
What You Should See
Cover the light sensor with your hand. When the sensor's readings drop below the set threshold, the tri-color LED's blue LED will light up indicating it is 'dark'. Then two LEDs along the bottom of the Development Board will twinkle in a random pattern.
Understanding Your Program
Program Overview
- Set up our array with the LEDs we want to twinkle.
- Set up our input and output pins.
- Read the light sensor value; if it's low, turn on the blue LED and begin twinkling.
- To twinkle, choose a random LED from the array, then rapidly brighten and dim it.
- Wait a random amount of time between twinkles.
- Repeat.
Code to Note
| Code | Description |
|---|---|
int x,lightLevel,brightness; |
Declaring Multiple Variables Shortcut:In this program, instead of creating a line for each variable declaration, we combined them into one statement. Since all three of the variables you will use are the same typeint, they can be declared together. |
int numLEDs = 2;int LED[2] = {5,6}; |
Using Arrays:As in the bar graph activity, we're creating an array calledLED with the list of LEDs we'd like to twinkle. Note that these are all PWM-capable pins (the ones with the "~" symbol). Because there could be a few or many LEDs in this list, we're also saving the number of LEDs we'll be using in numLEDs. |
int threshold = 50; |
Setting a Threshold Variable:In this program, we'll be creating a night-light that only twinkles when the ambient light level is below a certain threshold. You can fine-tune this value using the information printed in the serial monitor. |
lightLevel = analogRead(lightSensor);...if (lightLevel < threshold){ ... |
Check Light Levels Against Threshold:In theloop()function, the first thing we do is check the ambient light level. If it's below the threshold value, we start twinkling.
|
x = random(numLEDs); |
Choose a Random LED:First we pick which LED we'd like to twinkle. Therandom function will choose a number between 0 and numLEDs. We'll use this number as an index into the LED array.
|
for (brightness = 0; brightness <= 255; brightness++){ analogWrite(LED[x],brightness); delay(1);}
|
Creating a Twinkle Effect:To twinkle the LED, we use twofor() loops to quickly brighten and dim the LED. Note how we're using the random value x to choose which LED to twinkle.
|
delay(random(2000)); |
Adding Random Delays:Finally, we wait a random amount of time between 0 and 2 seconds (2000 milliseconds). After the time has elapsed, theloop() function automatically starts over, and we'll twinkle again if the light level is still below the threshold.
|
Coding Challenges
Try making the LEDs twinkle faster or slower, or have a shorter or longer pause between twinkles.
Instead of twinkling, can you simulate a heartbeat or other pattern?
Can you modify the code so that it twinkles when it's bright out?
Can you add sounds to the twinkling?