Getting Started with the DA16200 FreeRTOS SDK
Software Setup
- Windows 10 and Ubuntu 20.04.1 LTS
- Users may need administrative privileges to install some of the following software.
- xPack Project Manager:
- GNU Arm GCC 10.2.1
- Windows: Windows Build Tools
- Eclipse 2020-09
- DA16200 FreeRTOS SDK
- Serial Terminal with Y-Modem support
- Windows: Tera Term (Recommended)
- Linux: minicom (Recommended)
Users should have already familiarized themselves with the DA16200 FreeRTOS Getting Started Guide. While a majority of the information in this section is already covered in the DA16200 FreeRTOS Getting Started Guide, we have included a few additional details specific to the DA16200 boards in our catalog. Below, are a complete set of instructions for users to download, install, and setup the various programs required for the DA16200 FreeRTOS SDK.
Serial-to-UART Driver
Depending on the board and/or adapter being utilized, users will need to install the appropriate driver for their computer to recognize the serial-to-UART chip on their board/adapter. Most of the latest operating systems will recognize serial-to-UART chip on the board and automatically install the required driver.
To manually install the CH340 driver on their computer, users can download it from the WCH website. For more information, check out our How to Install CH340 Drivers Tutorial.
How to Install CH340 Drivers
Terminal Emulator (with Y-Modem)
In order to program their board through the USB-C connection and access the serial debug interface, users will need a serial terminal installed on their computer. We have verified that these emulators, below, support Y-Modem to upload the SDK bootloader and firmware. Users are welcome to use their preferred serial terminal, but we will only provide support with these applications for this tutorial.
For Windows computers, we recommend Tera Term. Please refer to the serial terminal basics tutorial to get started with installing and utilizing Tera Term:
Serial Terminal Basics
This tutorial will show you how to communicate with your serial devices using a variety of terminal emulator applications.On Linux computers, users should install
minicom.language:bash sudo apt install minicom
Once installed, users will need to configure the serial terminal with the following settings for the COM port they are utilizing:
- Baud Rate: 230400 bps
- Data Bits: 8 (8-N-1)
- Parity: None
- Stop Bits: 1
- Flow Control (HW/SW): None
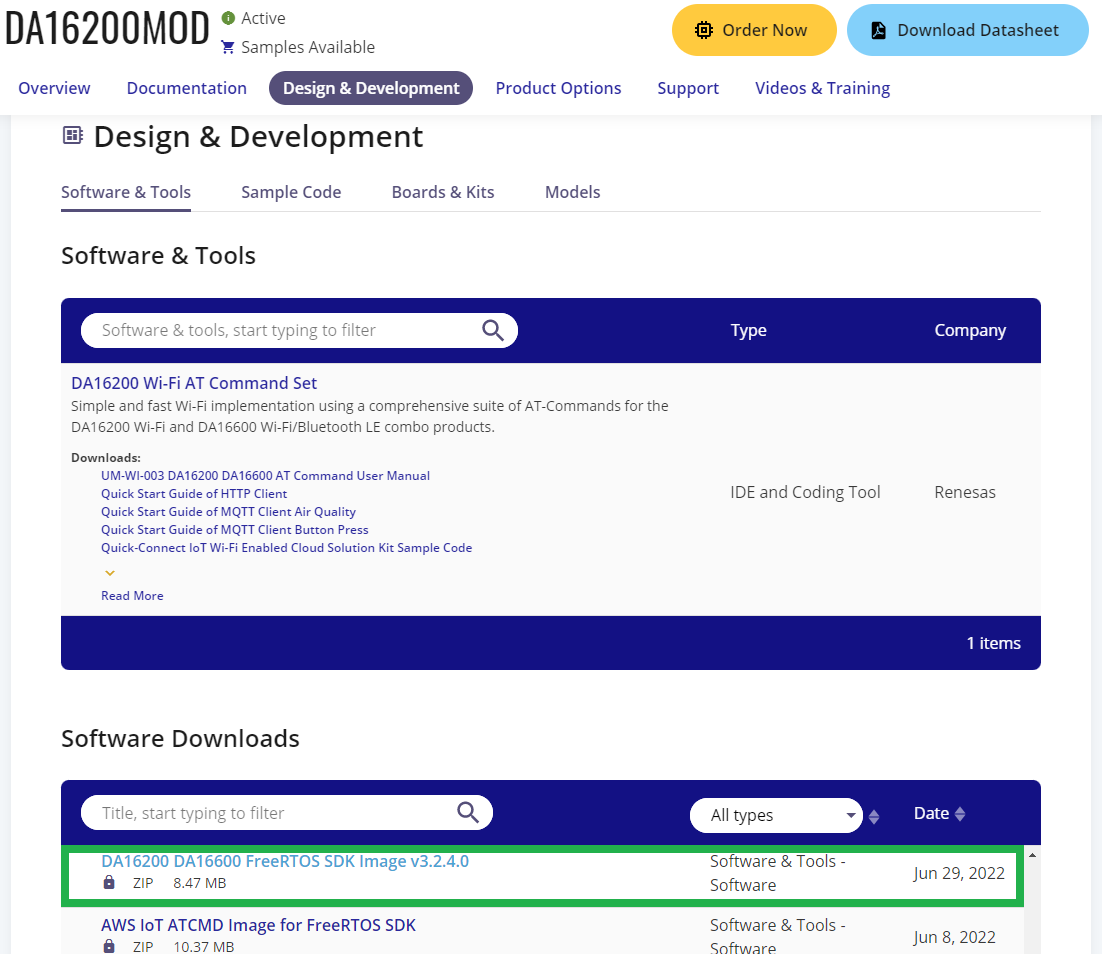
Download the DA16200 FreeRTOS SDK Image
In order to utilize the DA16200 FreeRTOS SDK, users should to program their board with the latest DA16200 FreeRTOS SDK firmware. To download the DA16200 FreeRTOS SDK Image, users will need to register an account first. Then, from the Design & Development tab of the DA16200MOD product page, users can download the:
- DA16200 DA16600 FreeRTOS SDK Image v3.2.4.0 (8.47 MB) 08/17/2022
- There are two firmware images for the DA16200 FreeRTOS SDK:
- FBOOT is the bootloader image which is used to initialize the DA16200 and launch the main firmware.
- File Name:
DA16200_FBOOT-GEN01-01-XXXXXXXXX_W25Q32JW.img - The bootloader image must be the first thing loaded into flash for a new device.
- Since the bootloader image contains SFDP (flash specific) information, the bootloader must be loaded into flash before other images are loaded.
- When the SDK is updated, always load the bootloader image first.
- File Name:
- FRTOS is the main firmware image which includes the RTOS and user applications.
- File Name:
DA16200_FRTOS-GEN01-01-XXXXXXXXX-XXXXXX.img
- File Name:
- FBOOT is the bootloader image which is used to initialize the DA16200 and launch the main firmware.
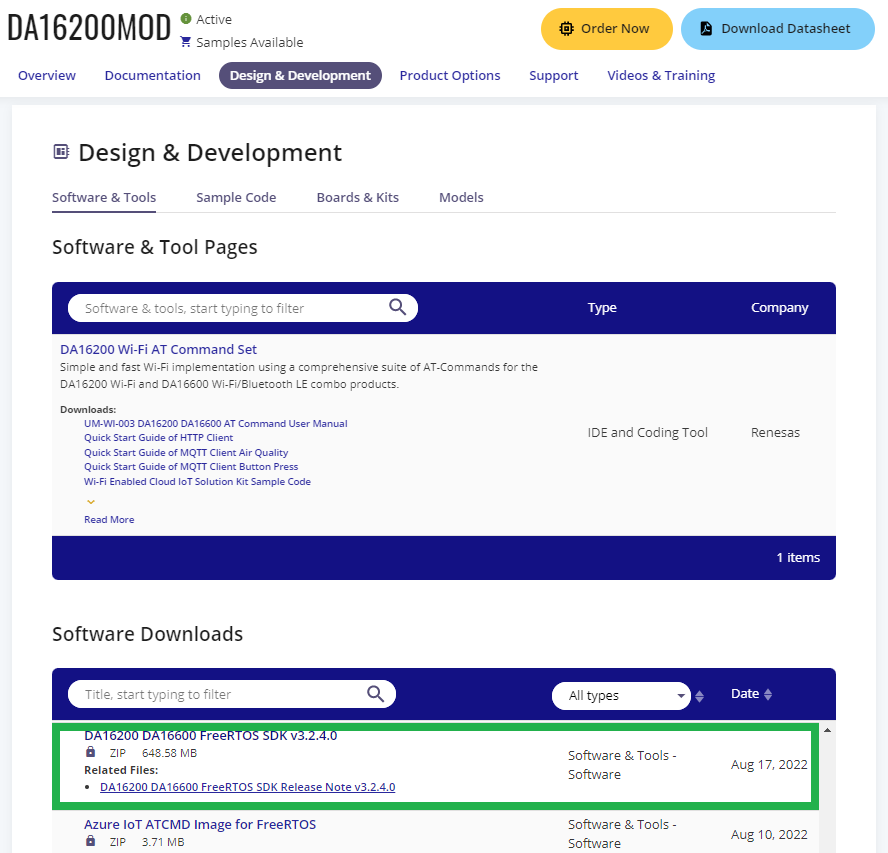
Download the DA16200 FreeRTOS SDK
C:/dialog_sdk).To download the DA16200 FreeRTOS SDK, users will need to register an account first. Then, from the Design & Development tab of the DA16200MOD product page, users can download the:
- DA16200 DA16600 FreeRTOS SDK v3.2.3.0 (648.58 MB) 08/17/2022
For more information on the content of the DA16200 FreeRTOS SDK (i.e. file organization, API, example applications, etc.), please refer to the DA16200 FreeRTOS SDK Programmer Guide.
xPack Project Manager
Users will need to install the xPack Project Manager (xpm), to install the following xPack development tools required to utilize the SDK. Follow the instructions on the xPack website to install the software.
To install the xPack Project Manager (xpm) through Node.js, open a Windows command line or a Linux terminal and enter the following command:
language:bash
npm install --global xpm@latest
GCC Toolchain
In order to compile the code from the SDK, users will need to install the GNU Arm GCC (v10.2.1) cross compiler.
This development tool can be installed as an xPack package through the xPack Project Manager. Once users have installed the xpm, from the section above, open a Windows command line or a Linux terminal and enter the following command:
language:bash
xpm install --global @xpack-dev-tools/arm-none-eabi-gcc@10.2.1-1.1.2
Windows Build Tools
Windows does not include any build tools (i.e. make) by default; therefore, users should install the Windows Build Tools xPack package.
This development tool can be installed as an xPack package through the xPack Project Manager. Once users have installed the xpm, from the section above, open a Windows command line and enter the following command:
language:bash
xpm install --global @xpack-dev-tools/windows-build-tools
Install and Setup Eclipse
The Eclipse IDE (integrated development environment) is a free and open source development platform that is released under the Eclipse Public License (EPL). The Eclipse IDE will be used to import the DA16200 FreeRTOS SDK into a workspace and build/compile the example projects using xPack development tools.
For more documentation on the Eclipse IDE, please refer to the resources below:
Installation
Installation of the Eclipse IDE is simple:
- Download the installer for the Eclipse IDE. (Users can also download the installation software from the Download or Getting Started pages.)
Run the downloaded executable to launch the Eclipse Installer.
On Linux platforms, use the following commands to extract and execute to Eclipse Installer:
language:bash tar -xvzf eclipse-inst-jre-linux64.tar.gz cd eclipse-installer ./eclipse-inst- Select the Eclipse IDE for Embedded C/C++ Developers from the installation options.
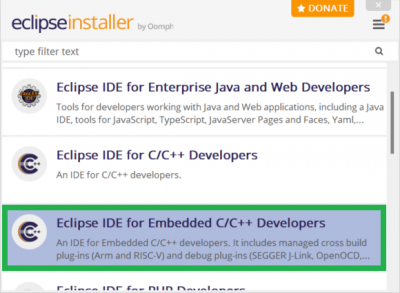 Installation menu from Eclipse Installer. (Click to enlarge)
- Select the program's installation location and accept the software agreements.
Configuration
The first time users launch the Eclipse IDE, they be prompted to select a folder for the program's workspace. However, before users can proceed to working on a project, they will need to setup DA16200 FreeRTOS SDK and link the xPack development tools.
Configure the Development Tools:
In order to build the DA16200 FreeRTOS SDK, users will need to configure the Eclipse IDE and link the necessary development tools.
- To setup the GCC Toolchain, users need to provide the file path to the compiler:
- Open the Window > Preferences dialog box.
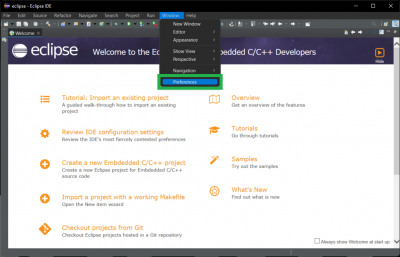 Open the Preferences dialog box from the Window drop down menu. (Click to enlarge)
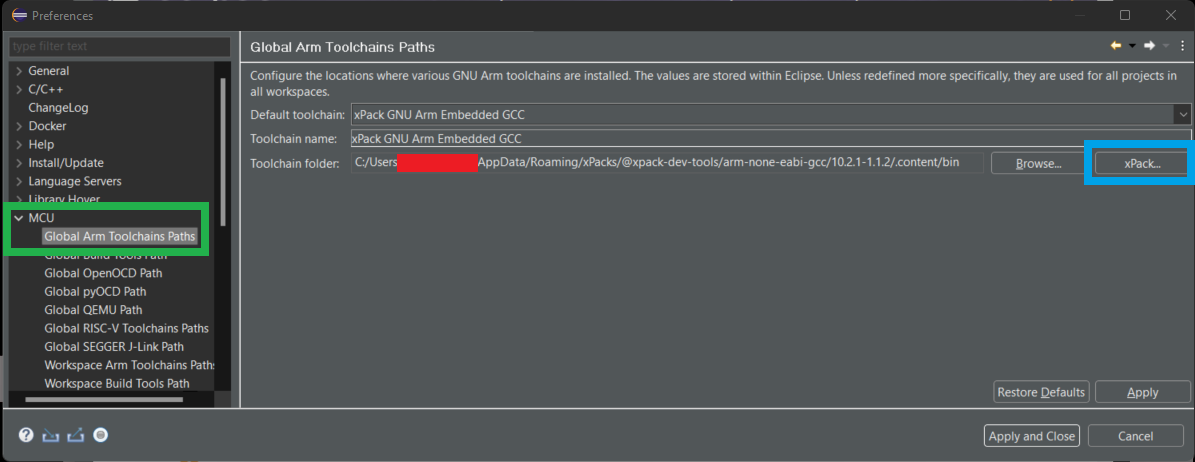
 - In the preferences dialog, select MCU > Global Arm Toolchain Paths and verify the
Toolchainfolder points to the where the GNU Arm GCC 10.2.1 toolchain is installed.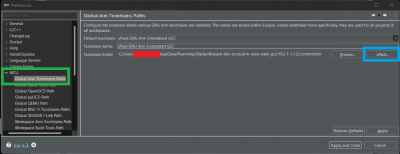 Link the compiler to the GCC toolchain. (Click to enlarge)
- If the GNU Arm GCC 10.2.1 xPack was installed, users should find it with a file path similar to the following:
C:/Users/<username>/AppData/Roaming/xPacks/@xpack-dev-tools/arm-none-eabi-gcc/<gcc version>/.content/bin
- If the toolchain folder is empty or incorrect, press the xPack button and select the correct Version.
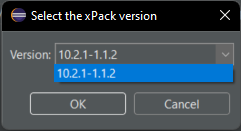 Verify the xPack version. (Click to enlarge)
- If the GNU Arm GCC 10.2.1 xPack was installed, users should find it with a file path similar to the following:
- Open the Window > Preferences dialog box.
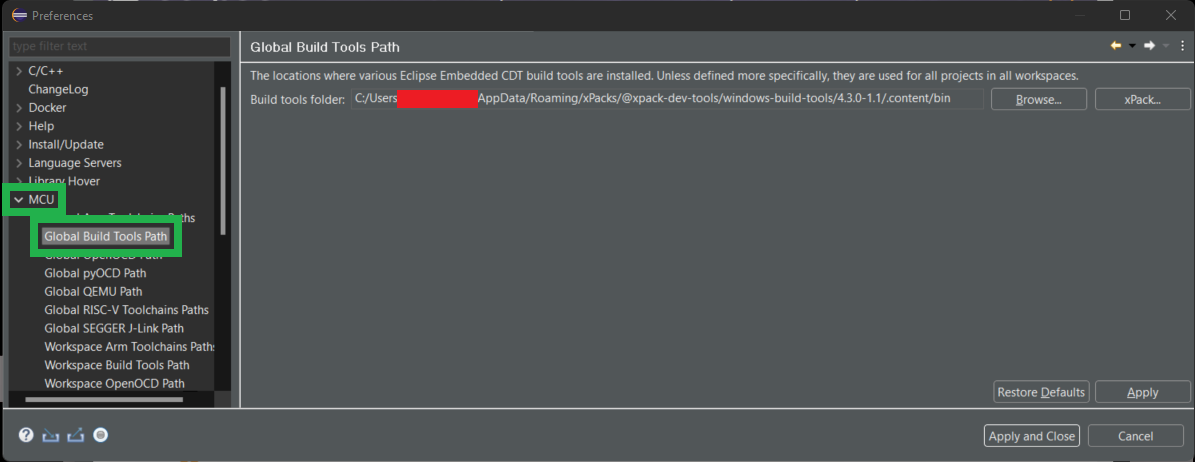
- To setup the build tool (i.e.
make; only on Windows), users need to provide the file path to the build tool:- Open the Window > Preferences dialog box.
Open the Preferences dialog box from the Windows drop down menu. (Click to enlarge)
- In the preferences dialog, check the MCU > Global Build Tools path and verify it points to where the Windows Build Tools xPack has been installed.
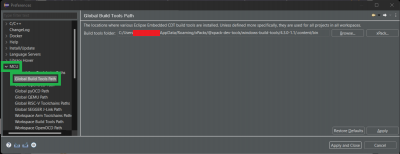 Link the Windows build tools to the Eclipse IDE. (Click to enlarge)
- If the Windows Build Tools xPack was installed, users should find it with a file path similar to the following:
C:/Users/<username>/AppData/Roaming/xPacks/@xpack-dev-tools/windows-build-tools/<Window Build Tools version>/.content/bin
- If the Windows Build Tools xPack was installed, users should find it with a file path similar to the following:
- Open the Window > Preferences dialog box.

Import the DA16200 FreeRTOS SDK:
<sdk_root_directory> path length must be less than 70 characters.
Users will also need to import the DA16200 FreeRTOS SDK into the Eclipse IDE:
- Download the DA16200 FreeRTOS SDK. (Users will need to register an account.)
- From the Design & Development tab of the DA16200MOD product page, users can download the DA16200 FreeRTOS SDK.
 Download the latest DA16200 FreeRTOS SDK from the DA16200MOD product page. (Click to enlarge)
- From the Design & Development tab of the DA16200MOD product page, users can download the DA16200 FreeRTOS SDK.
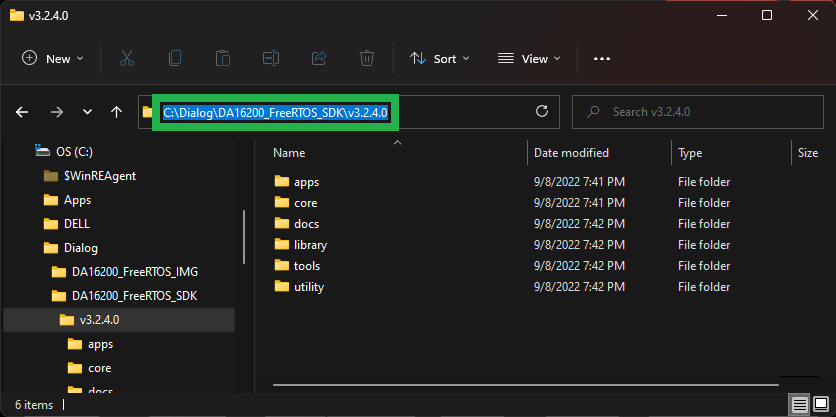
Extract the SDK zip file; this directory of this folder will be known as the
<sdk_root_directory>.- The Windows operating system has a path length limitation of 260 characters. Therefore, the
<sdk_root_directory>path length must be less than 70 characters.- We recommended that users extract the SDK into the root directory of a disk drive and rename the folder to shorten the file path length (i.e.
C:/dialog_sdk).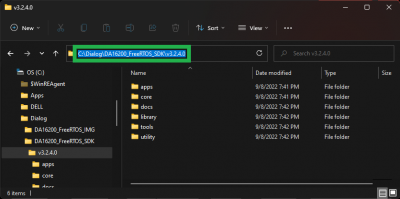 An example of a shortened
<sdk_root_directory>file path. (Click to enlarge)
- We recommended that users extract the SDK into the root directory of a disk drive and rename the folder to shorten the file path length (i.e.
For Linux systems, certain files used during the build process need to be set as executable. After extracting the SDK files, the
<sdk_root_directory>/tools/utilfile permissions must be changed by running theset_linux_perm.shscript in that directory:language:bash cd <sdk_root_diretory>/tools/util chmod 755 set_linux_perm.sh sh ./set_linux_perm.sh
- The Windows operating system has a path length limitation of 260 characters. Therefore, the
- To setup the SDK in Eclipse, the top-level project contained in the
<sdk_root_directory>should be imported. This will provide a view into the full SDK source code and will set up the launch and debug configurations required by the SDK.- Under the
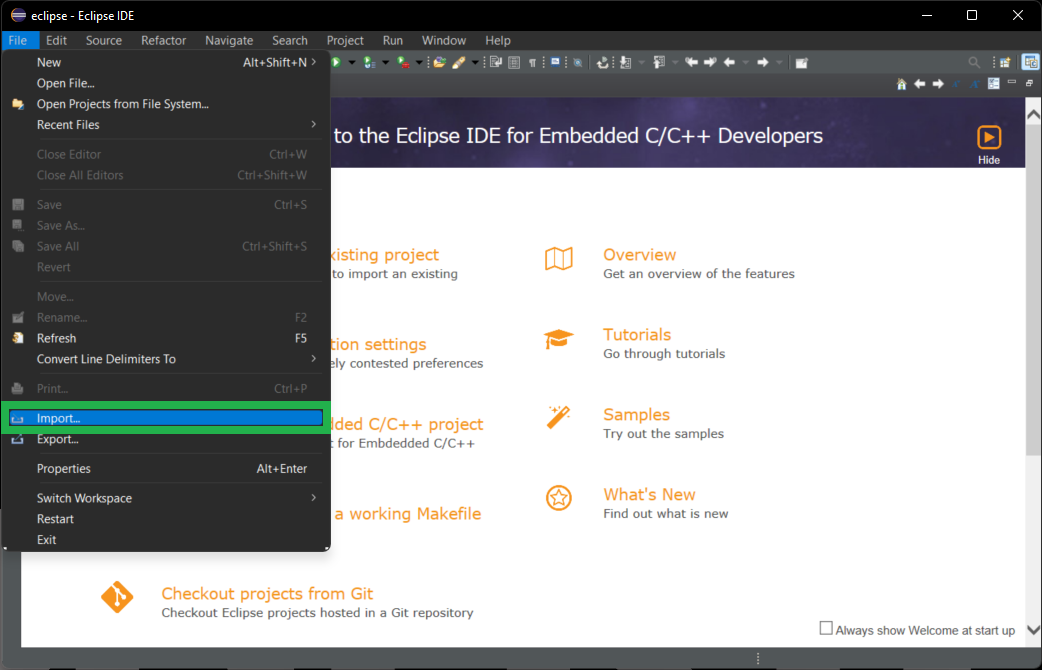
Filemenu selectImport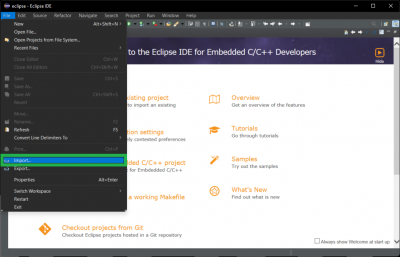 Open the Import dialog box from the Files drop down menu. (Click to enlarge)
 - In the Import dialog box, select General > Existing Projects into Workspace and press the Next button.
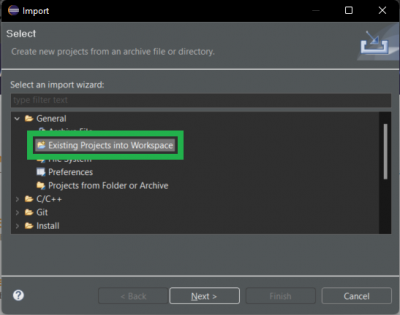 Select the Existing Projects into Workspace option. (Click to enlarge)
 - In the Import dialog box, select the Select root directory option and press the Browse button.
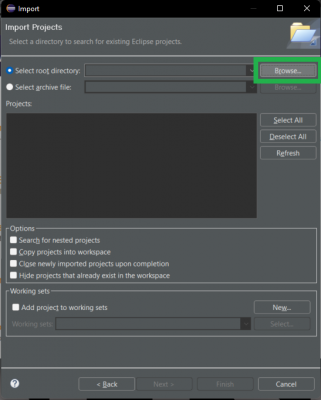 Select the Select root directory option. (Click to enlarge)
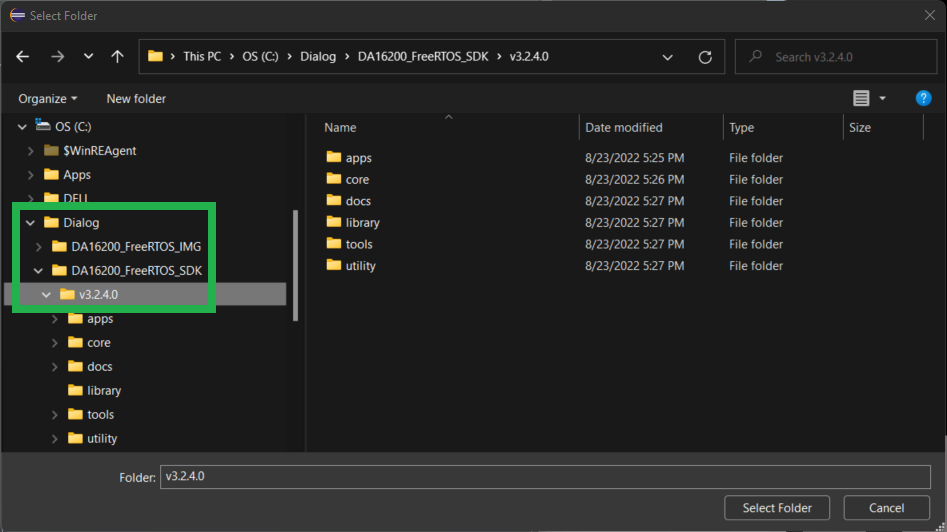
 - Use the file manager to navigate to the
<sdk_root_directory>directory and then press the Select Folder button.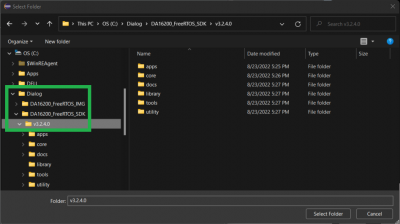 Select the folder of the the
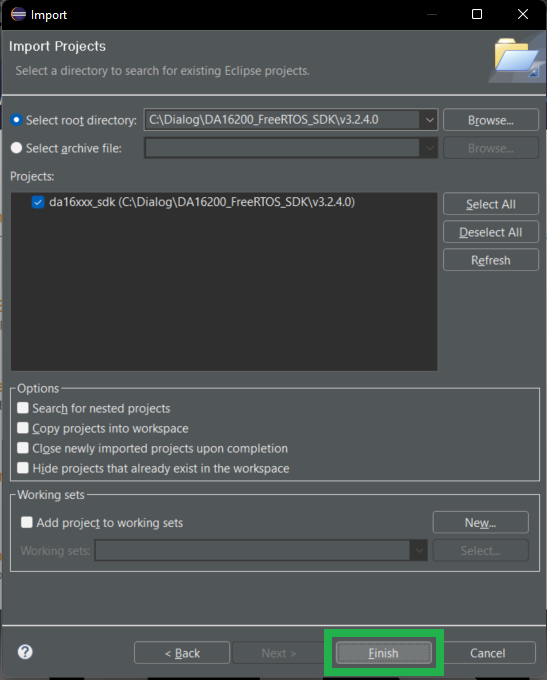
<sdk_root_directory>. (Click to enlarge) - A project should appear in the Projects list which matches the name of the
<sdk_root_directory>. Select that project and then press the Finish button. Select the project from the list. (Click to enlarge)
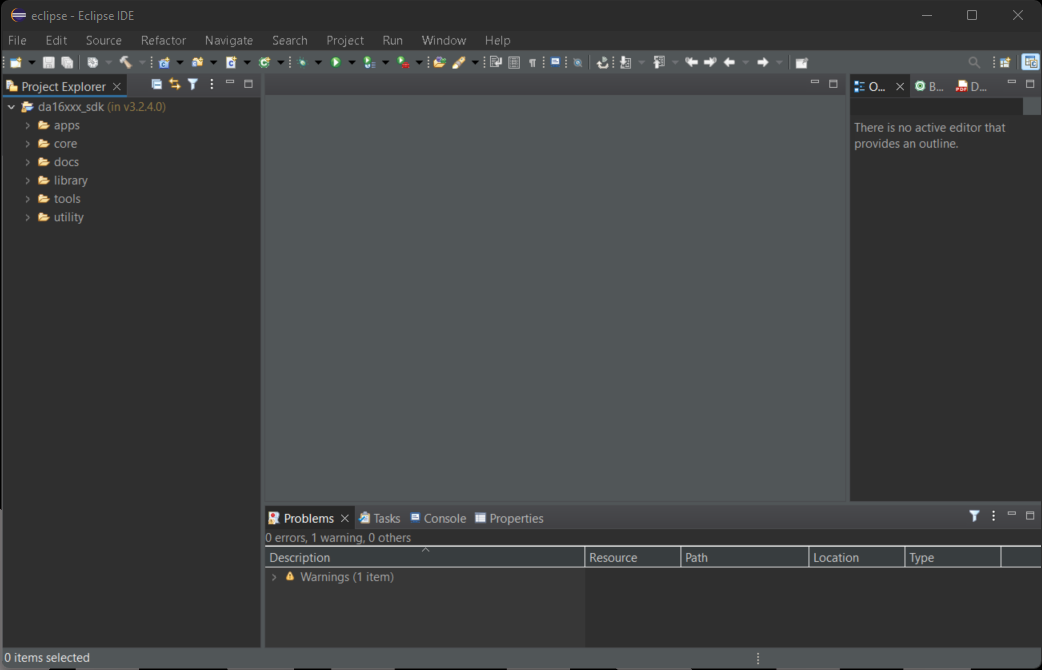
 - The project will appear in the Eclipse Project Explorer.
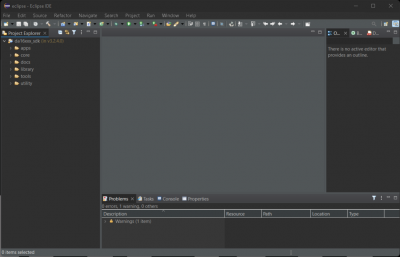 The DA16200 FreeRTOS SDK imported into the Eclipse Project Explorer. (Click to enlarge)
- Under the


Segger J-Link Software
Note: In order to program and debug the DA16200MOD, a J-Link Lite (or higher) programmer is required. Users may also be interested in these J-Link programmers and accessories.
J-Link EDU Mini Programmer
PGM-15345
J-Link BASE Compact Programmer
PGM-15347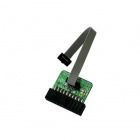
JTAG 20 Pin 0.1 In. To 10 Pin 0.05 In. Adapter
PGM-18421For a comparison of the different J-Link programmer models, please refer to the Segger website.
Below are the minimum requirements to setup the J-Link programmer to be used in the Eclipse IDE for the DA16200 FreeRTOS SDK:
- Eclipse 2021-06 (4.20.0) or later
- J-Link software V6.98 or later
In order to use the J-Link flash loader with the DA16200MOD, users will need to add it to the J-Link software:
- With the J-Link software already installed, find the installation directory and locate the
JLinkDevices.xmlfile.- Example:
C:\Program Files (x86)\SEGGER\JLink\JLinkDevices.xml
- Example:
Open
JLinkDevices.xmlin a text editor and add device entries for the DA16200 to the<DataBase>section as follows:language:xml <DataBase> <!-- -> <!-- Dialog Semiconductor -> <!-- -> <Device> <ChipInfo Vendor="Dialog Semiconductor" Name="DA16200_W25Q32JW" Core="JLINK_CORE_CORTEX_M4" WorkRAMAddr="0x80000" WorkRAMSize="0x00040000" /> <FlashBankInfo Name="QSPI Flash" BaseAddr="0x100000" MaxSize="0x400000" Loader="Devices/Dialog/DA16200_W25Q32JW.elf" LoaderType="FLASH_ALGO_TYPE_OPEN" /> </Device> <Device> <ChipInfo Vendor="Dialog Semiconductor" Name="DA16200.SeggerES.4MB" Core="JLINK_CORE_CORTEX_M4" WorkRAMAddr="0x83000" WorkRAMSize="0x00020000" /> <FlashBankInfo Name="QSPI Flash" BaseAddr="0x10000000" MaxSize="0x400000" Loader="Devices/Dialog/ES_DA16200_4MB.elf" LoaderType="FLASH_ALGO_TYPE_OPEN" /> </Device> <Device> <ChipInfo Vendor="Dialog Semiconductor" Name="DA16200.SeggerES.2MB" Core="JLINK_CORE_CORTEX_M4" WorkRAMAddr="0x83000" WorkRAMSize="0x00020000" /> <FlashBankInfo Name="QSPI Flash" BaseAddr="0x10000000" MaxSize="0x200000" Loader="Devices/Dialog/ES_DA16200_2MB.elf" LoaderType="FLASH_ALGO_TYPE_OPEN" /> </Device> <Device> <ChipInfo Vendor="Dialog Semiconductor" Name="DA16200.eclipse.4MB" Core="JLINK_CORE_CORTEX_M4" WorkRAMAddr="0x83000" WorkRAMSize="0x00020000" /> <FlashBankInfo Name="QSPI Flash" BaseAddr="0x10000000" MaxSize="0x400000" Loader="Devices/Dialog/DA16200_4MB.elf" LoaderType="FLASH_ALGO_TYPE_OPEN" /> </Device> <Device> <ChipInfo Vendor="Dialog Semiconductor" Name="DA16200.eclipse.2MB" Core="JLINK_CORE_CORTEX_M4" WorkRAMAddr="0x83000" WorkRAMSize="0x00020000" /> <FlashBankInfo Name="QSPI Flash" BaseAddr="0x10000000" MaxSize="0x200000" Loader="Devices/Dialog/DA16200_2MB.elf" LoaderType="FLASH_ALGO_TYPE_OPEN" /> </Device> </DataBase> Device entries added to the
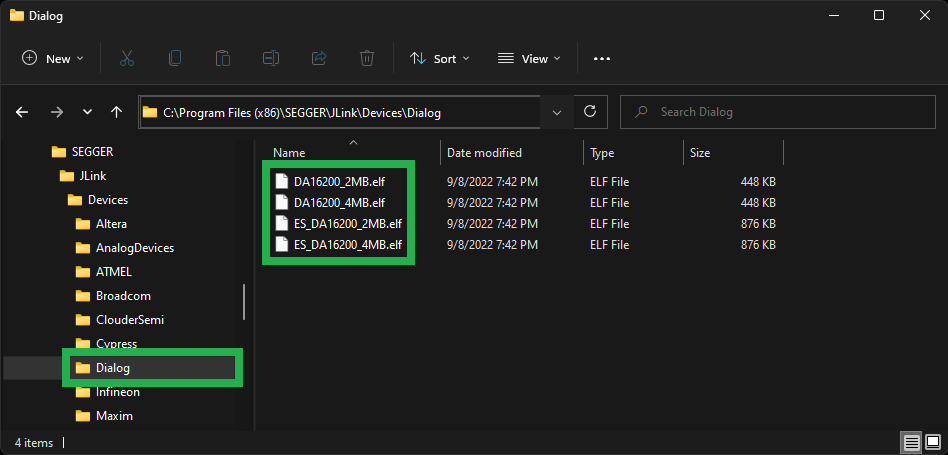
JLinkDevices.xmlfile. (Click to enlarge)- Copy the flash loader files from the
<sdk_root_directory>/utility/j-link/scripts/flashloader/Devices/Dialogdirectory into the directory where theJLinkDevices.xmlis located. Flash loader files in the
C:\Program Files (x86)\SEGGER\JLink\Devices\Dialogdirectory. (Click to enlarge) - Configure the file path of the J-Link software in the Eclipse IDE
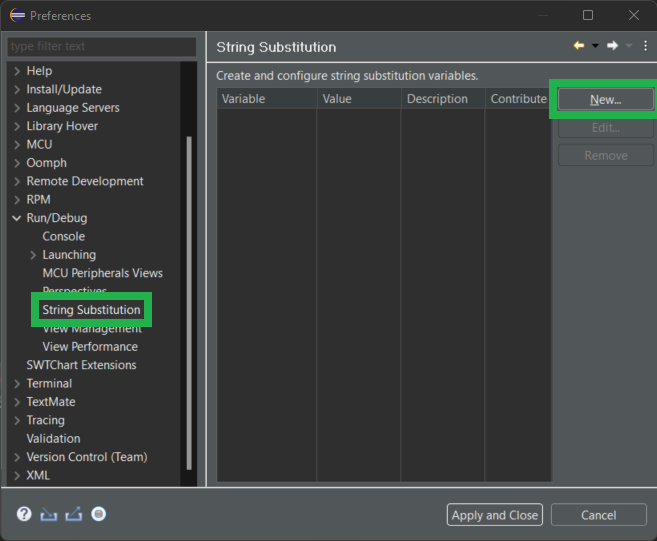
- In the Eclipse IDE, open the Window > Preferences dialog box.
Open the Preferences dialog box from the Window drop down menu in the Eclipse IDE. (Click to enlarge)
- In the preferences dialog box, select Run/Debug > String Substitution and press the New button.
 Create a new variable. (Click to enlarge)
 - Enter
jlink_pathas the variable name and set the value as the file path to the J-Link software:C:\Program Files (x86)\SEGGER\JLinkC:\Users\<USER>\AppData\Roaming\SEGGER\JLinkDevices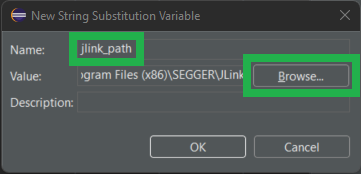 Add the
jlink_pathvariable linking to the J-Link software. (Click to enlarge)
- Click the OK and then the Apply and Close buttons to save the setting.
- In the Eclipse IDE, open the Window > Preferences dialog box.

Note: If users are having trouble locating the flash loader files or modifying the JLinkDevices.xml file, please feel free to utilize this archived version of the files. These files are meant to be used with:
- DA16200 FreeRTOS SDK v3.2.4.0
- J-Link v7.80b
Follow the instructions below, to utilize the archived files:
- Extract the archived files from the
j-link_files.zipzip folder. - Replace the
JLinkDevices.xmlfile in theC:\Program Files (x86)\SEGGER\JLinkdirectory with the extracted file. - Add the flash loader files by moving the extracted
Dialogfolder into theC:\Program Files (x86)\SEGGER\JLink\Devicesdirectory.
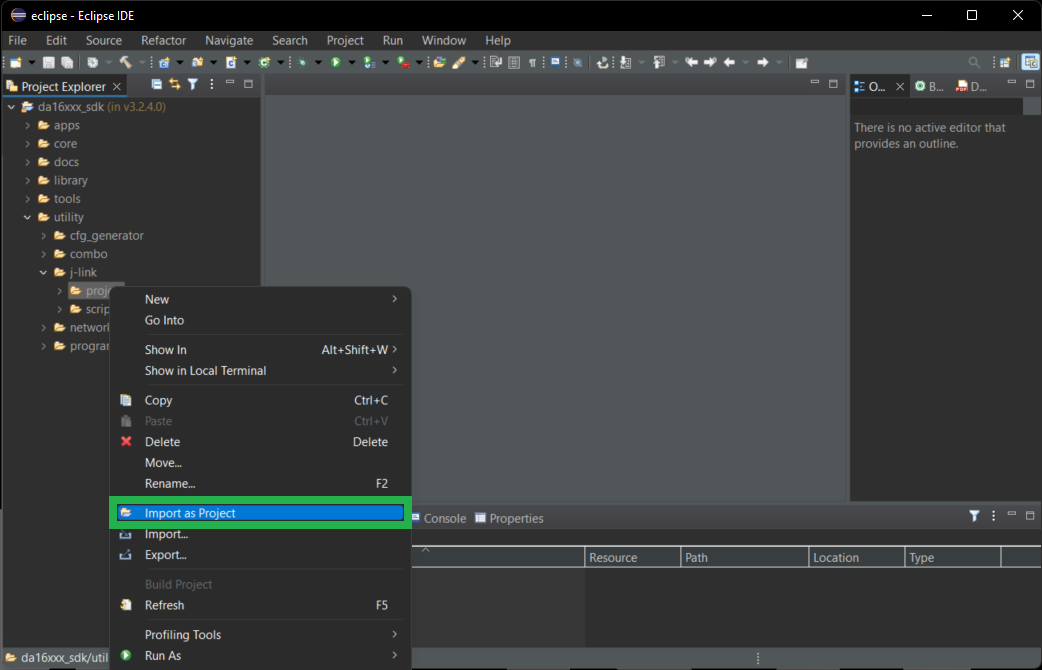
Once the users have linked the J-Link software to the Eclipse IDE, they will need to import the j-link project to provide an absolute path for the SDK scripts to use. The project can be imported using the Eclipse Project Explorer by navigating to the <sdk_top_directory>/utility/j-link/project/ and then right click on that directory and select Import as Project.
For more information on utilizing J-Link with the DA16200 FreeRTOS SDK, please refer to the instructions in the <sdk_root_directory>\utility\j-link\scripts\ReadMe.txt file.