Using the Serial 7-Segment Display
 jimblom
Example 2: SPI
SPI is a useful communication method if you have more than one device to hook up on a single bus. It requires more wires than basic serial, but it's more dependable because it's a synchronous interface.
In this example, we'll only use a single display. Realize, though, that you could add more displays (or other SPI devices) to the same SPI bus, each requiring only an additional SS pin per device.
Here's the hardware setup:
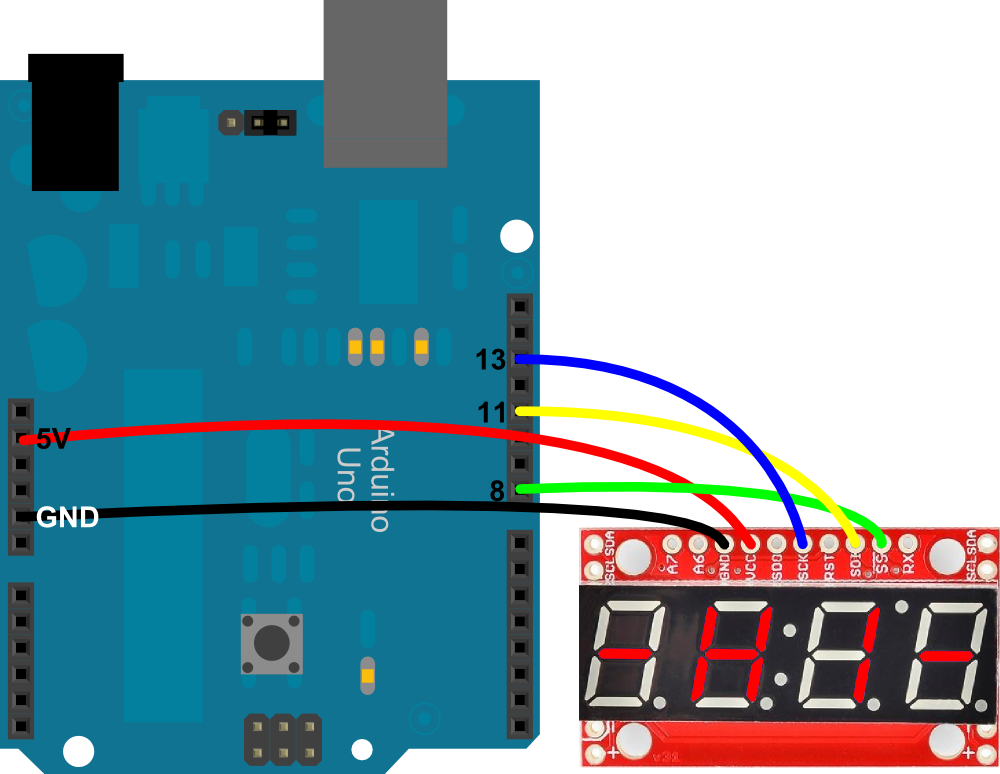
The SDI and SCK pins must remain where they are on the Arduino - those are the hardware SPI pins. The SS pin could be moved to any digital pin, as long as it's changed in the code.
Speaking of code, copy/paste from below, or you can download it in a zip file by clicking here.
language:c
/* Serial 7-Segment Display Example Code
    SPI Mode Stopwatch
   by: Jim Lindblom
     SparkFun Electronics
   date: November 27, 2012
   license: This code is public domain.

   This example code shows how you could use the Arduino SPI
   library to interface with a Serial 7-Segment Display.

   There are example functions for setting the display's
   brightness, decimals and clearing the display.

   The SPI.transfer() function is used to send a byte of the
   SPI wires. Notice that each SPI transfer(s) is prefaced by
   writing the SS pin LOW and closed by writing it HIGH.

   Each of the custom functions handle the ssPin writes as well
   as the SPI.transfer()'s.

   There's a custom function used to send a sequence of bytes
   over SPI - s7sSendStringSPI, which can be used somewhat like
   the serial print statements.

   Circuit:
   Arduino -------------- Serial 7-Segment
     5V   --------------------  VCC
     GND  --------------------  GND
      8   --------------------  SS
     11   --------------------  SDI
     13   --------------------  SCK
*/
#include <SPI.h> // Include the Arduino SPI library

// Define the SS pin
//  This is the only pin we can move around to any available
//  digital pin.
const int ssPin = 8;

unsigned int counter = 0;  // This variable will count up to 65k
char tempString[10];  // Will be used with sprintf to create strings

void setup()
{
  // -------- SPI initialization
  pinMode(ssPin, OUTPUT);  // Set the SS pin as an output
  digitalWrite(ssPin, HIGH);  // Set the SS pin HIGH
  SPI.begin();  // Begin SPI hardware
  SPI.setClockDivider(SPI_CLOCK_DIV64);  // Slow down SPI clock
  // --------

  // Clear the display, and then turn on all segments and decimals
  clearDisplaySPI();  // Clears display, resets cursor

  // Custom function to send four bytes via SPI
  //  The SPI.transfer function only allows sending of a single
  //  byte at a time.
  s7sSendStringSPI("-HI-");
  setDecimalsSPI(0b111111);  // Turn on all decimals, colon, apos

  // Flash brightness values at the beginning
  setBrightnessSPI(0);  // Lowest brightness
  delay(1500);
  setBrightnessSPI(255);  // High brightness
  delay(1500);

  // Clear the display before jumping into loop
  clearDisplaySPI();
}

void loop()
{
  // Magical sprintf creates a string for us to send to the s7s.
  //  The %4d option creates a 4-digit integer.
  sprintf(tempString, "%4d", counter);

  // This will output the tempString to the S7S
  s7sSendStringSPI(tempString);

  // Print the decimal at the proper spot
  if (counter < 10000)
    setDecimalsSPI(0b00000010);  // Sets digit 3 decimal on
  else
    setDecimalsSPI(0b00000100);

  counter++;  // Increment the counter
  delay(10);  // This will make the display update at 100Hz.*/
}

// This custom function works somewhat like a serial.print.
//  You can send it an array of chars (string) and it'll print
//  the first 4 characters in the array.
void s7sSendStringSPI(String toSend)
{
  digitalWrite(ssPin, LOW);
  for (int i=0; i<4; i++)
  {
    SPI.transfer(toSend[i]);
  }
  digitalWrite(ssPin, HIGH);
}

// Send the clear display command (0x76)
//  This will clear the display and reset the cursor
void clearDisplaySPI()
{
  digitalWrite(ssPin, LOW);
  SPI.transfer(0x76);  // Clear display command
  digitalWrite(ssPin, HIGH);
}

// Set the displays brightness. Should receive byte with the value
//  to set the brightness to
//  dimmest------------->brightest
//     0--------127--------255
void setBrightnessSPI(byte value)
{
  digitalWrite(ssPin, LOW);
  SPI.transfer(0x7A);  // Set brightness command byte
  SPI.transfer(value);  // brightness data byte
  digitalWrite(ssPin, HIGH);
}

// Turn on any, none, or all of the decimals.
//  The six lowest bits in the decimals parameter sets a decimal
//  (or colon, or apostrophe) on or off. A 1 indicates on, 0 off.
//  [MSB] (X)(X)(Apos)(Colon)(Digit 4)(Digit 3)(Digit2)(Digit1)
void setDecimalsSPI(byte decimals)
{
  digitalWrite(ssPin, LOW);
  SPI.transfer(0x77);
  SPI.transfer(decimals);
  digitalWrite(ssPin, HIGH);
}
This example works a lot like the serial version. The s7s.print() functions from the previous example are replaced by SPI transfers. Take note that each time an SPI.transfer() occurs, it's blanketed by two digitalWrite()s to the SS pin. The SS pin must go LOW, to let the display know that usable data is incoming. Once SS goes back to HIGH, the display will know that data is no longer being sent to it.