SparkFun Photodetector (MAX30101) Hookup Guide
Python Examples
☠ Do not rely on our examples for medical diagnosis or any life saving applications
Note: Particle detection, heart rate measurement, and photoplethysmography (for pulse oximetry) are applications of the MAX30101. These applications require a fundamental understanding of the operating principles of the sensor and a conceptual knowledge of the applications. Although, we provide some examples for these applications; they are primarily for demonstration purposes only and are not supported by SparkFun.
Note: Although there is an example, Maxim has since removed the proximity sensing and particle detection as functionalities of this sensor in their datasheet.
There are several examples written for the Qwiic_MAX30101x_Py Python package. They can be found in the Examples folder of the GitHub repository or view on the repository documentation page, hosted on ReadtheDocs. Users can also grab them here, using the link below. (*Please be aware of any package dependencies.):
Example 1 - Basic Readings
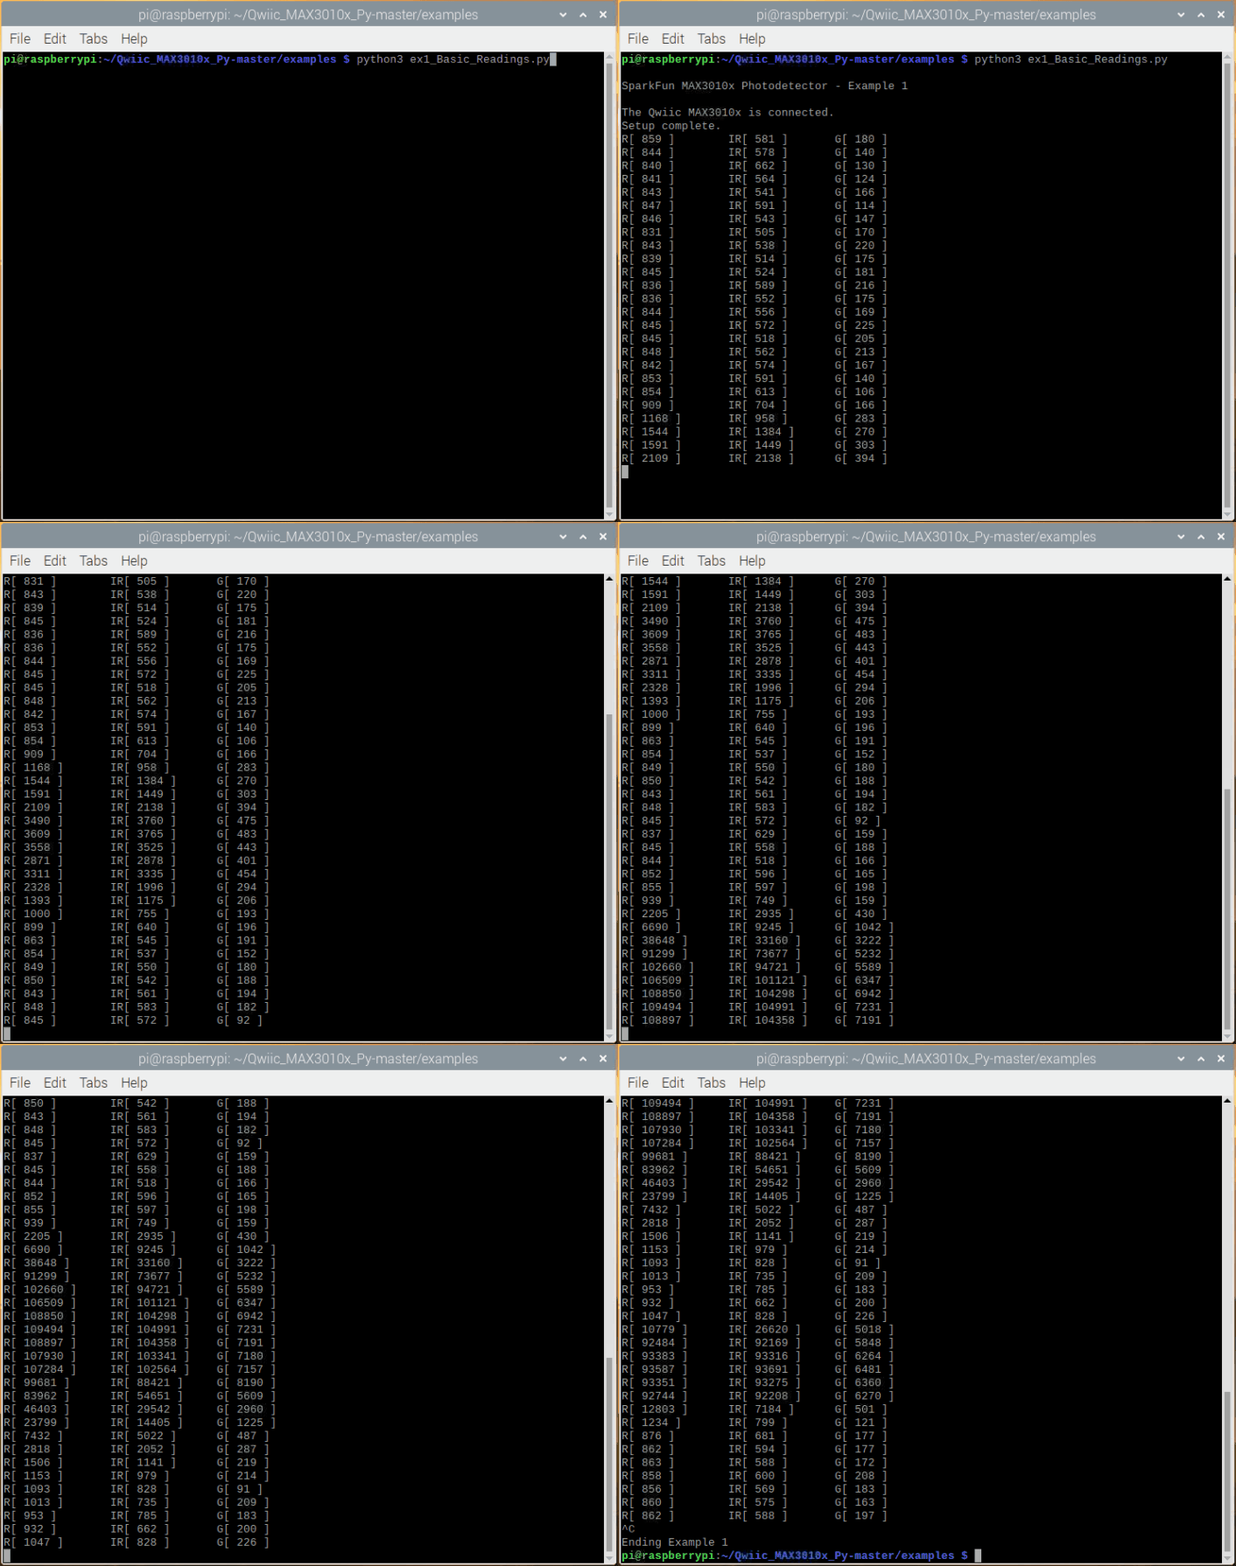
Example 1 outputs the raw values read by the sensor.
language:python
#!/usr/bin/env python
#-----------------------------------------------------------------------------
# ex1_Basic_Readings.py
#
# Simple example for the qwiic MAX3010x device
# Outputs all Red/IR/Green values.
#
#------------------------------------------------------------------------
#
# Written by Pete Lewis
# SparkFun Electronics, May 2020
#
# Based on code from the SparkFun MAX3010x Sensor Arduino Library
# https://github.com/sparkfun/SparkFun_MAX3010x_Sensor_Library
# By: Nathan Seidle @ SparkFun Electronics, October 2nd, 2016
#
# This python library supports the SparkFun Electroncis qwiic
# qwiic sensor/board ecosystem on a Raspberry Pi (and compatable) single
# board computers.
#
# More information on qwiic is at https://www.sparkfun.com/qwiic
#
# Do you like this library? Help support SparkFun. Buy a board!
#
#==================================================================================
# Copyright (c) 2019 SparkFun Electronics
#
# Permission is hereby granted, free of charge, to any person obtaining a copy
# of this software and associated documentation files (the "Software"), to deal
# in the Software without restriction, including without limitation the rights
# to use, copy, modify, merge, publish, distribute, sublicense, and/or sell
# copies of the Software, and to permit persons to whom the Software is
# furnished to do so, subject to the following conditions:
#
# The above copyright notice and this permission notice shall be included in all
# copies or substantial portions of the Software.
#
# THE SOFTWARE IS PROVIDED "AS IS", WITHOUT WARRANTY OF ANY KIND, EXPRESS OR
# IMPLIED, INCLUDING BUT NOT LIMITED TO THE WARRANTIES OF MERCHANTABILITY,
# FITNESS FOR A PARTICULAR PURPOSE AND NONINFRINGEMENT. IN NO EVENT SHALL THE
# AUTHORS OR COPYRIGHT HOLDERS BE LIABLE FOR ANY CLAIM, DAMAGES OR OTHER
# LIABILITY, WHETHER IN AN ACTION OF CONTRACT, TORT OR OTHERWISE, ARISING FROM,
# OUT OF OR IN CONNECTION WITH THE SOFTWARE OR THE USE OR OTHER DEALINGS IN THE
# SOFTWARE.
#==================================================================================
# Example 1
#

from __future__ import print_function
import qwiic_max3010x
import time
import sys

def runExample():

    print("\nSparkFun MAX3010x Photodetector - Example 1\n")
    sensor = qwiic_max3010x.QwiicMax3010x()

    if sensor.begin() == False:
        print("The Qwiic MAX3010x device isn't connected to the system. Please check your connection", \
            file=sys.stderr)
        return
    else:
        print("The Qwiic MAX3010x is connected.")

    if sensor.setup() == False:
        print("Device setup failure. Please check your connection", \
            file=sys.stderr)
        return
    else:
        print("Setup complete.")

    while True:
            print(\
             'R[', sensor.getRed() , '] \t'\
                                                             'IR[', sensor.getIR() , '] \t'\
                                                             'G[', sensor.getGreen() , ']'\
            )
            time.sleep(0.1)

if __name__ == '__main__':
    try:
        runExample()
    except (KeyboardInterrupt, SystemExit) as exErr:
        print("\nEnding Example 1")
        sys.exit(0)
Just as in the Arduino example, feel free to wave you hand over the sensor to see the changes in values. Users should see an output similar to the image below:
Example 3 - Temperature Sense
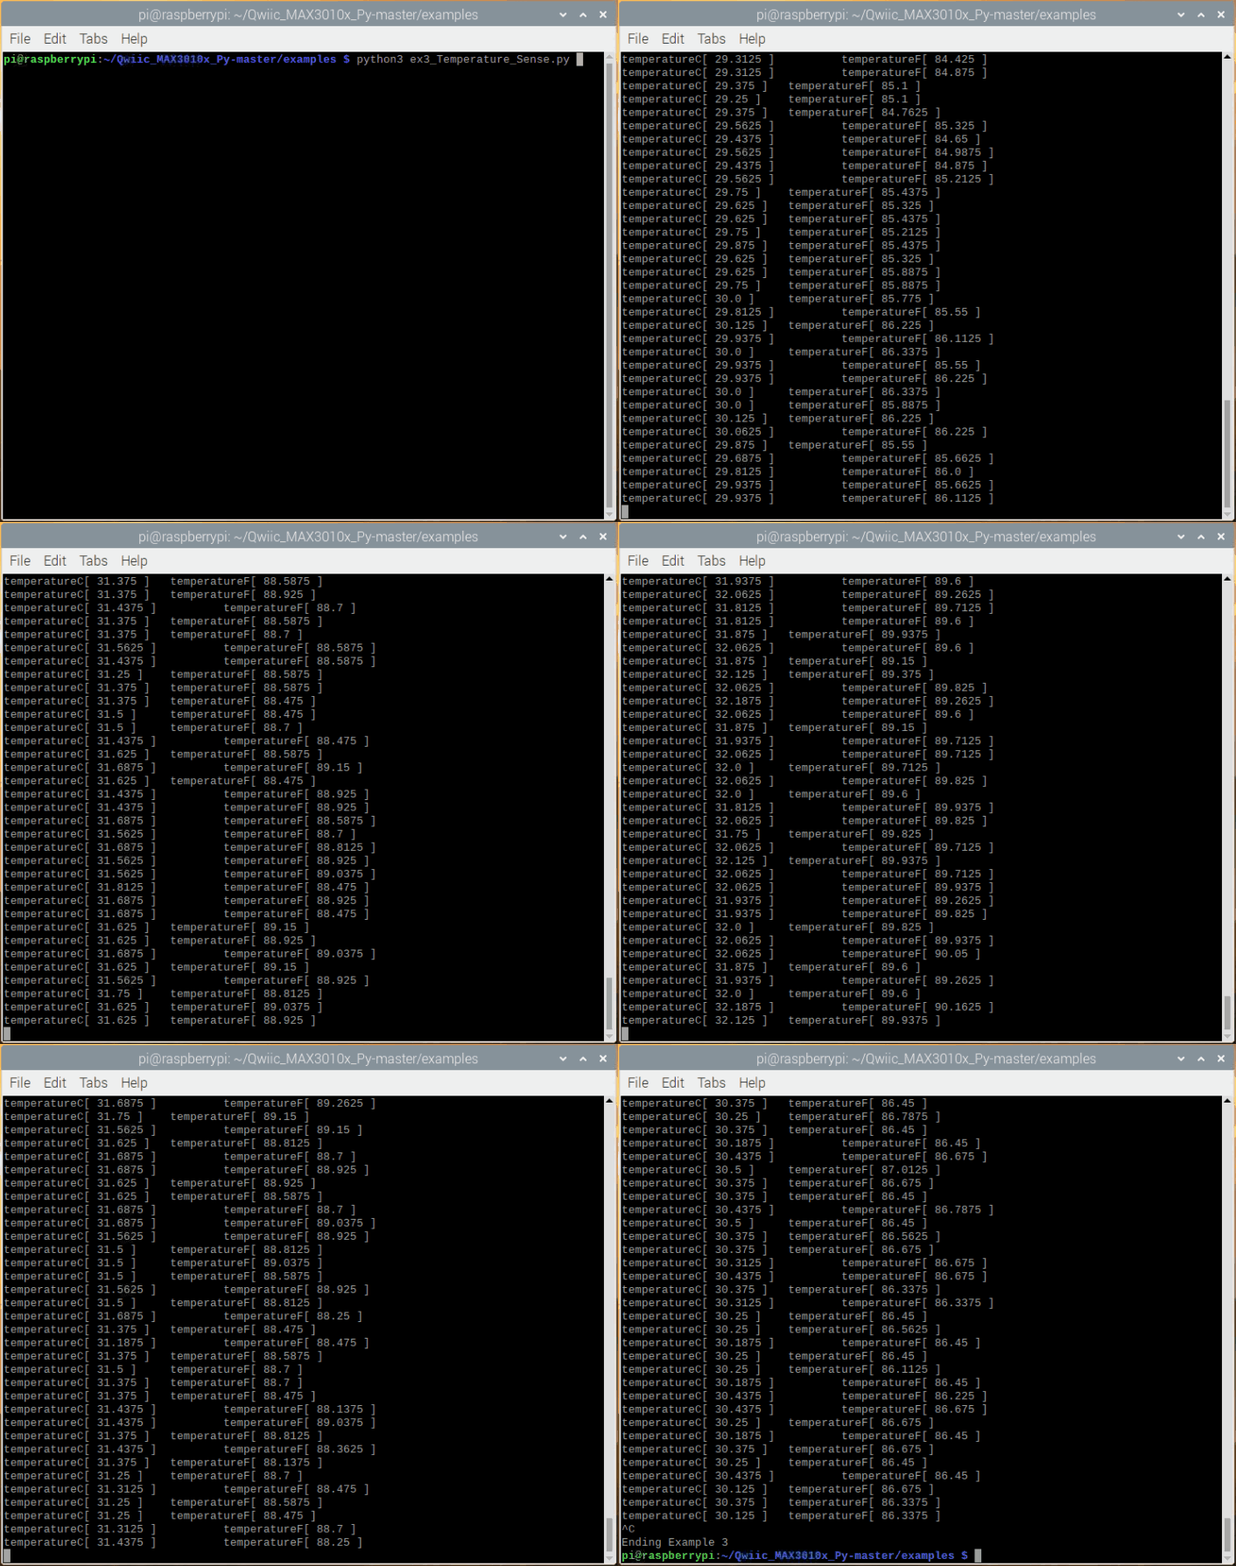
Example 3 outputs readings from the on-board temperature sensor in both Celsius and Fahrenheit. The temp sensor is accurate to ±1 °C but has an astonishing precision of 0.0625 °C.
language:python
#!/usr/bin/env python
#-----------------------------------------------------------------------------
# ex3_Temperature_Sesnse.py
#
# Simple example for the qwiic MAX3010x device
# This demo outputs the onboard temperature sensor.
# The temp sensor is accurate to +/-1 C but
# has an astonishing precision of 0.0625 C.
#
#------------------------------------------------------------------------
#
# Written by Pete Lewis
# SparkFun Electronics, May 2020
#
# Based on code from the SparkFun MAX3010x Sensor Arduino Library
# https://github.com/sparkfun/SparkFun_MAX3010x_Sensor_Library
# By: Nathan Seidle @ SparkFun Electronics, October 2016
#
# This python library supports the SparkFun Electroncis qwiic
# qwiic sensor/board ecosystem on a Raspberry Pi (and compatable) single
# board computers.
#
# More information on qwiic is at https://www.sparkfun.com/qwiic
#
# Do you like this library? Help support SparkFun. Buy a board!
#
#==================================================================================
# Copyright (c) 2019 SparkFun Electronics
#
# Permission is hereby granted, free of charge, to any person obtaining a copy
# of this software and associated documentation files (the "Software"), to deal
# in the Software without restriction, including without limitation the rights
# to use, copy, modify, merge, publish, distribute, sublicense, and/or sell
# copies of the Software, and to permit persons to whom the Software is
# furnished to do so, subject to the following conditions:
#
# The above copyright notice and this permission notice shall be included in all
# copies or substantial portions of the Software.
#
# THE SOFTWARE IS PROVIDED "AS IS", WITHOUT WARRANTY OF ANY KIND, EXPRESS OR
# IMPLIED, INCLUDING BUT NOT LIMITED TO THE WARRANTIES OF MERCHANTABILITY,
# FITNESS FOR A PARTICULAR PURPOSE AND NONINFRINGEMENT. IN NO EVENT SHALL THE
# AUTHORS OR COPYRIGHT HOLDERS BE LIABLE FOR ANY CLAIM, DAMAGES OR OTHER
# LIABILITY, WHETHER IN AN ACTION OF CONTRACT, TORT OR OTHERWISE, ARISING FROM,
# OUT OF OR IN CONNECTION WITH THE SOFTWARE OR THE USE OR OTHER DEALINGS IN THE
# SOFTWARE.
#==================================================================================
# Example 3
#

from __future__ import print_function
import qwiic_max3010x
import time
import sys

def runExample():

    print("\nSparkFun MAX3010x Photodetector - Example 3\n")
    sensor = qwiic_max3010x.QwiicMax3010x()

    if sensor.begin() == False:
        print("The Qwiic MAX3010x device isn't connected to the system. Please check your connection", \
            file=sys.stderr)
        return
    else:
        print("The Qwiic MAX3010x is connected.")

    # Setup Sensor
    # The LEDs are very low power and won't affect the temp reading much but
    # we will call setup() with LEDs off, to avoid any local heating (ledMode = 0)

    if sensor.setup(ledMode = 0) == False:
        print("Device setup failure. Please check your connection", \
            file=sys.stderr)
        return
    else:
        print("Setup complete.")

    sensor.enableDIETEMPRDY() # Enable the temp ready interrupt. This is required.

    while True:
            temperature = sensor.readTemperature()
            temperatureF = sensor.readTemperatureF()

            temperature = round(temperature, 4)
            temperatureF = round(temperatureF, 4)

            print(\
             'temperatureC[', temperature , '] \t',\
             'temperatureF[', temperatureF , ']',\
            )


if __name__ == '__main__':
    try:
        runExample()
    except (KeyboardInterrupt, SystemExit) as exErr:
        print("\nEnding Example 3")
        sys.exit(0)
Feel free to heat up the sensor with your finger or blowing on it to cool it down.
Example 4 - Heartbeat Plotter
Note: For this demo, you'll need a rubber band small enough to go through the mounting holes on the breakout. Make sure to follow the example in the Hardware Assembly section for the best results. Additionally, this example requires some software for the plotter to be installed.
On the Raspberry Pi, execute the following lines in the terminal:
sudo apt-get install libatlas3-base libffi-dev at-spi2-core python3-gi-cairosudo pip3 install matplotlib
sudo apt-get install python3-matplotlib
Example 4 is where the fun really begins! Hemoglobin reflects IR light really well, and the MAX30101 is capable of detecting such small changes in IR reflectance that it can detect blood flowing through your finger at different rates.
language:python
#!/usr/bin/env python
#-----------------------------------------------------------------------------
# ex4_HeartBeat_Plotter.py
#
# Simple example for the qwiic MAX3010x device
# Shows the user's heart beat on a graphical plotter
# Using Matplotlib
# To learn more about plotting data in python check out this tutorial:
# https://learn.sparkfun.com/tutorials/graph-sensor-data-with-python-and-matplotlib/
# The example code below was built using the code from the previously mentioned tutorial.
# Thanks Shawn Hymel!
#
# Instructions:
#   1) Install MatplotLib (see below)
#   2) Connect sensor to system via qwiic cable
#   3) Attach sensor to your finger with a rubber band (see below)
#   4) Run this python example
#   5) Checkout the blips!
#   6) Feel the pulse on your neck and watch it mimic the blips
#
#   It is best to attach the sensor to your finger using a rubber band or other tightening
#   device. Humans are generally bad at applying constant pressure to a thing. When you
#   press your finger against the sensor it varies enough to cause the blood in your
#   finger to flow differently which causes the sensor readings to go wonky.
#
# MatplotLib install
# Install Dependencies
# Like any good Linux project, we need to install a number of dependencies and libraries
# in order to get matplotlib to run properly. Make sure you have an Internet connection
# and in a terminal, enter the following commands. You may need to wait several minutes
# while the various packages are downloaded and installed.
#
# sudo apt-get update
# sudo apt-get install libatlas3-base libffi-dev at-spi2-core python3-gi-cairo
# sudo pip3 install cairocffi
# sudo pip3 install matplotlib
#
#------------------------------------------------------------------------
#
# Written by Pete Lewis
# SparkFun Electronics, May 2020
#
# Based on code from the SparkFun MAX3010x Sensor Arduino Library
# https://github.com/sparkfun/SparkFun_MAX3010x_Sensor_Library
# By: Nathan Seidle @ SparkFun Electronics, October 2nd, 2016
#
# This python library supports the SparkFun Electroncis qwiic
# qwiic sensor/board ecosystem on a Raspberry Pi (and compatable) single
# board computers.
#
# More information on qwiic is at https://www.sparkfun.com/qwiic
#
# Do you like this library? Help support SparkFun. Buy a board!
#
#==================================================================================
# Copyright (c) 2019 SparkFun Electronics
#
# Permission is hereby granted, free of charge, to any person obtaining a copy
# of this software and associated documentation files (the "Software"), to deal
# in the Software without restriction, including without limitation the rights
# to use, copy, modify, merge, publish, distribute, sublicense, and/or sell
# copies of the Software, and to permit persons to whom the Software is
# furnished to do so, subject to the following conditions:
#
# The above copyright notice and this permission notice shall be included in all
# copies or substantial portions of the Software.
#
# THE SOFTWARE IS PROVIDED "AS IS", WITHOUT WARRANTY OF ANY KIND, EXPRESS OR
# IMPLIED, INCLUDING BUT NOT LIMITED TO THE WARRANTIES OF MERCHANTABILITY,
# FITNESS FOR A PARTICULAR PURPOSE AND NONINFRINGEMENT. IN NO EVENT SHALL THE
# AUTHORS OR COPYRIGHT HOLDERS BE LIABLE FOR ANY CLAIM, DAMAGES OR OTHER
# LIABILITY, WHETHER IN AN ACTION OF CONTRACT, TORT OR OTHERWISE, ARISING FROM,
# OUT OF OR IN CONNECTION WITH THE SOFTWARE OR THE USE OR OTHER DEALINGS IN THE
# SOFTWARE.
#==================================================================================
# Example 4
#

from __future__ import print_function
import qwiic_max3010x
import time
import sys

sensor = qwiic_max3010x.QwiicMax3010x()

#Plotter Stuff
import matplotlib.pyplot as plt
import matplotlib.animation as animation

# Create figure for plotting
fig = plt.figure()
ax = fig.add_subplot(1, 1, 1)
xlen= 100 #sample number, increments and is used for labeling x axis in plot
xs = list(range(0,xlen))
ys = [0]*xlen
line, = ax.plot(xs, ys)
plt.title('Heartbeat over time')
plt.ylabel('IR Value')

# This function is called periodically from FuncAnimation
def animate(i, ys):
    # Read IR from MAX3010x
    ir = sensor.getIR()

    ys.append(ir)
    ys = ys[-xlen:]
    line.set_ydata(ys)
    ax.set_ylim([min(ys),max(ys)])

    return line,


def runExample():

    print("\nSparkFun MAX3010x Photodetector - Example 4\n")

    if sensor.begin() == False:
        print("The Qwiic MAX3010x device isn't connected to the system. Please check your connection", \
            file=sys.stderr)
        return
    else:
        print("The Qwiic MAX3010x is connected.")

    # Setup to sensor
    ledBrightness = 0x1F # Options: 0=Off to 255=50mA
    sampleAverage = 8 # Options: 1, 2, 4, 8, 16, 32
    ledMode = 3 # Options: 1 = Red only, 2 = Red + IR, 3 = Red + IR + Green
    sampleRate = 100 # Options: 50, 100, 200, 400, 800, 1000, 1600, 3200
    pulseWidth = 411 # Options: 69, 118, 215, 411
    adcRange = 4096 # Options: 2048, 4096, 8192, 16384

    if sensor.setup(ledBrightness, sampleAverage, ledMode, sampleRate, pulseWidth, adcRange) == False:
        print("Device setup failure. Please check your connection", \
            file=sys.stderr)
        return
    else:
        print("Setup complete.")
    # Set up plot to call animate() function periodically
    ani = animation.FuncAnimation(fig, animate, fargs=(ys,), interval=10, blit=True)
    plt.show()


if __name__ == '__main__':
    try:
        runExample()
    except (KeyboardInterrupt, SystemExit) as exErr:
        print("\nEnding Example 4")
        sys.exit(0)
Once the code is running, you should begin to see your pulse as the scale of the axis shrinks into the proper range. Again, the sensor can be a little finicky; especially, if it is moving around slightly. It make take several attempts to view your pulse.
Humans are bad at applying consistent pressure to a thing. Without a rubber band the pressure varies enough to cause the blood in your finger to flow differently which causes the sensor readings to go wonky. It is best to attach the sensor to your finger using a rubber band or other tightening device.
Feel free to compare the plot with your pulse from your carotid artery.
Example 5 - Heartrate
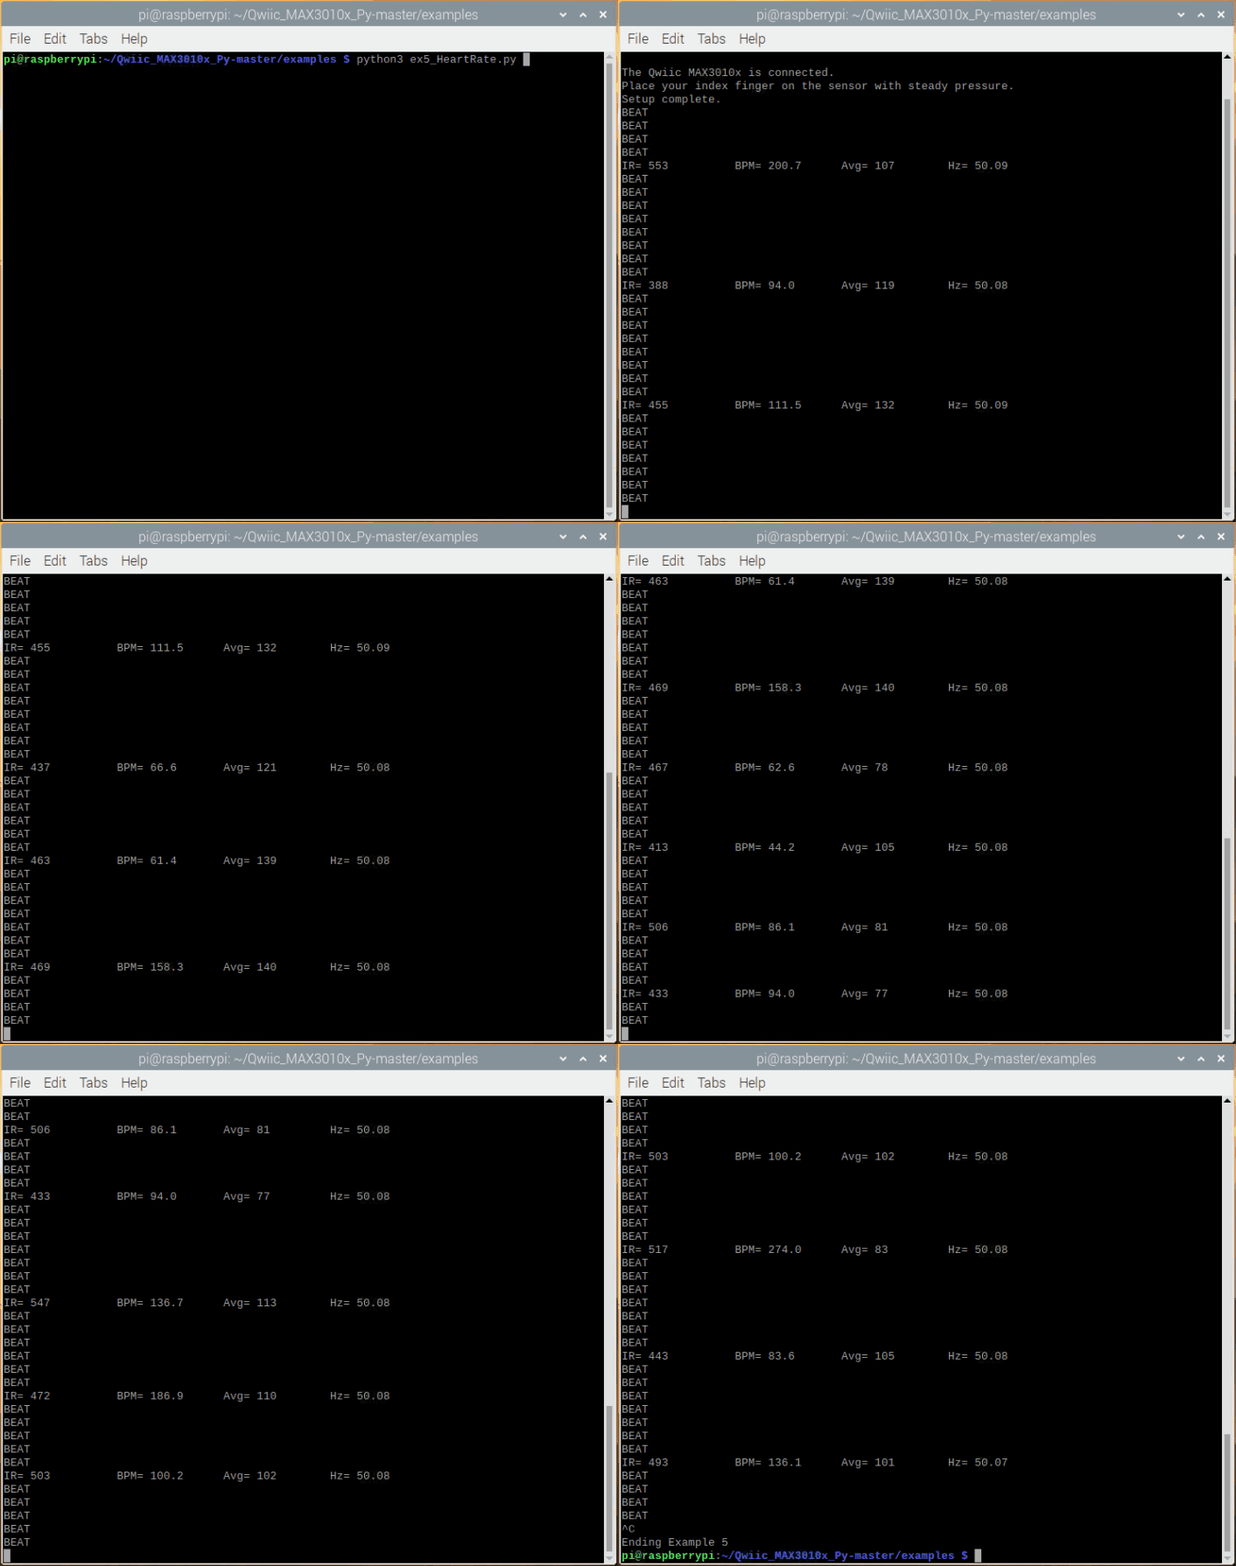
Example 5 runs a filter called the PBA or Penpheral Beat Amplitude algorithm on the IR data. This algorithm is able to pull out the blips from all the noise and calculate the time between blips to get a heart rate. The output is your instantaneous heart rate and your average heart rate (BPM).
language:python
#!/usr/bin/env python
#-----------------------------------------------------------------------------
# ex5_HeartRate.py
#
# Simple example for the qwiic MAX3010x device
# This is a demo to show the reading of heart rate or beats per minute (BPM) using
# a Penpheral Beat Amplitude (PBA) algorithm.
#
# It is best to attach the sensor to your finger using a rubber band or other tightening
# device. Humans are generally bad at applying constant pressure to a thing. When you
# press your finger against the sensor it varies enough to cause the blood in your
# finger to flow differently which causes the sensor readings to go wonky.
#
#------------------------------------------------------------------------
#
# Written by Pete Lewis
# SparkFun Electronics, May 2020
#
# Based on code from the SparkFun MAX3010x Sensor Arduino Library
# https://github.com/sparkfun/SparkFun_MAX3010x_Sensor_Library
# By: Nathan Seidle @ SparkFun Electronics, October 2nd, 2016
#
# This python library supports the SparkFun Electroncis qwiic
# qwiic sensor/board ecosystem on a Raspberry Pi (and compatable) single
# board computers.
#
# More information on qwiic is at https://www.sparkfun.com/qwiic
#
# Do you like this library? Help support SparkFun. Buy a board!
#
#==================================================================================
# Copyright (c) 2019 SparkFun Electronics
#
# Permission is hereby granted, free of charge, to any person obtaining a copy
# of this software and associated documentation files (the "Software"), to deal
# in the Software without restriction, including without limitation the rights
# to use, copy, modify, merge, publish, distribute, sublicense, and/or sell
# copies of the Software, and to permit persons to whom the Software is
# furnished to do so, subject to the following conditions:
#
# The above copyright notice and this permission notice shall be included in all
# copies or substantial portions of the Software.
#
# THE SOFTWARE IS PROVIDED "AS IS", WITHOUT WARRANTY OF ANY KIND, EXPRESS OR
# IMPLIED, INCLUDING BUT NOT LIMITED TO THE WARRANTIES OF MERCHANTABILITY,
# FITNESS FOR A PARTICULAR PURPOSE AND NONINFRINGEMENT. IN NO EVENT SHALL THE
# AUTHORS OR COPYRIGHT HOLDERS BE LIABLE FOR ANY CLAIM, DAMAGES OR OTHER
# LIABILITY, WHETHER IN AN ACTION OF CONTRACT, TORT OR OTHERWISE, ARISING FROM,
# OUT OF OR IN CONNECTION WITH THE SOFTWARE OR THE USE OR OTHER DEALINGS IN THE
# SOFTWARE.
#==================================================================================
# Example 5
#

from __future__ import print_function
import qwiic_max3010x
import time
import sys

def millis():
    return int(round(time.time() * 1000))

def runExample():

    print("\nSparkFun MAX3010x Photodetector - Example 5\n")
    sensor = qwiic_max3010x.QwiicMax3010x()

    if sensor.begin() == False:
        print("The Qwiic MAX3010x device isn't connected to the system. Please check your connection", \
            file=sys.stderr)
        return
    else:
        print("The Qwiic MAX3010x is connected.")

    print("Place your index finger on the sensor with steady pressure.")

    if sensor.setup() == False:
        print("Device setup failure. Please check your connection", \
            file=sys.stderr)
        return
    else:
        print("Setup complete.")

    sensor.setPulseAmplitudeRed(0x0A) # Turn Red LED to low to indicate sensor is running
    sensor.setPulseAmplitudeGreen(0) # Turn off Green LED

    RATE_SIZE = 4 # Increase this for more averaging. 4 is good.
    rates = list(range(RATE_SIZE)) # list of heart rates
    rateSpot = 0
    lastBeat = 0 # Time at which the last beat occurred
    beatsPerMinute = 0.00
    beatAvg = 0
    samplesTaken = 0 # Counter for calculating the Hz or read rate
    startTime = millis() # Used to calculate measurement rate

    while True:

        irValue = sensor.getIR()
        samplesTaken += 1
        if sensor.checkForBeat(irValue) == True:
            # We sensed a beat!
            print('BEAT')
            delta = ( millis() - lastBeat )
            lastBeat = millis()

            beatsPerMinute = 60 / (delta / 1000.0)
            beatsPerMinute = round(beatsPerMinute,1)

            if beatsPerMinute < 255 and beatsPerMinute > 20:
                rateSpot += 1
                rateSpot %= RATE_SIZE # Wrap variable
                rates[rateSpot] = beatsPerMinute # Store this reading in the array

                # Take average of readings
                beatAvg = 0
                for x in range(0, RATE_SIZE):
                    beatAvg += rates[x]
                beatAvg /= RATE_SIZE
                beatAvg = round(beatAvg)

        Hz = round(float(samplesTaken) / ( ( millis() - startTime ) / 1000.0 ) , 2)
        if (samplesTaken % 200 ) == 0:

            print(\
                'IR=', irValue , ' \t',\
                            'BPM=', beatsPerMinute , '\t',\
                                                                                #'DCE', getDCE() , '\t',\
                            'Avg=', beatAvg , '\t',\
                'Hz=', Hz, \
                )

if __name__ == '__main__':
    try:
        runExample()
    except (KeyboardInterrupt, SystemExit) as exErr:
        print("\nEnding Example 5")
        sys.exit(0)
As one might expect the human body isn't as precise as a metronome. The time between pulses can vary quite a bit so this code takes a running average of 4 readings to try to smooth out the variance.


