SparkFun Inventor's Kit Experiment Guide - v4.1
 Joel_E_B,
  bboyho
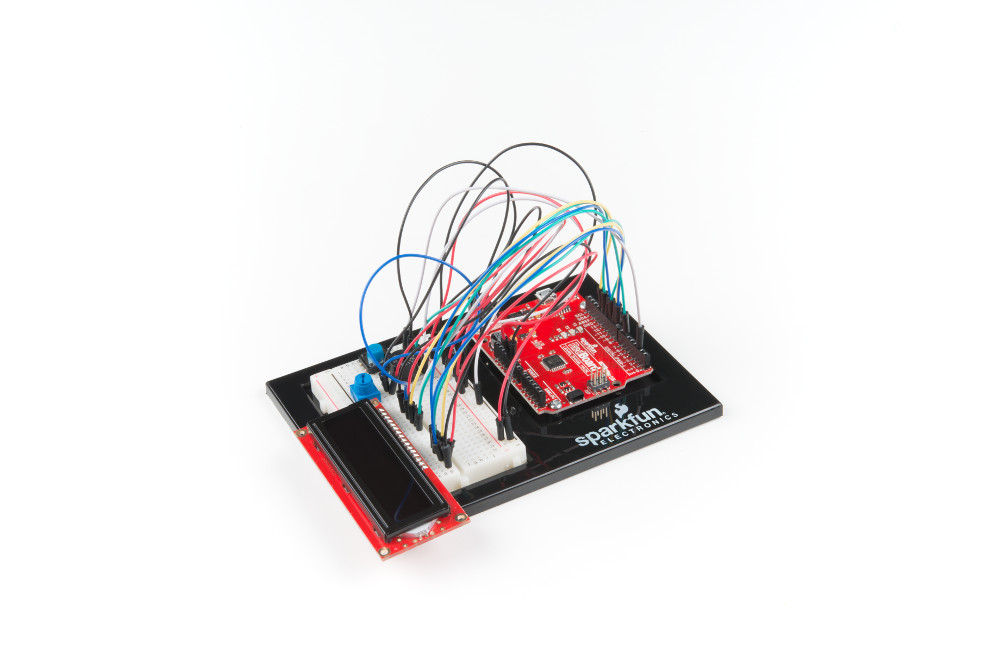
Circuit 4C: DIY Who Am I? Game
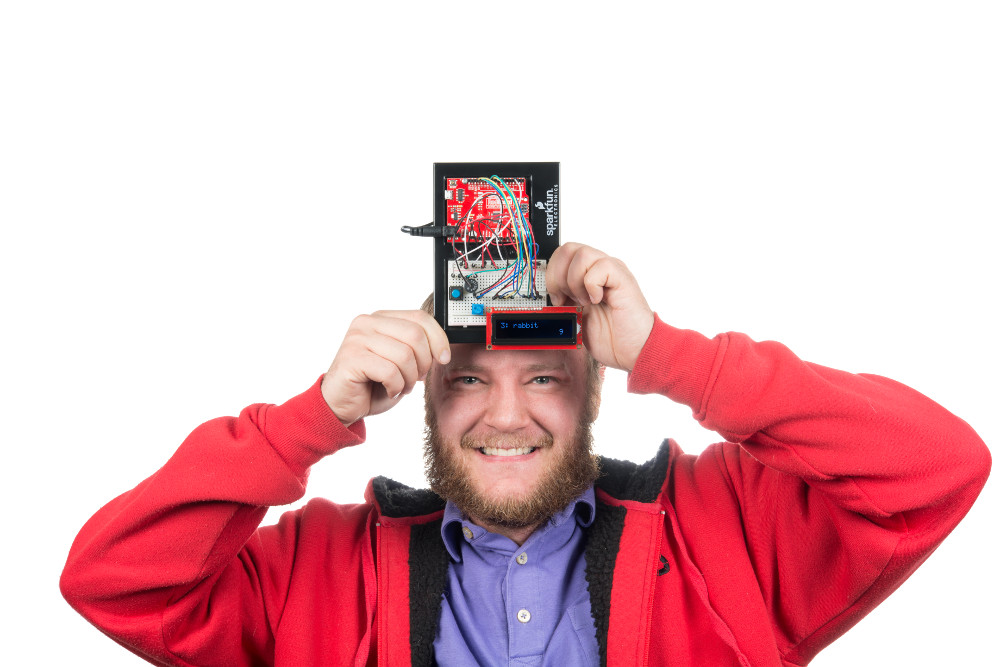
"DIY Who Am I?" is based on the popular Hedbanz game or HeadsUp! app. It's a fun party game in which a player holds an LCD screen to his/her forehead so that the player can’t see the word(s) that appear on the screen. Other players have to give hints, act out charades or make noises that will make the player with the LCD guess the word(s).
Parts Needed
Grab the following quantities of each part listed to build this circuit:
New Components
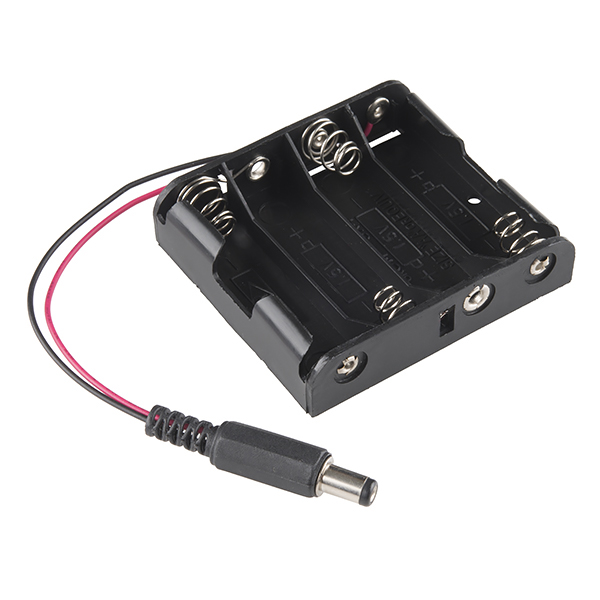
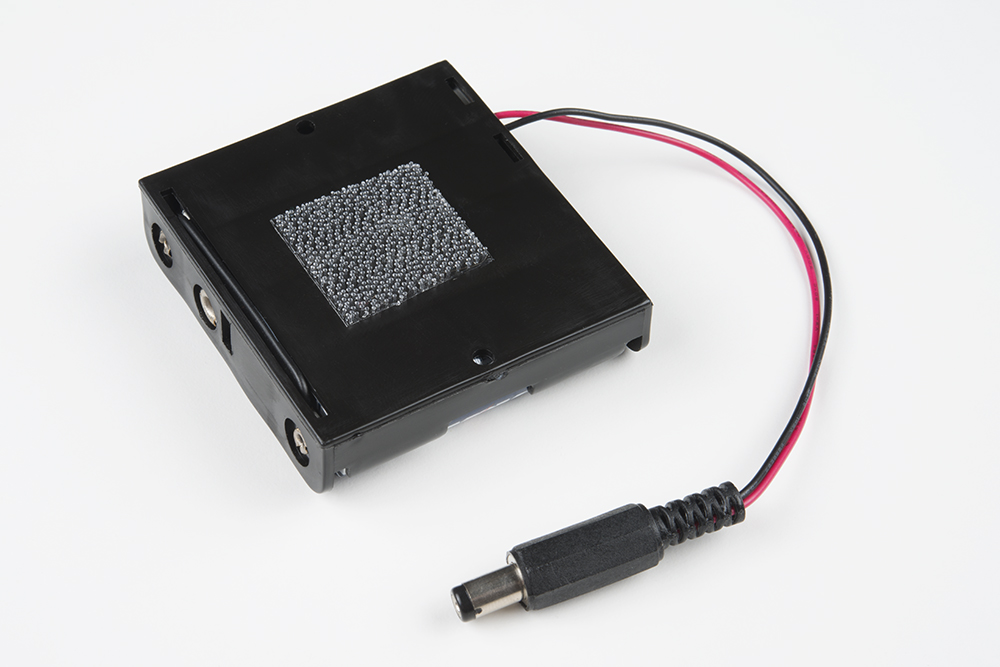
4xAA Battery Holder
Included in your kit is a 4-cell AA battery holder. The 5-inch cable is terminated with a standard barrel jack connector. The connector mates with the barrel jack on the RedBoard, allowing you to easily make your project battery powered.
New Concepts
Button Debounce
When working with momentary buttons, it is usually necessary to add button debouncing to your code. This is because the code that is meant to execute when the button is pressed may execute faster than you can press and release the button (microcontrollers are fast!). The simplest way to debounce a button is to add a small delay to the end of your code. This sketch adds a 500 millisecond delay at the end of loop() to account for this. This simple addition will prevent a word from getting skipped when you press the button for the game.
For a more complex example of button debouncing, in the Arduino IDE click File > Examples > 02.Digital > Debounce.
Strings
Strings are used to print words and even sentences to an LCD or the Serial Monitor. Strings are actually just an array of characters with a null character at the end to let the program know where the end of the string is.
Arrays of Strings
In circuit 2A you used an array of characters to represent musical notes. In this program, you’ll want to make an array of strings. Strings use multiple characters to make words, so you’ll need to use a little trick to put them in an array. The trick is to use a pointer. When you declare your array, you’ll use an asterisk after the char data type, as follows:
language:c
const char* arrayOfStrings = {“Feynman” “Sagan”, “Tyson”, “Nye”};
Pointers
Pointers are an advanced programming topic. They can be difficult to understand the first time you're introduced to them. For now, think of pointers as a variable that "points" to the value contained in a certain address in memory. In this sketch, the char* variable points to arrayOfStrings address and returns the character values to create a list of strings.
Hardware Hookup
| Polarized Components | Pay special attention to the component’s markings indicating how to place it on the breadboard. Polarized components can only be connected to a circuit in one direction. |
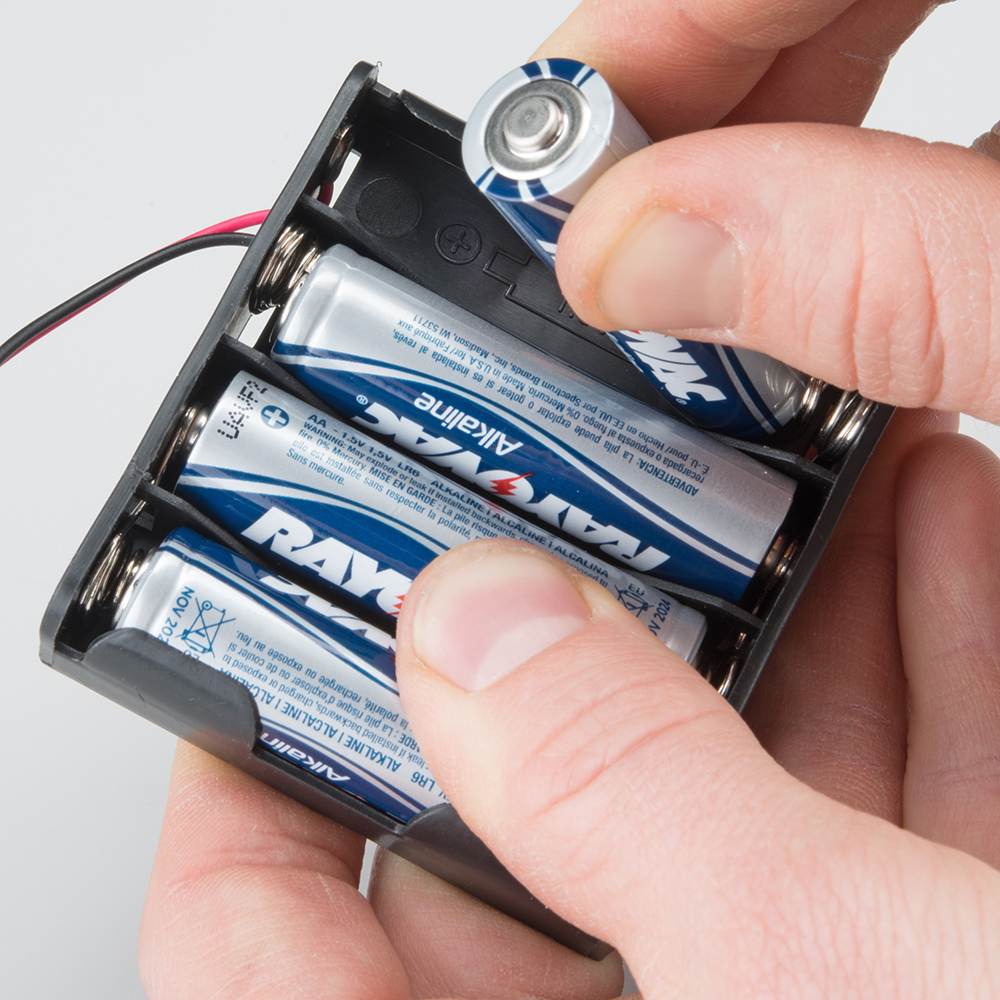
Batteries are polarized. They have a positive end and a negative end. The battery holder has images indicating which end goes in which orientation for each cell.
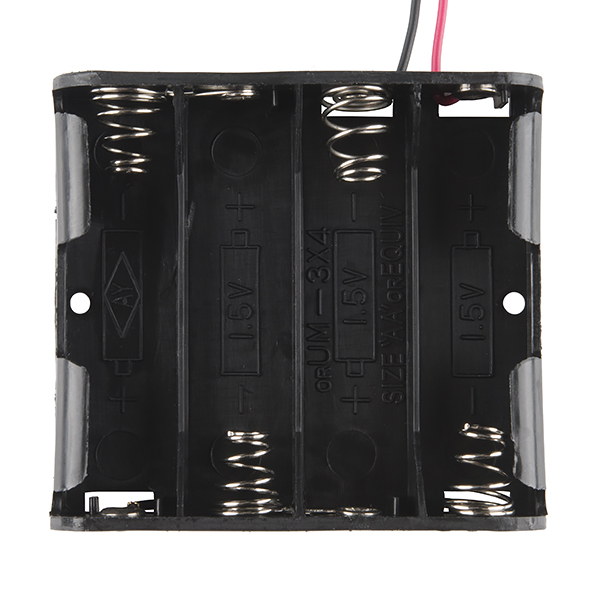
Ensure all the batteries are inserted correctly before plugging the battery holder into the RedBoard.
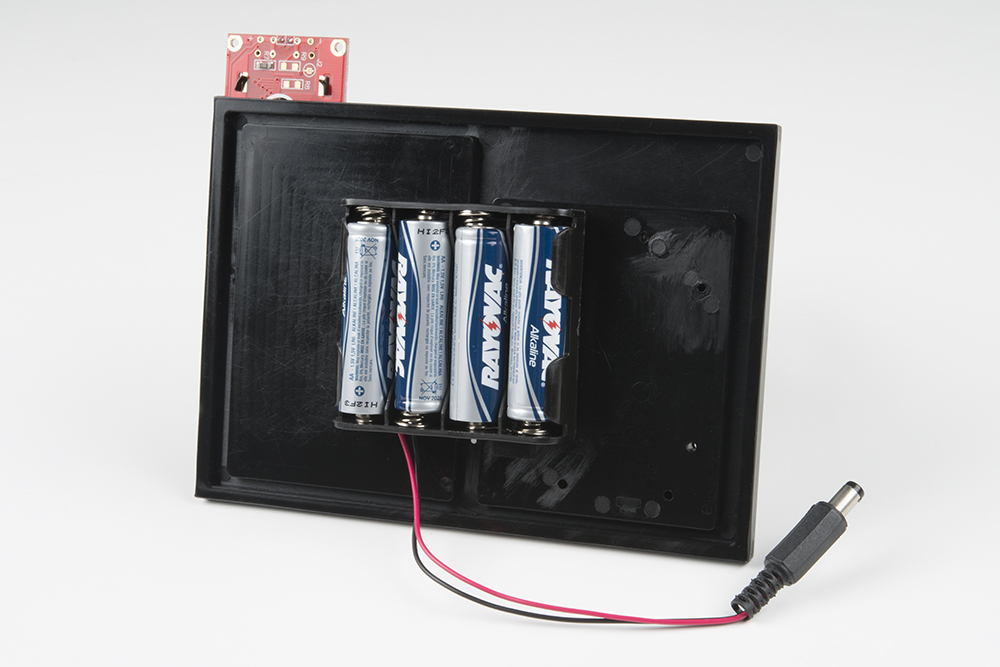
Battery Holder Attachment
To attach the battery holder to the breadboard baseplate, first cut two strips of Dual Lock that are roughly 1 inch x 1 inch each, or 2.5cm x 2.5cm. Remove the adhesive backing and attach one piece to the back of the battery holder.
Adhere the second piece to the bottom of the breadboard baseplate (directly in the middle is recommended, as this will come into play in Project 5).

Last, press the battery holder to the baseplate so that the two pieces of Dual Lock snap together. Insert the batteries into the holder if you have not done so already. Remember that batteries are polarized and can only go in one way.
Remove the battery pack while building your circuit.
Ready to start hooking everything up? Check out the circuit diagram and hookup table below to see how everything is connected.
Circuit Diagram
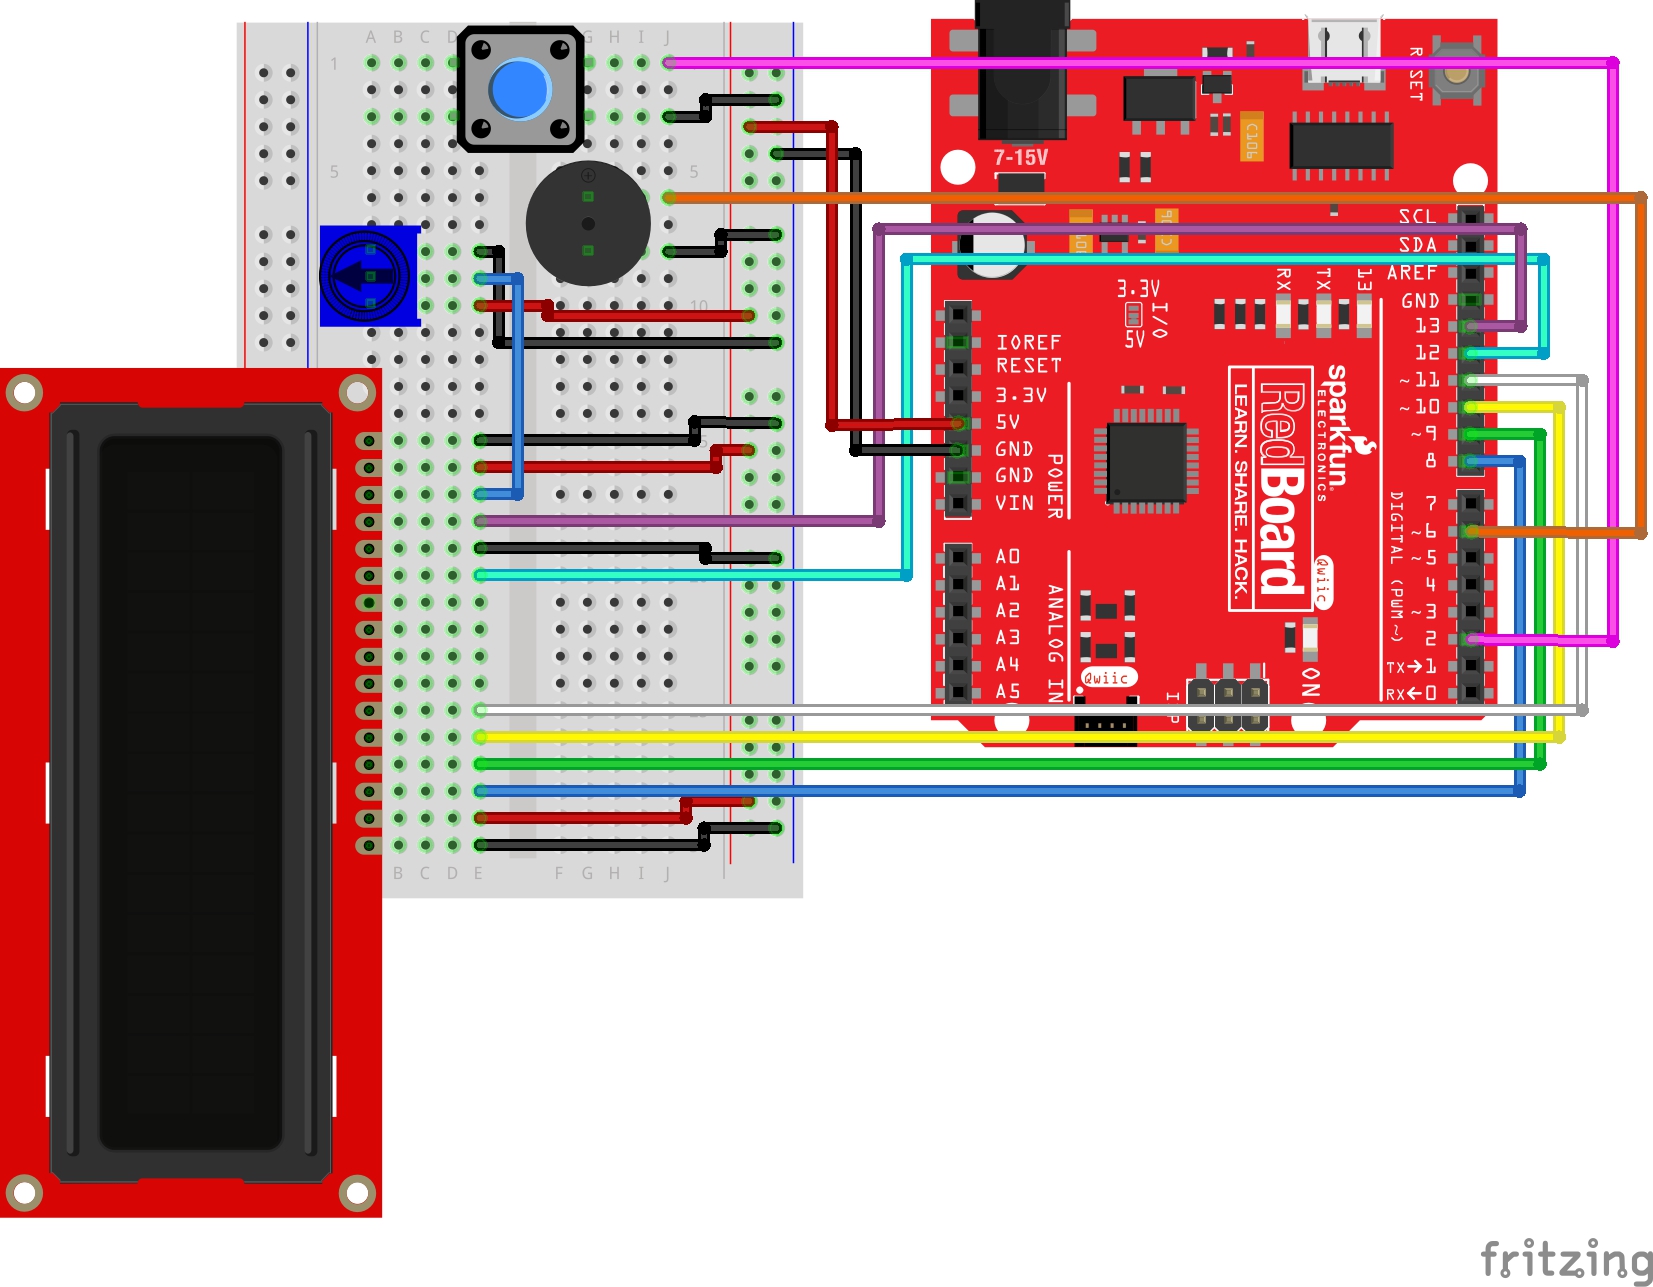
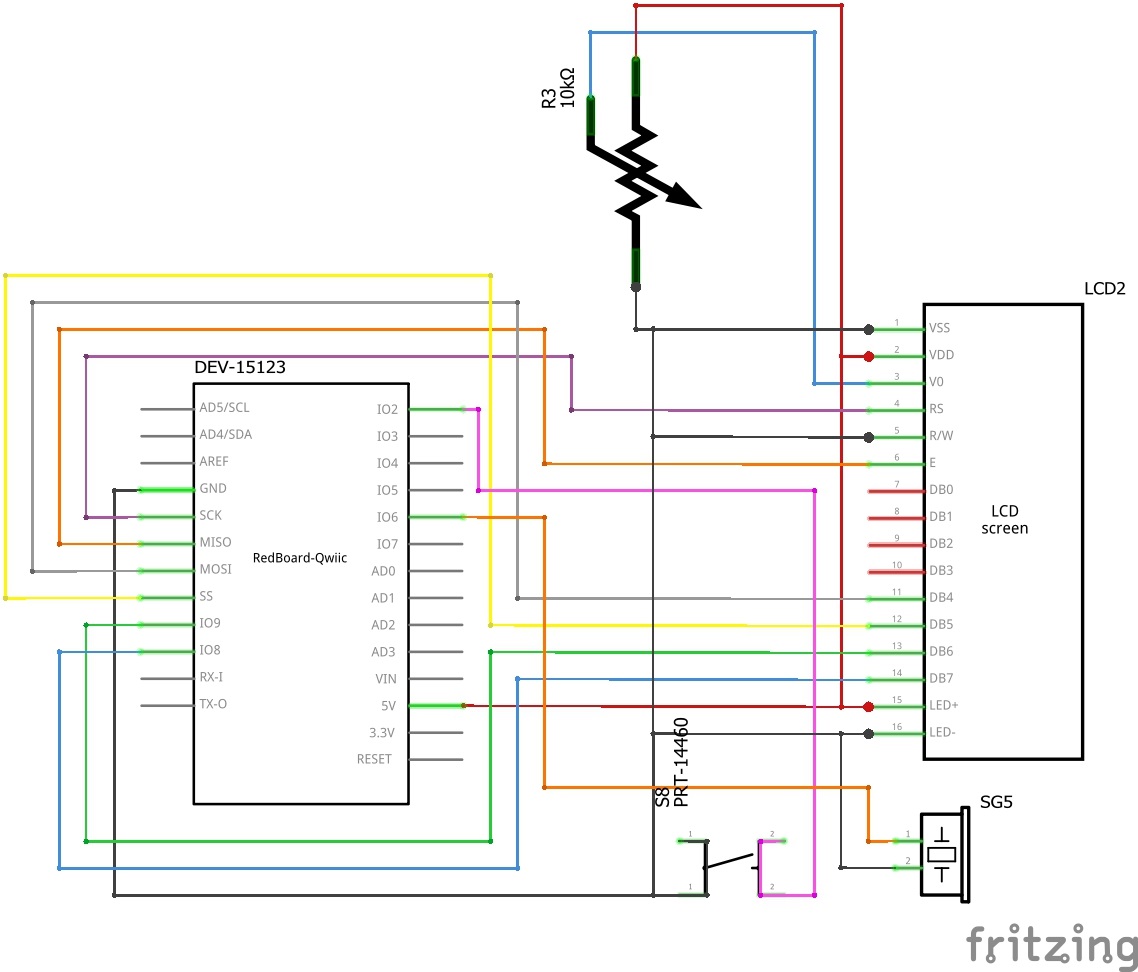
Having a hard time seeing the circuit? Click on the image for a closer look.
Hookup Table
| Component | RedBoard | Breadboard | Breadboard | Breadboard |
|---|---|---|---|---|
| Jumper Wire | 5V | 5V Rail ( + ) | ||
| Jumper Wire | GND | GND Rail ( - ) | ||
| LCD | A15-A30 (Pin 1 on A15) | |||
| Jumper Wire | E30 | GND Rail ( - ) | ||
| Jumper Wire | E29 | 5V Rail ( + ) | ||
| Jumper Wire | Digital Pin 8 | E28 | ||
| Jumper Wire | Digital Pin 9 | E27 | ||
| Jumper Wire | Digital Pin 10 | E26 | ||
| Jumper Wire | Digital Pin 11 | E25 | ||
| Jumper Wire | Digital Pin 12 | E20 | ||
| Jumper Wire | E19 | GND Rail ( - ) | ||
| Jumper Wire | Digital Pin 13 | E18 | ||
| Jumper Wire | E16 | 5V Rail ( + ) | ||
| Jumper Wire | E15 | GND Rail ( - ) | ||
| Potentiometer | A8 | A9 | A10 | |
| Jumper Wire | E9 | E17 | ||
| Jumper Wire | E8 | GND Rail ( - ) | ||
| Jumper Wire | E10 | 5V Rail ( + ) | ||
| Buzzer | G6 (Buzzer +) |
G8 (Buzzer -) |
||
| Jumper Wire | Digital Pin 6 | J6 | ||
| Jumper Wire | J8 | GND Rail ( - ) |
||
| Push Button | D1/D3 | G1/G3 | ||
| Jumper Wire | Digital Pin 2 | J1 | ||
| Jumper Wire | J3 | GND Rail ( - ) |
Open the Sketch
To open the code, go to: File > Examples > SIK_Guide_Code-master > SIK_Circuit_4C-DIYWhoAmI
You can also copy and paste the following code into the Arduino IDE. Hit upload, and see what happens!
language:cpp
/*
  SparkFun Inventor’s Kit
  Circuit 4C - Heads Up Game

  This is a DIY version of the popular Heads Up party game. To play, one person resets the RedBoard and holds the LCD
  facing away from them so that they cannot see it (usually on their forehead). The display will show a short countdown
  then display random words. The other player(s) who can see the screen must yell out clues until time runs out or the player
  guesses what word is on the screen. If they guess correctly, they can press the button on the breadboard and another word
  will be displayed.

  This sketch was written by SparkFun Electronics, with lots of help from the Arduino community.
  This code is completely free for any use.

  View circuit diagram and instructions at: https://learn.sparkfun.com/tutorials/sparkfun-inventors-kit-experiment-guide---v41
  Download drawings and code at: https://github.com/sparkfun/SIK-Guide-Code
*/

#include <LiquidCrystal.h>            //the liquid crystal library contains commands for printing to the display
LiquidCrystal lcd(13, 12, 11, 10, 9, 8);     // tell the RedBoard what pins are connected to the display

int buttonPin = 2;                    //pin that the button is connected to
int buzzerPin = 6;                    //pin for driving the buzzer
int buttonPressTime = 0;              //variable to show how much time the player has left to guess the word (and press the button)

long timeLimit = 15000;               //time limit for the player to guess each word
long startTime = 0;                   //used to measure time that has passed for each word
int roundNumber = 0;                        //keeps track of the roundNumber so that it can be displayed at the end of the game
const int arraySize = 25;

const char* words[arraySize] = {"moose", "beaver", "bear", "goose", "dog", "cat", "squirrel", "bird", "elephant", "horse",
                                "bull", "giraffe", "seal", "bat", "skunk", "turtle", "whale", "rhino", "lion", "monkey",
                                "frog", "alligator", "kangaroo", "hippo", "rabbit"
                               };

// the start value in the sequence array must have a value that could never be an index of an array
// or at least a value outside the range of 0 to the size of the words array - 1; in this case, it can't be between 0 to 24
int sequence[] = { -1, -1, -1, -1, -1, -1, -1, -1, -1, -1, -1, -1, -1, -1, -1, -1, -1, -1, -1, -1, -1, -1, -1, -1, -1}; //start with an array full of -1's

void setup() {

  pinMode(buttonPin, INPUT_PULLUP);       //set the button pin as an input

  lcd.begin(16, 2);                       //tell the LCD library the size of the screen

  generateRandomOrder();                  //generate an array of random numbers from 0 to 24 that will determine which order the words are shown in

  showStartSequence();                    //print the start sequence text

}

void loop() {

  for (int i = 0; i < arraySize; i++) {          //for each of the 25 words in the sequence

    lcd.clear();                        //clear off the array

    roundNumber = i + 1;                    //the array starts at 0, but the roundNumber will start counting from 1
    lcd.print(roundNumber);                 //print the roundNumber (this is the current round number)
    lcd.print(": ");                        //spacer between the number and the word
    lcd.print(words[sequence[i]]);        //print a random word from the word array

    startTime = millis();  //record the time that this round started

    while (digitalRead(buttonPin) == HIGH) {         //do this until the button is pressed...

      int roundedTime = round((timeLimit - (millis() - startTime)) / 1000); //calculate the time left in the round (dividing by 1000 converts the number to seconds
      lcd.setCursor(14, 1);                                                 //set the cursor in the lower right corner of the screen
      lcd.print("  ");
      lcd.setCursor(14, 1);                                                 //set the cursor in the lower right corner of the screen
      lcd.print(roundedTime);                                               //print the time left in the time limit
      delay(15);

      if (millis() - startTime > timeLimit) {       //if the time limit is up before the button is pressed
        gameOver();                                 //end the game
      }

      if (digitalRead(buttonPin) == LOW) {
        tone(buzzerPin, 272, 10);                   //emit a short beep when the button is pressed
      }

    }                       //exit this loop when the button is pressed

    delay(500);             //delay for a moment before going onto the next round, so that the button press doesn't get registered twice

  }
  //if you finish all 25 words
  winner();   //show the you win message
}


//--------------FUNCTIONS------------------------------

//DISPLAYS A COUNTDOWN TO START THE GAME
void showStartSequence() {

  lcd.clear();                  //clear the screen

  lcd.setCursor(0, 0);          //move the cursor to the top left corner
  lcd.print("Category:");       //print "Category:"

  lcd.setCursor(0, 1);          //move the cursor to the bottom left corner
  lcd.print("Animals");         //print "Animals:"

  delay(2000);                  //Wait 2 seconds

  lcd.clear();                  //clear the screen
  lcd.print("Get ready!");      //print "Get ready!"
  delay(1000);                  //wait 1 second

  lcd.clear();                  //clear the screen
  lcd.print("3");               //print "3"
  delay(1000);                  //wait 1 second

  lcd.clear();                  //clear the screen
  lcd.print("2");               //print "3"
  delay(1000);                  //wait 1 second

  lcd.clear();                  //clear the screen
  lcd.print("1");               //print "3"
  delay(1000);                  //wait 1 second
}

//GENERATES A RANDOM ORDER FOR THE WORDS TO BE DISPLAYED
void generateRandomOrder() {

  randomSeed(analogRead(0));            //reset the random seed (Arduino needs this to generate truly random numbers

  for (int i = 0; i < arraySize; i++) {        //do this until all 25 positions are filled

    int currentNumber = 0;              //variable to hold the current number
    boolean match = false;              //does the currentNumber match any of the previous numbers?

    //generate random numbers until you've generated one that doesn't match any of the other numbers in the array
    do {
      currentNumber = random(0, arraySize);            //generate a random number from 0 to 24
      match = false;                            //we haven't checked for matches yet, so start by assuming that it doesn't match
      for (int i = 0; i < arraySize; i++) {            //for all 25 numbers in the array
        if (currentNumber == sequence[i]) {     //does the currentNumber match any of the numbers?
          match = true;                         //if so, set the match variable to true
        }
      }
    } while (match == true);                    //if the match variable is true, generate another random number and try again
    sequence[i] = currentNumber;                //if the match variable is false (the new number is unique) then add it to the sequence
  }
}

//GAME OVER
void gameOver() {
  lcd.clear();                    //clear the screen

  lcd.setCursor(0, 0);            //move the cursor the top left corner
  lcd.print("Game Over");         //print "Game Over"

  lcd.setCursor(0, 1);            //move to the bottom row
  lcd.print("Score: ");           //print a label for the score
  lcd.print(roundNumber-1);       //print the score (the score is equal to the previous level/round number)

  //play the losing fog horn
  tone(buzzerPin, 130, 250);      //E6
  delay(275);
  tone(buzzerPin, 73, 250);       //G6
  delay(275);
  tone(buzzerPin, 65, 150);       //E7
  delay(175);
  tone(buzzerPin, 98, 500);       //C7
  delay(500);

  while (true) {}                 //get stuck in this loop forever
}

//WINNER
void winner() {
  lcd.clear();                    //clear the screen

  lcd.setCursor(7, 0);            //move the cursor to the top center of the screen
  lcd.print("YOU");               //print "You"

  lcd.setCursor(7, 1);            //move the cursor to the bottom center of the screen
  lcd.print("WIN!");              //print "WIN!"

  //play the 1Up noise
  tone(buzzerPin, 1318, 150);     //E6
  delay(175);
  tone(buzzerPin, 1567, 150);     //G6
  delay(175);
  tone(buzzerPin, 2637, 150);     //E7
  delay(175);
  tone(buzzerPin, 2093, 150);     //C7
  delay(175);
  tone(buzzerPin, 2349, 150);     //D7
  delay(175);
  tone(buzzerPin, 3135, 500);     //G7
  delay(500);

  while (true) {}                 //get stuck in this loop forever
}
What You Should See
The game will begin with a prompt telling you the category of words. Then it will run through a short countdown. When the first round starts, the word to be guessed will be displayed in the top left, and a countdown will be displayed in the bottom right of the LCD screen. Each time the button is pressed (before the timer expires) a new word will be displayed. If you win or lose, a short song will play and text will be displayed.
Program Overview
- Generate a random order for the words to be displayed.
- Show the starting countdown on the LCD.
- Start a loop that will run 25 times (there are 25 words total). For each round: a. Print the round number and the word to be guessed. b. Display a countdown timer in the lower right-hand corner of the screen that counts down the time limit for each round. c. If the time limit runs out, play the losing song, print "Game Over" and show the player's final score. d. If the player presses the button before the time limit is up, advance to the next word.
- If the player gets through all 25 words, play the winning song and print “YOU WIN!”
Code to Note
| Code | Description |
|---|---|
Array of Strings:const char* array_name [array_length] = | Makes an array of strings. The strings are stored as constants, so they can’t be changed once the program starts. |
Rounding function:round(value_to_round); | This math function rounds a number up or down to the nearest whole number. |
Random Function:random(min, max); | The random function takes a set of numbers and generates a pseudo-random number from that set. |
Button Debounce:delay(500); | This 500 millisecond delay at the end of the loop adds button debounce so that erroneous button presses are not detected by the RedBoard. |
| User Functions | Description |
generateRandomOrder(); | Makes an array that is a random ordering of the numbers from 1-25. This is used to display words for the game in a random order. |
showStartSequence(); | Shows the category of words on the LCD, then displays a countdown before the game starts. |
gameOver(); | Plays a sound and shows the text “Game Over” along with the player’s final score. |
winner(); | Shows the text “YOU WIN!” and plays a winning sound. |
Coding Challenges
| Challenge | Description |
|---|---|
| Change the time limit | Changing the time limit variable will change the difficulty of the game. |
| Change the words in the word list | Try changing the categories and words. The number of words in your words array must match the value of the variable “arraySize”. |
| Change the winning and losing songs | By changing the tones in the winner() and gameover() functions you can change which song plays at the end of the game. |
Troubleshooting
| Problem | Solution |
|---|---|
| The screen is blank or flickering | Adjust the contrast by twisting the potentiometer. If it’s incorrectly adjusted, you won’t be able to read the text. Also, check the potentiometer to make sure it's connected correctly. |
| No sound is coming from the buzzer | Check the wiring from the buzzer. Make sure you are using the correct pin as defined in your code. You may add a potentiometer volume knob if you desire. |
| The button doesn't work or words are getting skipped before they are guessed | If the button isn't working, check your wiring. If words are being skipped when the button is pressed, increase the debounce delay found at the end of the loop. It should be 500 milliseconds by default. Increasing this number by tiny increments will help with this problem. |