Pi AVR Programmer HAT Hookup Guide
 QCPete
 Introduction
In this tutorial we will use a Pi AVR Programmer HAT and a Raspberry Pi 3B+ to program an ATMega328P target IC (RedBoard). We will program the Arduino bootloader over SPI using the capsense pad to engage, and then do some programming using avrdude in the command line. We will also cover how the Pi AVR Programmer HAT hardware works in conjunction with Python, avrdude, and shell command files.
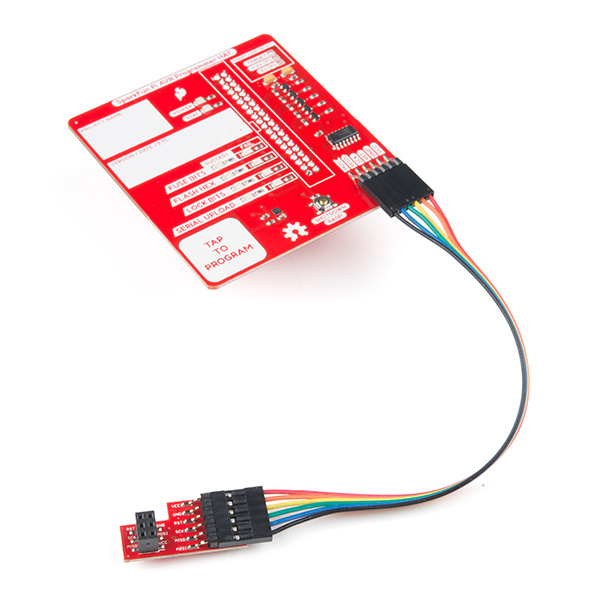
SparkFun Pi AVR Programmer HAT
DEV-14747The Pi AVR Programmer HAT makes it easy to program AVRs directly from the SPI hardware pins on any Raspberry Pi. It was originally designed as an in-house solution for SparkFun production, but now is offered as a robust programming tool for anyone to purchase. It is by far one of the fastest, most reliable, and hack-able (fully open sourced) AVR programming solutions available. It can be used directly from the command line using avrdude commands, or with some simple setup steps, it can function as a stand-alone programmer with capsense-pad engage and status leds!
All of the design files, firmware, and example programming files can be found here:
There are many reasons for programming your AVR via an in-system programmer (ISP):
- If your AVR doesn't have a bootloader on it, it's probably the only way to load code.
- ISP provides a faster and more reliable code upload.
- If your project requires that your hardware UART pins (RX/TX) be connected to another device, this can conflict with serial uploading of code. ISP programming does not require using these pins. Instead, it uses MOSI/MISO/SCK/RESET -- Arduino pins D11/D12/D13/RESET. This means you can leave RX and TX connected during development and re-program your AVR with new code without un-plugging and re-plugging any of your programming lines.
- With ISP, you can overwrite the bootloader and squeeze out some extra flash space.
- ISP allows you to poke at the fuse bits to change many settings, including the brown-out voltage.
Covered In This Tutorial
In this tutorial we will introduce you to all of the important aspects of the Pi AVR Programmer HAT. It's split into a series of sections, which cover:
- Board Overview -- A look at the hardware components that make up the Pi AVR Programmer HAT.
- Raspberry Pi Setup -- To get up and programming, there is a little bit of setup work to do on your Raspberry Pi. Here, we will show what settings to change and what files need to be modified and/or copied.
- Closer Look at the Repository Files -- Here you'll find a more detailed description of each file necessary to setup your Pi.
- Hardware Hookup -- How to hookup the Pi AVR Programmer from your Raspi to the example Target AVR.
- ISP Programming: Stand-Alone -- How to use the HAT in stand-alone mode and program an arduino bootloader (or any hex file) via SPI onto an ATMega328p target IC (the Redboard).
- ISP Programming: Command Line -- A more advanced, command-line-based approach to using the Pi AVR Programmer HAT.
- ISP Programming: Within the Arduino IDE -- How to use the HAT from within the Arduino IDE. A nice one-click solution for programming your Arduino with the speed of ISP.
- Speed Test -- We take the HAT for a speed test and see just how fast it goes!
Required Materials
To complete this tutorial, you will need the following hardware. You may not need everything though depending on what you have. Add it to your cart, read through the guide, and adjust the cart as necessary.
Suggested Reading
To read even more about the history behind this project and design choices, check out the full tutorial/write up here:
Raspberry Pi Stand-Alone Programmer
Whether you're a beginner or experienced electronics enthusiast, the Pi AVR Programmer HAT should be easy to get up-and-running. If you've programmed an Arduino before, you'll be well-prepared for the next step. Here are some addtional tutorials we'd recommend reading before continuing on with this one.
Serial Peripheral Interface (SPI)
Installing an Arduino Bootloader
What is an Arduino?
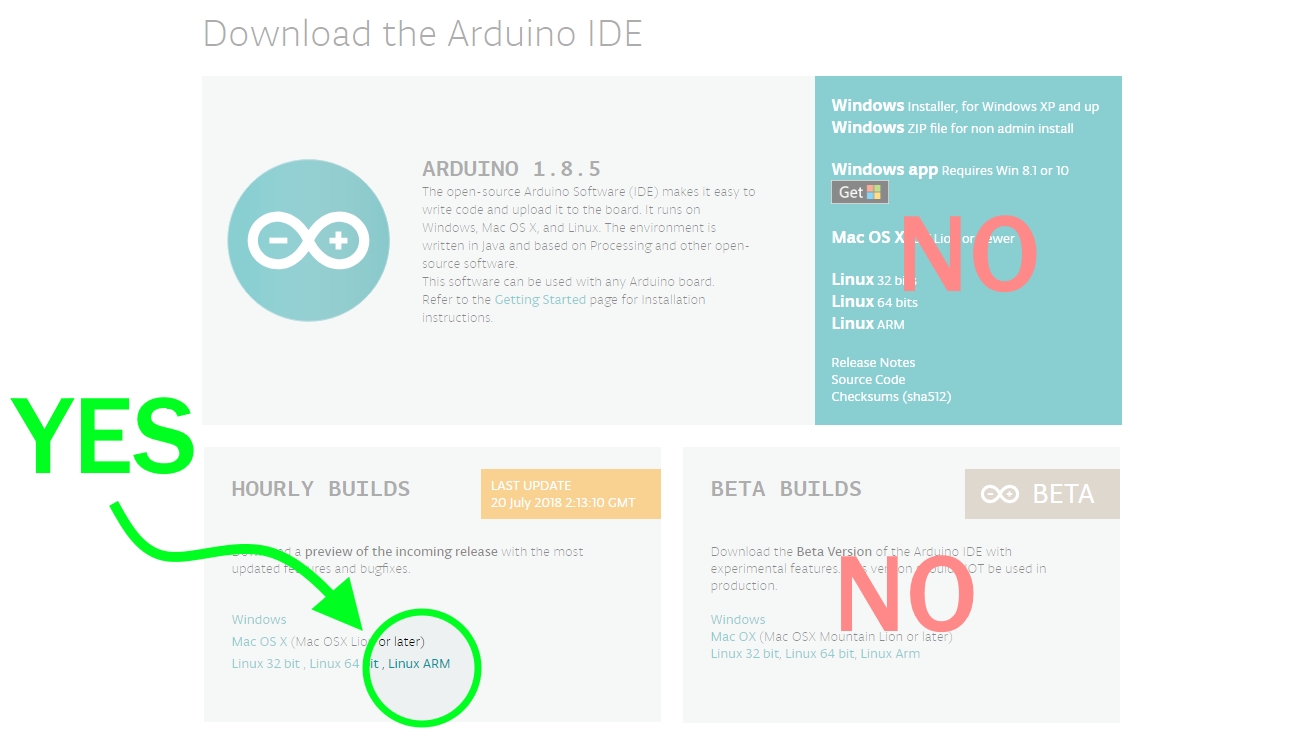
Installing Arduino IDE
Logic Levels
Serial Terminal Basics
Raspberry Pi 3 Starter Kit Hookup Guide
Board Overview
Before we get into using our Pi AVR Programmer HAT, let’s quickly overview what components fill the board out:
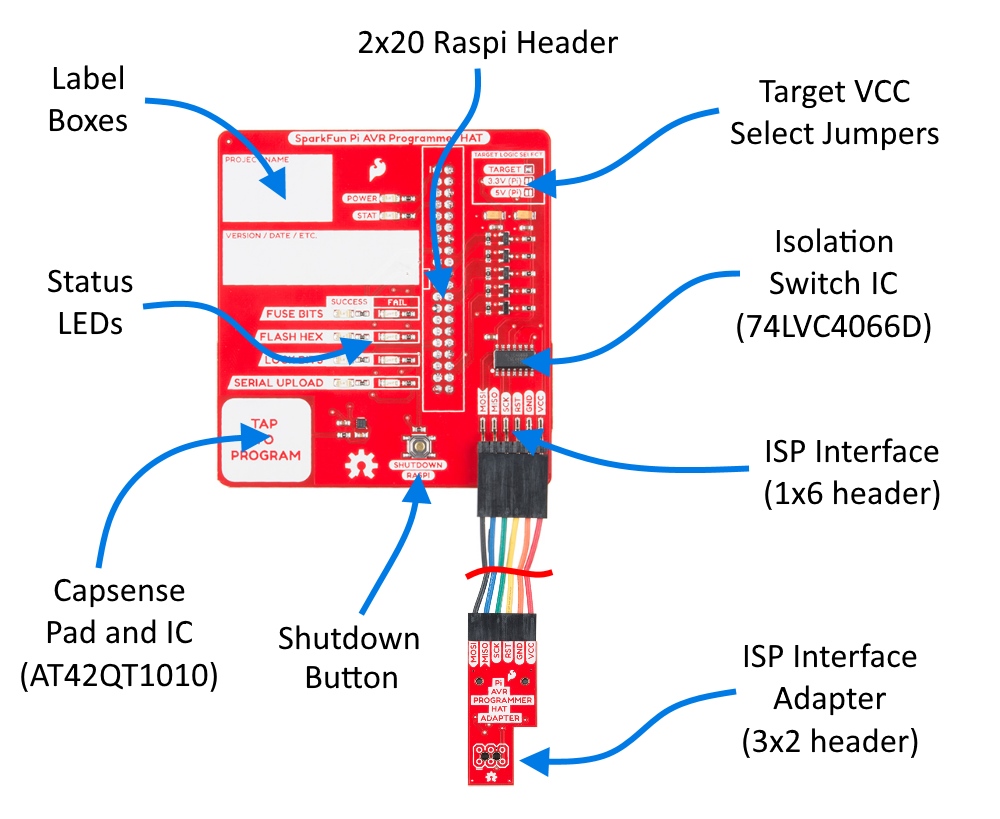
2x20 Raspi Header -- This female header will connect down to the GPIO pins on your Raspberry Pi. When pushed all the way down into the GPIO pins, the HAT will sit flush with the top of your enclosure.
Target VCC Select -- Jumpers to choose what logic level you’d like to talk to your target. Options include "TARGET", 3.3V, and 5V.
Isolation Switch IC -- The multiplexer IC that disconnects the SPI lines from your Pi to the Target.
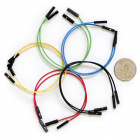
SPI Interface (1x6 header) -- These headers provide optional direct access to the SPI lines. This is in a 1x6 straight header format, so it will mate nicely with your 6-pin Jumper wire. Most programmers use ribbon cables, which will fail after so many insertions. This 1x6 cable and adapter solution is much more robust. You can also opt to remove the supplied jumper cable, and wire up to your target with your own jumper wires or custom adapter.
SPI Interface Adapter (2x3 header) -- This adapter mates easily with the standard ISP header found on most AVR boards.
Shutdown Button -- Hold this down for 6 seconds to shut down your Pi.
Capsense Pad -- Use this to engage programming. Simply tap with your finger and that will trigger the onboard capsense ATQ421010 IC which is connected to a GPIO on the Pi.
Status LEDS -- Used for indicating power, success and/or fail for various stages of programming.
Label Boxes -- These blank white silk-screen boxes are handy for labeling your Pi with a project name and version of your loaded hex file.
AVR ISP Pinouts
AVRs are programmed through an SPI interface. There are six unique signals required for communication between ISP and AVR:
- VCC
- GND
- Reset
- MOSI
- MISO
- SCK
To route those signals between devices, there are two standardized connectors -- one 10-pin, 2x5 connector and another 6-pin, 2x3 connector:
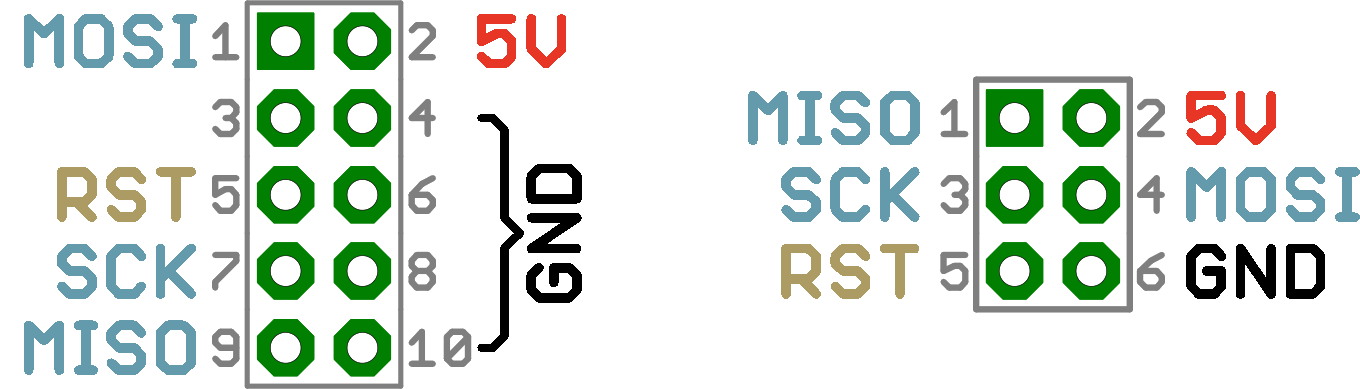
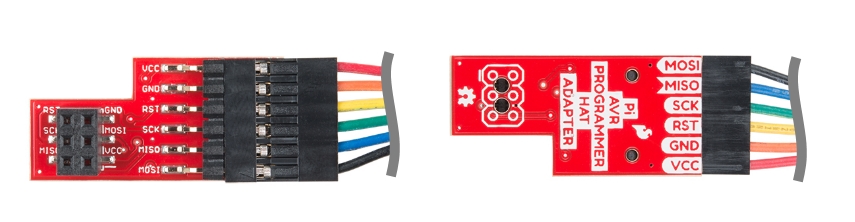
The Pi AVR Programmer HAT includes a 1x6 jumper cable and adapter which terminates with a 2x3 connector. There are labels on the bottom side near each leg on the SMD header:
If your target device has the 2x5 pinout option, then you could use some of our F/F jumper cables to connect directly from the right-angled 1x6 male header on the HAT PCB to your target.
Raspberry Pi Setup
Before we can do any programming, we need to do some setup work on our Raspberry Pi. If you are fairly familiar with Raspberry Pi, then you should check out the quick setup list for advanced users below. If you are fairly new to Raspberry Pi, then we recommend checking out the following tutorial: The Raspberry Pi 3 Starter Kit Hookup Guide. This offers a great walkthrough to setting up your Raspberry Pi with NOOBS (Raspberry Pi's easy-to-use graphical OS installer).
Raspberry Pi 3 Starter Kit Hookup Guide
Quick Setup List:
Install avrdude: Run the following command
sudo apt-get install avrdude.Put these four files in /home/pi:
Put the modified version of rc.local in your /etc folder.
Enable SPI hardware: Run
sudo raspi-config(as explained in the "Raspberry Pi SPI and I2C Tutorial" ).Open permissions on these files (to avoid debug errors). Run the following command:
sudo chmod 777 test.py avrdude_gpio.conf pi_program.sh your_firmware.hex.Adjust pi_program.h to your desired programming settings. Here you can choose fuse bits, device ID (your target type), programming speed (
-b 125000is the flag for setting this).Launch test.py. Run
sudo python test.py(or reboot and rc.local will launch it for you).Tap PROGRAM!
Closer Look at Repository Files
There are a lot of files in the GitHub repository for this project.
However, you don't actually need all of them to get up and running. There are quite a few that are extra examples and will show you some more of the advanced features of this programmer. Let's take a closer look at the most important ones.
test.py
The test.py is the Python module that handles all of the operations of the Pi AVR Programmer HAT. It is launched at bootup from inside rc.local. Once it is up and running, it blinks the "STAT" LED to show that it is alive. It then listens to the capsense pad, finds your firmware hex file, engages programming, parses output from avrdude, and ultimately blinks status LEDs.
It also has some functionality to watch for media drives and pull in any new hex files that live on them. This is an easy way to update your programming hex file on your Pi, but beware, it will overwrite your existing hex file, so be careful. It's usually a good idea to stop test.py before plugging in any thumbdrives (until you're absolutely sure you want test.py to pull in the hex file). To stop test.py (and any other background Python modules), simply use this command:
language:bash
sudo killall python
It's also not a bad idea to back up your hex files elsewhere (outside of /home/pi).
pi_program.sh
The pi_program.sh shell file contains the actual programming calls to avrdude. Test.py launches this shell to engage programming. It is very similar to the types of programming we do in SparkFun production. It allows you to adjust some variables at the top for device and fuse bits. Fuse bits can be a little tricky. If you need to adjust these and want some help, please check out our fuse bits tutorial.
language:bash
# DEVICE
# Here are some commonly used "part no"s in avrdude at SFE
# UN-comment the one you wish to use, or plug in something different
# Use "avrdude -p?" for a list of supported devices
DEVICE=atmega328p
#DEVICE=m32u4
#DEVICE=t2313

#FUSE BITS
HIGH_FUSE=0xD8
LOW_FUSE=0xFF
EXT_FUSE=0xFD # due to masking, 0x05 = 0xFD, 0x07 = 0xFF, ***Note on an ATMEGA2560, ext fuse writes and verifies as 0xFD
LOCK=0x0F # due to masking, 0x0F = 0xCF
Note that it also has a nice little trick at the top to search for a hex file within /home/pi and use that for programming.
language:bash
# get firmware file name
firmware=$(find /home/pi/*.hex)
$firmware .= "/home/pi/$firmware"
Beware, that if you have two hex files in this directory, it will use the first one it finds. You can modify pi_program.sh to call a specific hex file by changing the $firmware variable.
The last thing to note about this file is the manual GPIO control in the middle of calls. In between fuse bits programming and flashing of the hex, there is a manual flip of the GPIO controlling the reset line. After using this programmer for thousands of programming cycles, we found that in order to truly reset the target in between calls to avrdude, a more reliable approach is to quickly toggle that GPIO from the shell file. Without this, the second call to avrdude can occasionally fail to reset the target. But with this toggle, we've had 100% success!
language:bash
sudo gpio -g mode 26 output
sudo gpio -g write 26 0
sleep 0.1
sudo gpio -g write 26 1
sleep 0.1
avrdude_gpio.conf
The provided avrdude_gpio.conf configuration file is very similar to the default configuration file. The only modification necessary is adding in the linuxspi programmer definition (Note that this also defines your RESET pin). On the Pi AVR Programmer HAT, we have this hard wired to GPIO PIN 26. If you are working from a different .conf file, then this little block of text below needs to be added to the very bottom of the avrdude.conf file.
language:bash
programmer
  id = "linuxspi";
  desc = "Use the Linux SPI device in /dev/spidev*";
  type = "linuxspi";
  reset = 26;
;
rc.local
The provided rc.local file is very similar to the default rc.local file you get with most raspberry Pis. This file runs at bootup, so it is handy if you'd like to have some commands run every time you power up your Pi (very useful if you plan to run it headless). The only addtional command added to the default rc.local is as follows. It simply calls Python to launch our test.py module.
language:bash
python /home/pi/test.py &
Note the "&" is very important here. It allows your Pi to continue on and run the GUI. If it wasn't there, then your Pi would just wake up and run the Python module, and then do nothing else, this is dangerous, because you wouldn't be able to modify your Pi from here on out. It's kind of like "bricking" your Pi, so please don't forget that very important "&".
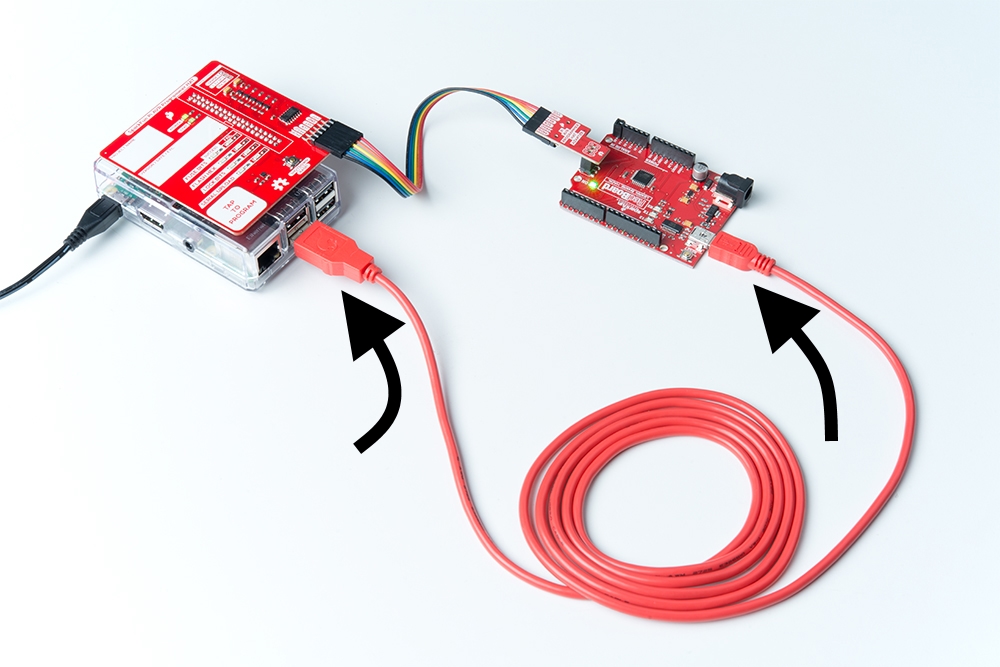
Hardware Hookup
Once you have completed the software setup to your Raspi, then it's time to plug in some hardware!
If you haven't already, put your Pi into an enclosure. Note that this is optional; it will work just fine without.
Plug in the HAT on top of your enclosed Pi.
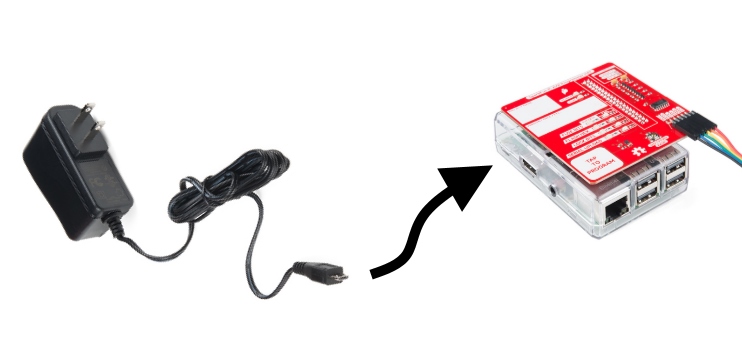
- Power your Raspi using a micro-B power adapter.
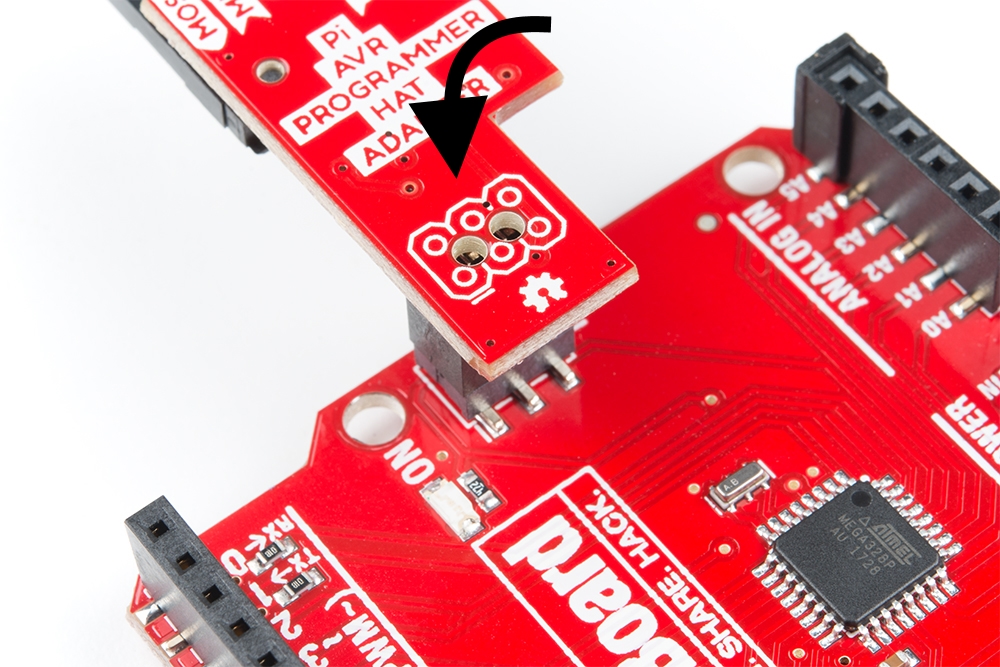
- Plug in the programming cable into your target IC. In this example, we are plugging into the 2x3 SPI header on the RedBoard. Note that this is polarized. The small white line indicates "pin 1". Make sure to align those up!
- Plug in a USB cable from the Pi to the RedBoard. This will provide power to the RedBoard. You could also opt to power the board via the barrel jack if you wish.
ISP Programming: Stand-Alone (aka Headless)
In this section, we are going to program using the Raspberry Pi "headless" (aka no monitor, mouse or keyboard). We will use the built in capacitive touch pad to engage programming and status LEDs to indicate success or failure. For this example, we will program the Arduino optiboot bootloader onto the RedBoard.
After you have setup your raspi for use with the Pi AVR Programmer HAT, then there are two important things to consider while using it as a stand-alone programmer:
Your hex file -- This should live in the '/home/pi' directory.
pi_program.sh -- This shell file contains all the settings for programming and can be edited with any text editor.
If you are plugging into the 2x3 header on a different AVR target IC, then we do recommend double checking that you have the polarity correct. The _pin 1_ is usually marked with a line of silk (as on the adapter), but it can also be indicated by a different style pad (usually square vs round).
After your setup and powered, programming is a simple as 1-2-3:
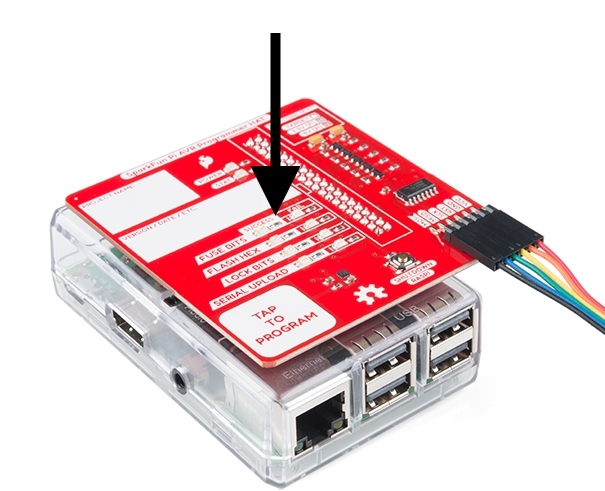
To engage programming in stand-alone use, simply tap the capacitive touch pad labeled, "TAP TO PROGRAM".
The STAT LED will go solid during programming. This can take a couple seconds -- depending on the size of your hex file.
Finally, the SUCCESS and FAIL LEDs will indicated the status at each stage of programming
To see more about the results of your programming (debug messages from avrdude), you will need to access some files on your raspi. During each cycle of programming, the output from avrdude is saved to some text files that live within /home/pi.
/home/pi/fuse_results.txt
/home/pi/flash_results.txt
/home/pi/SERIAL_UPLOAD/serial_upload_results.txt -- Note that this will only be updated if you did any serial uploading
ISP Programming: Command Line
In this section, we are going to program the Target AVR IC (Redboard) using calls to avrdude in the command line. This will require a monitor, keyboard and mouse hooked up to your Pi
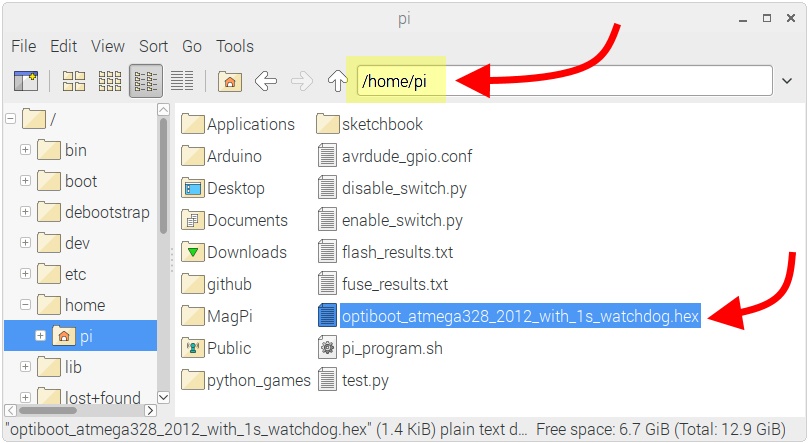
Download the bootloader hex file for the RedBoard here:
Save it in the correct directory (i.e. /home/pi/):
Sanity Check -- Device Signature Verification
Before we get into any actual programming, it's a good idea to ensure our connections are all correct and avrdude is working properly. To do this, we are going to simply call avrdude and ping for the device ID.
The Pi AVR Programmer HAT has an isolation switch between the raspi GPIO pins and the target. This serves as both protection of your rapsi and as a means to "free up" your target once you're done programming. You can use some handy Python modules to quickly set this switch: enable_switch.py and disable_switch.py. For easy access, it's a good idea to save them in the /home/pi directory.
Make sure to enable the programming switch by running a quick python module named enable_switch.py.
language:bash
sudo python enable_switch.py
Then run your avrdude command. Here is our first call to avrdude to check the device ID.
language:bash
sudo avrdude -p atmega328p -C /home/pi/avrdude_gpio.conf -c linuxspi -P /dev/spidev0.0 -b 125000 -v
Your readout should look like this:
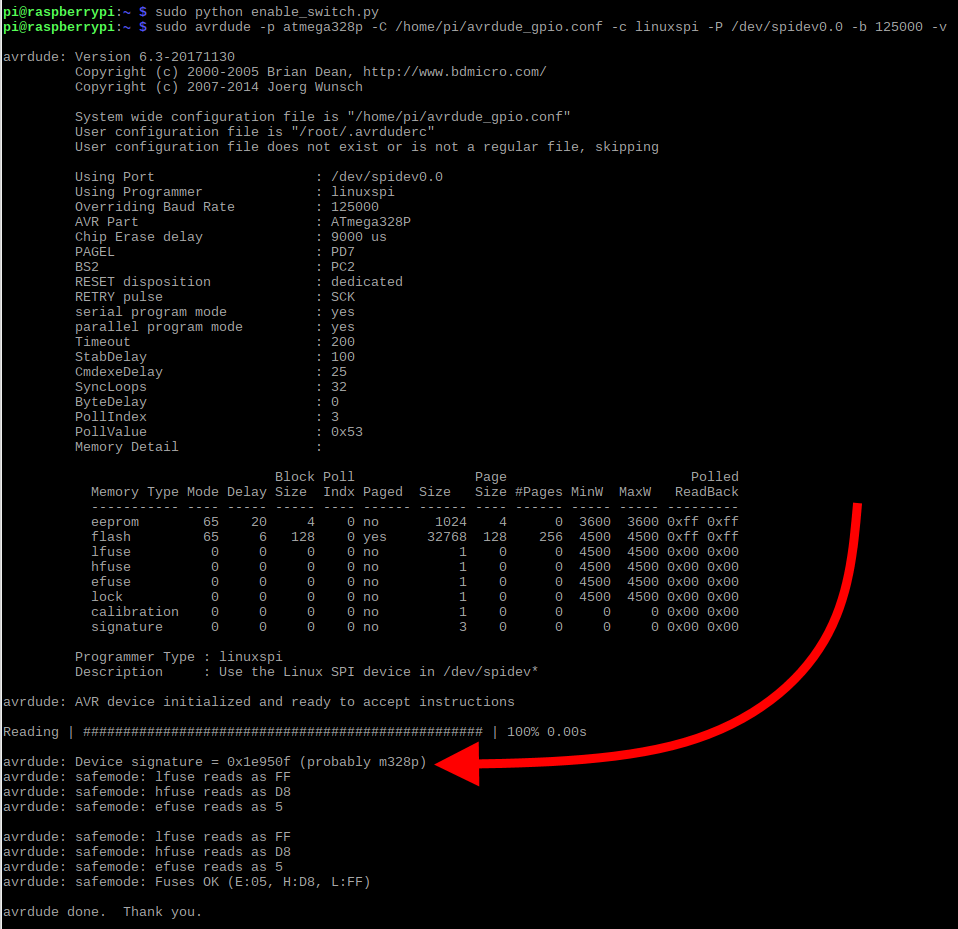
This basic command defines the programmer type you're using and the AVR it's talking to. AVRDUDE will attempt to read the Device Signature from your AVR, which is different for each AVR type out there. Every ATmega328P should have a device signature of 0x1E950F.
Flash Programming
Now that you've verified that everything is in working order, you can do all sorts of memory reading and writing with AVRDUDE. The main piece of memory you probably want to write is flash -- the non-volatile memory where the programs are stored.
This command will perform a basic write to flash (using this HEX file as an example):
language:bash
sudo avrdude -p atmega328p -C /home/pi/avrdude_gpio.conf -c linuxspi -P /dev/spidev0.0 -b 2000000 -D -v -u -U flash:w:blink.hex:i
Writing to flash can sometimes take a little longer than a device ID ping. With the built-in ISP hardware pins and the Pi AVR Programmer HAT, you can use up to 2MHz reliably. For blink.hex, it only takes 0.09 seconds! You'll see a text status bar scroll by as the device is read, written to, and verified.
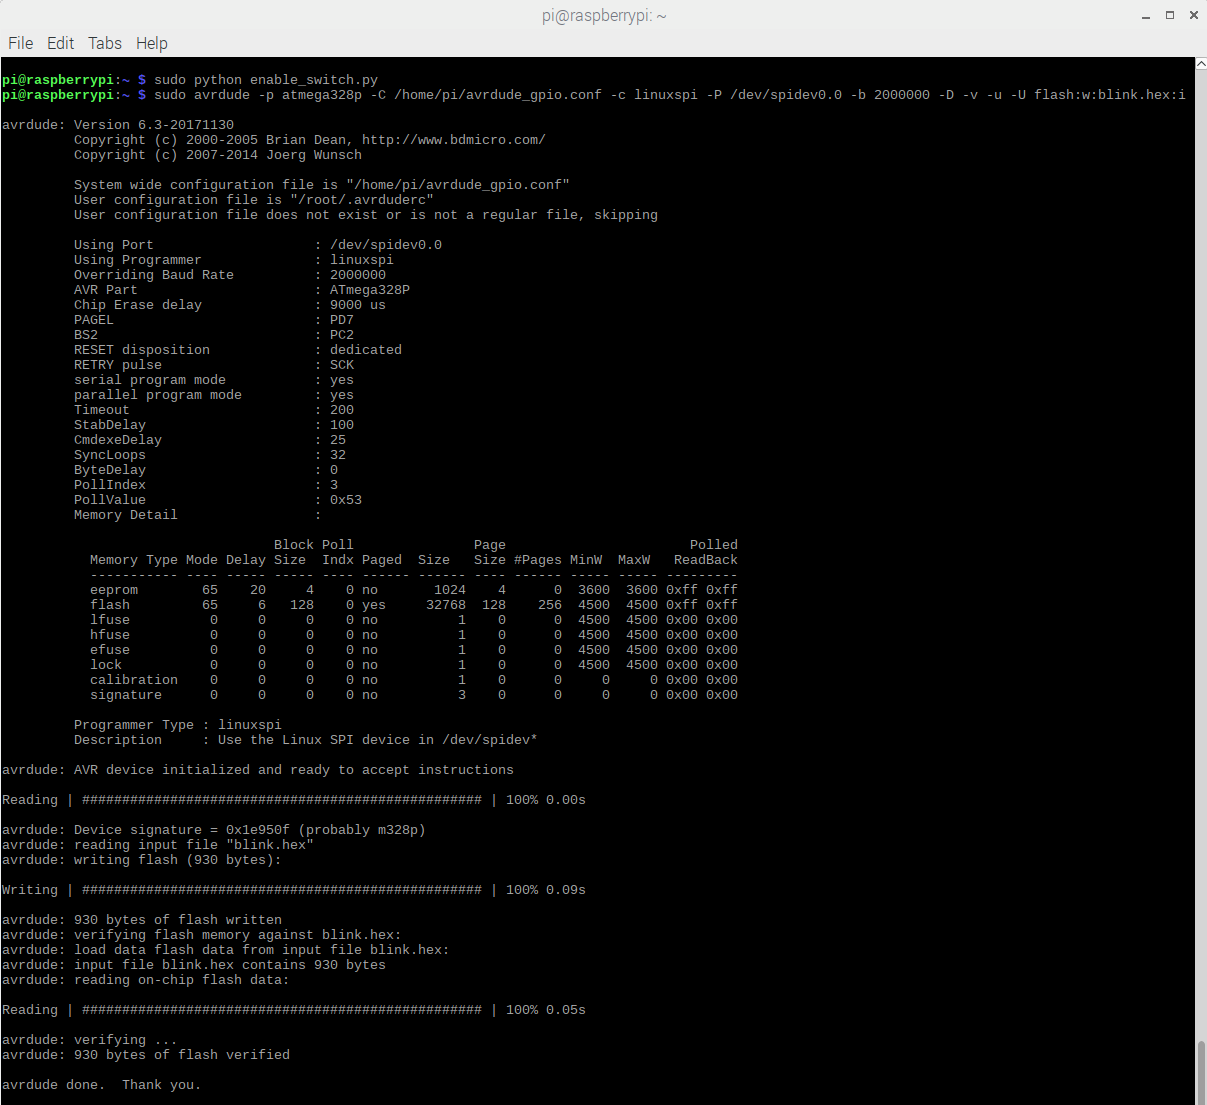
The -U option command handles all of the memory reads and writes. We tell it we want to work with flash memory, do a write with w, and then tell it the location of the hex file we want to write.
Useful Options
Here are just a few last AVRDUDE tips and tricks before we turn you loose on the AVR world.
Specify AVR Device
Two options required for using AVRDUDE are the programmer type and AVR device specification. The programmer definition, assuming you're using the Pi AVR Programmer HAT, will be -c linuxspi. Note that you will also need to specify the port (because there are two SPI ports on the raspi. This is done with the -P /dev/spidev0.0 portion of the call. If you need to use a different programmer check out this page and CTRL + F to "-c programmer-id".
The AVR device type is defined with the -p option. We've shown a few examples with the ATmega328P, but what if you're using an ATtiny85? In that case, you'll want to put -p t85 instead. Check out the top of this page for an exhaustive list of compatible AVR device types.
Verbose Output
Adding one or more -v's to your AVRDUDE command will enable various levels of verbosity to the action. This is handy if you need a summary of your configuration options, or an in-depth view into what data is being sent to your AVR.
There's plenty more where that came from. Check out the AVRDUDE Option Documentation for the entire list of commands.
ISP Programming: Within the Arduino IDE
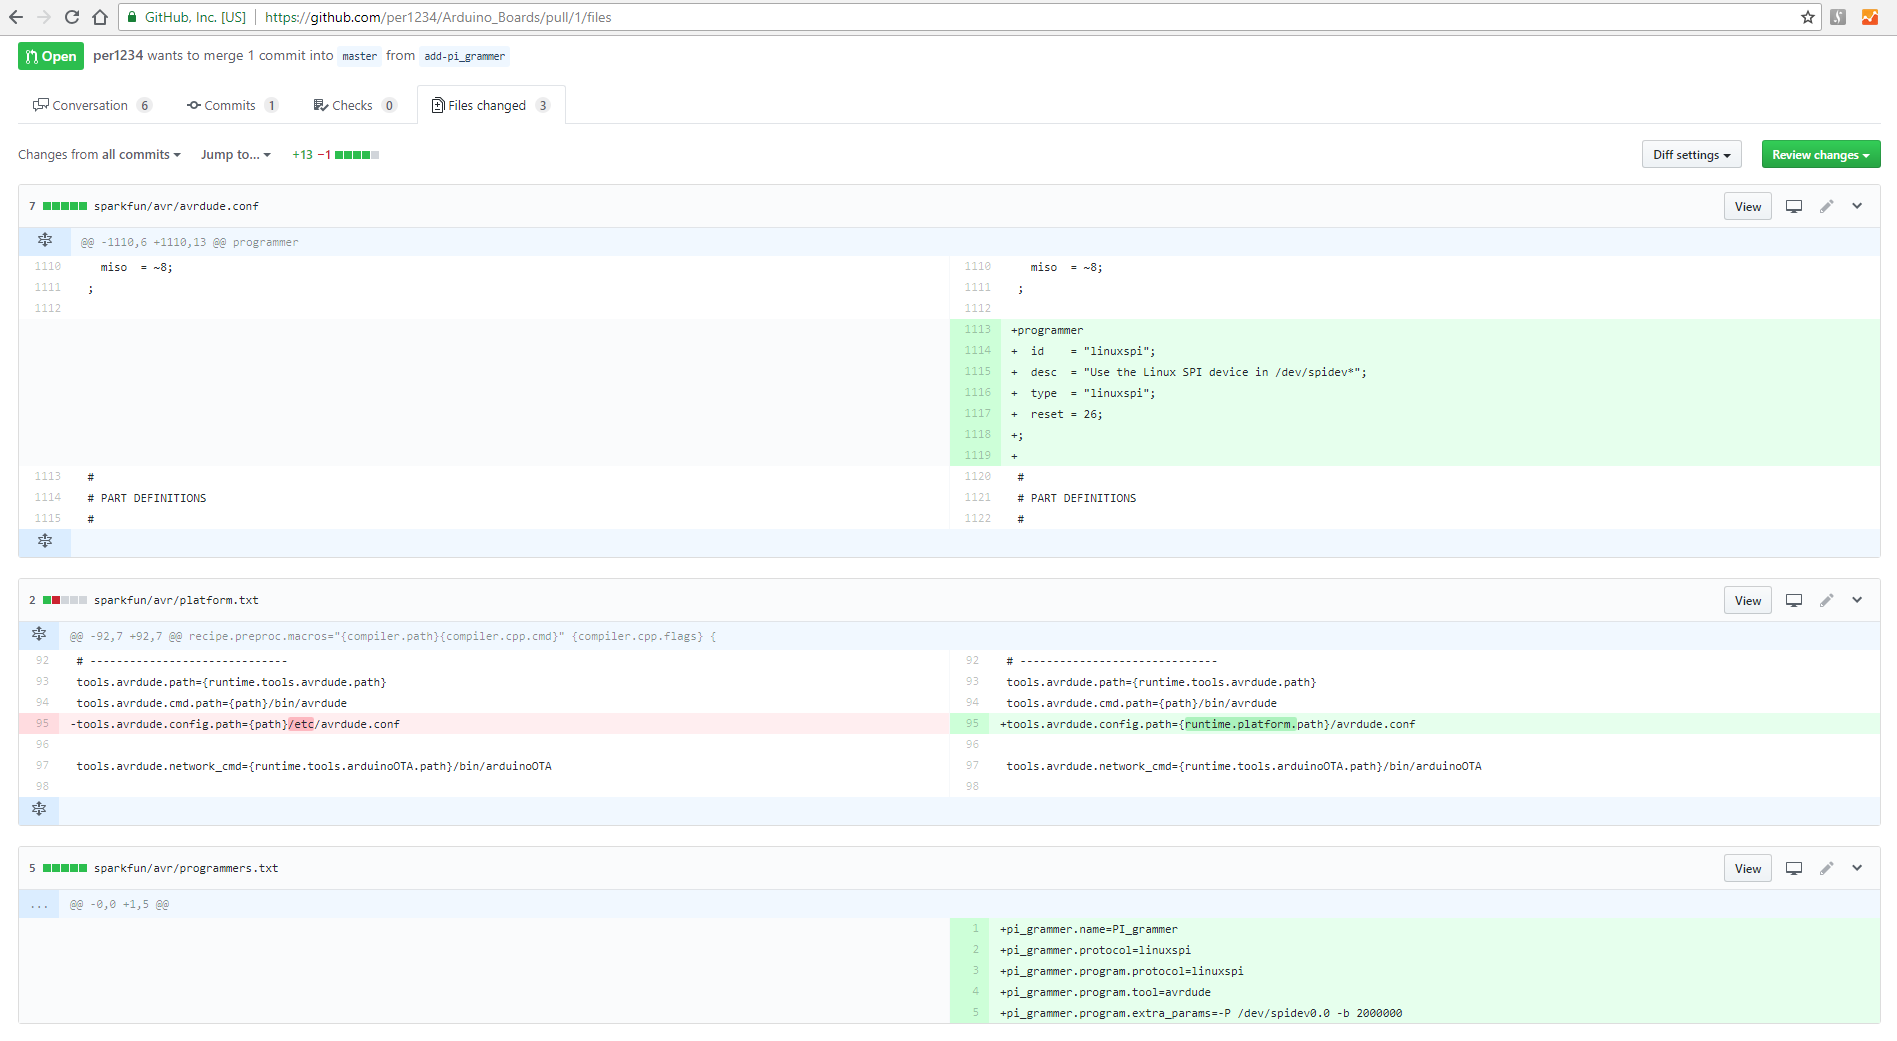
Here, we are going to show how to use the Pi AVR Programmer HAT directly from the Arduino IDE. Note that this functionality is not completely fleshed out. We are currently developing support for this feature and working out any bugs right now. Read all about it on the GitHub pull request here:
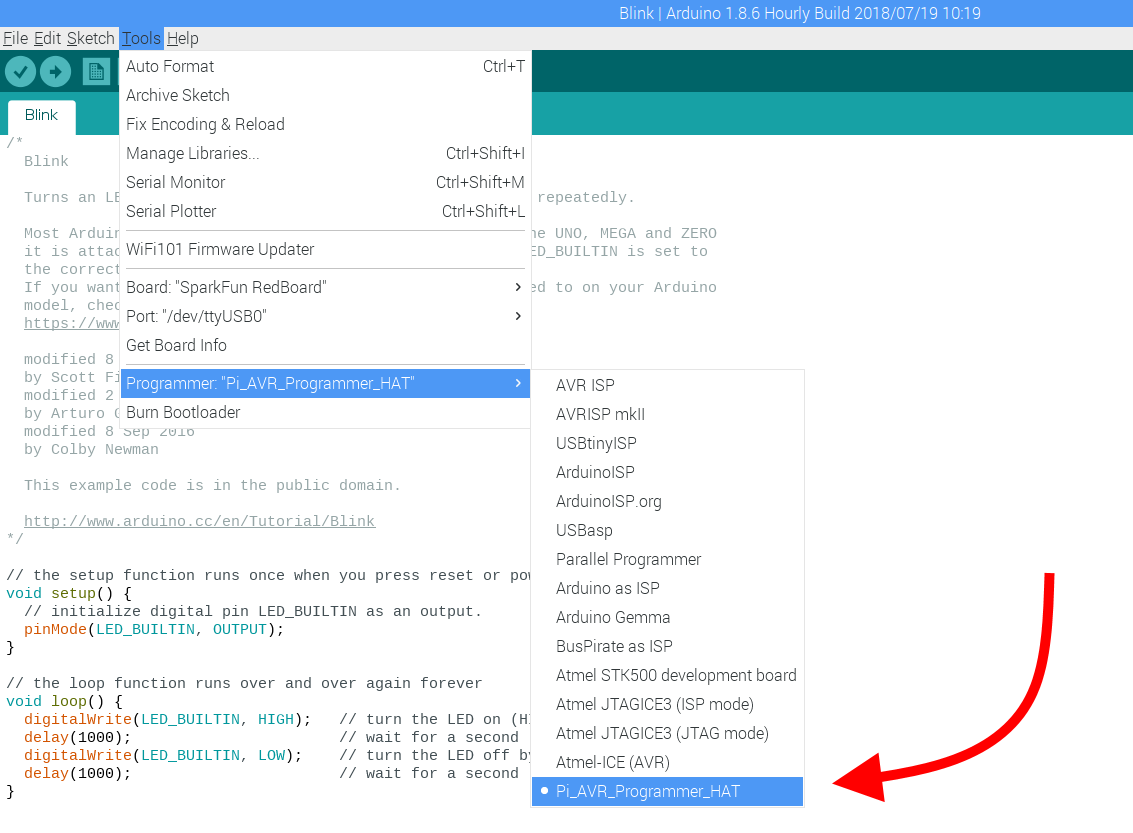
It is very important that you have the correct version of Arduino. The version of avrdude that comes with Arduino on your Raspi is probably not capable of using the Pi AVR Programmer HAT. You need Arduino Nightly Version because it comes with the latest version of avrdude -- version 6.3-20171130. For this tutorial, we are using Arduino 1.8.6 Hourly Build 2018/07/19.
You need to install the SparkFun Arduino Boards. If you are comfortable using the boards manager, then you can install them directly there. For more help, check out the instructions in the GitHub repository's README.md, and this write up for Installing Custom Boards into Arduino.
Modify the programmers.txt, avrdude.conf and platform.txt files (that is, unless it's already pulled into the repo by now). You can view it on GitHub at the open pull request for SparkFun Arduino Boards here. For reference, the following screen-shot also shows the differences:
Select "Pi_AVR_Programmer_HAT" from the drop down menu in the Arduino IDE. If you don't see it in your list of options, then try closing and re-opening Arduino.
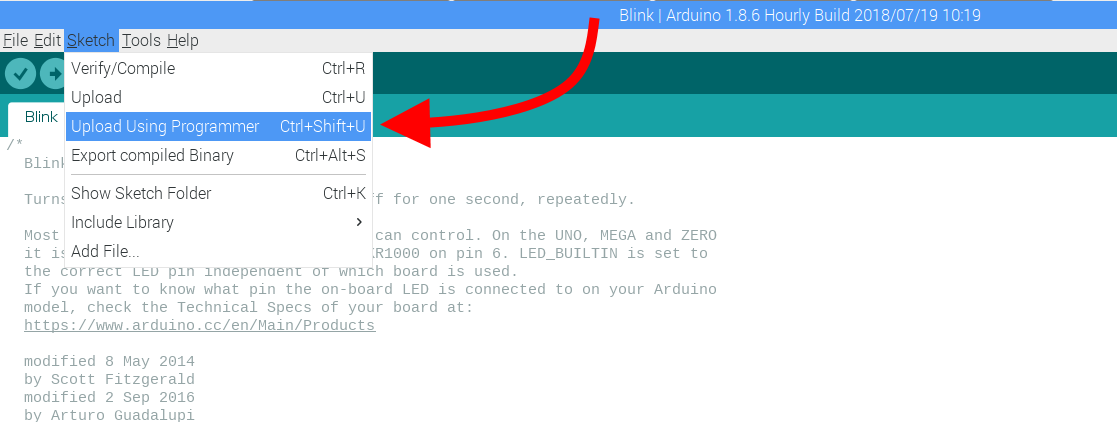
Now, instead of using the standard upload button, you can select "Upload Using Programmer". Ctrl + Shift + U is also pretty handy.
Turn on verbose output to see what's going on better.
Speed Test - How Fast Can This Thing Go?
For some fun, and to demonstrate the difference in programming speeds, we created a massive Arduino sketch, and recorded some of the programming speeds. Once compiled, this sketch used up a whopping 20440 bytes of memory -- this is about 63% of the ATmega328P's memory. For comparison, blink is only 930 bytes -- or 2% of memory.
This test was done with a 5V Arduino running on a 16MHz Crystal (the SparkFun RedBoard), and so that allowed us to program reliably at 2MHz. If you are using a 3.3V Arduino at 8MHz, it would be smart to bring that down to 1MHz. Our experience in production programming at SparkFun has shown us that in fact 1/8 of oscillator speed is the best way to go for nearly 100% reliability.
Here were the speed test results:
Serial upload via Arduino IDE:
6.32s upload
6.89s verify
13.21s total
ISP program via Arduino IDE and Pi AVR Programmer HAT:
4.04s write
3.40s read
7.44s total
ISP program via Pi AVR Programmer HAT in stand alone mode -- using test.py and pi_program.sh:
1.57s write
0.74s read
2.31s total
As you can see from the results above, the Pi AVR Programmer HAT used directly from avrdude was much faster than the other options! Almost 11 seconds faster than the traditional serial upload. Dang!
Resources and Going Further
Now that you've successfully got your Pi AVR Programmer Hat up and running, it's time to incorporate it into your own project!
For more information about the SparkFun Pi AVR Programmer Hat, check out the resources below:
- Schematic
- Eagle Files
- AVRDUDE Manual
- Raspberry Pi Foundation: RPi Hardware SPI
- GitHub Repo: Pi AVR Programmer HAT -- Here you'll find everything from PCB design files, and firmware to example programming setups.
- SFE Product Showcase: SparkFun Pi AVR Programmer HAT
We also recommend looking at the following resources:
- SparkFun
- Python for Beginners:File Handling Cheat Sheet in Python
- Ridge Solutions: Raspberry Pi – Restart / Shutdown Your Pi from Python Code
Want to check out some other SparkFun production processes or information about burning bootloaders on microcontrollers? Check out some of these related tutorials: