Monitor Sensor Data from Anywhere
 ROB-24601, Mariah
Step 2: Uploading Your Code
KaaIoT has a number of examples to get you started, so we’re going to begin there. But before we can do that, we need to create a project from within the KaaIoT dashboard:
- Sign into or create a free account with KaaIoT
- Go to the cloud, and log into your Root account
- You need to create a new Solution (KaaIoT’s name for a project). Give it a name and description.
- Navigate to Device Management/Devices, and add a device. This will create a new endpoint instance, with a unique Application Version - basically a UUID.
- Get an Endpoint Token, you can create yourself, or allow Kaa to create randomly. The Token is used to verify the identity of your endpoints, so any communication request must be made from a known source. Whichever way you decide to go, it is imperative that you copy or write it down! You’ll need both the App Version and Token for your Arduino code, and KaaIoT does not put it in a secret, retrievable place for you.
For the code itself, I used code from Kaa’s GitHub repository, then pulled our own basic demo code for the BME280 and the SPG40 and melded the three.
/*
* Monitor Sensor Data from Anywhere
*
* Rob Reynolds, Mariah Kelly, SparkFun Electronics, 2022
*
* This sketch will collect data from a BME280, a SGP40, and use a
* SparkFun ESP32 Thing Plus ESP32 WROOM to send the data
* over WiFi to a KaaIoT dashboard.
* https://www.kaaiot.com/
* Want to support open source hardware and software?
* Why not buy a board from us!
* Thing Plus ESP32 WROOM - https://www.sparkfun.com/products/17381
* SparkFun Air Quality Sensor - SGP40 (Qwiic) - https://www.sparkfun.com/products/18345
* SparkFun Atmospheric Sensor Breakout - BME280 (Qwiic) - https://www.sparkfun.com/products/15440
*
* License: This code is public domain but you can buy us a beer if you use
* this and we meet someday at the local (Beerware License).
*
*/


// First we'll install all of the necessary libraries
#include <Wire.h>
#include <WiFi.h>

#include "SparkFun_SGP40_Arduino_Library.h" // Go here to get the library:     http://librarymanager/All#SparkFun_SGP40
#include "SparkFunBME280.h"

#include <PubSubClient.h> // Download here: https://github.com/knolleary/pubsubclient/archive/refs/tags/v2.8.zip
#include <ArduinoJson.h>  // This library can be found in the library manager search bar!
#include "kaa.h" // This one can be found in the LM search bar as well!

#define KAA_SERVER "mqtt.cloud.kaaiot.com"
#define KAA_PORT 1883
#define KAA_TOKEN "ESP32DemoToken"     //Put your KaaIoT Token here (Created in KaaIoT)
#define KAA_APP_VERSION "*******************-v1"  //Put your auto-generated App Version here

#define RECONNECT_TIME  5000 //ms
#define SEND_TIME       3000 //ms

// Define output names for our sensor data here
#define COMMAND_TYPE "OUTPUT_SWITCH"
#define OUTPUT_1_NAME "temperature"
#define OUTPUT_2_NAME "humidity"
#define OUTPUT_3_NAME "VOC"
#define OUTPUT_4_NAME "altitude"
#define OUTPUT_5_NAME "pressure"

const char* ssid = "WirelessNetworkName";     //WiFi network goes here
const char* password = "WirelessNetworkPassword";     //WiFi Password goes here

char mqtt_host[] = KAA_SERVER;
unsigned int mqtt_port = KAA_PORT;

unsigned long now = 0;
unsigned long last_reconnect = 0;
unsigned long last_msg = 0;

WiFiClient espClient;
PubSubClient client(espClient);
Kaa kaa(&client, KAA_TOKEN, KAA_APP_VERSION);

#define PRINT_DBG(...) printMsg(__VA_ARGS__)

BME280 mySensor;
SGP40  myVOCSensor; //create an object of the SGP40 class

void setup() {
  Serial.begin(115200);
  Serial.println("Reading basic values from BME280 and SGP40");

  //mySensor.enableDebugging(); // Uncomment this line to print useful debug messages to Serial

  setupWifi();
  client.setServer(mqtt_host, mqtt_port);
  client.setCallback(callback);

  Wire.begin();

  //Initialize sensors
  if (myVOCSensor.begin() == false) {
    Serial.println(F("SGP40 not detected. Check connections. Freezing..."));
    while (1); // Do nothing more
  }
  if (mySensor.beginI2C() == false) {   //Begin communication over I2C
    Serial.println("The sensor did not respond. Please check wiring.");
    while (1); //Freeze
  }
}

void loop() {
  if (!client.connected()) { //Checking connection
    now = millis();
    if ( ((now - last_reconnect) > RECONNECT_TIME) || (now < last_reconnect) ) {
      last_reconnect = now;
      reconnect();
    }
    return;
  }
  client.loop();

  //Sending something
  now = millis();
  if ( ((now - last_msg) > SEND_TIME) || (now < last_msg) ) {
    last_msg = now;

    //Send something here
    sendOutputsState();
  }
}

void printMsg(const char * msg, ...) {
  char buff[256];
  va_list args;
  va_start(args, msg);
  vsnprintf(buff, sizeof(buff) - 2, msg, args);
  buff[sizeof(buff) - 1] = '\0';
  Serial.print(buff);
}

String getChipId() {
  char buf[20];
  uint64_t chipid = ESP.getEfuseMac();
  sprintf(buf, "%04X%08X", (uint16_t)(chipid >> 32), (uint32_t)chipid);
  return String(buf);
}

void composeAndSendMetadata() {
  StaticJsonDocument<255> doc_data;
  String ipstring = (
                  String(WiFi.localIP()[0]) + "." +
                  String(WiFi.localIP()[1]) + "." +
                  String(WiFi.localIP()[2]) + "." +
                  String(WiFi.localIP()[3])
                );

  // Insert any fixed data you want here - board, location, any other metadata
  doc_data["name"] = "ESP32";
  doc_data["model"] = "SparkFun Thing Plus";
  doc_data["location"] = "Niwot, CO";
  doc_data["longitude"] = "40° 5' 25.5474";
  doc_data["latitude"] = "-105° 11' 6.2874";
  doc_data["ip"] = ipstring;
  doc_data["mac"] = String(WiFi.macAddress());
  doc_data["serial"] = String(getChipId());

  kaa.sendMetadata(doc_data.as<String>().c_str());
}

void sendOutputsState() {
  StaticJsonDocument<255> doc_data;

  // This is where we get sensor data, asign it to our outputs, send it to our Dashboard
  doc_data.createNestedObject();
  doc_data[0][OUTPUT_1_NAME] = mySensor.readTempF();  // read sensor data for temperature
  doc_data[1][OUTPUT_2_NAME] = mySensor.readFloatHumidity(); // read sensor data for humidity
  doc_data[2][OUTPUT_3_NAME] = myVOCSensor.getVOCindex(); // read VOC sensor data
  doc_data[3][OUTPUT_4_NAME] = mySensor.readFloatAltitudeFeet(); // read sensor data for altitude
  doc_data[4][OUTPUT_5_NAME] = mySensor.readFloatPressure(); // read sensor data for pressure
  kaa.sendDataRaw(doc_data.as<String>().c_str());  // send data to Kaa IoT Cloud

}


void setupWifi() {
  delay(10);
  Serial.println();
  Serial.print("Connecting to ");
  Serial.print(ssid);
  WiFi.begin(ssid, password);
  while (WiFi.status() != WL_CONNECTED) {
    delay(500);
    Serial.print(".");
  }
  String ipstring = (
                  String(WiFi.localIP()[0]) + "." +
                  String(WiFi.localIP()[1]) + "." +
                  String(WiFi.localIP()[2]) + "." +
                  String(WiFi.localIP()[3])
                );
  Serial.println();
  PRINT_DBG("WiFi connected\n");
  PRINT_DBG("IP address: %s\n", ipstring.c_str());
}

void callback(char* topic, byte* payload, unsigned int length) {
  PRINT_DBG("Message arrived [%s] ", topic);
  for (int i = 0; i < length; i++) {
    Serial.print((char)payload[i]);
  }
  Serial.println();
  kaa.messageArrivedCallback(topic, (char*)payload, length);
}

void reconnect() {
  PRINT_DBG("Attempting MQTT connection to %s:%u ...", mqtt_host, mqtt_port);
  // Create client ID
  String clientId = "ESP8266Client-";
  clientId += String(getChipId());
  // Attempt to connect
  if (client.connect(clientId.c_str()))
  {
PRINT_DBG("connected\n");
kaa.connect();
composeAndSendMetadata();
  } else
  {
    PRINT_DBG("failed, rc=%d try again in %d milliseconds\n", client.state(), RECONNECT_TIME);
  }
}
You can check that your code is working locally by opening the Arduino’s serial monitor and checking the data flow. Once that’s been confirmed, you’re ready to jump back over to your dashboard, and make sure you’re receiving the data there as well.
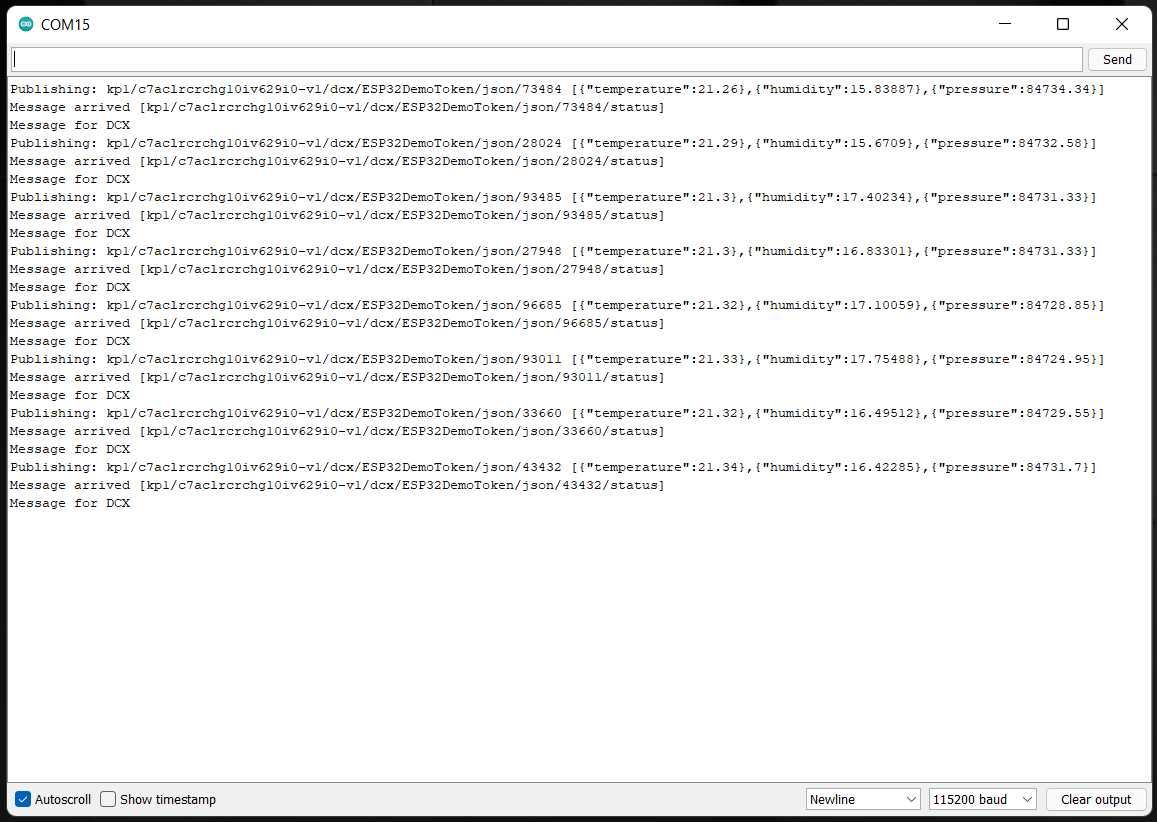
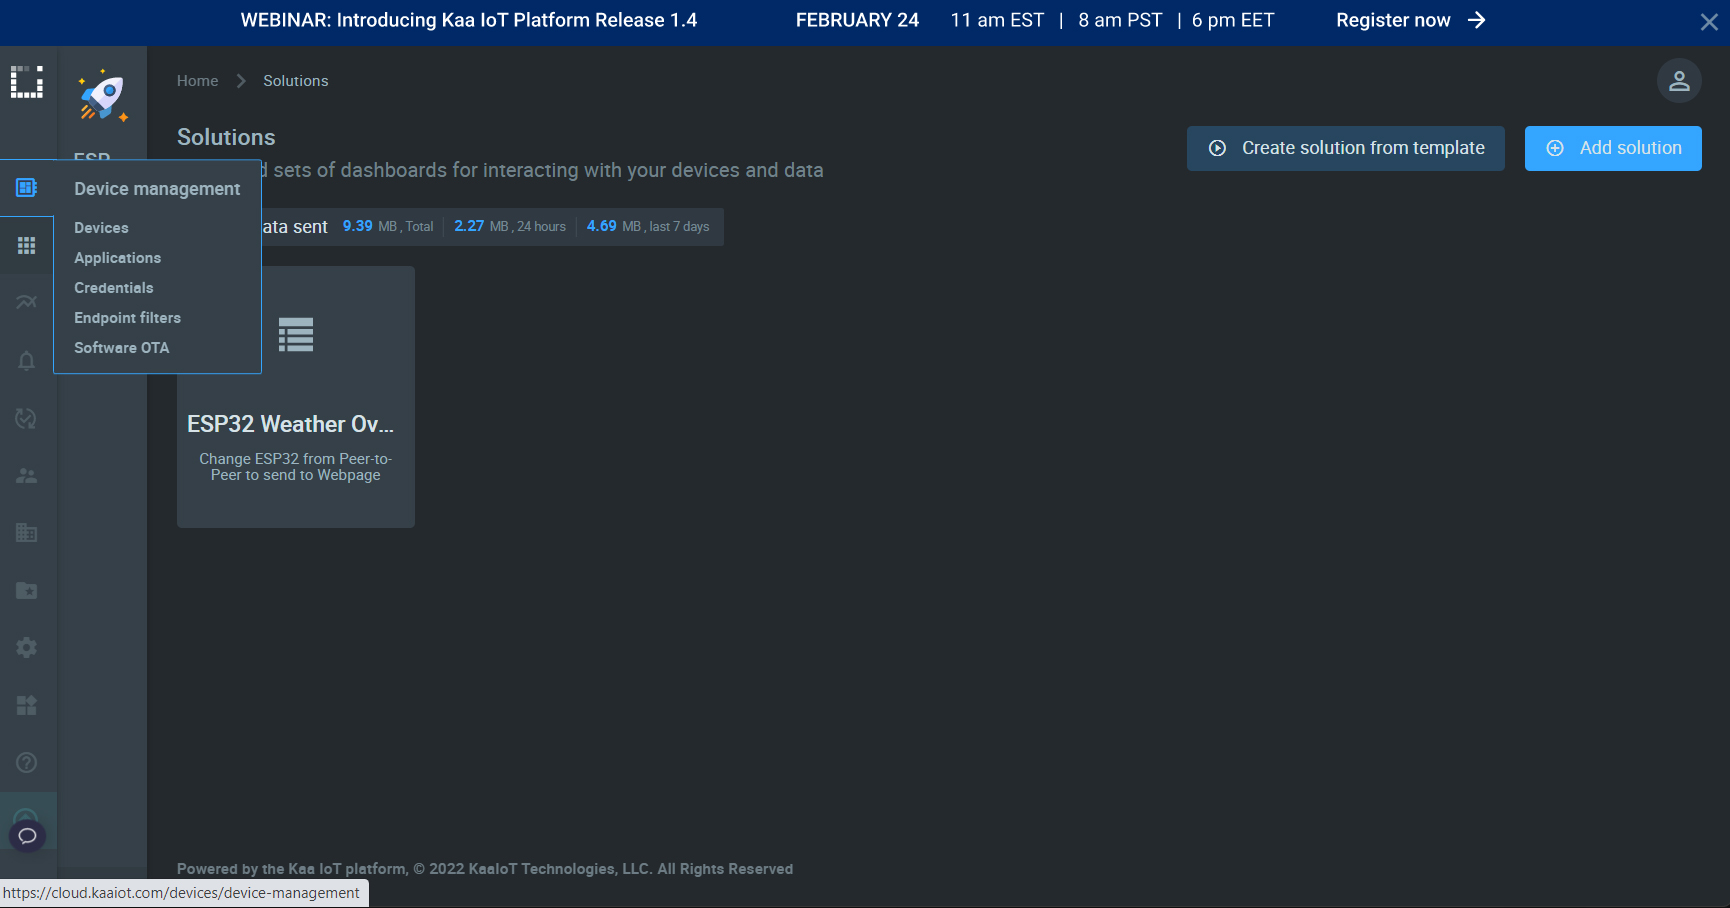
By navigating to the Device Management/Devices page on your KaaIoT page, you’ll be able to verify that the sensor data is being received. KaaIoT has some auto detectors for things like temperature, humidity, and barometric pressure.

Now that we have verified that our sensor is reading data, our ESP32 is sending data, and our dashboard is receiving data, it's time to decide how we want to display that data.