MicroSD Breakout With Level Shifter Hookup Guide
 .Brent.
 Introduction
The MicroSD Breakout with Built-In Level Shifter makes it easy to add mass storage to your project while working with a 5V system.
Required Materials
To follow along with this hookup guide, you will need the following:
Suggested Reading
If any of these subjects sound unfamiliar, considering reading the following tutorials before continuing on.
- What is an Arduino? - New to Arduino? Start here.
- Installing the Arduino IDE - A refresher on using the Arduino environment.
- Serial Peripheral Interface (SPI) - This tutorial shows you how to communicate with an SD card over SPI.
- SD Cards and Writing Images - Learn the basics of SD and microSD cards.
- Logic Levels - Logic level basics for 3.3V and 5V systems.
- How to Solder: Through Hole Soldering - Basic information on how to solder to PTH pins.
How to Solder: Through-Hole Soldering
Serial Peripheral Interface (SPI)
What is an Arduino?
Installing Arduino IDE
Logic Levels
SD Cards and Writing Images
Hardware Overview
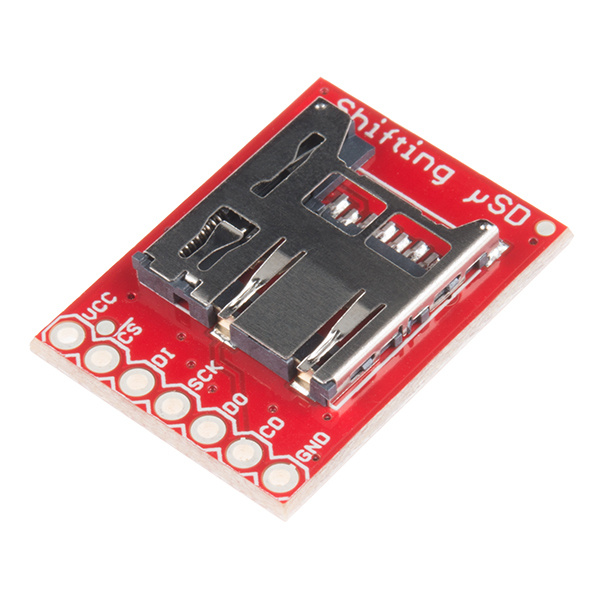
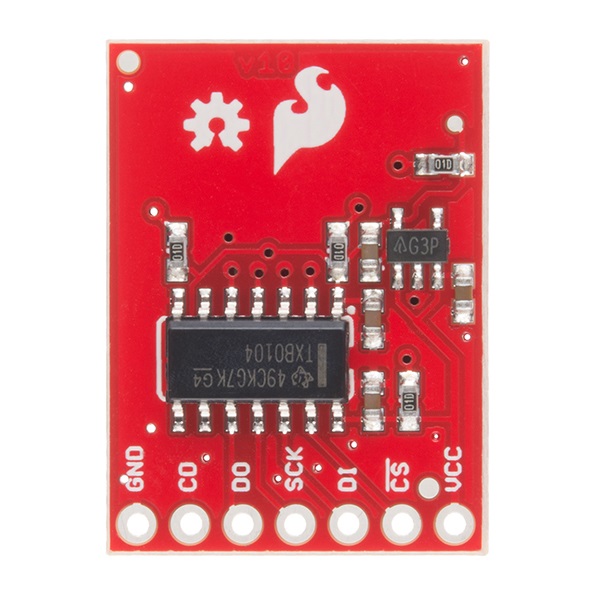
The SparkFun Shifting microSD Breakout is quite similar to the SparkFun microSD Transflash Breakout, but with the additional feature of being 5.0V tolerant for ease of use. No more discrete level shifting is required! If you are using a 3.3V device, we recommend using the microSD Transflash Breakout without the level translation.
One thing that makes this product stand out is that it is SPI_FULL_SPEED stable. Some errors were seen in our testing with other products, but none have been caught using this board. We didn't have NIST do our testing. We can't rule out the influence of environmental factors or the host processor used, but if we were looking for stability and reliability at high speed, we'd use this board.
If your processor is capable of it, this board supports the use of even the fastest UHS µSD cards. We only tested to 25MHz, but it should be good to two to four times that. Today most Arduino type µControllers are only capable of SPI_HALF_SPEED (6Mbps). Consider this board if you want a little future proofing or have a faster setup. The Arduino SD library is capable of SPI_FULL_SPEED (25Mbps).
The SparkFun Shifting µSD is also a bit unique from its competitors in that it is bi-directional - it level translates all of its outputs back to the level of the hardware it's connected to.
Hardware Hookup
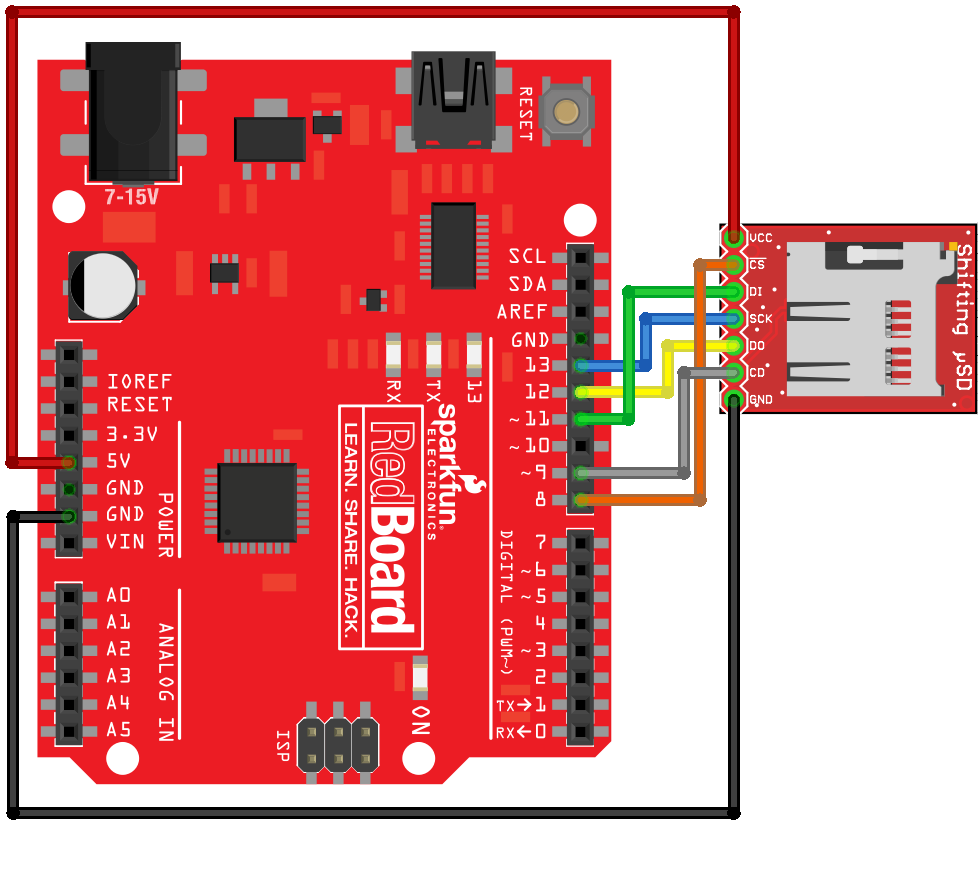
There are numerous ways to wire up an equivalent circuit to the one used in this guide. That will all depend on the type of Arduino you are using, the availability of a breadboard, or the types of wires you have laying around. The required materials list above assumes you have access to one of the most popular 5V Arduino form factors and you will wire it directly to the Shifting µSD board with jumper wires. No breadboard required, and only minimal soldering to get a connection to the µSD board.
Here is how you would wire up the Shifting µSD to a 5V RedBoard or Arduino Uno [1].
Code Example
Copy and paste the code in the Arduino IDE. Selected the correct board (in this case, the Arduino Uno) and serial port that the Arduino enumerated to. Finally, hit the upload button.
language:c
/*
 * A simple file logger that allows the user to write to a file on the µSD card
 * using the Arduino IDE Serial Monitor (57600 baud). Entered text is written
 * to the µSD card every 20 characters, but to make sure everything is written
 * append 'EOF' to your writing. Doing so writes everything remaining in the
 * buffer to the file and reads back the contents of the file.
 */

#include <SPI.h>
#include <SD.h>

File fd;
const uint8_t BUFFER_SIZE = 20;
char fileName[] = "demoFile.txt"; // SD library only supports up to 8.3 names
char buff[BUFFER_SIZE+2] = "";  // Added two to allow a 2 char peek for EOF state
uint8_t index = 0;

const uint8_t chipSelect = 8;
const uint8_t cardDetect = 9;

enum states: uint8_t { NORMAL, E, EO };
uint8_t state = NORMAL;

bool alreadyBegan = false;  // SD.begin() misbehaves if not first call


////////////////////////////////////////////////////////////////////////////////
// Standard Arduino setup function
////////////////////////////////////////////////////////////////////////////////
void setup()
{
  Serial.begin(57600);
  while (!Serial);  // Wait for serial port to connect (ATmega32U4 type PCBAs)

  // Note: To satisfy the AVR SPI gods the SD library takes care of setting
  // SS_PIN as an output. We don't need to.
  pinMode(cardDetect, INPUT);

  initializeCard();
}


////////////////////////////////////////////////////////////////////////////////
// Arduino calls this function over and over again when running
////////////////////////////////////////////////////////////////////////////////
void loop()
{
  // Make sure the card is still present
  if (!digitalRead(cardDetect))
  {
    initializeCard();
  }

  if (Serial.available() > 0)
  {
    readByte();

    if (index == BUFFER_SIZE)
    {
      flushBuffer();  // Write full buffer to µSD card
    }
  }
}


////////////////////////////////////////////////////////////////////////////////
// Do everything from detecting card through opening the demo file
////////////////////////////////////////////////////////////////////////////////
void initializeCard(void)
{
  Serial.print(F("Initializing SD card..."));

  // Is there even a card?
  if (!digitalRead(cardDetect))
  {
    Serial.println(F("No card detected. Waiting for card."));
    while (!digitalRead(cardDetect));
    delay(250); // 'Debounce insertion'
  }

  // Card seems to exist.  begin() returns failure
  // even if it worked if it's not the first call.
  if (!SD.begin(chipSelect) && !alreadyBegan)  // begin uses half-speed...
  {
    Serial.println(F("Initialization failed!"));
    initializeCard(); // Possible infinite retry loop is as valid as anything
  }
  else
  {
    alreadyBegan = true;
  }
  Serial.println(F("Initialization done."));

  Serial.print(fileName);
  if (SD.exists(fileName))
  {
    Serial.println(F(" exists."));
  }
  else
  {
    Serial.println(F(" doesn't exist. Creating."));
  }

  Serial.print("Opening file: ");
  Serial.println(fileName);

  Serial.println(F("Enter text to be written to file. 'EOF' will terminate writing."));
}


////////////////////////////////////////////////////////////////////////////////
// This function is called after the EOF command is received. It writes the
// remaining unwritten data to the µSD card, and prints out the full contents
// of the log file.
////////////////////////////////////////////////////////////////////////////////
void eof(void)
{
  index -= 3; // Remove EOF from the end
  flushBuffer();

  // Re-open the file for reading:
  fd = SD.open(fileName);
  if (fd)
  {
    Serial.println("");
    Serial.print(fileName);
    Serial.println(":");

    while (fd.available())
    {
      Serial.write(fd.read());
    }
  }
  else
  {
    Serial.print("Error opening ");
    Serial.println(fileName);
  }
  fd.close();
}


////////////////////////////////////////////////////////////////////////////////
// Write the buffer to the log file. If we are possibly in the EOF state, verify
// that to make sure the command isn't written to the file.
////////////////////////////////////////////////////////////////////////////////
void flushBuffer(void)
{
  fd = SD.open(fileName, FILE_WRITE);
  if (fd) {
    switch (state)  // If a flush occurs in the 'E' or the 'EO' state, read more to detect EOF
    {
    case NORMAL:
      break;
    case E:
      readByte();
      readByte();
      break;
    case EO:
      readByte();
      break;
    }
    fd.write(buff, index);
    fd.flush();
    index = 0;
    fd.close();
  }
}


////////////////////////////////////////////////////////////////////////////////
// Reads a byte from the serial connection. This also maintains the state to
// capture the EOF command.
////////////////////////////////////////////////////////////////////////////////
void readByte(void)
{
  byte byteRead = Serial.read();
  Serial.write(byteRead); // Echo
  buff[index++] = byteRead;

  // Must be 'EOF' to not get confused with words such as 'takeoff' or 'writeoff'
  if (byteRead == 'E' && state == NORMAL)
  {
    state = E;
  }
  else if (byteRead == 'O' && state == E)
  {
    state = EO;
  }
  else if (byteRead == 'F' && state == EO)
  {
    eof();
    state = NORMAL;
  }
}
The example code for this product is a simple file logger that allows the user to write to a file on the µSD card using the Arduino IDE Serial Monitor (57600 baud). When the board boots you should see the following in the Serial Monitor:
language:bash
Initializing SD card...Initialization done.
demoFile.txt doesn't exist. Creating.
Opening file: demoFile.txt
Enter text to be written to file. 'EOF' will terminate writing.
The last line of that block of text is important to note. Your work is written to the µSD card every 20 characters, but to make sure everything is written append EOF to your writing. Doing so writes everything remaining in the buffer to the file and reads back the contents of the file.
language:bash
EOF

demoFile.txt:
Test line of text.
Bacon ipsum dolor amet beef picanha drumstick alcatra brisket, short ribs sirloiBacon ipsum dolor amet beef picanha drumstick alcatra brisket, short ribs sirloin.
One thing to note is that the UART buffer on the Arduino might limit the number of characters entered on a single line. In one test I noticed that my Arduino only accepted 164 bytes before loosing data, but I've seen that vary a bit.
Troubleshooting
Arduino has troubleshooting tips on their Notes on the Arduino SD Card Library page, including instructions for formatting new cards (if needed) and using the library with other Arduino boards.
Resources and Going Further
Now that you know how to add more storage to your Arduino projects, it's time to get out there and create something amazing. Need some inspiration? Check out these other SparkFun tutorials.
- SD cards are a great way to add more storage to Internet of Things projects. You can add a microSD Shield to a WiFly Shield to serve up larger web pages or hold more data. You can also use the CC3000 Shield, which has a microSD card slot built in.
- Need more power than your Arduino can provide? Check out the Edison, which also has a microSD card Block to add more storage to larger projects.
- Logging data is a common use for SD cards. Take your logging project to the next level with the Logomatic.
Or check out any tutorial tagged with logging for inspiration: