MicroMod mikroBUS™ Carrier Board Hookup Guide
Software Overview
Necto Studio
Necto Studio is a productive cross-platform integrated developing environment provided by MikroElektronika and is available on Windows, Linux, and macOS. It includes C compilers, mikroSDK 2.0, package manager, and USB or WiFi Debugger capabilities with flexible licensing options. The development environment features intelligent code completion, auto-close brackets, and drag and drop visual elements.
Users can find their favorite Click Board library and working example through the Package Manager. Users will also be notified about new versions of installed packages, and easily update in one click.
MikroElektronika even provides first-time users with the longest time trial on the market - Get fully unlocked, feature-rich NECTO for three months, and explore it to the most delicate details before purchase!
For more information about NECTO Studio, please visit the product page.
mikroSDK
mikroSDK 2.0 makes application code portable and reusable on many different platforms and architectures, with virtually no code changes. It is a collection of open-source software libraries with unified API and software development tools. Everything you need to start developing, and prototyping cross-platform embedded applications, including Click board™ applications and GUIs for embedded devices.
mikroSDK 2.0 is open-source, and it’s natively supported in NECTO Studio. The video below, is a brief overview of how to use the mikroSDK:
Additional Resources:
For more details on Necto Studio, check out our getting started guide below:
Getting Started with Necto Studio
- When creating a hardware setup, users will want to select:
- mikroC AI for ARM compiler
- mikroSDK (latest)
- MicroMod Carrier Board
- STM32F405RG-Tx (should be only option)
- No display
- CODEGRIP Programmer (recommended)
- To be able to debug and program the MCU from Necto Studio, users will want to configure the following target option parameters:
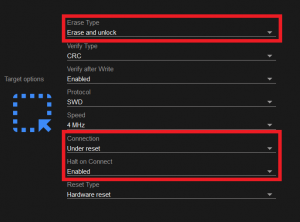 Target options for the CODEGRIP programmer in Necto Studio. (Click to enlarge)
 - Erase Type:
Erase and unlock - Connection:
Under reset - Hold on Connect:
Enabled
- To be able to debug and program the MCU from Necto Studio, users will want to configure the following target option parameters:
- For more details, check out the Setups section of the Necto Studio getting started guide.
- For the CODEGRIP programmer (recommended), users will need to link with the programmer and configure the programming target in the CODEGRIP Suite:
- MCU:
STM32F405RG - Protocol:
SWD - Connection:
Under reset - Halt on Connect:
Enabled - For more details, check out the Programmer Configuration section of the Necto Studio getting started guide.
- MCU:

Arduino IDE
While not the preferred method for programming their board, users can use the Arduino IDE to upload sketches to the MicroMod mikroBUS™ carrier board. We recommend that users select a Click board™ with a supporting Arduino library for their processor board. Below, are a few tips to get users started.
Getting Started with MicroMod
For those unfamiliar with the MicroMod ecosystem, be sure to review the Getting Started with MicroMod guide. Also, make sure that the correct board definitions are installed in the Arduino IDE, for the associated processor board.
Getting Started with MicroMod
Board Definitions
Make sure that the correct board definitions are installed in the Arduino IDE, for the connected processor board. Depending on the processor board, users may need to install drivers (if they have not done so already). For help installing board definitions, use the MicroMod processor boards landing page and review the associated hookup guide for that hardware.
Installing Board Definitions in the Arduino IDE
Arduino Library
Users will need to add the supporting Arduino library for their Click board™. If there isn't a supporting Arduino library, users will need to write a sketch to utilize that device; we DO NOT provide or offer support on custom code.
Note: This tutorial assumes users have the latest version of the Arduino IDE installed. If this is your first time using Arduino, please review our tutorial on installing the Arduino IDE. If you have not previously installed an Arduino library, please check out our installation guide: