IoT Power Relay
 SFUptownMaker
 Introduction
In this tutorial, we'll show you how to host a webpage on the ESP32 Thing that will allow you to set times for a power relay to be turned on or off.
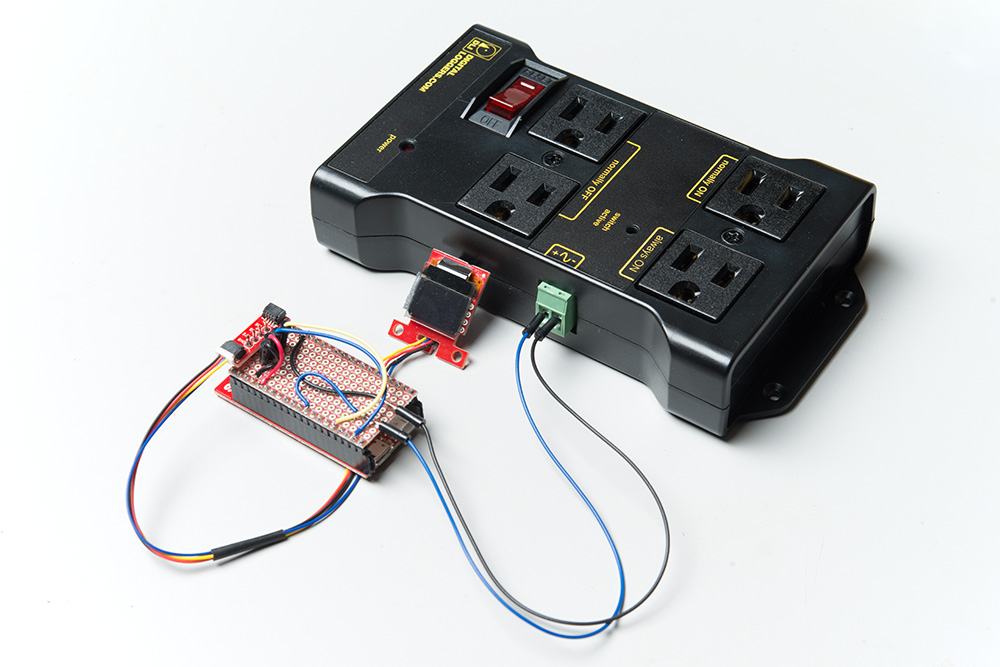
It utilizes our ESP32 Thing, IoT Power Relay, and the Qwiic Micro OLED screen to create a smart outlet that can maintain a weekly schedule for powering any AC powered load you want to cycle regularly.
Required Materials
Hardware
To follow this project, you will need the following materials. Depending on what you have, you may not need everything on this list. Add it to your cart, read through the guide, and adjust the cart as necessary.
Software
You will need the Arduino IDE with the ESP32 software support package installed. In addition, you'll need to download the IoT_Power_Relay code from GitHub. Visit the links to access the installs and code as well as more information on installing board support for the ESP32 in Arduino.
Tools
You will need a good soldering iron, solder, general soldering accessories, and a screw driver to follow along.


Suggested Reading
Before undertaking this project, there are a few tutorials that you may want to review. If you aren't familiar with the Qwiic system, we recommend reading here for an overview.
| Qwiic Connect System |
We also recommend the following tutorials.
How to Solder: Through-Hole Soldering
ESP32 Thing Hookup Guide
Hardware Hookup
Base Plate
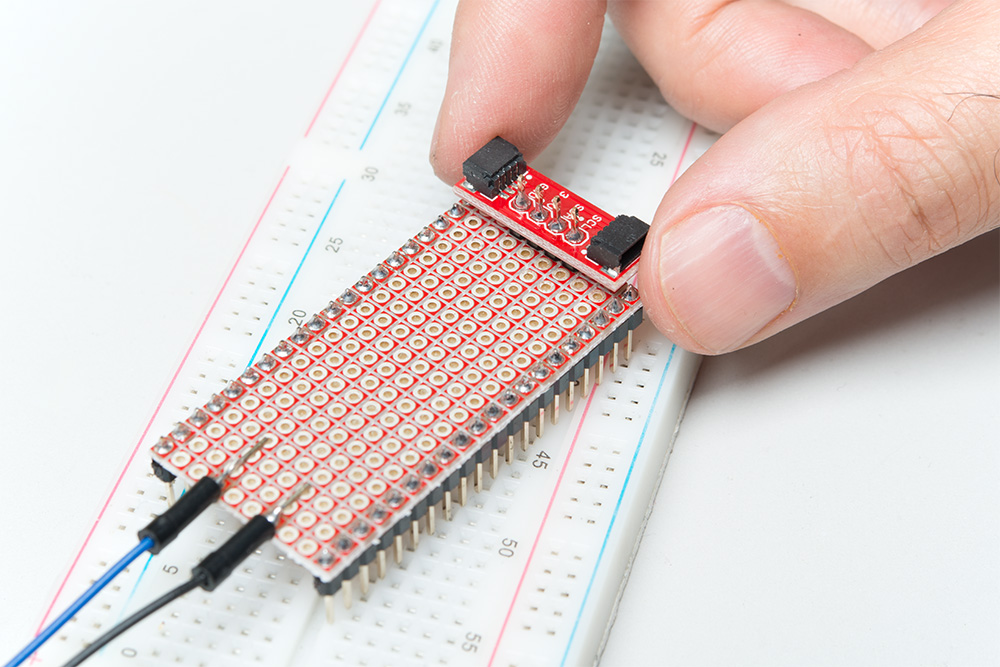
You'll need to use a snappable protoboard to create a base plate to work from. Snap it to a size that will cover the ESP32 without obscuring the antenna--20 holes by 10 holes. We want to solder down male pins to the underside of the base plate, as shown below. Note the use of a breadboard as a fixture to hold the pins perpendicular to the plate.
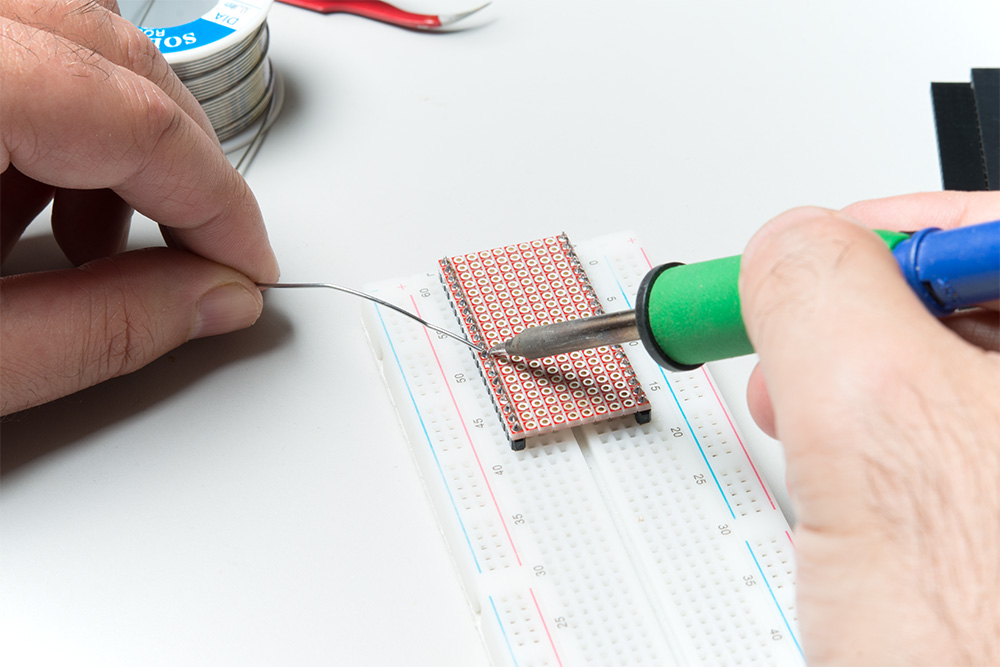
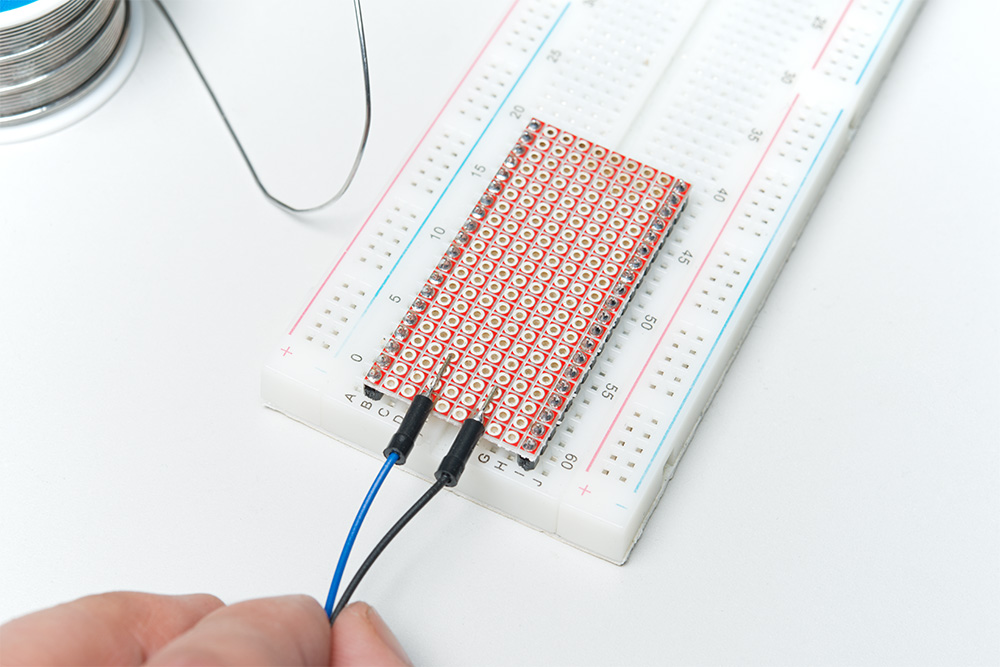
You'll also need to solder down the wires used to connect to the IoT Relay box. I like to use the cheap jumper wires we sell for this purpose, as the plastic ferrule on the ends provides strain relief.
Qwiic Connector
Since we don't have a Qwiic connector handy, we'll use our Qwiic adapter board to provide a Qwiic-compatible connector. Solder the header down as shown below. It should be directly centered on the base plate.
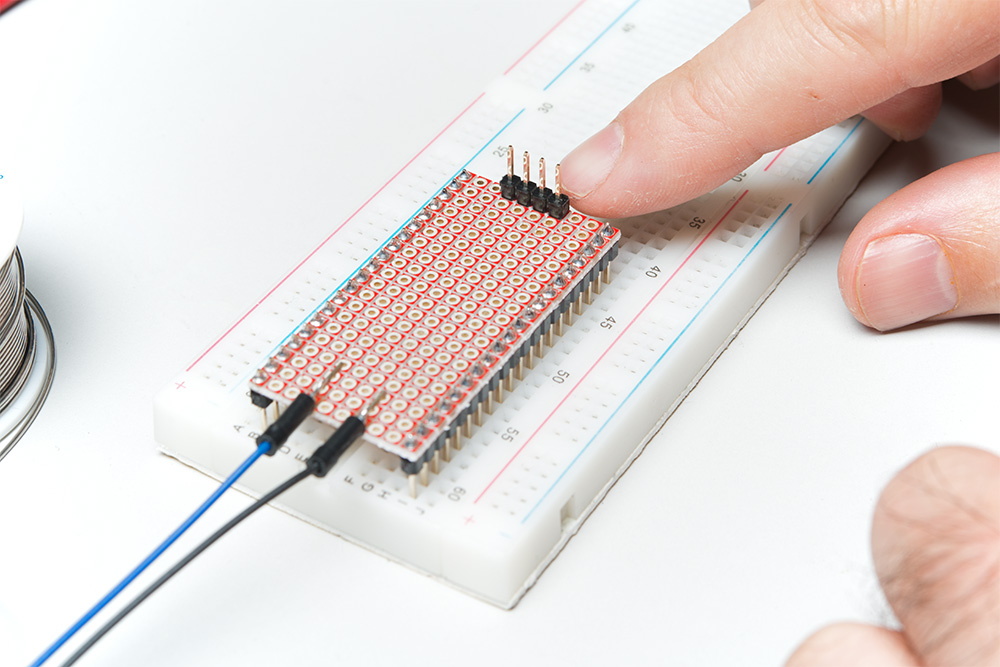
Once you've soldered down the header (you'll need to remove the base plate from the breadboard to access the underside of it), you can solder the adapter to the header on the top side of the board.
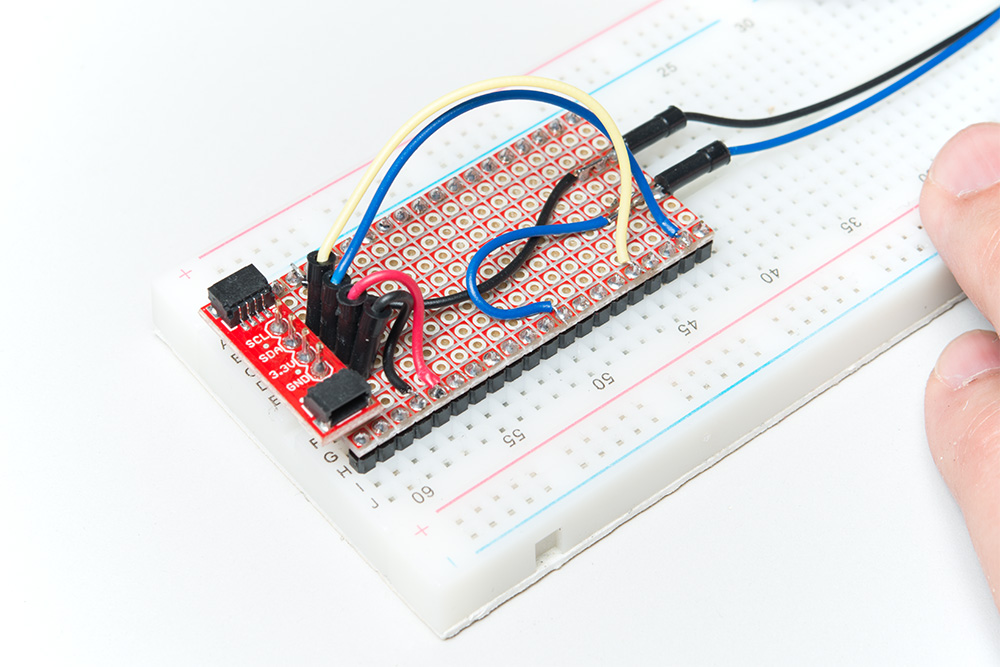
Route the Signals
Route the two wires you soldered on earlier to GND and pin 5 (9th pin down on the right hand side, if the edge that will be closest the antenna is on top).
We'll also need to route the signals to the Qwiic adapter -- 3.3V, GND, SDA and SCL. SDA and SCL are broken out to pins 21 and 22, respectively, on the ESP32 Thing. When you're done, you should have something that looks like this:
ESP32 Thing
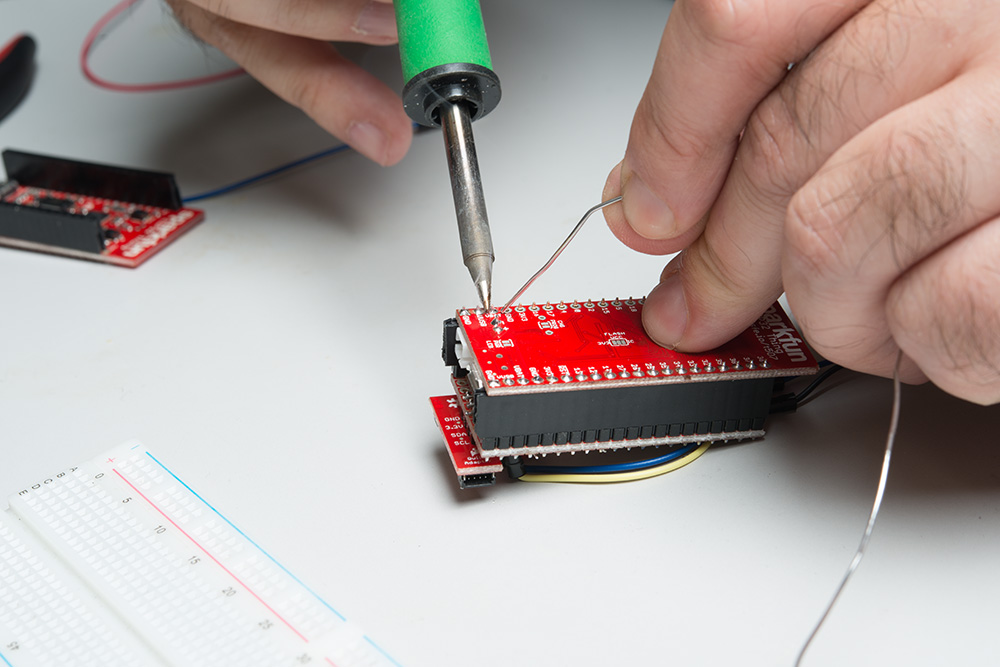
We want female headers on our Thing board to mate with the male headers on the base plate. You'll need to cut to length the female headers from the wishlist. Remember that you'll lose one pin to the cutting, so you need two pieces of the full size header. In the picture below, note how I'm using the base plate to hold the headers perpendicular to the ESP32 board for soldering.
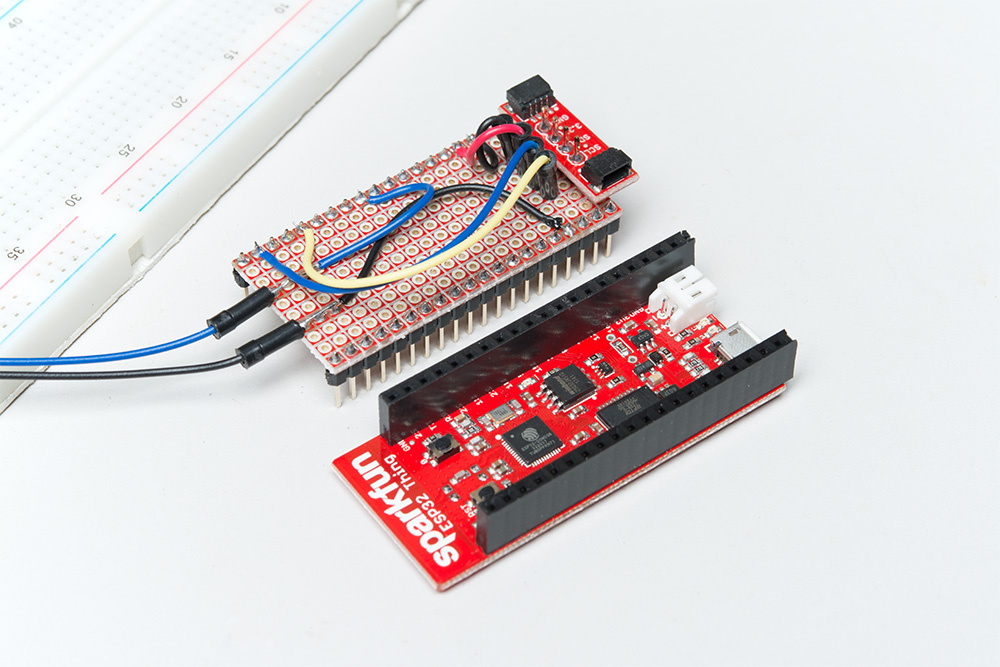
You should now have something that looks a lot like this picture:
Fitting It All Together
It might help to mount the IoT Relay and ESP32 Thing to some kind of base, such as a piece of plywood or even corrugated cardboard, before finishing the assembly. I didn't do that, so I could continue to manipulate the hardware for pictures.
Pull the screw terminal out of the side of the IoT Relay. You won't be able to screw down the wires without doing this.
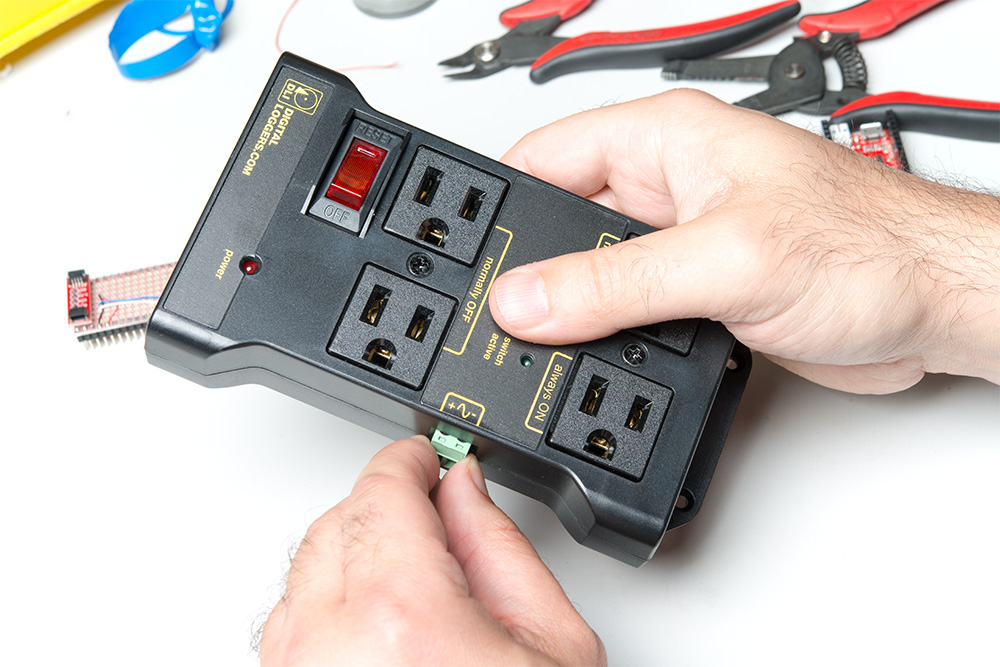
It takes a significant amount of force to pull the screw terminal free of the box, and you may find that you need a pair of pliers or something similar to get it free
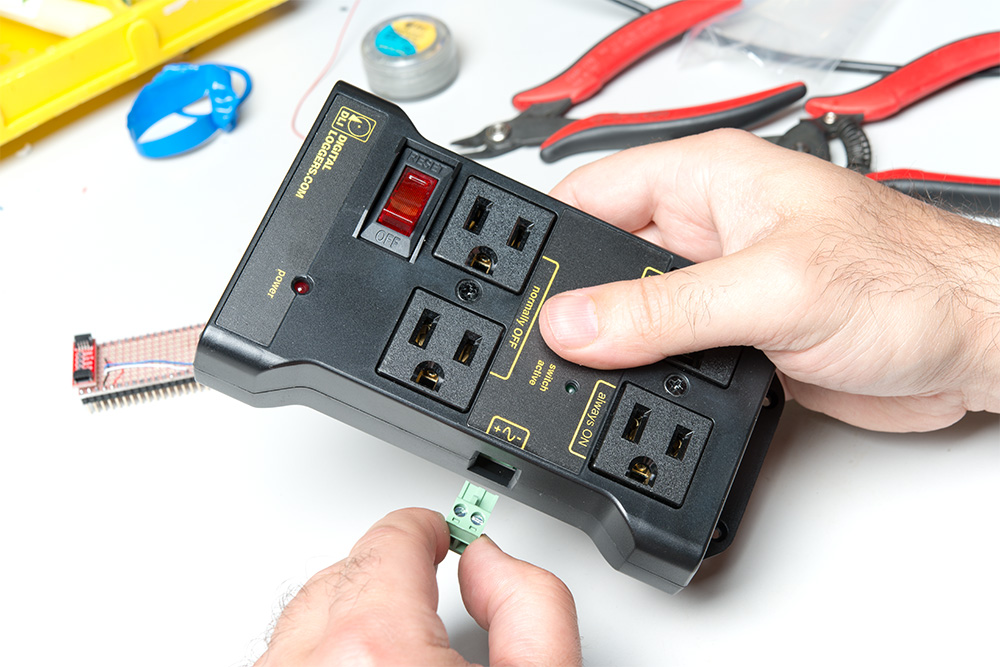
You may now screw the wires you attached to the base plate into the screw terminal block. Note the polarity markings on the IoT Relay box. Make sure you connect the '-' terminal to GND and the '+' terminal to the wire routed to pin 5 on the ESP32 Thing.
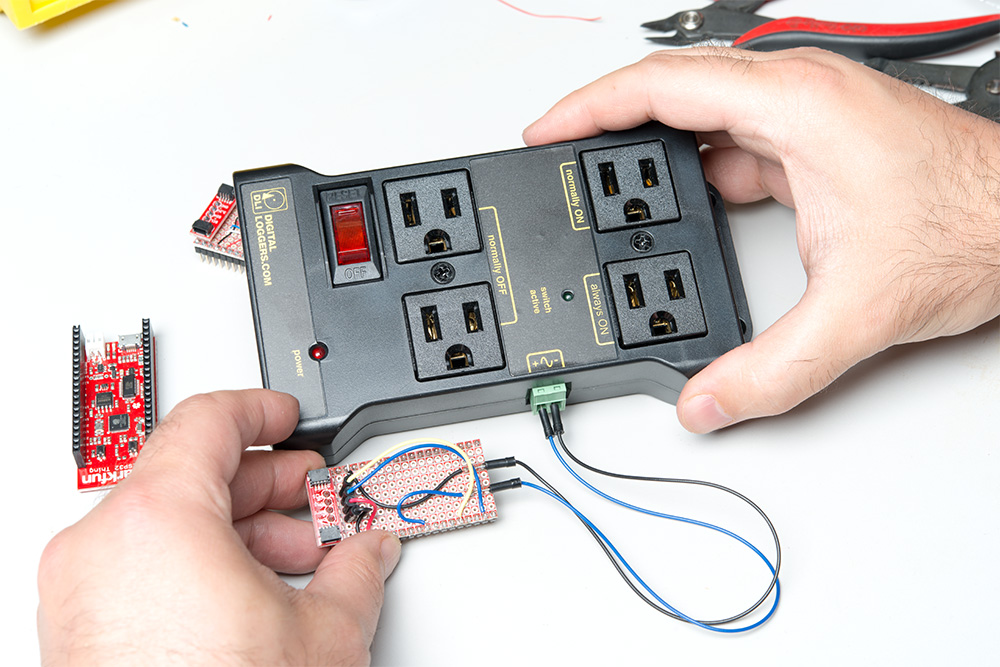
Now, place the base plate onto the ESP32 Thing. Be careful of the orientation, making sure that the Qwiic connector is on the end farthest from the antenna.
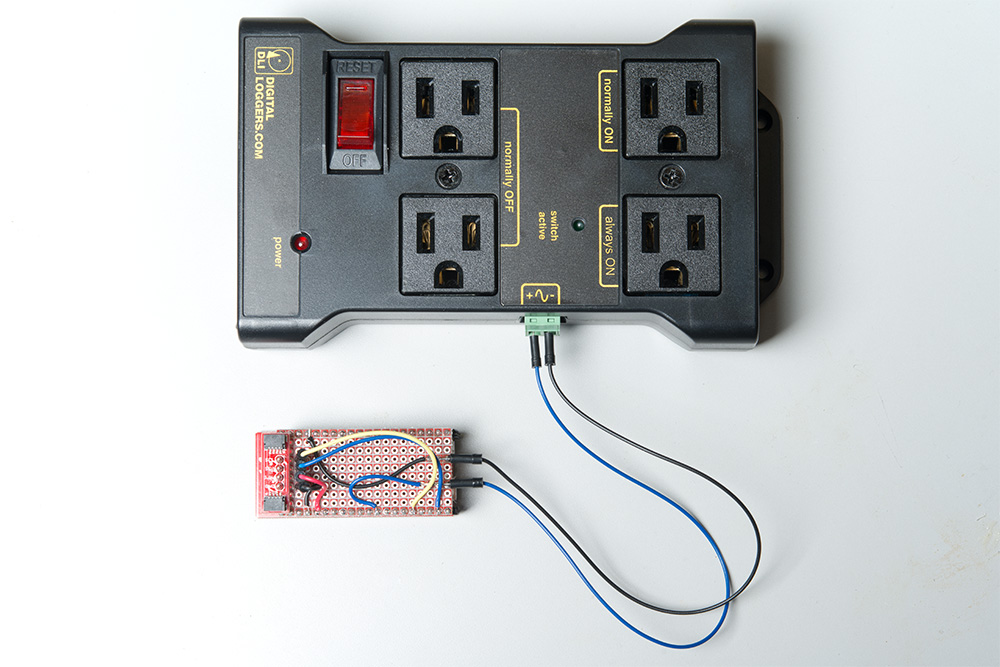
Finally, connect the Micro OLED to the Qwiic connector. You'll probably want to affix that to the base along with the ESP32 Thing and the IoT Relay box. I suggest hot glue.
ESP32 Example Code
Note: This example assumes you are using the latest version of the Arduino IDE on your desktop. If this is your first time using Arduino, please review our tutorial on installing the Arduino IDE. If you have not previously installed an Arduino library, please check out our installation guide.
With Arduino installed, please make sure you also download and install the ESP32 software support package.
And lastly, download the IoT_Power_Relay GitHub repo which contains the firmware you'll be uploading to the ESP32.
Now that we have our basics, let's go over the code that will be programmed onto the ESP32!
Core Code
This is the core code, in the TeleSitter.ino main file.
The includes section holds all the library references needed for this project. time.h is the ESP32 native time library, while TimeLib.h is the Arduino time library. We use both of them because time.h does graceful NTP server synchronization, while TimeLib.h is better for tracking current time and reacting to it.
Preferences.h is the ESP32 non-volatile memory support module.
language:c
#include <WiFi.h>
#include "PageContent.h"
#include "time.h"
#include <Preferences.h>
#include "TimeLib.h"
#include "SFE_MicroOLED.h"
#include <Wire.h>
Next, we set up a few constant strings: SSID, WiFi password, and the address of the ntpServer we wish to use. "pool.ntp.org" is an open NTP project great for things like this.
language:c
const char* ssid      = "ssid_goes_here";
const char* password  = "wifi_password_goes_here";
const char* ntpServer = "pool.ntp.org";
We use global variables to track the times that we turn on and off our power switch. In the full code, there are four variables for each day. Only Monday's variables are shown here.
language:c
int mHoursOn = 8;
int mMinutesOn = 0;
int mHoursOff = 0;
int mMinutesOff = 0;
Here we set up defines for our project. We use pin 5 for controlling the switch because it has an LED on it, making testing easy. The MicroOLED library requires a reset pin to be defined, even if it isn't used, and requires a note on the status of the jumper on the back of the MicroOLED board. We leave the jumper set to '1', which is the default that it ships with.
language:c
#define CTRL_PIN 5
#define OLED_RESET 10 // Not used, but needed for initialization
#define DC_JUMPER 1   // Default value. If you didn't change the jumper
                      //  on the PCB, this is what you want.
Next we create objects that will be used throughout the code. The port number for the server is passed to the constructor; 80 is the default port for http requests and that number shouldn't be changed.
language:c
WiFiServer server(80);
MicroOLED oled(OLED_RESET, DC_JUMPER);
Preferences alarmTimes;
setup(). Does typical setup-y things like printing debugging messages during startup, configuring the serial port and pins, etc.
language:c
void setup()
{
  Serial.begin(115200);
  pinMode(CTRL_PIN, OUTPUT);  // Also has a blue LED on the ESP32 Thing

  // We start by connecting to a WiFi network
  Serial.println();
  Serial.println();
  Serial.print("Connecting to ");
  Serial.println(ssid);

  WiFi.begin(ssid, password);
During setup, we try to connect to WiFi. It's been my experience that if the WiFi doesn't connect within 10-15 seconds, it's probably not going to, and the smartest thing to do is reset the ESP32. This section of the code handles that.
language:c
  int wifiCounter = 0;
  while (WiFi.status() != WL_CONNECTED)
  {
    delay(500);
    Serial.print(".");
    if (++wifiCounter > 30) ESP.restart();
  }

  Serial.println("");
  Serial.println("WiFi connected.");
  Serial.println("IP address: ");
  Serial.println(WiFi.localIP());
During normal operation, we can't count on the user to have a computer attached to the ESP32. Thus, we provide the OLED to tell the user what the current IP address is.
  // Initialize the OLED and display the IP address
  oled.begin();
  oled.clear(PAGE);
  oled.setCursor(0,0);
  oled.print(WiFi.localIP());
  oled.display();
The ESP32 has an odd way of storing data in non-volatile memory. You must create a region ("TeleSitter", here), and then issue a begin() call to the library. Note that the second parameter to begin() must, per the documentation, always be false.
language:c
  // Initialize the NVM storage handler and fetch the cached
  //  alarm time information.
  alarmTimes.begin("TeleSitter", false);
  getAlarmTimes();

  // Enable the server functionality.
  server.begin();
Timekeeping initialization. Read the comments for more information on how and why the timekeeping is done the way it is.
language:c
  // We use two different timekeeping services, the ESP32 built-in
  //  and the one from the Arduino TimeLib. Why? Because the ESP32
  //  based one gets its time from an NTP server and it's unclear
  //  which functions it uses that ping the NTP server, so we want
  //  to avoid excessive NTP checks.

  // Preeeetty sure configTime() pings the NTP server. Parameters
  //  are GMT offset in seconds, DST offset in seconds, and NTP
  //  server address.
  configTime((-7*3600), 0, ntpServer);
  // A tm struct holds time info. It can be current local time, as
  //  here, or an arbitrary time, as used elsewhere.
  struct tm timeinfo;
  // Unclear as to whether getLocalTime() populates the tm struct
  //  solely from the local clock or from the NTP server. Thus, we
  //  avoid calling it too often by setting the Arduino timekeeping
  //  with it at boot time, then using the Arduino timekeeping for
  //  most of our timekeeping duties.
  getLocalTime(&timeinfo);
  // Set the Arduino library timekeeping to currrent time derived
  //  from the NTP server. We have to add 1 to the month as returned by
  //  the ESP32 module, as Arduino numbers months starting from 1 and ESP
  //  numbers starting from 0. Also, add 1900 to the year, as Arduino stores
  //  the full year number and ESP stores it as an offset from year 1900.
  setTime(timeinfo.tm_hour, timeinfo.tm_min, timeinfo.tm_sec,
          timeinfo.tm_mday, timeinfo.tm_mon+1, timeinfo.tm_year + 1900);
  // Check to see if DST is in effect. This function relies upon
  //  having the Arduino timekeeping set. We'll repeat this check
  //  once a day at 3am and reset the Arduino clock accordingly.
  if (dstCheck()) configTime((-7*3600), 3600, ntpServer);
  else configTime((-7*3600), 0, ntpServer);
  // Fetch the current time into timeInfo again. This is now DST
  //  correct local time.
  getLocalTime(&timeinfo);
  // Set the Arduino clock to DST correct local time.
  setTime(timeinfo.tm_hour, timeinfo.tm_min, timeinfo.tm_sec,
          timeinfo.tm_mday, timeinfo.tm_mon+1, timeinfo.tm_year + 1900);
}
loop(). Starts out by doing a health check on the WiFi connection. IF the WiFi connection is lost, the ESP32 will reboot.
language:c
void loop(){

  // Health check. If we've lost our wifi connection, restart
  //  the ESP to (hopefully) reconnect without user noticing.
  if (WiFi.status() != WL_CONNECTED)
  {
    Serial.println("WiFi dropped; rebooting");
    delay(100);
    ESP.restart();
  }
Every pass through loop, we check our alarm status to see if we should turn the output on or off. We'll talk about what exactly is involved in the alarm checking later.
language:c
  checkAlarm();
Check if it's 0300 local time or not. If it is, we go through the clock setting process again. We only do this once a day because our clock is good enough to keep time over 24 hours fairly accurately and because we don't want to accidentally activate rate limiting on the NTP server. We do it at 0300 because that is a good time to catch the DST shift.
language:c
  if (hour() == 3 && minute() == 0 && second() == 0)
  {
    struct tm timeinfo;
    getLocalTime(&timeinfo);
    setTime(timeinfo.tm_hour, timeinfo.tm_min, timeinfo.tm_sec,
            timeinfo.tm_mday, timeinfo.tm_mon + 1, timeinfo.tm_year + 1900);
    // Check to see if DST is in effect.
    if (dstCheck()) configTime((-7*3600), 3600, ntpServer);
    else configTime((-7*3600), 0, ntpServer);
    getLocalTime(&timeinfo);
    setTime(timeinfo.tm_hour, timeinfo.tm_min, timeinfo.tm_sec,
            timeinfo.tm_mday, timeinfo.tm_mon + 1, timeinfo.tm_year + 1900);
  }
This code was taken more or less directly from the example code provided with the ESP32 library. It handles incoming requests by serving up the webpage that we will create later, then checking what the nature of the request is and taking some action based on that. Note that, regardless of the request, the webpage is served back.
language:c
  WiFiClient client = server.available();   // listen for incoming clients
  if (client) {                             // if you get a client,
    Serial.println("New Client.");          // print a message out the serial port
    String currentLine = "";                // make a String to hold incoming data from the client
    while (client.connected())              // loop while the client's connected
    {
      if (client.available())               // if there's bytes to read from the client,
      {
        char c = client.read();             // read a byte, then
        Serial.write(c);                    // print it out the serial monitor
        if (c == '\n')                      // if the byte is a newline character
        {
          // if the current line is blank, you got two newline characters in a row.
          // that's the end of the client HTTP request, so send a response:
          if (currentLine.length() == 0)
          {
We split the response into several blocks, to make editing easier, and unlike the original example, we make our webpage in constants defined elsewhere. Note the use of printf() in the body printing section. That allows us to push variables from our code to the webpage.
language:c
           client.print(pageContentHead);
            client.printf(pageContentBody, mHoursOn, mMinutesOn, mHoursOff, mMinutesOff,
                                           tHoursOn, tMinutesOn, tHoursOff, tMinutesOff,
                                           wHoursOn, wMinutesOn, wHoursOff, wMinutesOff,
                                           rHoursOn, rMinutesOn, rHoursOff, rMinutesOff,
                                           fHoursOn, fMinutesOn, fHoursOff, fMinutesOff,
                                           sHoursOn, sMinutesOn, sHoursOff, sMinutesOff,
                                           nHoursOn, nMinutesOn, nHoursOff, nMinutesOff);
            // Print out the current time and date. This is useful for debugging
            //  as it's the only way to check the internal server clock.
            client.printf("%d:%02d:%02d<br>", hour(), minute(), second());
            client.printf("%d/%d/%d %d<br>", day(), month(), year(), weekday());
            client.print(pageContentFoot);
            break;
          }
          else                // if you got a newline, then clear currentLine:
          {
            currentLine = "";
          }
        }
        else if (c != '\r')   // if you got anything else but a carriage return character,
        {
          currentLine += c;      // add it to the end of the currentLine
        }
We expect to get a few types of response from the client that connects to this device. These can be differentiated by the text in the response. For instance, a request for the path reset should trigger a reset of the alarm times, and an HTTP get request that starts with a question mark indicates an incoming string of data that is to be parsed into alarm times.
language:c
        if (currentLine.endsWith("GET /reset"))
        {
          resetAlarmTimes();
        }
        if (currentLine.endsWith("HTTP/1.1"))
        {
          if (currentLine.startsWith("GET /?"))
          {
            parseIncomingString(currentLine);
            storeAlarmTimes();
          }
        }
      }
    }
    // close the connection:
    client.stop();
    Serial.println("Client Disconnected.");
  }
}
Lastly, we have a few chunks of code that don't really belong anywhere else, so we stick them at the end of the main code.
language:c
void turnOn()
{
  digitalWrite(CTRL_PIN, HIGH);
}

void turnOff()
{
  digitalWrite(CTRL_PIN, LOW);
}

void printTitle(String title, int font)
{
  int middleX = oled.getLCDWidth() / 2;
  int middleY = oled.getLCDHeight() / 2;

  oled.clear(PAGE);
  oled.setFontType(font);
  // Try to set the cursor in the middle of the screen
  oled.setCursor(middleX - (oled.getFontWidth() * (title.length()/2)),
                 middleY - (oled.getFontWidth() / 2));
  // Print the title:
  oled.print(title);
  oled.display();
  delay(1500);
  oled.clear(PAGE);
}
Alarm Handling Code
Alarms.ino handles the checking of the alarm times: whether or not the output should be turned on. It calculates the time of the day, in seconds, then calculates the times the output should be on or off depending upon the day of the week. It then does a comparison of those times and takes the appropriate action.
language:c
void checkAlarm()
    {
      int dow = weekday();
      int secsOfDay = hour()*3600 + minute()*60 + second();
      int timeOn, timeOff;
      switch(dow)
      {
        case 1: // Sundays
          timeOn = nHoursOn*3600 + nMinutesOn*60;
          timeOff = nHoursOff*3600 + nMinutesOff*60;
          break;
        case 2: // Mondays
          timeOn = mHoursOn*3600 + mMinutesOn*60;
          timeOff = mHoursOff*3600 + mMinutesOff*60;
          break;
        case 3: // Tuesdays
          timeOn = tHoursOn*3600 + tMinutesOn*60;
          timeOff = tHoursOff*3600 + tMinutesOff*60;
          break;
        case 4: // Wednesdays
          timeOn = wHoursOn*3600 + wMinutesOn*60;
          timeOff = wHoursOff*3600 + wMinutesOff*60;
          break;
        case 5: // Thursdays
          timeOn = rHoursOn*3600 + rMinutesOn*60;
          timeOff = rHoursOff*3600 + rMinutesOff*60;
          break;
        case 6: // Fridays
          timeOn = fHoursOn*3600 + fMinutesOn*60;
          timeOff = fHoursOff*3600 + fMinutesOff*60;
          break;
        case 7: // Saturdays
          timeOn = sHoursOn*3600 + sMinutesOn*60;
          timeOff = sHoursOff*3600 + sMinutesOff*60;
          break;
      }
      if (timeOn > timeOff)
      {
        if (secsOfDay > timeOn) turnOn();
        else if (secsOfDay > timeOff) turnOff();
      }
      else
      {
        if (secsOfDay > timeOff) turnOff();
        else if (secsOfDay > timeOn) turnOn();
      }
    }
Non-Volatile Memory Functionality
NVM.ino handles the various accesses to non-volatile memory that must be managed. This includes setting and resetting the alarm times and loading the alarm times into memory upon startup.
Again, I've removed redundant code for the additional days of the week to make things a little simpler to follow.
resetAlarmTimes() simply sets the on time to 0800 and the off time to 0000 and then stores it to NVM.
language:c
void resetAlarmTimes()
    {
      mHoursOn = 8;
      mMinutesOn = 0;
      mHoursOff = 0;
      mMinutesOff = 0;
      storeAlarmTimes();
    }
storeAlarmTimes() takes the current global alarm time variables and stores them into NVM. Note that storage into NVM is dependent upon data type; we use putInt() because our time data is of type int.
language:c
void storeAlarmTimes()
{
  alarmTimes.putInt("mHoursOn", mHoursOn);
  alarmTimes.putInt("mMinutesOn", mMinutesOn);
  alarmTimes.putInt("mHoursOff", mHoursOff);
  alarmTimes.putInt("mMinutesOff", mMinutesOff);
}
getAlarmTimes() is the opposite of storeAlarmTimes(). Note the use of getInt() here to correspond to putInt() earlier.
language:c
void getAlarmTimes()
{
  mHoursOn = alarmTimes.getInt("mHoursOn", 8);
  mMinutesOn = alarmTimes.getInt("mMinutesOn", 0);
  mHoursOff = alarmTimes.getInt("mHoursOff", 0);
  mMinutesOff = alarmTimes.getInt("mMinutesOff", 0);
}
Parse Input from Client
The client responds to a button press by sending a large string of values to the ESP32 Thing. We need to parse those values out into their appropriate hour and minute times. The code in ParseInput.ino does just that.
language:c
void parseIncomingString(String str)
    {
      String str0 = "mHoursOn=";
      String str1 = "&mMinutesOn=";
      mHoursOn = extractInteger(str, str0, str1);
      str0 = str1;
      str1 = "&mHoursOff=";
      mMinutesOn = extractInteger(str, str0, str1);
      str0 = str1;
      str1 = "&mMinutesOff=";
      mHoursOff = extractInteger(str, str0, str1);
      str0 = str1;
      str1 = "&tHoursOn=";
      mMinutesOff = extractInteger(str, str0, str1);

      str0 = str1;
      str1 = "&tMinutesOn=";
      tHoursOn = extractInteger(str, str0, str1);
      str0 = str1;
      str1 = "&tHoursOff=";
      tMinutesOn = extractInteger(str, str0, str1);
      str0 = str1;
      str1 = "&tMinutesOff=";
      tHoursOff = extractInteger(str, str0, str1);
      str0 = str1;
      str1 = "&wHoursOn=";
      tMinutesOff = extractInteger(str, str0, str1);

      str0 = str1;
      str1 = "&wMinutesOn=";
      wHoursOn = extractInteger(str, str0, str1);
      str0 = str1;
      str1 = "&wHoursOff=";
      wMinutesOn = extractInteger(str, str0, str1);
      str0 = str1;
      str1 = "&wMinutesOff=";
      wHoursOff = extractInteger(str, str0, str1);
      str0 = str1;
      str1 = "&rHoursOn=";
      wMinutesOff = extractInteger(str, str0, str1);

      str0 = str1;
      str1 = "&rMinutesOn=";
      rHoursOn = extractInteger(str, str0, str1);
      str0 = str1;
      str1 = "&rHoursOff=";
      rMinutesOn = extractInteger(str, str0, str1);
      str0 = str1;
      str1 = "&rMinutesOff=";
      rHoursOff = extractInteger(str, str0, str1);
      str0 = str1;
      str1 = "&fHoursOn=";
      rMinutesOff = extractInteger(str, str0, str1);

      str0 = str1;
      str1 = "&fMinutesOn=";
      fHoursOn = extractInteger(str, str0, str1);
      str0 = str1;
      str1 = "&fHoursOff=";
      fMinutesOn = extractInteger(str, str0, str1);
      str0 = str1;
      str1 = "&fMinutesOff=";
      fHoursOff = extractInteger(str, str0, str1);
      str0 = str1;
      str1 = "&sHoursOn=";
      fMinutesOff = extractInteger(str, str0, str1);

      str0 = str1;
      str1 = "&sMinutesOn=";
      sHoursOn = extractInteger(str, str0, str1);
      str0 = str1;
      str1 = "&sHoursOff=";
      sMinutesOn = extractInteger(str, str0, str1);
      str0 = str1;
      str1 = "&sMinutesOff=";
      sHoursOff = extractInteger(str, str0, str1);
      str0 = str1;
      str1 = "&nHoursOn=";
      sMinutesOff = extractInteger(str, str0, str1);

      str0 = str1;
      str1 = "&nMinutesOn=";
      nHoursOn = extractInteger(str, str0, str1);
      str0 = str1;
      str1 = "&nHoursOff=";
      nMinutesOn = extractInteger(str, str0, str1);
      str0 = str1;
      str1 = "&nMinutesOff=";
      nHoursOff = extractInteger(str, str0, str1);
      str0 = str1;
      str1 = " HTTP/1.1";
      nMinutesOff = extractInteger(str, str0, str1);
    }

    int extractInteger(String str, String sub0, String sub1)
    {
      int index0 = 0;
      int index1 = 0;
      index0 = str.indexOf(sub0) + sub0.length();
      index1 = str.indexOf(sub1);
      return str.substring(index0, index1).toInt();
    }
Check for Daylight Saving Time
In much of the world clocks are set back by one hour and forward by one hour once per year. In most of the US, this is done (forward) on the second Sunday in March and (back) on the first Sunday in November. dstCheck.ino contains code I wrote for SparkFun's Big GPS clock to automate handling of DST changes.
language:c
// This code was lifted more or less whole-hog from the SparkFun Big GPS Clock
//  project. I wrote that too.

bool dstCheck()
{
  //Serial.println("DST Check");
  // As of 2007, most of the US observes DST between the 2nd Sunday morning in
  //  March and the 1st Sunday morning in November. DST in the US changes by
  //  time zone, so at 2am local time on the 2nd Sunday in March, we increase
  //  the offset from UTC by one hour.

  // We can bail out if month is < 3 or > 11.
  if ( (month() < 3) || (month() > 11) )
  {
    return false;
  }

  // We can also bail out if month is > 3 and < 11.
  if ( (month() > 3) && (month() < 11) )
  {
    return true;
  }

  // Okay, edge cases, March and November. We can do a couple more low-math
  //  checks to quickly decide whether the date is a possible one.
  // For November, the date of the first Sunday *must* be less than 8, so if
  //  the date is greater than 8, we can return false.
  if (month() == 11)
  {
    if (day() > 7)
    {
      return false;
    }
    // Otherwise, we need to figure out whether we've seen the first Sunday
    //  yet.
    TimeElements firstOfNovTE;
    firstOfNovTE.Day = 1;
    firstOfNovTE.Month = 3;
    firstOfNovTE.Year = year();
    firstOfNovTE.Hour = 0;
    firstOfNovTE.Minute = 0;
    firstOfNovTE.Second = 0;
    time_t firstOfNov = makeTime(firstOfNovTE);
    int8_t firstDayOfNov = weekday(firstOfNov);
    int8_t firstSundayOfNov = (9 - firstDayOfNov) % 7;
    // If we *haven't* seen the first Sunday yet, we are in DST still.
    if (day() < firstSundayOfNov)
    {
      return true;
    }

    // If it's *after* the first Sunday, we aren't in DST anymore.
    if (day() > firstSundayOfNov)
    {
      return false;
    }

    // If we're here, it's the first Sunday of November right now, and we only
    //  need to know if the current hour is < 2; at 0200 MST, DST ends.
    if (hour() < 2)
    {
      return true;
    }
    return false;
  }

  // For March, dates less than 8, or greater than 13 are automatically out.
  if (month() == 3)
  {
    if (day() < 8)
    {
      return false;
    }
    if (day() > 13)
    {
      return true;
    }

    // Otherwise, we need to figure out whether we've see the second Sunday
    //  yet.
    // TimeElements is a struct, but we have to initialize it in the long-form, due
    //  to limitations of the compiler used by the Arduino IDE.
    TimeElements firstOfMarTE;
    firstOfMarTE.Day = 1;
    firstOfMarTE.Month = 3;
    firstOfMarTE.Year = year();
    firstOfMarTE.Hour = 0;
    firstOfMarTE.Minute = 0;
    firstOfMarTE.Second = 0;
    time_t firstOfMar = makeTime(firstOfMarTE);
    int8_t firstDayOfMar = weekday(firstOfMar);
    int8_t secondSundayOfMar = ((9 - firstDayOfMar) % 7) + 7;

    // If we *haven't* seen the second Sunday yet, we aren't in DST yet.
    if (day() < secondSundayOfMar)
    {
      return false;
    }

    // If it's *after* the second Sunday, we are in DST now.
    if (day() > secondSundayOfMar)
    {
      return true;
    }

    // If we're here, it's the second Sunday of November right now, and we only
    //  need to know if the current hour is < 2; at 0200 MST, DST starts.
    if (hour() < 2)
    {
      return false;
    }
    return true;
  }
  return false; // We *should* never get here, but we need to return something
                //  or chaos ensues.
}
Web Page Content
PageContent.h declares three different page content chunks: a header, a body, and a footer. Those are merely our demarcations and don't actually correspond to HTML concepts with the same name.
Header
The header is defined as type String. It contains the http response code information, content type information, and all of the html header information up to and including the opening tag for the page's body content. It also includes some CSS to format the page. Note the use of backslashes to escape the newline at the end of each line. An alternative is to surround each line in its own set of double quotes, but I find this easier to read.
String pageContentHead =
"HTTP/1.1 200 OK\r\n\
Content-type:text/html\r\n\
\r\n\
<!DOCTYPE html> <html>\
<style>\
input[type=text] {\
  width: 20px;\
}\
form {\
  font-family: monospace;\
}\
table, th, td {\
  text-align: left;\
  border: 5px;\
}\
</style>\
<head>\
<title>TeleSitter</title>\
</head>\
<body>";
Body
The body text is defined as a character array. This is to facilitate use of the printf() command later to insert values into the body text.
I've again trimmed the content here to remove duplicated code. Normally, there would be a table entry for every day of the week, along with a time validater for each day. I've left only the Monday table entry and validater as an example. The validater uses client-side Javascript to check the times and make sure they make sense before sending a response to the server. If you try to put invalid time information into any of the fields, you'll get an error and the server won't be contacted.
char pageContentBody[] =
    "<form id=\"timeForm\">\
    <table>\
    <tr>\
    <th>Day</th><th>On Time</th><th>Off Time</th>\
    </tr>\
    <tr>\
    <td>Monday</td>\
    <td><input type=\"text\" name=\"mHoursOn\" value=\"%d\">:<input type=\"text\" name=\"mMinutesOn\" value=\"%02d\"></td>\
    <td><input type=\"text\" name=\"mHoursOff\" value=\"%d\">:<input type=\"text\" name=\"mMinutesOff\" value=\"%02d\"></td>\
    </tr>\
    <tr>\
    </table>\
    <button type=\"button\" onClick=\"submitTimes()\">Submit</button><br>\
    <a href=\"/reset\">Reset times</a><br>\
    </form>\
    <p id=\"responseText\"></p>\
    <script>\
    function submitTimes() {\
      var hrs, mins, text;\
      \
      hrs = document.forms[\"timeForm\"][\"mHoursOn\"].value;\
      mins = document.forms[\"timeForm\"][\"mMinutesOn\"].value;\
      if (!validateHrs(hrs)) return;\
      if (!validateMins(mins)) return;\
      hrs = document.forms[\"timeForm\"][\"mHoursOff\"].value;\
      mins = document.forms[\"timeForm\"][\"mMinutesOff\"].value;\
      if (!validateHrs(hrs)) return;\
      if (!validateMins(mins)) return;\
      text = \"Times valid!\";\
      document.getElementById(\"timeForm\").submit();\
      document.getElementById(\"responseText\").innerHTML = text;\
    }\
    \
    function validateMins(mins) {\
      if (isNaN(mins) || mins < 0 || mins > 59) {\
        return false;\
      }\
      return true;\
    }\
    \
    function validateHrs(hrs) {\
      if (isNaN(hrs) || hrs < 0 || hrs > 23) {\
        return false;\
      }\
      return true;\
    }\
    \
    </script>";
Footer Text
Not much to see here, just closing up the HTML.
String pageContentFoot =
"</body>"
"</html>\r\n";
What You'll See
Open a web browser and type in the address from the micro OLED screen. This is what you'll see when you load the webpage served by the ESP32 in your web browser.
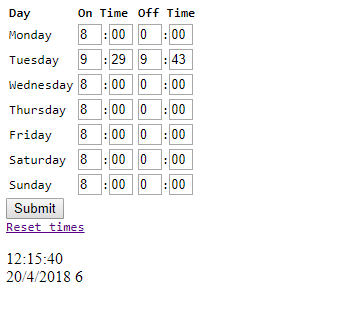
You can update each day's times individually and submit the times using the submit button. To make things a little easier to code, times are in 24-hour format. The current date and time according to the clock on the ESP32 are also displayed.
Try adding a device like a lamp to the "normally OFF" outlet. Anything scheduled to be on as indicated by the time should be powered and vice versa. If you are remotely powering the ESP32 Thing, try adding a USB power supply to the "always ON" outlet.
Resources and Going Further
For more information, check out the resources below:
- W3Schools - This is a great website to help you learn more about writing for the web. I figured out most of how to write the page in this tutorial using W3School's excellent tutorials.
- Simple WiFi Server Example - The original example that I started with for this project. It may be easier to start with this if you want to customize the server.
- ESP32.com -- Great forums, where you can discuss ESP32 news, get help, or show off your project.
- ESP-IDF -- IoT Development Framework -- If you want to take your development environment up a step from Arduino, this should be your first step into ESP32 software development. Some notes on the IDF:
- The IDF is well-documented. Check out the set up guides (for Windows, Mac or Linux) for help getting your environment set up. For help with the API's and data structures, check out esp32.info.
- There are a handful of example applications.
- Use the ESP-IDF project template, once you're ready to start creating applications of your own.
- ESP32 Software Support Package
- GitHub Repo - Project repo for the TeleSitter.
Check out these other great projects:
LED Cloud-Connected Cloud
ESP8266 Powered Propane Poofer
IoT Industrial Scale
Or check out this blog post for ideas.