WiFly Shield Hookup Guide
 Joel_E_B,
  CTaylor
Setting Up a Simple Server
In this example, you will create a simple server with your WiFly module. The functionallity will be simple, but you can take what you learn with this example to create more complex projects.
Materials Needed
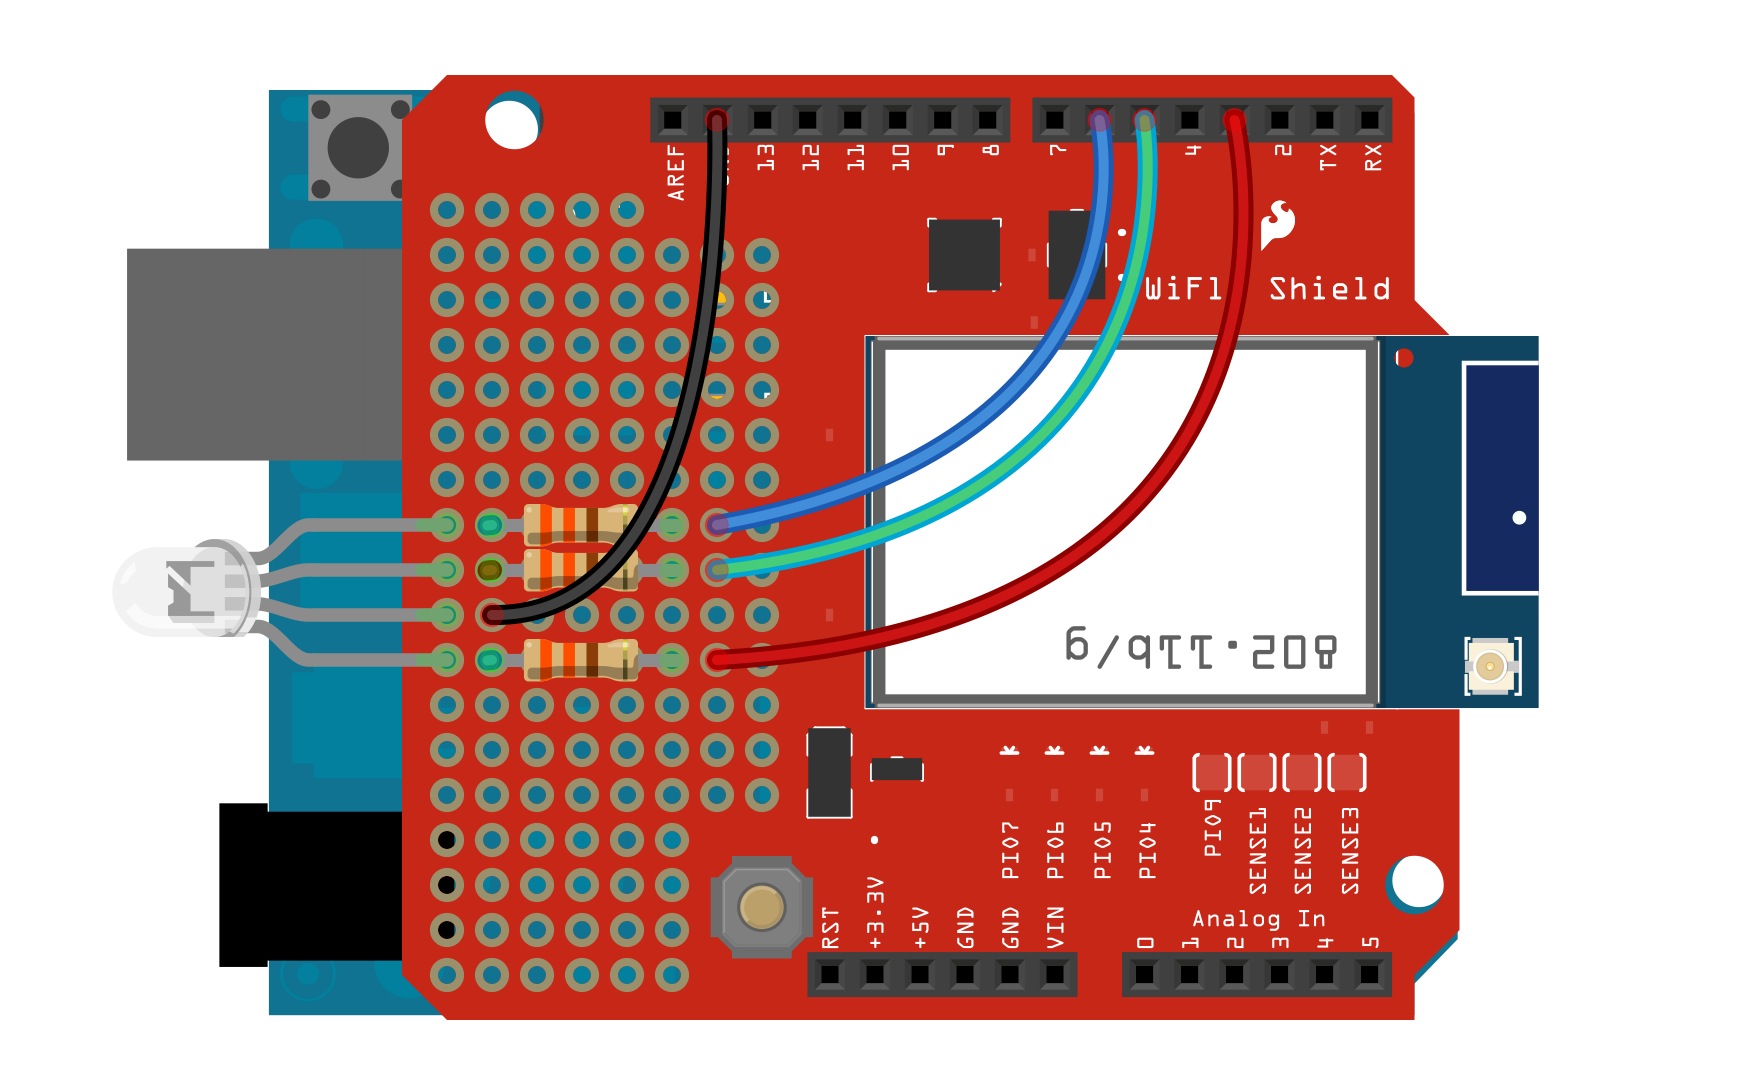
If you've been following along, you should already have a WiFly shield attached to an Arduino. For this example, the only other items you will need are an RGB LED and three 330Ω resistors. You will also need some wire or other means to connect the LED to the WiFly Shield.
Assembly
In this example, the LED and resistors will be soldered directly to the shield. If you need a refresher on soldering, check out our tutorial. For those who don't want to solder to their shield, you can use a breadboard to build the circuit.
Connect the LED and resistors to the shield like the image below. When working with a prototyping surface, don't forget that none of the through-holes are connected to one another. You must make solder connections on the underside of the shield to complete the circuit.
Firmware
Once the hardware is wired up, it's time to upload the code. Copy the code below, and upload it to your Arduino, or you can download the sketch here. Note: Keep in mind that you must have gone through the previous steps to configure your WiFly module to connect to your network automatically.
language:c
/*********************************************************
WiFi LED Controller
Joel Bartlett
SparkFun Electronics
August 1, 2013

This code uses an Arduino Uno with a SparkFun WiFly shield attached
to act as a webserver cabable of controlling an RGB LED

To use this code with Arduino 1.0+, it is recommended that you use
the latest version of the WiFLy Library found here:
https://github.com/sparkfun/WiFly-Shield
Many thanks to Philip Lindsay (aka Follower) for creating this library
and many thanks to jmr13031 for updating the library for Arduino 1.0+

This code borrows heavily from the code found from Upverter.com
https://gist.github.com/1201213
Many thanks to Emmanuel DeVries for doing a lot of the heavy lifting.

This also borrows from the Sparkfun Speakjet Wifly Example by Chris Taylor
https://www.sparkfun.com/tutorials/158
***********************************************************/
//I took out the credentials.h file as well as the code that
//tells the wifly server the ssid and the parephrase since
//this info was setup manually on the WiFly shield.
//The IP address is also set maually instead of being assigned.

#include <SPI.h>
#include "WiFly.h" //include the WiFly experimental library

char msg[128];//variables for reading in the html responses
int letterCount = 0;

int redPin = 3;
int greenPin = 5;
int bluePin = 6;

WiFlyServer server(80);// This is set manually but this line is needed to initialize server()
                  //Port 80 is the default HTTP port

///////////////////////////////////////////////////////////////////
void setup()
{
  pinMode(redPin, OUTPUT);  //set RGB pins as outputs
  pinMode(greenPin, OUTPUT);
  pinMode(bluePin, OUTPUT);

  digitalWrite(redPin, LOW); //set all LEDS to LOW/OFF
  digitalWrite(greenPin, LOW);
  digitalWrite(bluePin, LOW);

   WiFly.begin();//begin WiFly communictaiosn

  Serial.begin(9600);  //Serial communication at 9600 buad for debugging
  Serial.print("IP: ");
  Serial.println(WiFly.ip());  //Prints IP address once associated with the network
                              //If DHCP is on, this IP can change. If static IP is set, it should not.

  server.begin(); //initialize the server
}
///////////////////////////////////////////////////////////////////
void loop()
{
  WiFlyClient client = server.available();
  //the flag dataFlag give a notification of where the actual post
  //is once we flag it we can begin recording the message
  //so we can do stuff with it later on

  int dataFlag = 0;
  int msgIsolator = 0;

  //int inChar; //variable for reading in data from the phone/browser
  //boolean isParsing = false;// flag for reading in and parsing data

  if (client) {
    // an http request ends with a blank line
    boolean current_line_is_blank = true;
    boolean endOfCode = true;
    char c;

    while (client.connected())
    {
      if (client.available())
      {
        c = client.read();
        delay(10);
        //Uncomment this line to see the HTTP respone
        Serial.print(c);

        // if we've gotten to the end of the line (received a newline
        // character) and the line is blank, the http request has ended,
        // so we can send a reply
        if (!client.available()) {
          endOfCode = true;
        } else if (c == '\n') {
          // we're starting a new line
          current_line_is_blank = true;
        } else if (c != '\r') {
          // we've gotten a character on the current line
          current_line_is_blank = false;
          endOfCode = false;
        }

        //this is where the message that the user entered is going so this is where
        //we record it into a char array
        if (msgIsolator == 1)
        {
          recordMessage(c);
          delay(100);
        }

        if ((c == '\n' && current_line_is_blank && !client.available()) || endOfCode)
        {

          //As soon as the page has been refreshed the letter count is set to zero
          letterCount = 0;

          //Once the page has been refreshed we are no longer on the first run through
          //off the program so we set this to false
          endOfCode = false;

          // send a standard http response header
          client.println("HTTP/1.1 200 OK");
          client.println("Content-Type: text/html");
          //client.println("Connection: close");

          client.println();

          //This basically creates what the user will see on the site.
          client.println("<html>");
          client.println("<title>RGB LED Server</title>");

          //the form code creates the buttons to click and change the temp/blanketstate
          client.println("<center>");
          client.println("<form name=\"input\" action=\"\" method=\"post\">");
          client.println("<input type=\"submit\" name=\"%\" value=\"Red\" style=\"height:50px; width:150px\" >");// I made the buttons larger for smart phone screens
          client.println("</form>");

          client.println("<form name=\"input\" action=\"\" method=\"post\">");
          client.println("<input type=\"submit\" name=\"%\" value=\"Green\" style=\"height:50px; width:150px\" >");
          client.println("</form>");

          client.println("<form name=\"input\" action=\"\" method=\"post\">");
          client.println("<input type=\"submit\" name=\"%\" value=\"Blue\" style=\"height:50px; width:150px\" >");
          client.println("</form>");

          client.println("</center>");
          client.println("</html>");
          //***NOTE: I originally added the Reload button, and it broke everything. I combined the temperature state and number into one line and
          //took out some other html code. It then worked. This leads me to beleive that there is only so much that the WiFly can serve up at a time??***
          delay(500);//delay is very important. It gives the browser time to process requests
          letterCount = 0;
          checkAction();//go to check action function is a HTML button is pressed.
          break;
        }

        //if you want to see all data comming in and going out uncomment the line below
        //Serial.print(c);

        //We detect where the actual post data is in other words what the user entered
        //once we isolate it we can parse it and use it
        if (c =='%')
        {
          dataFlag = 1;
        }
          if (dataFlag == 1)
          {
            //in here goes the user entered data it follows the string "25="
            if (c == '=')
            {
              //trim the fat of the soon to be recorded char so we only get the user entered message
              msgIsolator = 1;
            }
          }
      }
    }

  // give the web browser time to receive the data
  delay(100);//delay is very important
  client.flush();
  client.stop();
  }
}
///////////////////////////////////////////////////////////////////////

char recordMessage (char incomingMsg)
{
  //letterCount = 0;
  msg[letterCount] = incomingMsg;
  letterCount++;
  delay(100);
}
///////////////////////////////////////////////////////////////////////
void checkAction()
// the first two or three letters of each message are read to determine which button was clicked on the webage
{
  if (msg[0] == 'R' && msg[1] == 'e' && msg[2] == 'd')// Turn on RED LED
  {
    digitalWrite(redPin, HIGH);
    digitalWrite(greenPin, LOW);
    digitalWrite(bluePin, LOW);
  }
  //-------------------------------------------------------
  else if (msg[0] == 'G' && msg[1] == 'r' && msg[2] == 'e')//Turn on GREEN LED
  {
    digitalWrite(redPin, LOW);
    digitalWrite(greenPin, HIGH);
    digitalWrite(bluePin, LOW);
  }
  //-------------------------------------------------------
  else if (msg[0] == 'B' && msg[1] == 'l' && msg[2] == 'u')//Turn on BLUE LED
  {
    digitalWrite(redPin, LOW);
    digitalWrite(greenPin, LOW);
    digitalWrite(bluePin, HIGH);
  }

}//end checkAction()
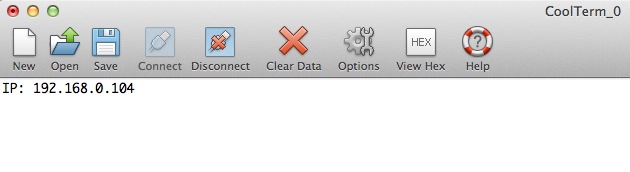
Once the code is uploaded, open the Serial Terminal set to 9600. After a few seconds, the WiFly should print out its IP address. This will vary depending on if you are using DHCP or if you assigned a static IP.
In your browser, type the IP address that was printed out in the Terminal into the address bar. After a few seconds, you should see a web page with these three buttons load.

As long as everything is connected correctly, each button on the website should light up the corresponding LED when clicked. The change will not be instantaneous as the commands need to propagate from the browser, through the network, and to your WiFly shield.
You can even control it from your smart phone as long as it's connected to the same wireless network as the WiFly shield.

Troubleshooting
- Please note that data transmission of the wireless network is NOT instantaneous. It may take up to several seconds for your request to be sent to and processed by the Wifly shield depending on the size and configuration of your wireless network. If you are experiencing problems, there are many links in the chain to investigate.
It is also worth noting that the sketch prints data to the terminal by default. This will add some time to this delay. You can change this by commenting/uncommenting line 88.
if (client.available())
      {
        c = client.read();
        delay(10);
        //Uncomment this line to see the HTTP respone
        //Serial.print(c);
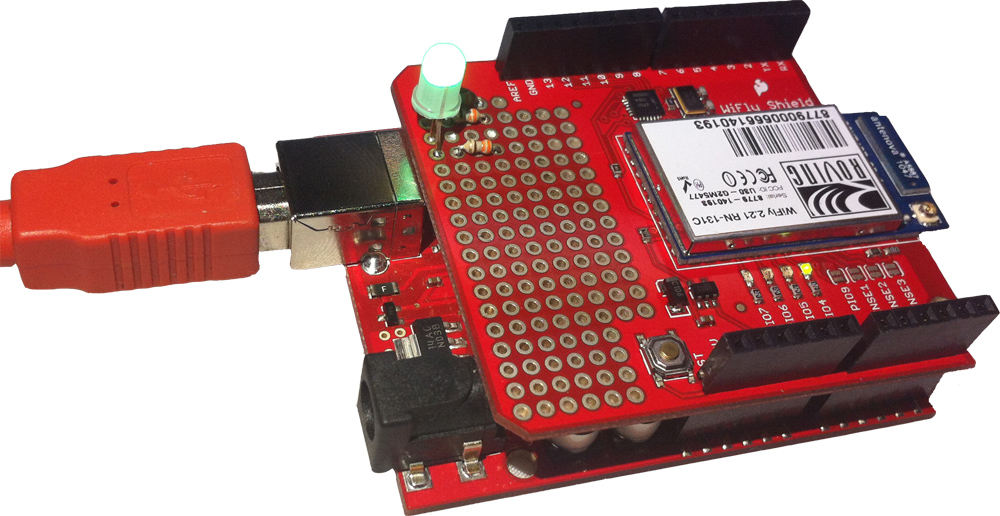
When you click any of the HTML buttons, you should see the green LED on the WiFly shield go solid while it processes the request. If you see that the LED is just hanging and never returns to blinking, then the WiFly shield is getting hung up on the HTML request. This could be the result of a firmware issue or a network/browser issue.
If the red or yellow LED on the WiFly shield are blinking continuously, it is having a problem connecting to your wireless network. See the datasheet for more info on LED statuses.
If you have a steady blinking green LED and your Arduino is printing out a valid IP address but you are not seeing a webpage load, then the problem is most likely in the code or in your wireless network settings. Makes sure you selected the correct security settings and make sure you save your settings to the WiFly config file after you have set all the necessary settings.
Going Further
Try changing up the code to add different colors and more buttons. You can also take a look at the server example that comes with the WiFly library. This example reads the analog inputs on the Arduino and posts them to a webpage. See if you can add digital inputs and analog outputs to the same webpage. You could also replace the single RGB LED with a strip of RGB LEDS controlled via some MOSFETs. Then you could create an Internet controlled LED Light Cube