WiFly Shield Hookup Guide
Configuration Files and Upgrading the Firmware
The firmware for the WiFly module is updated occasionally. Luckily for you, there is a simple way to update your module to the latest version.
The WiFly module sold by SparkFun Electronics currently ships with firmware version 2.38. To check which version of the firmware your WiFly shield is running, upload the Terminal sketch, enter command mode, and enter this command:
ver
Note: The version is usually displayed after each command issued in command mode as well.
Before we update the firmware, let's go over the configuration files stored within the WiFly and how to add other config files.
Storing Separate Configuration Files
Using the terminal sketch mentioned on the WiFly Library page, create a connection to the module, and enter command mode.
Now issue the command
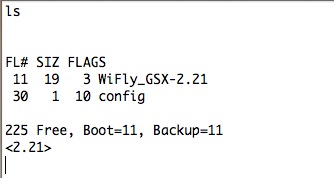
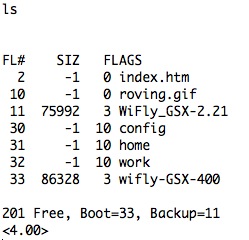
ls
to list all the files on the module. Depending on what firmware version you have, you should see something like this:
You'll notice the WiFly_GSX-2.21 file is the current firmware version and the config file is where all of the settings are stored.
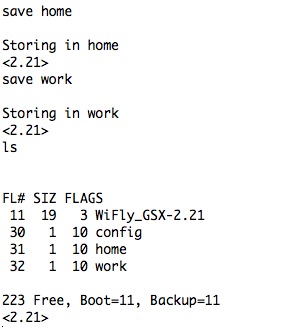
One great feature of the WiFly is its ability to store multiple configuration files. For instance, if you wanted to use the WiFly at both your home and your work, you could create two separate config files, each with the correct settings for both locations. To do so, set all the settings for one location such as SSID, pasphrase, security. etc. Then use the save command followed by the name you want to call that configuration.
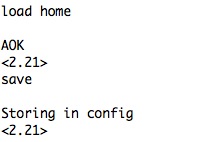
Now, to use one of those config files, simply issue the load command followed by the name of the file. It's impotant to note that even though there are separate config files, the WiFly always uses what is stored in the default config file, so after you load a config file, it's best to save it to the default config file using just the save command.
Now, even after a firmware update, you should be able to load all of the settings you had before. (Note: Firmware updates will often include new features/settings, so there is no guarantee that your previous settings will work on a new version of the firmware.) You can delete a config file using the del
Updating the Firmware
Directions on how to update the firmware can be found on Microchip site, but we will also go over the process here.
Again, use the terminal sketch to enter command mode. You must be connected to the Internet in order to get the firmware update from Roving Networks, so follow the directions on the Connecting to a Network page to connect to your wireless network.
While you are connected, you should still be able to issue commands. We now need to set the FTP settings on the module and point it to the correct website from which to retrieve the new firmware. Depending on 1) how old your module is and 2) how many settings you have changed, you may need to change several settings.
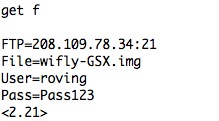
The first thing to check/change is the FTP settings. Issue the command
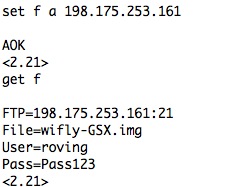
get f
to see your current FTP settings.
To get the update, you must make sure the FTP address is the correct one. The Roving Networks page say the the firmware must be pulled from rn.microchip.com. Pinging this URL gives the correct IP address.
Now, set the FTP address to the one returned during the ping, if it does not match the one stored in memory. Also make sure the user name and password match the ones in the image below. These should be the default values unless you changed them in your configuration.
With all the correct settings, issue this command
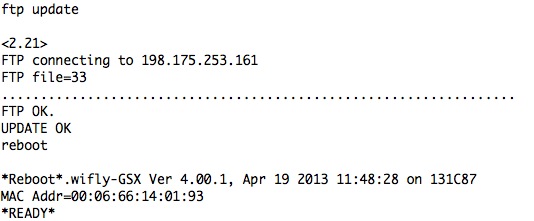
ftp update
You should see something like this:
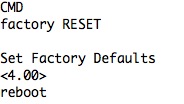
Once the update has finished, you need to reboot the module, give it a factory RESET, and then reboot it again.
Failing to issue the factory RESET will result in config files not being saved correctly.
Now, using the ls command, we can see the new firmware. The old firmware is still stored in the module in case you need to revert back to an older version.
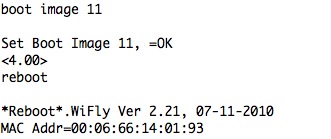
To boot from an older firmware version, use the boot image
Again, it's best to reboot, RESET, and reboot after changing the firmware.
As of this writing, the most up to date version of the firmware that will be downloaded with this process is Ver 4.41.
Troubleshooting
If you can't get the firmware to update, check the following:
- Make sure you are actually connected to the Internet.
- Make sure the FTP address is correct (198.175.253.161).
- Make sure the FTP port is correct (21).
- Make sure the FTP User=roving and the Pass=Pass123
- If all else fails, issue a factory RESET and then try updating the firmware.
